BikeVis Bullets are our favorite motorcycle conspicuity lights.
They’re easy to install and connect and they use very little juice.
But the design ensures that they’re very bright.
And you can add a BikeVis PodMod Modulator (review) “twinkler” for each pair of lights for even more conspicuity.
We’ve reviewed BikeVis Bullets several times before.
In fact, the original BikeVis Bullets (review) won the 2009 webBikeWorld Product of the Year Award.
Since then, the BikeVis Bullets V2 (review) were released and they’re even brighter.
And 2016 brings a new color: amber.
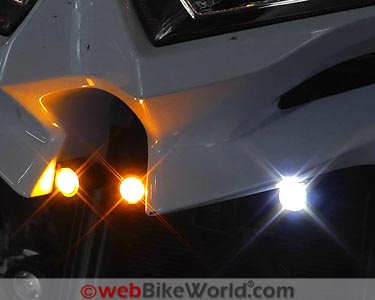
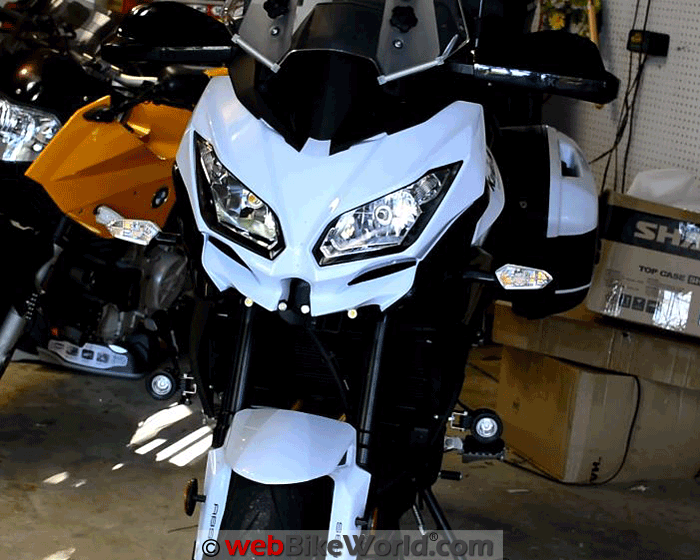
We flush-mounted a pair of white and a pair of amber BikeVis Bullets on the new 2015 Kawasaki Versys 650 LT Project Bike (Blog) and they look fantastic.
Let’s take a quick look…
This is a quick update with video about the latest version of BikeVis Bullets.
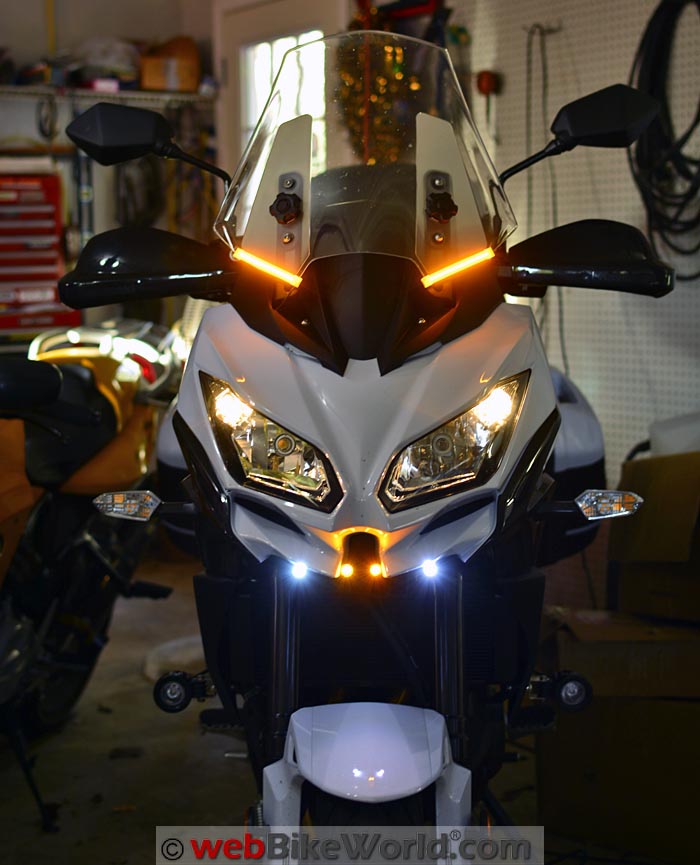
The 2015 Versys 650 LT Project Bike with AdMore LED strips and BikeVis Bullets in amber and white.Background
Have you noticed that many new cars now have LED daytime running lights? They’re big, bold and bright and they’re hard to miss.
Meanwhile, the motorcycle manufacturers have been asleep at the wheel. It used to be that only motorcycles had DRLs, so at least we had a fighting chance to stand out in all the traffic.
Now, even with the headlight on, a motorcycle is lost in the crowd, like “Where’s Waldo?”
So while the automobile manufacturers have jumped on the LED DRL bandwagon, the motorcycle manufacturers have given us basically nothing for increased conspicuity. C’mon manufacturers — let’s get it together!
In the meantime, motorcycle owners can do something. First, be sure to check out the many webBikeWorld LED and lighting reviews, which are loaded with information and tips on buying and installing visibility lights.
Also, check out our 2015 Kawasaki Versys 650 LT Project Bike Blog, because we’ve been equipping it with all sorts of lighting accessories, like the AdMore LED light strips (review) and the inexpensive OZ LED Mini Trail Lights (review).
The newest edition of the Versys is ready-made for accessories like this, with plenty of power and ground wires right behind the fairing.
Every new bike we get goes through an initial prep stage to install a louder set of horns on a relay (reviews), LED turn signal replacements like the new Inertia LED CAN bus 1157 lights (review) and a set of BikeVis Bullets, along with other lighting accessories.
BikeVis Bullets 2016
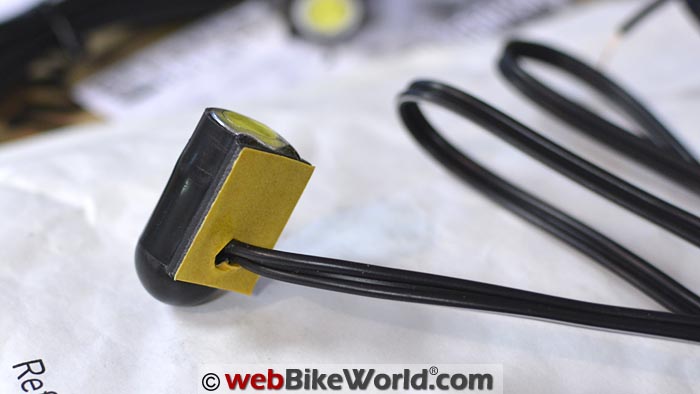
The external size and shape of the BikeVis Bullets hasn’t changed since Version 1. They’re about the size, shape and diameter of a fingertip from the tip to the first knuckle.
Each Bullet puts on just one Watt at about 72 mA at about 60 lumens. While that may not sound like much compared to, say, the 3,000 lumen FandyFire flashlight (review), the concentrated Bullet shape helps the light to cut through the noise.
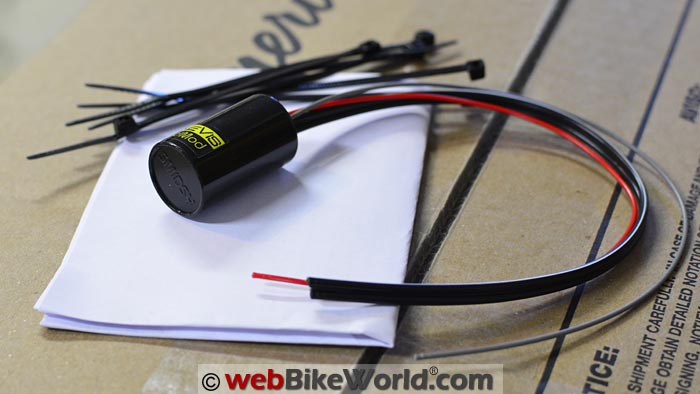
The “must have” accessory with each pair of Bullets is the BikeVis PodMod modulator or “twinkler”. It rapidly modulates the Bullets from bright to dim 10 times per second, which attracts the eye and improves the conspicuity even further.
The Bullets are relatively easy to install. Each light has double-sided tape on the back and although Rick was reluctant to drill a hole in the fairing of other bikes, we flush-mounted these on the Versys and it was easy to do and looks great.
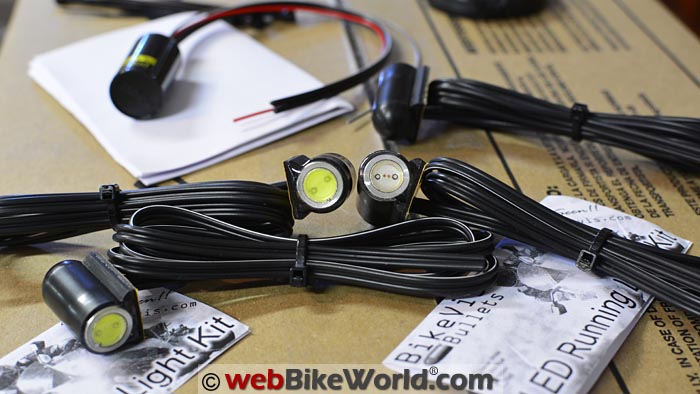
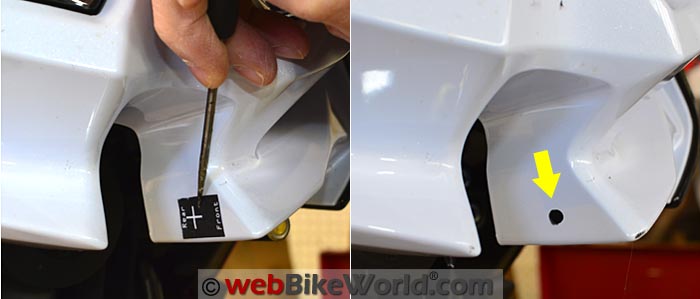
2016 BikeVis Bullets in white (left) and amber (right). The tint on the lights is opposite from the actual LED color! Close-up of the BikeVis PodMod modulator. Double-sided tape and wiring on a BikeVis Bullet. (L) Using the template to locate the drilled hole. (R) Hole can be drilled or melted through.Installing the BikeVis Bullets
Nothing has changed with regards to mounting the Bullets. All of the details on installing the BikeVis Bullets is included in the original BikeVis Bullets review and the procedure hasn’t changed the BikeVis Bullets V2.
This is the first time we actually drilled holes in a fairing to mount the Bullets, and now that we’ve overcome the initial worry, it’s the only way to go. Drilling into a fairing is easy (maybe too easy!), so be careful, measure a few times, use the template that comes with the instructions and always drill a pilot hole first.
We used a tiny 1/16″ drill for the pilot hole, then a 1/4″ (6 mm) hole for the wires. The instructions indicate that you can use a soldering iron to melt a hole and we heated up a nail, held with pliers, with a propane torch.
It doesn’t take much to heat the nail to red hot and it easily melts right through the fairing. Be super careful doing this though and whether your drilling or melting, always check behind the fairing first to make sure there are no wires or parts underneath!
Wiring the Bullets
The Bullets have two wires, a ground and a power feed. The power or black/white wire on the Bullets is connected to a “powered on” wiring in the motorcycle. On the new Versys, that’s easy — there are plenty of good power connections in back of the fairing.

See the AdMore LED light array review for details on removing the black fairing top on the Versys and photos of wiring and connections.
For a pair of Bullets, you’ll need to twist the two power and two ground leads together, then use a third wire to go to a Posi-Tap and tap into a switched power wire on your bike. Do the same for the ground.
We use a Posi-Twist connector to join the wires.
If you’re using a PodMod, add the PodMod power and ground wires to the twisted connection. Then connect the PodMod red wire to the bike’s switched power and the gray PodMod wire to a ground point.
Anyone with very modest wire cutting and splicing skills — and a selection of Posi-Locks! — should have no problem installing the BikeVis lights.
BikeVis Bullets in Action
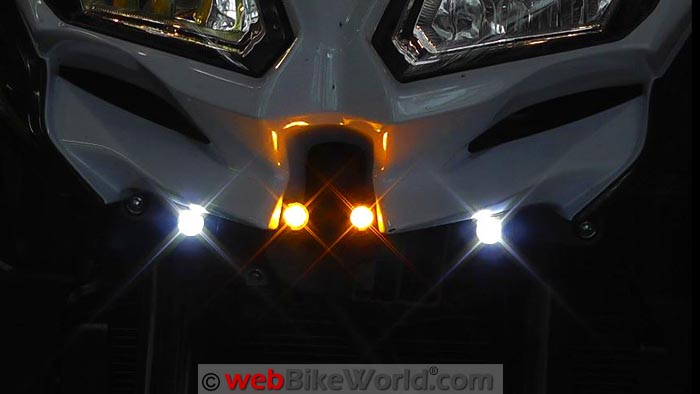
The combination of the amber and white light from the 2016 BikeVis Bullets (V2) is brighter and more noticeable than the original Bullets. But it doesn’t overwhelm oncoming drivers like a high beam or other types of driving lights.
The idea is to add some extra visibility to the front of the motorcycle so oncoming traffic sees the bike at a greater distance and can also judge its approach speed.
It would be best to mount the BikeVis Bullets (or any other type of visibility light) as wide as possible on the front of the bike. The width helps improve depth perception for oncoming traffic. But wide mounting isn’t always possible.
On the Versys, we chose to mount two amber Bullets in the center cutout in the fairing, then a pair of white Bullets on either side. It looks great!
The twinkling effect provided by the PodMod modulator also adds quite a bit to the visibility effect. It’s not an on/off device; it creates a sort of “twinkle” effect that draws attention without dazzling the oncoming traffic.
Conclusion
The BikeVis Bullets are our favorite quick and easy motorcycle conspicuity lights. The 4-pack combination of amber and white really helps the bike stand out from the background noise, which is ultra-important today.
The BikeVis Bullets can be installed on any bike with a 12V system. They’re very small, they draw a minimum amount of current and they work.
See Also:
▪ BikeVis Bullets V2 Review
▪ BikeVis PodMod Modulator Review
Owner Comments and Feedback
See details on submitting comments.