Tips for Adjusting a Motorcycle Chain
This article got way out of hand.
It started out as a “Quick Look” about adjusting the chain on the Suzuki GW250.
By coincidence, the Suzuki V-Strom 1000 ABS also needed a chain adjustment at the same time.
So this evolved into a combo article covering both bikes, but then we ended up writing about 3x more than we thought and, well, here we are.
The bottom line is that we’ve probably covered this topic ad naseum on webBikeWorld.
But in defense, I will say that the previous articles focused on how to adjust a motorcycle chain for specific brands and models.
Thus, we tried to make this article more generic and the information described here should apply to just about any chain-driven motorcycle.
And while this information may seem too basic for seasoned motorcyclists, don’t forget that there are some new riders out there who may have purchased a Suzuki GW250 (Blog), so be sure to send your own tips and tricks.
Since both the GW250 and the Suzuki V-Strom 1000 ABS (Blog) were brand new in the webBikeWorld garage and both needed a chain adjustment at the same time, we used them as the examples.
Neither of us are motorcycle chain adjustment experts, but we have, oh, about 80 years’ worth of moto experience between us.
So there may be some nice time- and labor-saving techniques out there that we don’t know about.
Most or all of the basic techniques shown here should work for any motorcycle, but if you have any tips or tricks of your own, feel free to send them to the Editor at editor@webbikeworld.com
 The Essentials for a Clean Chain: Motorex Chain Clean 611 and a Chain Drain (see text).
 A doity chain.
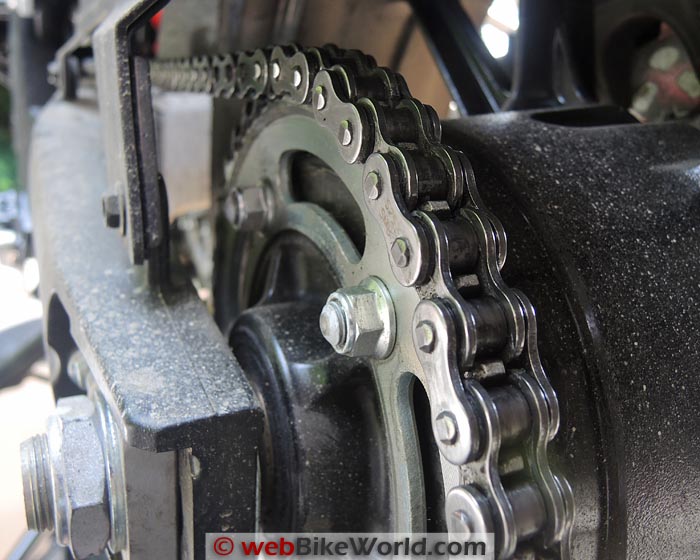 A clean(ish) chain. Motorex Chain Clean 611 and a paper towel works wonders.
Chain Adjustment 101
Remember that the primary source of information on chain adjustment for your motorcycle is the owner’s manual.
Don’t try to second-guess the engineers who designed your bike; follow the instructions to the letter and you should be fine.
And by the way, that goes for oil, fuel and tires also.
There’s a ton of information out there on the interwebs about adjusting a motorcycle chain — even without leaving webBikeWorld.
I suggest you do a few quick searches and read the articles and watch the videos posted on many websites to become familiar with this task.
I won’t repeat it all here other than to say that basically, a motorcycle chain stretches as it’s being used and eventually the slack has to be taken up by moving the rear axle back slightly.
A loose chain can cause premature wear on the front and/or rear sprockets and, if excessive, it’s possible for the chain to jump off a sprocket and that could end up being anything from unfortunate (if you’re lucky) to a complete disaster.
On the other hand, a chain that is too tight can cause premature wear problems and the friction can make the chain overheat, so you don’t want that either.
That’s where the owner’s manual comes into play; read the section on chain adjustment and follow the instructions carefully.
First Things First
It’s a good idea to clean the chain first before you start the adjustment procedure. There are plenty of webBikeWorld articles on motorcycle chain cleaning, so I suggest you start there.
Some owners are pretty obsessive about keeping their chain clean; I wouldn’t put myself in that category.
When I work up the ambition — which is usually about the same time that the chain needs adjusting (a two-for-one project!), I usually spritz some WD-40 or Motorex Chain Clean 611 (review) on the chain.
Then I let it sit for a few minutes and wipe the chain with a couple of folded paper towels.
It’s a good idea to wear protective gloves and also to first place some old newspapers or something under the chain.
We use the Chain Drain (review), which is indispensible for catching the mess when doing a chain lube or chain cleaning.
And by the way, if you don’t have a Handy SAM 1000 motorcycle table lift (review) or if the bike doesn’t have a center stand, you may at least want to buy a rear wheel stand (reviews).
Having the bike held upright makes it much easier to clean and lube the chain.
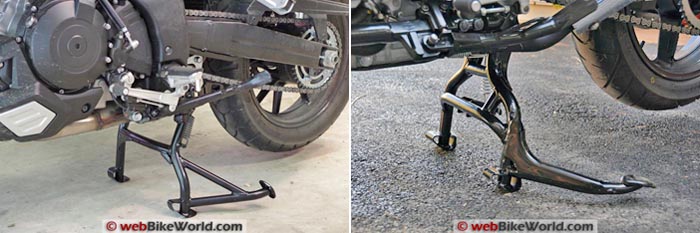 Suzuki V-Strom 1000 ABS center stand on the left. Suzuki GW250 center stand on the right.
Side Stand vs. Center Stand
Using a center stand or rear wheel stand is helpful when you’re cleaning, lubing or adjusting the chain but measuring the actual amount of chain slack is usually done with the bike on the side stand, which puts a slight load on the suspension.
Again, the owner’s manual will usually tell you how to orient the bike to measure the chain slack.
But if you’re looking for a center stand, we recently posted a couple of reviews, the Suzuki GW250 center stand installation and review and the Suzuki V-Strom 1000 ABS center stand installation and review.
And don’t forget the SW-Motech center stand review for the Suzuki DR650 (Blog). If you own one (or more) of these bikes, get the center stand!
Motorcycle Chain Adjustment: Find the Tight Spot
Which brings us to the first step in the chain adjustment procedure.
After the chain is clean and with the bike on the side stand, measure the amount of slack in the chain (details on this in a minute), about half-way between the front and rear sprockets.
Note that some owner’s manuals will instruct you to take a few measurements by rotating the rear wheel to find the section of chain with the least amount of slack.
This is because sometimes the chain will wear differently and one part of the chain will bind or will have less sag than others.
Being the lazy guy that I am, I cheat on this by rotating the rear wheel with the bike on the center stand first and take about 3-4 measurements to see if there’s any noticeable difference.
On a new chain, there shouldn’t be a tight spot but as the chain wears, there might be a significant difference, so keep that in mind.
If you adjust the chain so the sag is to specs on the loosest part of the chain, it might be much too tight on the part of the chain that binds.
Check for Sprocket Wear
Also, while you’re down there, be sure to carefully inspect the teeth of the rear sprocket. It’s usually very difficult to access the front sprocket without removing a cover or something on the engine, but you may want to check it also.
It’s usually a bit difficult to tell if the teeth of the sprockets are wearing unevenly and, in fact, once the wear is really noticeable, then it’s probably way past time for a sprocket and chain replacement (article).
You may have to wipe the sprocket teeth with a paper towel as you rotate the rear tire to get the teeth clean enough to see properly and make a judgment on this.
If you’re within a couple thousand miles or so of a new chain on, say, a new bike, you probably (hopefully) won’t find any wear, but it’s a good idea to get into the habit of checking anyway.

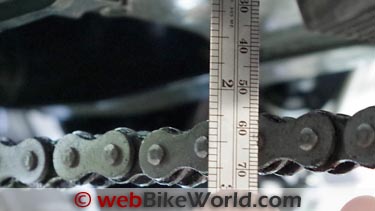
Checking the Slack and Taking the Measurements
I use a short 150 mm metric scale to take the chain slack measurements; most owner’s manuals give you the allowed amount of slack in millimeters anyway and it’s much easier to use the metric system rather than inches.
Want proof of the primacy of metric? Quick: what’s the difference between 40 mm and 30 mm? OK, now what’s the difference between 21/32″ and 5/8″? I rest my case…
Many of the owner manuals I’ve seen don’t indicate exactly where on the chain to measure the slack.
I usually pick the lower edge of the larger part of the “figure 8” of a link (photo above), then pull the chain upwards with my other hand and measure the distance to the same spot on the chain.
Note that this may seem obvious…but perhaps not to a new owner: always measure the lower run of the chain; that is, the length of chain that runs along the bottom of the sprockets, not the top run.
It can be hard to hold the scale in the exact same place, so if you can find something solid on which to rest the scale or your hand, do so.
I used to have a machinist’s pointer on a heavy magnetic base and I’d set it to point to the lowest part of the chain, then pull the chain up and measure from there.
But — again being lazy — now I just try and hold my hand steady and take a couple of measurements and eyeball it. I’m hoping some webBikeWorld readers will have a better tip on how to do this?
By the way, if a lift isn’t available, I lay on an automotive shop creeper to take the measurements.
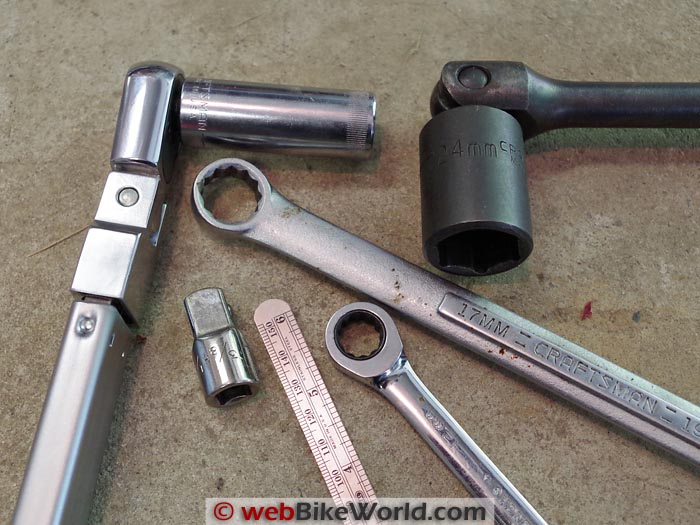 Large 6-point socket (impact type shown here), torque wrench and more tools needed.
Rear Axle Nut Sizes for the Suzuki GW250 and V-Strom 1000 ABS
The Suzuki GW250 rear axle nut size requires a 17 mm socket for the left side and a 24 mm socket for the right. You’ll also need a 12 mm wrench for the adjuster nut.
The 2014 Suzuki V-Strom 1000 ABS rear axle nut size is 36 mm for the right side. There’s no nut on the right side (I’ll explain later). You’ll need a 12 mm and 10 mm open-end wrench (aka spanner).
Loosen the Rear Axle Nuts
Again, the owner’s manual will have the instructions on how to do this.
You’ll probably need a couple of honkin’ big hex sockets; I bought individual sockets at various times for new bikes. There doesn’t seem to be a standard on rear axle nut size unfortunately.
I like to get 6-point sockets if possible, because you’ll have to use a lot of torque to tighten the nut when you’re done and it’s too easy to slip ‘n’ strip a 12-point socket under load.
This has happened to me more than once with a big nut on the back of a motorcycle.
If you can’t find large-sized 6-point plated sockets, look for the impact socket types, like the dark socket shown in the photo above. They have a much thicker wall, but for this application, they work fine.
You’ll also need two breaker bars and possibly a 1/2″ to 3/8″ adapter.
With the sockets on the breaker bars, turn both nuts on both sides of the swingarm simultaneously; this will help keep the torque or twisting even between both sides.
Don’t loosen the nuts all the way, but just enough to move the axle.
I can’t tell you how much that is for your bike; it comes from experience but the bottom line is that you don’t have to (or shouldn’t have to) loosen the nuts all the way.
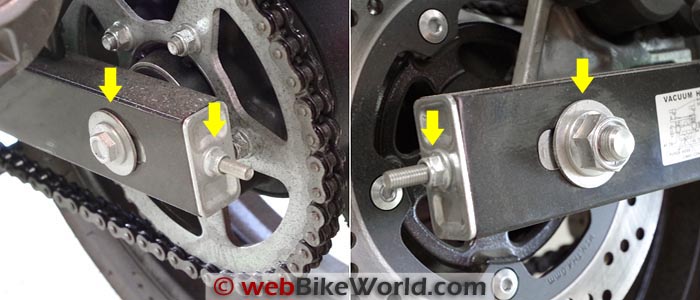 Axle nut and chain adjusters, left and right side, Suzuki GW250.
Adjustment Variations
This is where the procedure can vary from bike-to-bike. If you’re lucky, there’s some type of tightening nut that’s located on a threaded rod or a threaded screw that pushes on the axle. As you turn the nut, the axle moves.
This is the arrangement on the (cheaper) GW250, as illustrated in the photo above.
By the way, note the axle nut on the left side of the bike (left photo, yellow arrow on the left) is 17 mm, while the larger nut on the right side (photo right, yellow arrow on the right) is the 24 mm size.
At the rear of the swingarm on both sides is a 12 mm nut on a threaded rod, shown by the inner yellow arrows.
This is the nut used to move the axle towards the rear of the bike, which takes up the slack in the chain.
It’s a simple but very useful feature; unfortunately, not all motorcycles have this; some have an adjustment screw that holds against the axle, but does basically the same thing.
Here’s my tip: I mark the top of the adjustment nut with a line, using a permanent marker (like a Sharpie). Then I can count the number of flats on the adjustment nut.
Adjustment Take-up
There’s no set formula for how many turns of the nut equals how much take-up on the chain slack, but over time you may get a good feel for it on your particular bike.
It’s better to “sneak up” on the adjustment rather than turn the nut too many times and then have to back it off again. I turn the nut to maybe two flats go by (1/4 turn or so), then I check the chain slack again.
But before I do that, I snug up the axle nuts and move the bike forward and back and “bounce” it on the brakes to settle the suspension and any take-up in the adjusters.
Measure the chain slack again and see where you’re at — this is where you may get a good indication of how much movement of the adjuster nut translates to the amount of take-up in the chain slack.
You may have to go back and forth a few times until you get the slack into spec.
For example, I let it go way too far on the GW250 before the first adjustment. Chains have a tendency to stretch more in the first few hundred miles from new (new bike or new chain), so keep that in mind.
I had about 50 mm of slack on the GW250 and the book calls for 20-30 mm max.
The V-Strom owner’s manual also lists 20-30 mm of slack as the maximum allowed also. Try to hit it in the center of the tolerance range, which means about 25 mm.
Too Loose?
It often happens that you’ll tighten the chain too much — it doesn’t take much distance in the rear to pull the chain tight.
Then you’ll have to turn the adjustment nut or screw back in (loosen the axle nuts again if you snugged them up before taking the measurement).
And this time, you’ll have to move the bike back and forth and bounce it to get the axle and chain adjustment to loosen.
Sometimes I’ll hold the bike on the right-hand side, move it forward and back and jam on the rear brake pedal to get the axle settled. It’s tricky to do but it has to be done to move the axle back.
Perhaps a webBikeWorld reader has a better idea on how to do this also?
Next, you’ll have to start over again and this time, don’t move the adjustment nut or screw as much.
The good part is that once you do this a few times on your particular bike, you’ll have a much better idea of how many turns equal how much slack take-up.
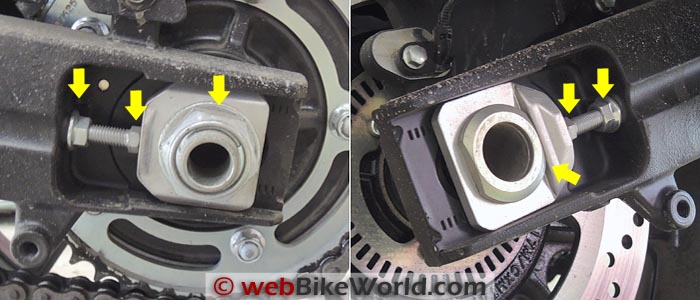 Carrier block for the axle with adjusters on the Suzuki V-Strom 1000 ABS.
Chain Adjuster Type Variant
On the Suzuki V-Strom 1000 ABS — and some other “high-end” motorcycles, you may find a different type of chain adjustment system on the swingarm (dual-sided, by the way).
Check out the photos above of the system on the V-Strom. The axle sits in a square slider that fits in a molded or machined “U” section of the swingarm. The adjuster nut is in the front, not the back.
Loosen the 12 mm shoulder nut on the inside (left arrow in left photo and right arrow in right photo) and then turn the 10 mm adjustment screw (center arrow in both photos) to slide the entire axle holder assembly rearward.
Note that this arrangement has only one large axle nut on the left side of the swingarm; it’s 36 mm in size.
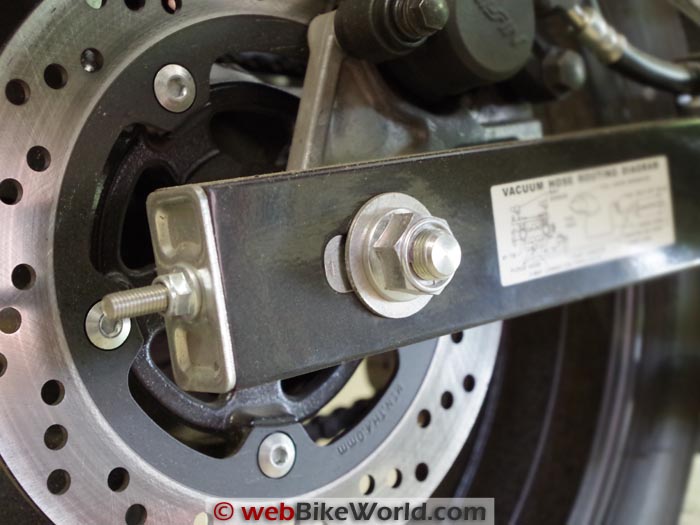
 Measuring the axle distance on the GW250 (see text)
Both Sides Even Now
It’s important to make sure both adjuster nuts are turned the same amount, to keep the axle straight and the wheel evenly aligned.
This is also what makes tiny adjustments at the rear become magnified when you measure the actual chain slack.
Here’s another trick: rather than use those crudely stamped hash marks on the swingarm, which are supposed to help guide you for how much movement you’re putting into the adjustment on the axle, I use the metric scale to measure from the axle to a point on the swingarm.
For example, check out the photos above. In the first pair of photos, the photo on the left shows measuring the axle location by using the edge of the round carrier to the rear of the swingarm (48 mm).
The right photo shows another way to do this: measure the amount of threaded rod sticking out past the nut.
In the second pair of photos below, the scale is measuring the distance from the rear of the square axle carrier on the V-Strom to the end of the swingarm (15 mm).
These distances (remember to check both sides) will tell you how much the adjuster/axle is moving. If you keep them even on both sides, the wheel should remain in alignment.
Remember also to measure first before you even loosen the axle nuts the first time before you start the chain adjustment project, as a reference.
NOTE: If you’re measuring from the end of the axle carrier, make sure the carriers are the same size on each side!
On the new V-Strom, both carriers are 30 mm long.
But if one side was shorter than the other, the measurements to the end of the swingarm will be different. The idea is to make sure you’re measuring to the same point on both sides so the axle is even.
 Right side adjuster on the Suzuki GW250.
Wheel Alignment?
Most owner’s manuals will advise checking the wheel alignment after a chain adjustment.
I have found this to be very difficult to do and the tolerances when using, for example, the “string procedure” are so great that I can’t really tell anything about alignment anyway.
We have tried and experimented with various methods in the webBikeWorld garage over the years, including lasers, special tools, the string method, straightedge and more.
Here’s my dirty little secret: I never check the wheel alignment.
If you use a good scale or set of Vernier calipers to measure the axle distance as I’ve described above, the wheel should remain in near-perfect alignment.
In my many years of experience, a wheel would have to be dramatically out of whack for you to notice anyway.
So my theory is to measure the axle distance carefully and don’t sweat the alignment. If you do the chain adjustment correctly, you really shouldn’t need to align the wheels. (See the Comments section below for an alignment trick).
Wrapping It Up
Don’t forget to tighten the locknuts on the adjuster bolt or screw on both sides. Don’t overdo it; give it just enough to prevent the screw from moving.
Snug up both axle nuts (or one) at the same time and make them pretty tight, but then bounce the bike and check the chain slack again and measure the distance from the axle to the point on the swingarm once more to check.
If everything looks good, put the final torque on the rear axle nut, making sure you have the correct torque in Nm or Lbs. Ft. and hold the opposite nut with a socket so that it doesn’t spin.
The GW250 calls for 65 Nm (47 ft. lbs.) and the V-Strom is a hefty 100 Nm (72.5 ft. lbs.).
If you have any comments or suggested improvements to this article, please forward them to editor@webbikeworld.com
Publication Date: July 2014
Owner Comments and Feedback
See details on submitting comments.
From “M.W.” (August 2014): “Always interesting articles on webBikeWorld. I use the rolled rag between the chain and sprocket, a very good tip.
To measure chain tension, I first check its in neutral then pick the centre of the run and hook my tape measure to the top of the chain, extend the body of the tape to the floor and hold it there.
Next I push the chain upwards which extends the tape blade, then I hold the tape blade in that position and push the chain down, now I read the measurement at the top of the chain to find the tension.
I have a quick post ride check, when my particular bike is on the side stand, if the chain is pushed up it will just touch the lower swing arm chain slider.
You mentioned checking the front sprocket which wears more quickly than the rear. I removed my front sprocket cover and had a nasty surprise.
So to enable me to check it easily and more frequently in future, I drilled an 18 mm hole in the cover directly opposite the the back teeth of the sprocket then plugged it with a rubber stopper, the sort of thing used in the bottom of a steel chair leg tube.
Now I can just remove the plug and check the sprocket teeth with the help of a torch. I hope this is of some help.”
From “D.T.” (July 2014): “From experience, if you have changed to an aftermarket shock, it may be longer.
Also, a heavier spring may make the bike higher when on the side stand. Both of these can cause you to make the chain too tight using the factory spec.
The best practice is to disconnect the shock, align the countershaft, the swing arm pivot and the axle centers.
Adjust the chain for proper slack at that tightest point. Connect shock. Find the new benchmark measurement from middle swing arm to chain.”
Editor’s Note: The distance from the countershaft sprocket to the rear axle is fixed and doesn’t change.
What does change is the “hypotenuse” formed by the top and bottom chain run as the swingarm moves up and down with the suspension.
This also puts tension on the top run of the chain, which in turn affects the sag on the bottom run.
I asked a local expert (“C.S.”) about this. He said “the chain length (distance between the axle and the sprocket) does change as the swing arm goes up and down because the front sprocket is almost always in front of the front pivot of the swing arm.
The important geometry for chain sag is the longest distance the chain has to reach.
This happens when the swing arm pivot is directly under the line connecting the axle and the sprocket. When the swing arm swings above or below this position, the chain distance is less.
So the shock length does not affect this, it just moves the end of the swing arm up (shorter shock) or down (longer shock).
In either case, you have to expect that the swing arm will at some point during (up and down) rear wheel travel pass through the geometry where the longest chain length is needed.
From “M.S.” (July 2014): “Quick and Dirty Breaker Bar: Slip a piece of galvanized pipe over the end of your ratchet. If you have a square ratchet handle (Craftsman) and the pipe is too small, the pipe can be pounded oval to fit.
It may be quicker, but don’t tighten the axle or sprocket bolts with an impact wrench or air ratchet without setting the torque first.
Tightening them too tightly can cause excessive wear on the bearings and cause them to fail prematurely. Dealerships tend to use air tools because it’s quicker – but not always correct.
An old toothbrush and WD-40 work well to clean the chain. The bristles get to most of the spaces between the links – better than a rag.”
From “D.H.” (July 2014): “My procedure is similar to B.N.’s (below) but instead of a rag, I use an Allen wrench (T-handle preferred but not necessary); 6mm works fine on my bike. The extra tension keeps it all lined up properly.”
From “N.M.” (July 2014): “I like your site and check it often for new content. I just don’t think any mention of chain lube is complete without at least a passing remark about the ScottOiler device.
If as you presume and I agree, some readers of this article are new to motorcycles, they may not have heard of it. I wouldn’t even own a chain driven bike without one. This is based on 20+years of motorcycle commuting experience.
Even with my ham-fisted approach to throttle control I can get 40K miles out of a chain and sprocket set no problem. And no crouching with oil or spray. Ever. Fill it every third tankful of gas and go.”
Editor’s Reply: This chain adjustment article was not at all about chain lubes.
We have dozens of chain lube articles and we’ve also reviewed every one of the Scottoiler products and more.
Here is the main index of all the webBikeWorld motorcycle chain lube reviews. Also, here’s areview of the Scottoiler California spec system.
Here’s a review of the Scottoiler eSystem. And a review of the basic Scottoiler chain lube system.
And don’t forget the Cameleon chain oiler review. We have the latest version of the Cameleon oiler currently in the review process.
From “B.N.” (July 2014): “When the axle nut is tightened it can make the axle move and causes the wheel to be misaligned. This means loosening everything and resetting the alignment.
Before I tighten the nut I fold up a rag and put it between the sprocket and chain at the top of the sprocket.
Rotating the tire backward pulls the axle tight against the adjusters. I keep some tension on the wheel as I do a final alignment check and tighten the nut. This insures that the everything stays in alignment.
A quick way to check alignment is to place a ruler or other straight edge against the side of the sprocket along the lower run of the chain.
If the wheel is aligned, the far end of the ruler will be parallel to the edge of the chain along the whole length.”