

A well designed, well tested and well proven product, Scottoiler systems have been extending the life of motorcycle chains for over twenty years.
Complete with everything needed, less tools and the requisite skills, the Scottoiler kit is quite straightforward and if the whole installation is understood, simple to execute.
Depending on the market, Scottoiler systems can demand a bit of a premium and despite some worthy competition, they are still the benchmark for effectiveness and reliability.
For the adventure-tour rider, don’t leave home without one.
Editor’s Note
H.B.C. took delivery of a brand-new BMW F800GS (info)
Also, here is his BMW F800GS review and you’re now reading his report on a Scottoiler installation.
Note that the installation of a Scottoiler (and other types of motorcycle chain oilers) has been well documented, including on the Scottoiler website (see selected links at the end of this article).
However, this report describes one of the first installations of a Scottoiler system on a BMW F800GS.
Introduction
webBikeWorld published the Cameleon Motorcycle Chain Oiler review way back in March of this year and visitor comments were a mix of pro and con regarding chain oilers in general.
Most long-term users tend to really appreciate the benefits that an oiler system can provide, even though the units can be finicky to setup initially.
I had installed a Scottoiler some time back on a previous off-road machine and that lubrication device worked well and no matter where I go, near or far, especially at rallies, Scottoiler systems will be seen on a great many machines.
So when the Editor asked me if I wanted to try a Scottoiler kit on my new, but very dirty 2009 F800GS, I didn’t hesitate.
The 2009 BMW F800GS was probably one of the most anticipated and awaited motorcycles in recent memory.
Not recanting anything I have ever said or written about any other motorcycle, this new Beemer is now Number One for me.
It is everything I expected and more…but that is the subject of another draft submission.
(Editor’s Note: It’s rumored though that H.B.C. just bought a BMW HP2 Sport, so we’ll see what happens to the pecking order!).
To say I have been living on this long-legged twin since picking it up in early October would be an understatement.
Considering the use and abuse it will get, and considering that long swing-arm and chain, a good lubrication system is going to pay for itself quickly.
Besides, a chain oiler was already on my growing list of ‘enhancements’ planned for this most capable of machines.
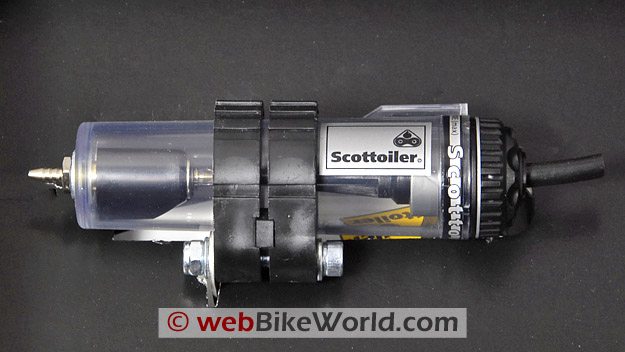
The Scottoiler Reservoir Metering Valve, or “RMV”, is the heart of the Scottoiler system.Background
Although the name Scottoiler is taken from its inventor, Fraser M. Scott, the name also implies its roots in Scotland; Milngavie, Glasgow to be exact.
The company prides itself on being an “investor in people” company and has stayed focused on a relatively small line of products for a large number of brands and models of motorcycles and bicycles as well.
For motorcycles, the Scottoiler line includes the Mark7 Universal kit, the Mark7 Touring Kit, the CR-01 Off Road kit and now, the BMW F650/800GS kit.
Scottoiler systems have been helping keep motorcycle chains lubricated and living longer for over 20 years.
Scottoiler products are well designed and extremely reliable thanks in large part to high production and quality control standards.
They are also able to supply universal kits, spare parts, fittings and accessories for virtually any application.
While the Scottoiler system may seem more complex than many, it is relatively simple in principle: use engine pressure (or a lack of it; i.e., vacuum), along with gravity to power the whole thing.
No electronic gadgetry here, although the newly announced eSystem changes that.
(Editor’s Note: And we hope to have a review of the new system as soon as it’s been released).
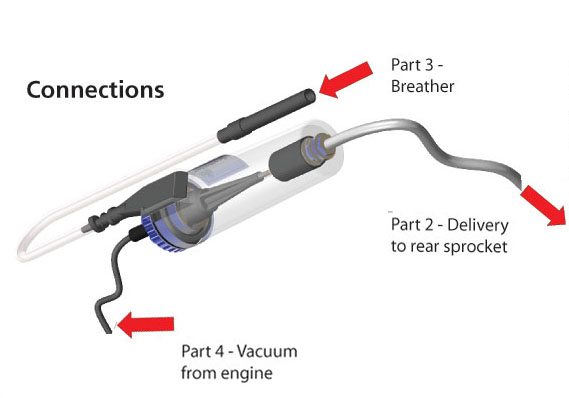
With the engine running, a porous damper disc in the Vacuum Damper component (see below) stabilizes vacuum and air flow.
With only 3 cc of air moving back and forth through the thin vacuum tubing there is no impact on engine operation if the system is properly installed.
The knurled Flow Adjuster knob at the top of the Reservoir Metering Valve, or “RMV” (the RMV is the Scottoiler nomenclature for the actual oil reservoir and metering device; see photo below) allows direct control over how much oil is metered through the RMV, down the dispenser tubing to the dispenser nib.
Gravity and centrifugal force take care of the rest.
Image courtesy Scottoiler.That Provided and That Needed
The Scottoiler Kit comes packaged in what seems to be the industry standard black box, reflecting a certain sophisticated air, which in reality, the Scottoiler system is.
Everything needed is packed inside, including a BMW Spares Kit bag with the specific bits and pieces unique for the motorcycle.
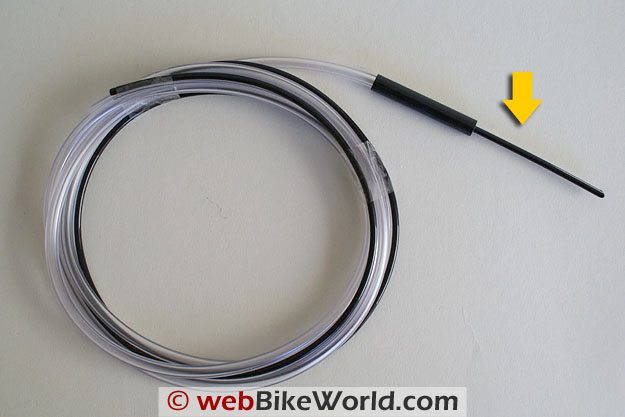
The ‘loose’ components include the Reservoir Metering Valve (RMV) unit and the dispenser assembly (clear plastic tubing and cut-away dispenser tip).
Also a breather assembly (rubber cap, clear tubing and hard plastic tubing); the vacuum tubing (thin black plastic) and 30cm of clear plastic conduit for securing the tubing at various spots.
A filling and priming spout for use with the 250 ml container of Blue Scottoil and four long cable ties round out the loose pack list.
A BMW Spares Kit Bag contains one M6 Nylock nut, a Dispenser Plate, two M6 Washers, one M6 Socket Bolt, a small piece of sandpaper, one small tube of Instant Adhesive, a spare dispensing Nib and a BMW Vacuum Damper.
All of the tools required are identified in the instructions and includes T25 and T30 Torx wrenches (sockets are better); a (small) flat screwdriver; a 4 mm Allen key; and a set of long nose pliers – a 6 inch pair was needed for this installation.
Thus prepared and armed with fresh coffee from Tim Hortons, the task begins in the rather balmy 6C temperature of the garage compared to the minus 4C temperatures outside at the time. Finishing the garage was long overdue.
With basic heating requirements met, it is now a viable work environment (Editor please note) throughout (most) of the sometimes long winter.
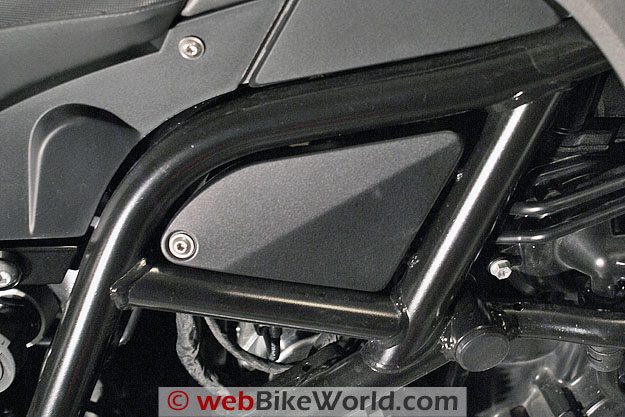
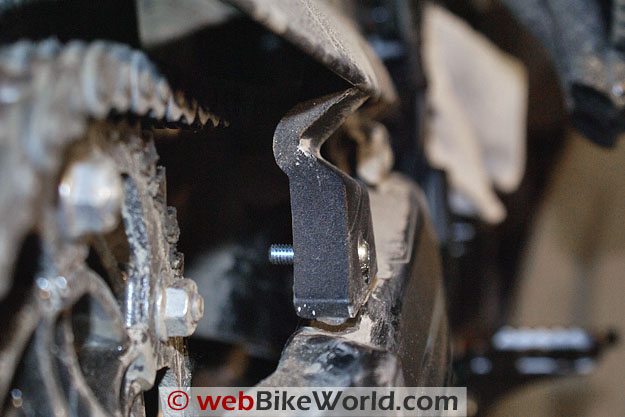
BMW F800GS Side Cover, Right Hand Side After the Torx bolt is removed, the side cover must be pulled from these metal tangs.Installing the Reservoir Metering Valve Components
The F650GS – F800GS Scottoiler kit includes a colour fold-out instruction sheet, along with a registration card.
But the Scottoiler representative had also forwarded two files via email; one a component listing and the other an updated instruction sheet for the F650/F800GS models.
Both files are posted on the Scottoiler forum, which is another source of support for Scottoiler owners.
One thing to note — there is no date or version information on the instructions, something that is useful for any component and/or instructional issuances.
The plastic triangular shaped side cover on the right hand side of the F800GS must first be removed (photo below).
Remove the T25 Torx bolt and pull the side cover out a half inch or so.
Wiggle it backwards slowly, allowing the two studs that are welded to the frame to pull out of the rubber plugs on the cover.
Now the fun starts! The vacuum bung plug is attached (firmly) to the hard plastic spigot on the bottom of the airbox . As this bung sits on the inner side of the fuel injection vacuum tubing, it is not directly accessible.
A couple of initial but firm downward tugs on the bung using the needle-nose pliers failed to even budge it.
The small flathead screwdriver was used to gently break the seating at the top between the bung and the plastic spigot.
Once this was done the bung pulls off easily using the long-nose pliers (photo below). Just be careful when working in this area – all the CAN-BUS fuel injection harnesses are in the vicinity as well.
Airbox plug removed. Airbox vacuum tube fitting on 8 mm damping elbow.With the bung plug removed, the next step is to take the thin black vacuum tubing from the kit and push one end as far as possible up into the narrow elbow of the BMW vacuum damper component from the kit.
Even with keeping the thin tubing cool and slightly warming up the elbow unit, the tubing only goes in about 10 mm or less, hopefully this is enough.
Getting the 8mm elbow (photo above) back on to the airbox spigot took a little bit of effort – access is limited.
I was actually able to get my fingers in from the bottom and push the damper component up onto the spigot.
With a little heat applied from the heat gun, I was able to get it wiggled up almost to the top of the spigot or as the instructions state, “until it can go no further”.
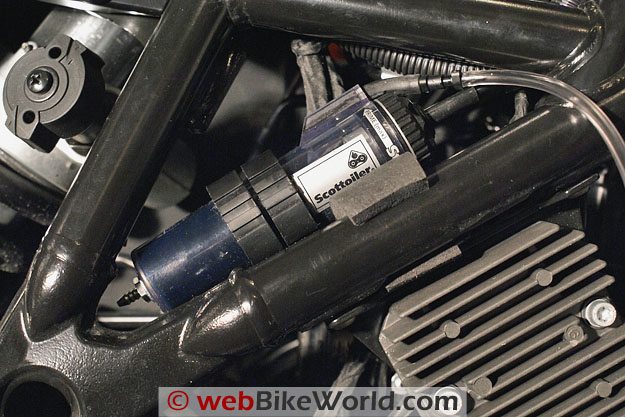
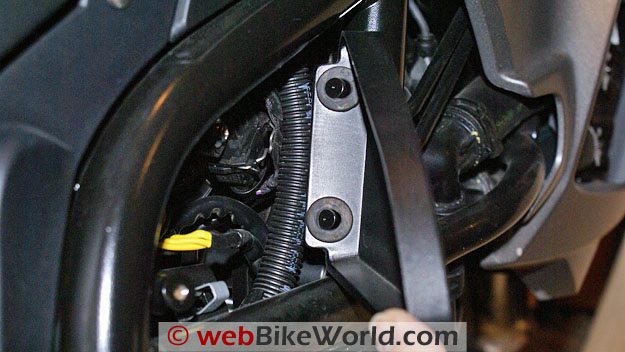
Next up was the Reservoir Metering Valve or RMV, the heart of the Scottoiler system.
Note that the F800GS shown here is a Canadian-spec model without the the evaporative emissions canister that is fitted for the U.S. market (photo below).
But even without the canister, the RMV is a snug fit inside the frame perimeter.
It is worth the time to do a test-fit of everything so that issues can be identified and addressed before final assembly.
The BMW F800GS as sold in Canada, does not have the evaporative emissions canister.Removing both short (10 mm) T30 bolts holding the rectifier/regulator assembly allows this component to drop down slightly and a test-fit of the RMV undertaken.
Outside of noting the need to rotate the RMV to put the filler plug and thus the breather assembly to the outside for easy access, everything else looked do-able.
Slipping the RMV clamp assembly between the frame and the regulator/rectifier mounting plate, both T30 bolts can be reinstalled but not tightened up, yet. Make sure that one of the provided kit washers is used as a spacer on the forward bolt.
This offsets the thickness of the RMV clamp assembly plate and keeps even pressure between everything when tightened back up.
During the test-fit, the need to extend the thin vacuum tubing run by about two inches was noted. This will allow the RMV to be removed as needed for any cleaning or service work without having to disconnect the tube.
When cutting this thin tubing, make sure the cut is straight, clean and that the tube is not blocked by any small particles of plastic. Push the black vacuum tube as far as possible into the centre tube at the top of the RMV.
This action is not diagrammatically illustrated in the updated instructions, although the need to do this is noted on the component and connections (part 4) diagram.
The RMV mounting bracket is clamped together with a 5mm head bolt and a 10 mm nut.
This was loosened off slightly and the unit rotated outwards a bit, for the reasons identified above, and then tightened up again.
The clamp needs to be somewhat snug to keep the RMV from jiggling around or vibrating against the frame tube.
Concerned that it did still move around more than desired, a short piece of sponge tubing was put on the frame tube as a cushion, and some piece of mind.
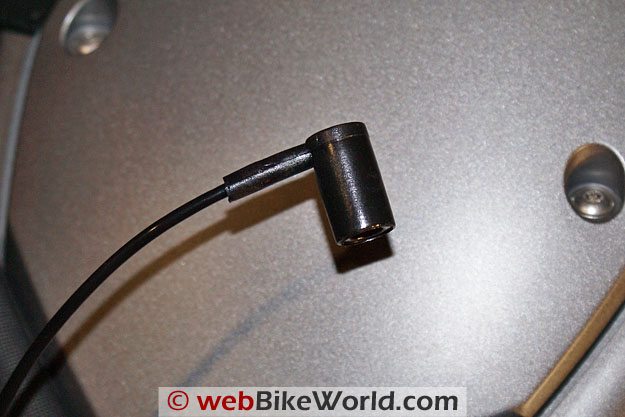
With this done, the filler plug and breather assembly were mounted up.
The soft filler plug is simply squeezed into place. The plug lines up with the hole in the RMV and cut-outs on the RMV moulding itself.
The breather assembly can then be plugged into the end of the filler plug.
The regulator/rectifier bracket is now tightened up, which gets rid of any remaining slack in the RMV mount as well.
For now, the breather tube is run straight ahead around the inside of the forward frame tube and then back down along the angled lower frame tube.
A nylon tie strap acts as a temporary bracket for the breather tube.
This positioning has the added advantage of angling the breather tube downwards to keep water out, something specifically identified in the instructions. A proper clip of sorts will be installed later.
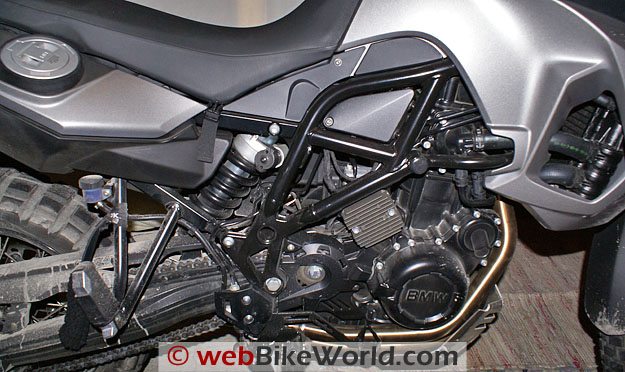
Scottoiler filler plug breather hose. Scottoiler Reservoir Metering Valve installed on BMW F800GS. Scottoiler oil tube routing on BMW F800GS.Installing the Dispenser Assembly
I watched both parts of the Scottoiler Full Install YouTube video for the F650/F800GS and reviewed the detailed F800GS Scottoiler Fitting Instructions (a large .jpg file available on the Scottoiler website).
I then had a decision to make regarding the actual routing of the dispenser or feed tube and whether or not to remove the back wheel.
Deciding to leave the wheel in place, I further deviated from the recommended mounting in not running the tube along the inside of the swingarm. I wanted a more expedient but still effective mounting, at least for now.
The decision was made to run the tubing along the outer edge of the chain guard up to the RMV.
Regardless of how the tube is routed, the trickiest part of this task is to properly mount the dispenser assembly itself. After another test fitting, the job became pretty simple.
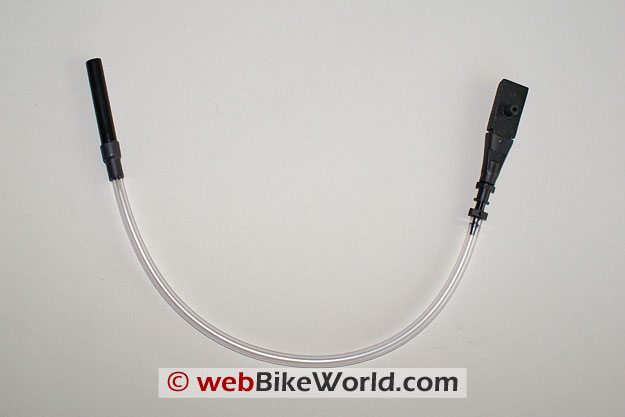
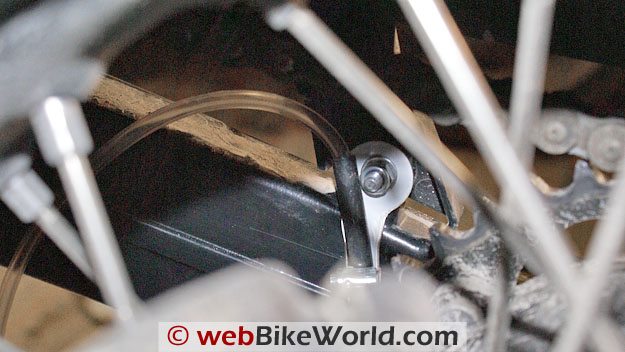
Once the correct placement and angle of the assembly is assessed to put the slash cut of the nib facing away from the sprocket, the jubilee clip (hose clamp) from the kit will secure it all in place.
With this done, the dispenser plate assembly is mounted to the back or inside of the rear chain guard mount using the extended bolt provided in the kit.
It is best to just snug everything up at first, and if the small hose clamp is properly oriented, both it and the assembly mounting bolt can be loosened off if any final adjustments are needed.
As mounted in the dispenser plate, the dispenser tip itself will just clear the outer edge of the sprocket when positioned between the 3 and 4 o’clock position and will also just clear the sprocket mounting bolts. Tolerances must be quite close for the drip to be optimized.
Dispenser assembly in place, the tubing was angled up to the inside edge of the chain guard and routed along its length, then up beside the shock mount to the RMV.
Three small holes were drilled at appropriate spots in the chain guard itself and nylon straps used to hold the tubing in place.
Note that in using the straps one must be careful not to squeeze or compress the tubing itself. The next clean-up effort will involve using small plastic hose clamps bolted to the chain guard using the same holes.
I used short strips of .225 inch diameter heat shrink tubing at bends and securing points to reduce wear and tear and protect the tubing.
The final step was to allow an extra inch of tubing, then cut it cleanly.
With the newly cut end slightly warmed, it was pushed on to the beveled end of the RMV providing a tight seal. An air leak here will negatively impact overall system effectiveness.
The instructions could be confusing in that they identify using the brake circuit to help secure the feed line.
In reality, only the hydraulic junction box is located on the right side along with the chain drive; the disc brake and CAN-BUS components are mounted on the left side, as is the rear disc brake.
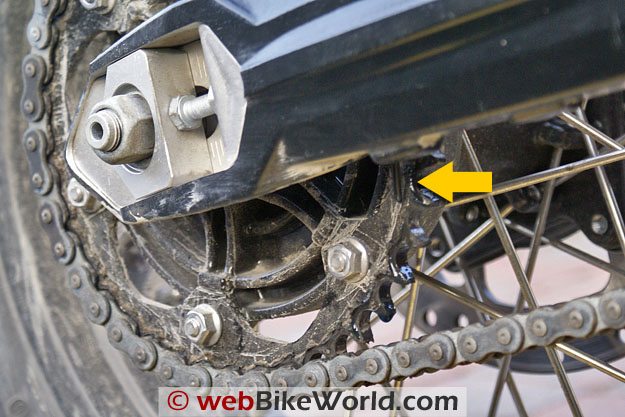
Replacement mounting bolt. Scottoiler dispenser tube; arrow indicates drip tube to be located over chain.Loading and Priming the Scottoiler System
Getting the system loaded with the provided standard temperature Blue Scottoil, which is rated for 0 to 30 degrees Centigrade use and then primed probably sounds like a black powder musket loading procedure, but this took a wee bit longer than getting the musket ready.
Cut the tip of the 250 ml container off close to the top. Pull the filler plug/breather assembly gently out of its fitting in the RMV.
Take the supplied filling/priming spout tube and push the open end of the plastic tube down onto the top of the container.
When ready, simply insert the other end with the hard tip into the RMV filler hole and squeeze the container.
Depending on the temperature, it won’t take long to transfer the required amount of oil, around 50cc, to fill the RMV. Just make sure you keep the filling tube in place and the bottle/tube connection together.
If not, you will have sticky blue oil all over everything. A filling tube that screws directly on to the top of the container would be nice…
To prime the system in accordance with the instructions, put the filler plug back on to the RMV.
Then connect the filling/priming tip to the end of the filler plug and turn the knurled flow adjuster wheel at the top of the RMV to the Prime position (stop will be against the fill plug moulding).
Make sure a good connection is made and squeeze the container.
Some additional oil is pushed into the RMV and at the same time the system is pressurized or primed, or supposed to be.
After two attempts on one day and a third on the second day, the internal diaphragm was still not moving and nothing was being pushed down into the dispenser tube.
In the end logic and expediency prevailed. The Beemer was moved outside, the engine started up and within two minutes oil had started to flow down into the dispenser tube. Initial flow was slow, due in large part, I suspect, to the fact that it was minus 4C outside at the time.
It took a good 30 minute ride (any excuse eh?) with the odd stop to check on flow progress before the first drops of oil came out of the dispenser tip.
The flow adjuster was turned back (anti-clockwise) to minimum and then turned clock-wise a quarter turn, producing one to two drips per minutes, the optimum flow rate identified in the instructions.
Another couple days of riding in the ever declining temperatures has served to get the chain better lubricated with the help of the Scottoiler and everything seems to be working well even in the cool weather. So far, so good.
Dispenser tube mounted on chain guard. Scottoiler drip tube just showing, with oil starting to flow on sprocket.Conclusion
Admittedly a Scottoiler system is not for everyone.
Yes it is larger than some, yes it is relatively complicated, yes it needs setting up, but yes, it does work.
The Scottoiler might not be a ‘fashion statement’, but it makes a statement just by being seen and being mounted, it is that well recognized and that well regarded.
The system is not obtrusive by any means, especially as mounted on the F800GS.
It is important to align it carefully on the mount vis-à-vis the frame tubes and make sure the pump housing is rotated outwards a bit to allow easy access to the filler tube cap and breathing tube.
As well alignment, position and function of the dispenser nib is critical and should be checked periodically.
Regarding U.S. models and based on correspondence with the Scottoiler representative, a T-fitting of some sort might be needed for the airbox spigot interface to accommodate both the emissions canister connection and the Scottoiler vacuum connection.
(Editor’s Note: It’s my understanding that the necessary parts will be provided in the U.S. kit).
As well, a change to the mounting bracket might be needed to mitigate a probable fitment conflict between the emissions canister and the RMV.
A workaround is being looked into and any required update parts will be provided by Scottoiler when available, which could be soon.
If liking this product makes me a bit on the ‘OCD’ side, as the Editor so politely put it in the Cameleon Motorcycle Chain Oiler article, so be it.
References
- Haynes Scottoiler installation
- Motorcycle News How to fit a Scottoiler
- Scottoiler Installation Guides Page (on the Scottoiler website)
- Scottoiler Fitting Guides (also on the Scottoiler website)
- See Also: wBW Scottoiler FS-365 Review | wBW Scottoiler eSystem Review
- Scottoiler vSystem California Spec Review
- BMW Motorrad Scottoiler Review
| wBW Review: Scottoiler Chain Oiler | |
|---|---|
| Manufacturer: Scottoiler (with worldwide retail information and shipping) | List Price (2008): £73.36 (approx. $140.00 CAD; $115.00 USD) |
| Colors: N/A | Made In: Scotland (unconfirmed) |
| Review Date: November 2008 Notes: The BMW F650/F800 GS Scottoiler kit is Item Number SO-2005. | |
Owner Comments and Feedback
See details on submitting comments.
From “R.B.” (12/08): “Having had a Scottoiler on a Suzuki Bandit 1200 for 57k miles showed it extended chain life by 50%, from 14k to 21k per chain/sprocket replacement.
An added benefit is the time and effort saved not lubing the chain. At the end of a day’s ride there’s no reaching for the chain lube and a rag.
The only drawback is the ever present coating of oil on everything behind the swingarm pivot point.
Even fine tuning the flow did not stem the oily tide. If you you like you bike scrupulously clean the Scott Chain Oiler is not for you.