
The Cameleon oiler is relatively easy to install and it has some advantages over other automatic chain lube systems.
The Cameleon system is simple, it has very few moving parts and the oil is stored in the hose, which can be easily concealed.
We’ve avoided the topic of motorcycle chain oilers for many years on webBikeWorld.
They just seemed too complicated, too bulky and too fussy.
But we’re probably in the minority on this one, because many, many motorcycle owners swear by products like the Scottoiler, the Lubetronic, the CLS chain oiler and more.
There are even some home-made solutions; see the wBW Motorcycle Oil Page for more information and links.
No offense, but I always figured the chain oiler dudes to be a bit on the OCD side.
Many motorcycle owners seem to be too obsessed with chain lubes anyway; it only takes a drop here and there to do a proper job on a modern O-ring chain.
The old “if some is good, more is better” approach is not the way to go, because it will at a minimum spray oil all over the rear of the bike and in the worst case on to the rear tire — wouldn’t that be just special?
Me? If I remember once a month or so I might spritz a bit of DuPont Teflon chain lube on a few links and call it done. It’s a chore that I just can’t bring myself to love.
It actually doesn’t take a heck of a lot of rocket science to fling lube on a chain.
After all, the “total loss” lubrication system was used for years on everything from chains to crankshafts back in the days when ships were wood and men were iron.
All you need is a hose, a bottle to hold the oil and a squeeze or two here and there as you ride along and your chain will be in greaser heaven.
Honestly, it would be fairly easy to rig up a small squeeze bottle or plastic tube and hang it somewhere and run a very narrow diameter hose down over the chain and give it a drop or two once in a while.
Fancy it up with a roach clip on and off control and you’re all set.
I think about designing something like this occasionally when I have trouble falling asleep at night but apparently I forget about it by time I wake up.
That’s basically what a chain oiler does, but there are a couple of problems with that method.
First, it’s nice to be able to control and/or shut off the flow of oil, for obvious reasons, like when the bike is parked. And second, who knows how much squeezing to do?
So the lazy (that’s me) guy’s solution would be to have a chain oiler that would allow control of both the flow and the quantity of the lubrication. Hey wait — that’s the Scottoiler, right?
Well, every once and a while when I think my chain is past due for a lube I take another look at the Scottoiler. But I’ve never quite been able to wrap my mind around it.
No offense, Scottoilers– and there are zillions of you out there, but whenever I take a visit to the Scottoiler website and look at all the parts that are involved — well, it just looks way too complicated for something that should be as simple as a chain oiler.
And it also looks too big to hide under the seat — but hey, that’s just me.
Thus, I was quite ready to scoot along for the rest of my natural motorcycling career using my occasional spritzing technique.
But I have a confession to make: in the back of my mind, there’s that little voice that every once and a while makes me feel just the slightest bit guilty about my wicked ways.
I mean after all — I’m probably an anti-chain-lube minority of one here, and even though I make it a point to never follow the crowd, there’s still that little 1% in me that makes me wonder if I’m doing the right thing.
So that, strangely enough, is where the Cameleon chain oiler comes in.
I don’t even remember when I first heard of the thing — I think it was an email from a friend. But something about it looked new and different and interesting.
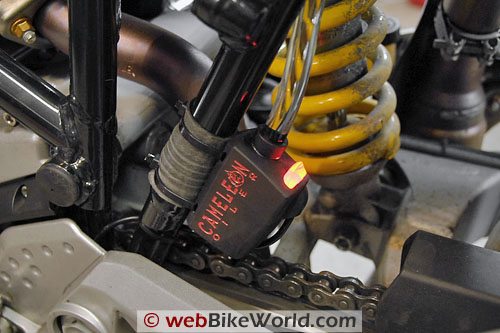
Cameleon chain oiler controller attached to a downtube on the Multistrada. I use a piece of rubber cut from an old tire tube around the frame to protect it.The Cameleon Chain Oiler
The Cameleon oiler is a simple and efficient device. The oil is stored not in a bottle, but in a clear vinyl hose that is attached to the frame or bodywork.
This is rather ingenious — the hose itself becomes the storage unit for the oil, so there’s no big bottle to try and fit under the seat.
The control unit isn’t much thicker than the hose itself, and it has slots molded in along the top for cable ties.
The controller can be mounted just about anywhere, but the Cameleon is available with your choice of colors on the printed logo, and, as you’ll see, it has a colored light also that glows when you’re riding, so you’ll probably want to mount the controller somewhere out in the open.
Kind of interesting actually — a chain oiler that’s a fashion statement and meant to be seen, not hidden!
The controller adjusts the amount of oil that flows from the storage hose through to the third part of the system, a stiff but flexible hose that is attached along the swingarm and is positioned to drip the oil on to the chain.
The controller is a valve, powered by an electrical connection.
The power and ground wires are spliced in to the motorcycle’s rear tail light (or other electrical device that turns on and off with the ignition), so the controller becomes active when the bike’s ignition is engaged.
I’m not exactly sure what goes on inside, but the controller allows a programmed amount of oil to flow through the system for a certain length of time.
The oil is gravity fed from the storage tube down through the controller and out through the flexible hose, on to the chain.
Mounting the Cameleon Chain Oiler
One of the advantages of the Cameleon system is the no-moving-parts oil storage hose, which can be easily concealed in and among the frame tubes or bodywork of the bike.
The hose can be cut to fit if necessary, but I was able to use the entire length as provided by Cameleon. I snaked it up behind the Multistrada’s frame tubing and up under the seat.
The end of the hose is capped and it fits behind the seat and this makes it easy to grab and fill when necessary.
The frame tubes on the Multistrada are perfect for attaching the controller with the provided cable ties, although the Cameleon cable ties proved to be too brittle and they broke when tightened, so we used some high-quality flexible cable ties we had in the toolbox.
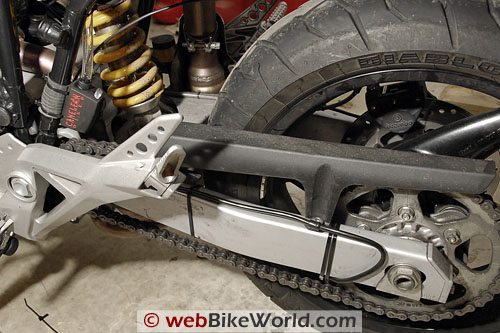
Mounting the storage hose and the controller was relatively easy; mounting the tube that drips the oil on the chain was more difficult.
Cameleon claims you can mount the entire system in 1/2 hour, but that’s if you know exactly what you’re doing and if everything fits and aligns perfectly.
After we got the storage hose and the controller mounted, Burn and I messed with several different configurations, trying to come up with the ideal setup for the hose that drips the oil on to the chain.
It took a few hours to settle on a configuration that worked the way we wanted.
Cameleon provides a few hose clamps in the box and some self-tapping screws and they suggest drilling into the swingarm to mount the clamps that hold the oil drip hose.
In talking to some other chain oiler users, I discovered that drilling and tapping a swingarm to mount the drip hose is a fairly common procedure, but I wasn’t too keen on this idea.
So we first tried running the oil drip tube on top of the swingarm, using cable ties to hold it, but I didn’t like the looks of this and I was also afraid that the cable ties might get caught on something and get torn off.
Here’s a photo of the first trial:
First try at an installation, with the tube running down the length of the swingarm.After studying it for a while, we decided to mount the tube along the chain guard and then down along the back of the swingarm.
I drilled a couple of holes in the cheap plastic chain guard on the Multistrada and used some stainless steel bolts, washers and nuts as you can see in the photo below.
We still had to use one cable tie to hold the tube on the swingarm, and I may end up drilling a hole in back of the swingarm next time I have the rear wheel off, where I’ll use a hose clamp to make this installation even cleaner-looking.
Here’s a photo of the final setup:
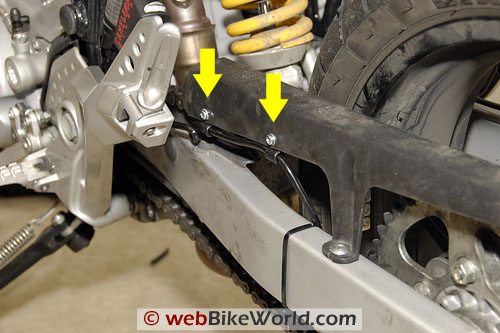
Final installation location. The yellow arrows indicate the bolts used to mount the hose clamps to the chain guard. The cushioned hose clamps can be seen underneath the guard, below each bolt.One issue that we ran into with the oil drip hose is getting the tip of the tube to stay aligned out over the top of the chain.
The ideal location in my mind would be to place the tip up by the front chain sprocket, which would also hide the entire installation and the lengths of tube needed, but I couldn’t quite figure out how to do this on the Multistrada.
Plus, the chain tends to whip up and down near the front, which makes it difficult to place the tip of the drip hose so that it won’t get fouled.
Scottoiler now has a “floating” chain oiler tip that apparently rides on the lower run of the chain so the oil drips directly on the chain and nowhere else. I may see if I can get one of those and adapt it to the Cameleon system.
The drip tubing provided by Cameleon connects to the controller.
It has a stiff casing with a thick length of steel wire inside that’s maybe about 8 or 10 gauge or so.
This hose can be bent to fit and it will remain in the chosen shape, but it’s pretty difficult to cut — it takes a hefty pair of wire snips to do it.
If the tip of the tube is unsupported over a length of about 2-3″ or so, it seemed like it might be too flexible to hold steady in position over the chain, so we tried to find a way to support the tube as close as possible to the tip.
Programming the Cameleon Controller
Programming the controller is very easy and — dare I say it — fun.
The program can also be changed or modified within seconds whenever necessary. Cameleon provides a chart (below) that gives some starting points for suggested amounts of oil. The chart shows the time in seconds on the Y axis and the type of motorcycle on the X axis.
To choose a starting point, first pick the color for the chosen oil weight. The recommended oil weights run from 90W (red) to 250W (blue; 250W oil must have the consistency of petroleum jelly!).
Next, choose a motorcycle type (i.e. Touring, Cruiser, Sportbike, Supermoto, Dirt Bike, etc.).
Then look up from the motorcycle type to the oil weight color, then look to the left on the Y axis to find the time, and you have the recommended starting point.
Let’s try it for the Multistrada. First, here’s a scan of the chart provided by Cameleon (this chart is also on their website):
Cameleon put a bottle of 90W chain oil in the box, so that’s what I used — notice that 90W uses the color RED on the strip along the bottom of the figure above.
The Multistrada is sort of like a Supermotard, so in the chart above, look through the bikes and find the Supermotard (fourth from the left). Now look up and find the RED (90W) section of the colored strip, then look at the Y axis — it indicates about 4.5 seconds.
It took me a while to figure this out, but once I understood it, it’s very easy (and I hope my explanation here makes it even easier for you!).
After the unit is installed and has power and after the correct time is chosen from the chart, the Cameleon chain oiler can be programmed.
This is the fun part!
Turn on the ignition, and press the button on the bottom of the controller within 3 seconds of turning on the ignition (See the video below).
The light on the back of the controller will then start to cycle through about 10 different colors — the same colors shown in the chart above.
When the light cycles to the oil color chosen from the chart, hold the button for the amount of time suggested by the chart and you’re set. So in my case, I waited for the RED light to show and then I held the button in for about 4.5 seconds (using a second hand on a watch).
Addendum
By the way, I don’t really understand the relationship between time, oil weight and motorcycle type on the chart.
Some email correspondence with Cameleon didn’t help to explain this. I’d like to know if the time (4.5 seconds) means that the valve opens up once every 4.5 seconds?
Or does it mean that the valve opens up for 4.5 seconds every certain amount of time? Why do touring and Sportbikes appear farther down on the Y axis and dirt bikes are higher?
I think if Cameleon explained the chart it would help owners make a more informed decision on how to set the Cameleon oiler.
When the button is released, the light blinks rapidly to indicate that the time and color is set. Now it will start to cycle through the colors again.
It can now be programmed to choose one of the colors to display while the engine is running. It’s a fun way to indicate that the Cameleon is on and working.
I chose purple, so when the purple light glows, I pressed the button again and it’s all set.
OK, so once it’s programmed, here’s how it works: whenever the bike is started, the Cameleon turns itself on and after a couple of seconds the red light displays for the time period I chose — 5 seconds.
Remember, the red light shows in this instance because that is the color I chose based on the oil weight and my motorcycle type from the chart above.
After the red light displays for the five seconds I selected, it will change to my chosen riding color — purple — and it will stay purple while the bike is running.
It’s pretty cool actually, and the program can be changed at any time to account for different conditions, like rain, dirt, touring, etc.
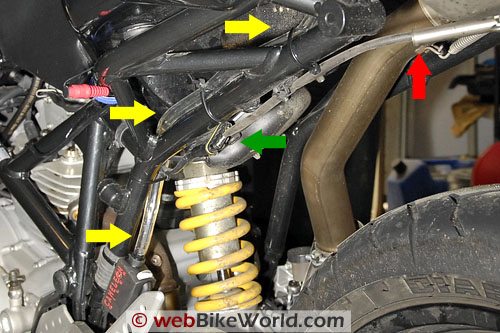
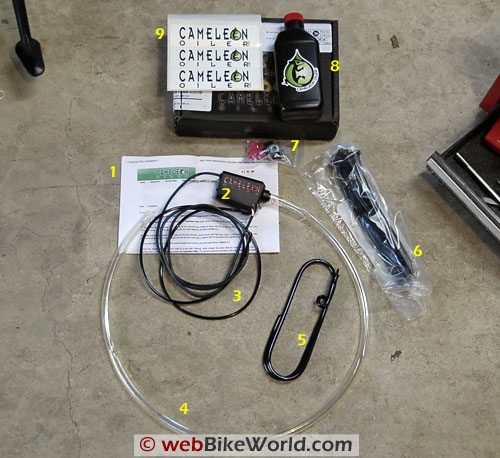
We ran the storage tube along the frame of the Multistrada, using cable ties to secure it. The yellow arrows indicate the tube; the green arrow indicates the power connector for the Multistrada’s tail lights; the red arrow indicates the metal conduit for the tail light wires (the conduit protects the wires from burning on the exhaust). In the Box: 1. Instructions; 2. Cameleon control unit; 3. Electrical wiring; 4. Oil storage hose; 5. Oil drip hose; 6. Cable ties; 7. Hose clamps; 8. Chain oil; 9. Cameleon stickers.I discovered that it takes a while for the 90W oil to work its way through the system; in fact, when I got back after a 30 mile or so ride, the drip hose was still dry.
An email to Cameleon suggested that I program it for 30 seconds or so and take another ride, to get the oil flowing through. I did this and when I returned home the tip of the oiler hose was definitely wet and I could see the oil on the chain.
So I re-programmed it back to the suggested 5 second intervals, which seems fine. I think I may switch to a thicker weight oil though, especially as the weather warms up.
Conclusion
The problem with any of these automatic chain oilers is that you really don’t know how much oil is dripping on the chain. I’d love to rig up a camera to take a video of the tip of the oiler hose as I ride to see how much oil really drips off the end and where it goes.
I’m assuming that the tip of the hose is directing the oil on to the chain, but surely there is some variability in the form of cross-winds, bumps, etc.
The Cameleon oiler is relatively easy to install and it has some advantages because it’s simple, has very few moving parts and the oil is stored in the hose, which can be easily concealed.
Whether or not an automatic chain oiler works any better than an occasional spray of chain lube remains to be seen.
A true “scientific” test that compares various chain lubes and oilers would be very difficult to do, what with all the variables and the time it would take to run the chain through a simulated road course and then to extrapolate chain wear over time.
So in the end, I’m not really sure if a chain oiler is just a pacifier or if it will really make a difference…
In any case, although I don’t have another automatic chain oiler to compare it to, the Cameleon has a lot to offer.
UPDATE: Cameleon Chain Oiler Review Updated (2014)
| wBW Review: Cameleon Chain Oiler | |
|---|---|
| Manufacturer: Cameleon Oiler | List Price (2008): $199.00 (Free international shipping) |
| Colors: LED light in your choice of 10 colors. | Made In: Canada |
| Review Date: March 2008
Note: Item was provided by a retailer, distributor or manufacturer with these Terms and Conditions.
|
|
Owner Comments and Feedback
See details on submitting comments.
From “N.T.”: “I purchased a Pro-Oiler (very similar to the Cameleon) about a year and half ago for my speed triple and used it for nine months. I really liked the idea of hassle free chain maintenance. But I soon discovered that automatic oilers need their own maintenance and can be a little fussy. I ended up doing just as much tinkering and adjusting as I would have done spraying some lube on the chain.
So I finally gave up on the idea and switched to using the DuPont Teflon spray that I read about your website – haven’t looked back since.
I think there is some confusion about chain maintenance. O-ring chains have all the lube they need in the O-rings themselves so all that needs to be done is prevent any grit/grime that accumulates on the chain from grinding the links and to provide some lubrication between the links and the sprocket teeth.
But most lubes end up attracting grit because they are greasy or waxy. End up doing more damage than good.
That’s why I think the Teflon spray is the perfect lube – it provides lubrication between the links and the sprocket but because it’s a “non- stick” substance no dirt sticks to your chain. Ever since I started using it my chain has stayed nearly perfectly clean – it’s pretty incredible.
I’m at 10,000 miles now and the chain and sprocket are still in great shape. When I had the automatic oiler it was always goopy and dirty.
So don’t waste your money – the Teflon spray is the way to go!”
From “M.W.”: “I read your review of the chain oiler & it seems like a slightly less complicated system than the Pro Oiler I have on my CBR. I think they are a brilliant idea as they save all that spray lube, which seems to build up, adhere to every where except the chain, & appears to be harder to clean up than plain oil.
After a few thousand kms, & parking the bike in the same area at home, from areas that are difficult to clean, the spray lube build up then falls to the ground in very small balls. A curious little dog who likes to sniff the squashed insects on the bike, stands on one of these little balls & proceeds to run all over the carpet. The reaction from my wife was about 7.5 on the Richter scale. Glad it wasn’t on my foot. I then fitted a CLS unit to my previous bike which worked very well.
A couple of may be useful tips, before fitting an oiler remove the chain, sprocket guards, clean all old spray lube, also clean the chain & anywhere else it may be on the gearbox or swing arm. Otherwise this residue is diluted by the oiler & you have a worse mess.
If you drill into the aluminium swing arm, which is the best way to secure the feed nozzle, use a self tapping screw with a coarse a thread as possible as this grips better in the soft alloy, a little thread lock when you are happy with the location.
At present I have 26,000ks on the OEM chain & after the initial tensioning it remains untouched.”
From “L.P.”: “I read your review on the Cameleon chain oiler and I have to agree with “T” (below), the ProOiler may be a better rig. I’ve just finished installing one on my ’07 Ducati ST3s and it works like a charm. It works so well in fact I had to mess around with the settings just to make certain I understood what I was looking at.
If I have a complaint at all it’s that programming it seemed more complex than what I expected, but as you found on the Cameleon once I got onto it there were no further issues. Point in fact there are so many ways to address riding conditions initial setup can be confusing.
To help get around this the folks at ProOiler provide an optional selection that allows you to make more limited choices much like the Cameleon. I chose to go with the more complex program as it allows more precise control for oiling under varying conditions. The price for the ProOiler is slightly higher than the Cameleon, around another $30 or so and shipping is not included. S
upport-wise they’re as good as they come, I had to contact them twice because my particular bike had a few changes from earlier ones. They were very prompt in sending two replacement items which once received made the installation go smoothly. All-in-all I’ve been very pleased with their response and the quality of the oiler is superb.
I’ve only owned one other automatic oiler, a single sided ScottOiler mounted on my Aprilia Pegaso and although it works OK it developed a leakage problem early on. Evidently this is due to the failure of an O-ring and as it’s addressed in their web site’s troubleshooting section it must be a common occurrence.
Left alone in my garage, the entire oil reserve leaked out onto the floor, big mess and very expensive proprietary oil from ScottOiler at that. I haven’t ordered replacement O-rings yet so I can’t comment on the complexity of repairs.
Still, having an automatic oiler in place beats the heck out of manually oiling any day, and I’ll bet once bitten you’ll never go back to spray cans.”
From “D.C.”: “I’ve been a fan of your site for quite awhile. Bought my REVIT jacket because of the reviews here.
I live in Singapore. It’s anywhere from 26c to 33c with high humidity all year round. At least we get to ride anytime… with rain gear ready of course.
Allow me to share my experience on chain oilers. It would be up to the reader to believe my report or toss it off as Internet chatter.
A friend of mine rides an ’02 Yamaha Fazer. He installed the ScottOiler (single sided) from the get go and has travelled over 40,000 miles in about 4 years (daily commuting and touring). The chain and sprockets were inspected from time to time by our favourite mechanics and they found no significant wear. They were quite impressed with the longevity. In the end he changed them just for safety. After all, you can’t really see metal fatigue from just looking.
For maintenance, he wiped the chain down with paper towels roughly once every 3 weeks. No chain adjustments were ever made (except when the rear tyre was changed, this happened twice).
For me, I used to have an ’01 Yamaha R1. I installed a manual chain oiler (much like Loobman, single sided). It operates based on gravity and there’s an air valve to allow air into the reservoir (a 35ml syringe bottle). This is the “on-off” switch for it. About once a week (or when I see the chain drying up) I turn it on for about 5 or 10 seconds, shut it, and ride off. I’m not sure how long it keeps dripping but my guess is about 3 to 5 minutes. I used plain engine oil as my lubricant (roughly USD 5 per litre).
In the 3 years I’ve ridden it, for about 30,000 miles, daily commuting and touring up to Malaysia with my friend, I’ve never had to adjust the chain either. Up till when I sold off the bike, the chain and sprockets looked good.
Now, I’ve gotten myself a Fireblade. I had decided to use Maxima Chain Wax as I didn’t want to have a chain oiler on. I couldn’t get my hands on the Teflon lubricant reviewed at this site.
I cleaned and sprayed the chain every other week (about 300 or 400 miles commuting). My chain and sprockets were noticeably worn in about 6 months. Lots of drive lash. I got quite irritated at the need for maintenance. It’s messy and it’s not like I have my own garage here. In Singapore, most people live in apartments, with common car parks.
Not surprisingly, after a few more months when I replaced the chain and sprockets, I bought the ScottOiler (too lazy to install my manual oiler).
Nevertheless it would (be) wise for the owner to examine the left side of the rear tyre from time to time. High speeds do cause flinging. Though both me and my friend have gone to the track for some fun and did not experience any sliding. When the rear tyres were examined they were definitely used fully to the edges. Still, take left hand corners with care.
Oh, and a ScottOiler from another friend of mine got stolen. It was installed in an exposed manner, much like the Cameleon.
Sorry for the long post… if you’ve read this far, thanks for reading!”
From “T.”: “I read your article with interest. It’s a pity you have avoided this subject for so long and the Pro-oiler has escaped your notice as the best on the market, as I have had this system on two bikes and 40,000 miles of trouble free chain oiling.
As you might already know, it lubes automatically according to distance travelled (perfect) and requires no specific oil, but engine/ATF oil work well and are thin enough to reduce mess and at the same time keep those O rings moist and out last the “sprayed” chain by 2-3 time not to mention the convenience of forgetting about constant adjustment, removing Gunk and grime bending down.
BTW no affiliation here, just a delighted and lazy customer.”