

Many accessories available to lift a variety of motorcycle types.
Allows the operator to get close to the bike when lifted.
Allows wheels to be removed when the bike is lifted. Rated to lift up to 1,650 lbs (748 kg)
I was intrigued by the photos and description of the Bike-Lift, which is also known as the “Eazy Rizer Big Blue” in the U.S.A.
Made by the same company who manufactures the Bike-Grab wheel chock (see the wBW review), the Bike-Lift looked like it had everything one could ask for in a motorcycle lift.
The manufacturer claims that it is adaptable for any type of motorcycle, and various accessories are available that will allow a “frame capture”; i.e., the motorcycle’s frame can be lifted so that the wheels can be removed.
The Bike-Lift’s (aka Easy Rizer) shape, minimalist design and small footprint allow it to be stored in a much smaller space than a table lift. Its wheels give it some mobility, unlike a larger table lift, which is a semi-permanent garage fixture.
The manufacturer’s website has several videos available for download which demonstrate the product being used as a motorcycle stand.
This includes lifting and working on many different types of motorcycles, including cruisers, sportbikes, and motorcycles using the engine as a stressed frame member.
Special adapters are available that will allow most motorcycles to be lifted by the frame or engine only, leaving the wheels and tires free for easy access and removal. The Bike-Lift also features a virtually unencumbered “360 degree” access to the motorcycle and all its parts.
This is an advantage over a table lift, which prevents full access to the underside of the motorcycle and which usually will not allow the removal of both wheels simultaneously.
The Bike-Lift also allows “up close and personal” access to almost every portion of the motorcycle without having to lean over the surface of a motorcycle table lift.
Bike Lift Motorcycle Lift
The Bike-Lift can be configured with four different methods for lifting a motorcycle, but this is also a cause confusion during the ordering process.
The website has lots of text and photos, but the information is biased towards marketing the product and should instead be organized more effectively to describe the product and its options.
For example: better assembly instructions and and examples of how to configure and use the product on different types of motorcycles.
Also, the videos show several instances of incorrect or unsafe usage of the product, seemingly for marketing purposes rather than to provide technical information that would be useful to owners.
Since we work on many different types of motorcycles in the webBikeWorld garage, we were very interested in the Bike-Lift’s adaptability to various motorcycle configurations.
This may have caused us more confusion during the ordering process than an owner who would be using the lift for a single brand or type of motorcycle, but it’s important to carefully study each configuration to make sure the lift will work with your application.
We ended up ordering just about every option we could think of, and still could use a few more. It took several phone calls and emails to help us through the process of ordering and setting up the equipment. The U.S. distributor was very helpful and answered our many questions.
To make matters even more interesting, there are also two different Bike-Lifts offered for sale. The “Original Red” is a smaller capacity version that can be folded and hung on a wall for storage.
We ordered the “Big Blue”, which is sort of the “professional” model, with a higher capacity and, we think, a more stable lifting base.
Each Bike-Lift must be assembled by the owner prior to use. The instructions are straightforward and use a combination of line drawings and rather poor quality photographs as illustrations.
It took us about one hour to assemble the lift and a helper is needed to hold the lifting assembly on to the main upright while the bolts are secured.
Before lifting a motorcycle, the bike must be held vertical and off the center stand or side stand.
This means that a rear swingarm stand (aka paddock stand), such as the Steel Horse rear swingarm stand (see the wBW review), the Steel Horse front wheel stand (see the wBW review) or Quasar Industries’ own Bike-Grab (see the wBW review) must be used to hold the bike upright prior to moving the Bike-Lift underneath the motorcycle.
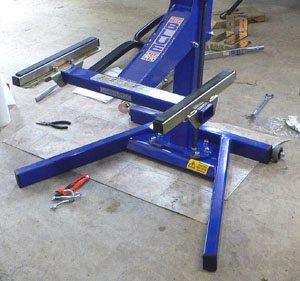
The work of lifting and lowering the motorcycle is performed by an Acme-type threaded rod, which is located on the right side of the vertical upright in Photo 1 (below).
The threaded rod holds the motorcycle at any distance along its length, and the manufacturer claims that no locking devices are necessary to hold the bike in place.
The threaded rod is rotated with a 22 mm hex nut on top. A 1/2″ square drive drill adapter is supplied with the lift, which allows a heavy-duty, high-torque cordless drill to be used to raise and lower the bike.
Our cordless 8.4 Volt drill doesn’t have the guts for this job, so we ended up using a 22 mm socket and a ratchet wrench to turn the screw by hand.
This works well and, we think, is safer because it gives the operator a better “feel” for what’s happening as the bike is lifted and more warning if the bike isn’t balanced properly.
The Bike-Lift can be configured to lift different types of motorcycles by using one of four basic setup configurations:
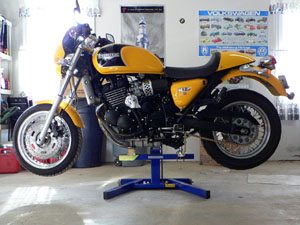
Photo 1: Bike-Lift with Beam Mounts attached to main rail. Photo 2: Single Wheel Mount on right side of Bike-Lift. Photo 4: Motorcycle on Bike-Lift using engine lifting saddle and Footpeg Mounts.Beam Mounts
The Beam Mounts are used for motorcycles with frame rails that run underneath the engine and where the frame rails are the lowest part underneath the bike (see photo 1).
The Beam Mounts slide over the main rail of the Bike-Lift. J-hooks are provided and are used to secure the frame of the motorcycle to prevent it from tipping.
Many cruisers can use this type of mount, and it’s probably the easiest way to pick up a motorcycle, as long as the bike has the two frame rails running underneath.
Wheel Mounts
The Wheel Mounts fit in to the ends of the main rail of the Bike-Lift (see photo 2). The Wheel Mounts slide under each wheel can be used to ” capture” the wheels of the motorcycle and are used in conjunction with a side stand capture device.
The side stand on the motorcycle is folded out as it would be if the bike were parked, and the device holds the end of the side stand in place.
This method does not seem to be recommended by the manufacturer, and as far as we can tell, the side stand capture device is not listed for sale on the U.S. website.
The manufacturer claims that the the Wheel Mounts have enough clearance to allow the wheels to be spun around by the operator.
The disadvantages of using the Wheel Mounts are that the wheels can’t be removed once the bike is lifted.
Also, the wheelbase on some motorcycles may be too long for the wheels to fit inside the Wheel Mounts, even when they are spread to their maximum length.
Also, the 110/90-19″ front tire on our new Triumph Tiger can barely fit inside a Wheel Mount because of its diameter, so we doubt any tire larger than 19″ will work with this method.
Foot Peg Mounts
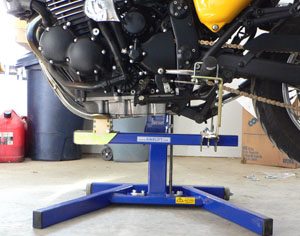
Photo 3 illustrates the Foot peg Mounts. According to the representative we talked to at the U.S. distributor, the Footpeg Mounts are the preferred method for lifting a motorcycle.
The Footpeg Mounts require the use of an engine lifting “saddle” (shown on right side of the main rail in Photo 3 and the bronze colored part under the engine in Photo 4) that fits over the main rail of the Bike-Lift and has three different height adjustments.
The saddle must be located underneath the engine and as close to the motorcycle’s balance point as possible.
The Footpeg Mounts are shown on the left side of the main rail in Photo 3. They attach to a horizontal spreader and they can be adjusted in and out for width.
Footpeg Mount risers allow adjustment up and down for height. The U-bolts (also visible on top of the Footpeg Mounts on the left side of Photo 3) are placed over the motorcycle’s foot pegs to prevent the bike from tipping when it is lifted.
The U-bolts shown in Photo 3 were not large enough to fit over the foot pegs of three different motorcycles in our garage. After several discussions with the distributor, it was determined that they had sent the wrong size U-bolts, and a larger set was dispatched.
Our advice is to make sure you get the largest size U-bolts with your Bike-Lift. The distributor mentioned that the Footpeg Mounts are being redesigned to make them easier to use and to make them easier to adapt to a wider variety of motorcycle types.
Our rough measurements indicate that the Foot peg Mounts will fit motorcycles where the distance between the same spot on the right and left footpegs is somewhere between 14-1/2″ to 21-1/4″.
The Foot peg Mount risers have a limited height adjustment, and their height must be coordinated with the engine lifting saddle, so that the saddle starts to lift the motorcycle just about the same time as the Foot peg Mounts contact the motorcycle’s footpegs.
The engine lifting saddle and the horizontal bar that serves as a base for the Foot peg Mounts can be located anywhere along the main rail of the Bike-Lift. This provides some adjustability for the distance between the balance point under the engine and the foot pegs.
However, the central box section arm of the lift that hangs out from the lift’s vertical pillar prevents the engine lifting saddle or the horizontal mounting bar from sliding past the middle.
Our measurements indicate that the engine lifting saddle and the Foot peg Mounts can be located at a distance ranging from 6-7/8″ to 22″ wide. This means that the distance from the balance point underneath the engine back to the foot pegs must be within this range for the Bike-Lift to work.
If this all sounds confusing, it’s because it is.
Although the information on the manufacturer’s website makes it look easy, it took two of us several hours to figure it all out and to get all of these parts adjusted correctly, not counting the time spent assembling the lift and the couple of days waiting for the correct U-bolts to arrive.
Our suggestion to the manufacturer is to develop a better description of the product, how it can be used and clear instructions on how to mount and adjust all of the various adapters for the different configurations.
After we got everything adjusted correctly, we were able to successfully lift the motorcycle. Once the correct setup is determined for any single motorcycle, it takes much less time to get everything mounted and adjusted the next time the lift is put into service.
However, if different setups are required to lift other types of motorcycles, it may take some extra time to get everything set up correctly.
There are two other mounting configurations that are also available.
Adapters to fit up underneath the exhaust headers can be purchased. When used in conjunction with the engine lift saddle, a motorcycle can be lifted and the wheels are free to be removed.
This method is apparently used in professional repair shops, but takes longer to set up and requires specific adapters for various exhaust configurations.
There are also special mounts for the BMW R-series, Ducati, Buell and other motorcycle brands. To make things even more confusing, it’s possible to use variations of the different adapters.
For example, it’s possible to use the engine lifting saddle and a single Wheel Mount to lift some motorcycles. This adaptability allows the Bike-Lift to work with many different motorcycle engine/frame configurations, but can make the ordering process confusing for the prospective owner.
Lifting the Motorcycle
After we finally set up the Foot peg Mounts and got them correctly adjusted, we were ready to lift the motorcycle.
Remember that the motorcycle is still being held upright at this point by the Bike-Grab, a front wheel stand or a rear swingarm stand.
The Bike-Lift has two rubber wheels, and it can be easily moved by grasping the upright vertical column and tilting the unit back.
Once the Bike-Lift is located under the motorcycle and the engine lifting saddle and the Foot peg Mounts are adjusted correctly and all of the nuts and bolts are tightened, the bike is ready to lift.
We use our ratchet wrench and 22 mm socket to lift the motorcycles.
It’s scary at first to see the foot pegs fold up as the bike is lifted, but if everything is lined up correctly and if the Foot peg Mounts and the engine lifting saddle both contact their respective sections of the motorcycle at nearly the same time, the bike should be balanced and the lift should work.
The Bike-Lift is designed to lift most motorcycles so that the axles can be brought to waist height. This helps make wheel removal less strenuous and it also helps prevent operator back strain.
The manufacturer (Quasar Industries, UK) claims that the Bike-Lift is the “world’s safest bike lift”, having “rock solid stability”.
Although the motorcycles that we have lifted seem relatively stable, they don’t seem as stable as the motorcycles shown on the lift in the videos on the manufacturer’s website.
We can easily get the Bike-Lift to rock back and forth if we push back and forth on the motorcycle without using much force.
We’ve been careful and have taken reasonable precautions and we haven’t had any incidents where the bike felt like it was tipping over.
But we do advise caution. We wouldn’t recommend any heavy lifting or torque wrench work with the motorcycle on the Bike-Lift, contrary to the manufacturer’s claims.
Conclusion
The Bike-Lift is an interesting alternative to a motorcycle table lift. It can theoretically be configured to lift and hold any type of motorcycle.
It allows the operator to get much closer to the work than is the case with a table lift, because there is no table surface in the way.
When properly configured, it allows both wheels to be removed simultaneously if required. It can also be stored in a much smaller area than a full table lift, so it is more suitable for the average garage owner.
The adaptability of the Bike-Lift has a downside, because it may take some time to understand how to optimize the configuration for lifting certain types of motorcycles.
We’re not sure we’re ready to accept the manufacturer’s claims that the product will work with every motorcycle type, but if it does, it’s a valid alternative to other methods of lifting a bike for maintenance or repair.
More webBikeWorld:
Owner Comments and Feedback
See details on submitting comments.