
The AdMore Amber LED Array kit consists of a pair of 115 mm long by 9.5 mm wide stick-on LED light strips.
They were originally designed to fit in the matching groove on the front of the Barkbusters Storm hand guards (review).
The AdMore LEDs can be used as always-on conspicuity lights, as turn signals or both, like the Skene Photon Blasters we reviewed not long ago.
But the AdMore LED arrays can also mount wherever there is room on the motorcycle, not just on the hand guards. They’re backed with 3M double-sided tape, which sticks pretty nicely to just about anything.
Although I bought the LEDs some time ago, I hadn’t tried them until recently, when I touched their power and ground leads to a spare 12 Volt battery to see what happened. Yeeow! They’re bright!
I was surprised at how bright they are and it got me thinking about where I could use them.
The could probably fit on the OEM guards on the Versys, but I had a different idea and I ended up sticking them to the front of the windshield instead.
As it turns out, this is an excellent location for added visibility and the lights are very easy to connect with a ground wire and a Posi-Tap into a powered (switched by ignition) wire.
Background
I bought this set of AdMore LED strips when I purchased the Barkbusters hand guards for the2014 Suzuki V-Strom 1000 ABS (Blog), our previous Project Bike.
They’re probably three times as expensive as they should be, at $79.00 for the pair and $14.00 for shipping in the U.S.A.
And the quality is, well, not really up to modern standards in my opinion. The very light gauge wires (20 or 22 gauge?) are stuffed in a rubbery sheath, but the connection at the circuit board is fairly awful.
To be fair, the Amber LED Arrays were AdMore’s first front-facing light product apparently and the newer AdMore LED light strips appear to be much higher quality, although I’ve only seen photos of them.
Anyway, for one reason and another, I never did get around to installing the AdMore lights on the V-Strom hand guards.
That’s because I couldn’t quite figure out a method for securing the wiring behind the hand guards that would satisfy me; I didn’t want to run the very thin wires along the handlebar and I wasn’t too keen on drilling holes in the hand guards for zip ties.
I also experimented with a few different types of glue and silicone sealers that might hold the wiring inside the hand guards but I couldn’t find any that can stick permanently to ABS plastic.
Then I remembered the AdMore Amber LED Arrays that were collecting dust in the spare parts box on a shelf in the garage. I knew that some day I’d find a use for them, and that day arrived with the newest webBikeWorld Project Bike, the 2015 Kawasaki Versys 650 LT (Blog).
I had considered buying another set of the Skene Photon Blasters (review) for the Versys, but I didn’t want to mount them down on the forks again like I did on the BMW F800S (Blog) and alternate mounting locations on the Versys didn’t satisfy me.
I’ve been pimping the Versys with a variety of conspicuity trinkets in the front and rear.
First up was the cheap OZ LED Mini Trail Lights (review), then the Denali Soundbomb Split Horn (review), which fits very nicely in the Versys, tucked behind the fairing nose.
So far, I have also installed a pair of the BikeVis Bullets V2 (review) with the “twinkler”. I drilled holes underneath the lip of the fairing on the Versys to mount the Bullets as an experiment and it worked out very nicely.
I have also acquired another pair of white and a pair of the new amber-colored Bullets and I plan on mounting those also (more = better!) and will report on that soon.
In In the meantime, back to those AdMore Amber LED Arrays…
The AdMore Amber LED Array
The AdMore Amber LED Array strip lights are sold as an accessory for the Barkbusters “Storm” hand guards (review).
There’s a groove molded into the Barkbusters hand guards to accept the LED strips, which attach using the 3M double-sided tape that has been applied to the rear of each light strip.
Each LED light strip or light bar has 30 LEDs. They do have a very bright orangey amber glow, so they’re highly visible.
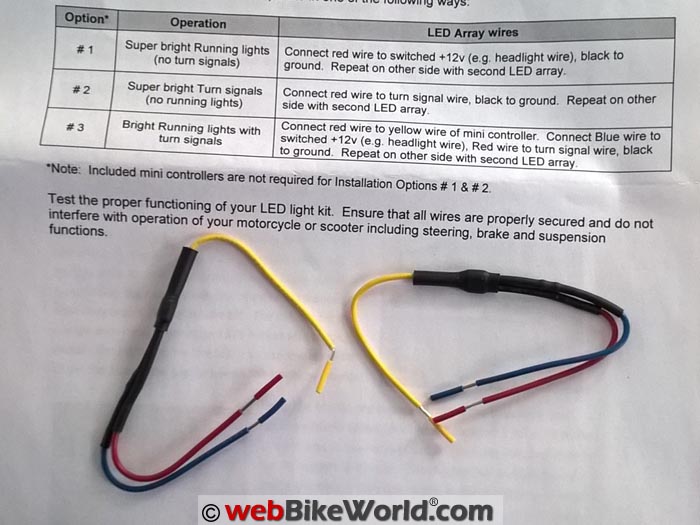
The lights can be used for always-on visibility or as turn signals only or both. The kit comes with two “mini controller” wiring harnesses that can be spliced into the system if you plan on using the LEDs as turn signals.
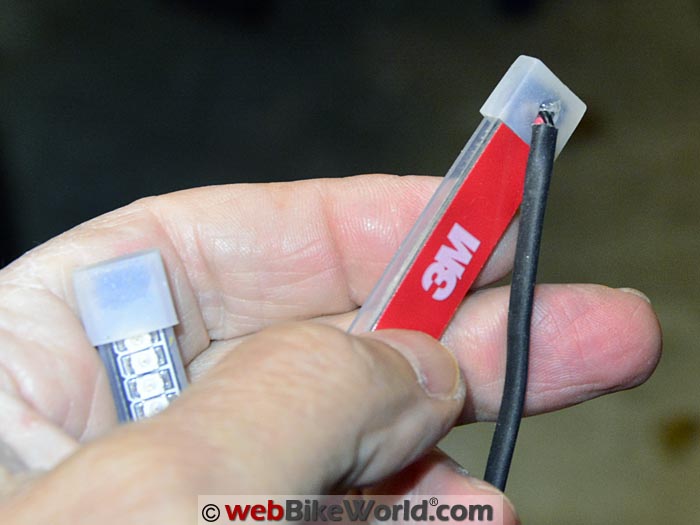
The light arrays consist of two LED light strips and each LED array or strip is inserted into a transparent plastic cover, with end caps to keep out the moisture. They’re claimed to be “fully weatherproof”.
They’re designed to be flexible to a certain extent, to mold to the curves on the hand guards. AdMore also makes some non-flexible LED lights that we have not tried.
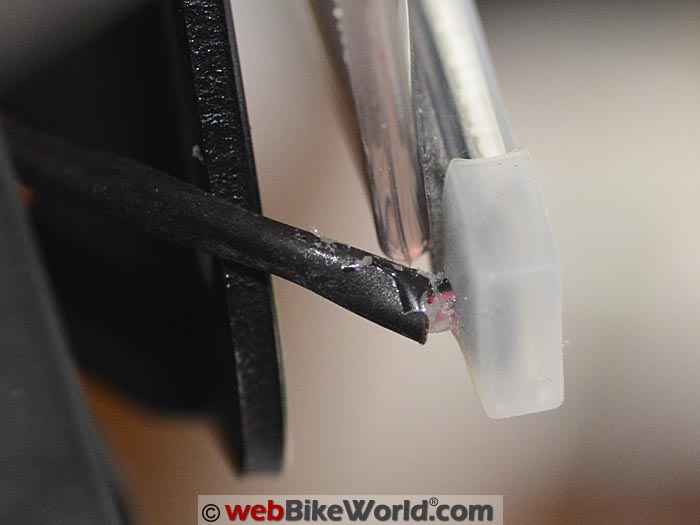
The weak point is where the wires enter the LED array housing. Close-up of the entry point. It looks like they added some silicone sealer for water resistance, let’s hope it works.Problems?
The only issue with the LED arrays is the way the wires connect in the rear of each.
That’s a common problem with miniaturized lights and electronics today, because the devices are so small that the wiring is so thin that the connection between the wires and the circuit board becomes a critical point of failure.
I noticed this also recently on an LCD thermometer I bought for the Versys; the wire for the remote sensor is so small and thin that it quickly broke at the circuit board juncture.
The interface issue is the problem of connecting “normal” sized wires and switches necessary for the reality of the human interface and ruggedness to the ultra-mini electronics of today. Junior engineers — here’s your career path: become an electronics interface specialist!
There’s not much an owner can do about the wiring harness to LED interface on the AdMore light strips.
Just be sure to handle the light strips carefully and try to avoid pulling on the wires and avoid any sharp curves or turns as you locate and connect the wires on the bike.
As you can see from the photos above, the point where the wires enter the LED array appears weak and it also looks like moisture could enter.
Connecting the Wires
I wasn’t interested in using the LED arrays as turn signals; I just wanted the “always on” function for more visibility to oncoming traffic. In that case, all that needs to be done is to connect red (power) to a switched power source and black to ground.
This could be done by connecting both red wires and both black wires together using a Posi-Twist (review) and then leading a third wire out of the Posi-Twist and then to a Posi-Tap (review), which is then used to tap into a switched power and ground lead.
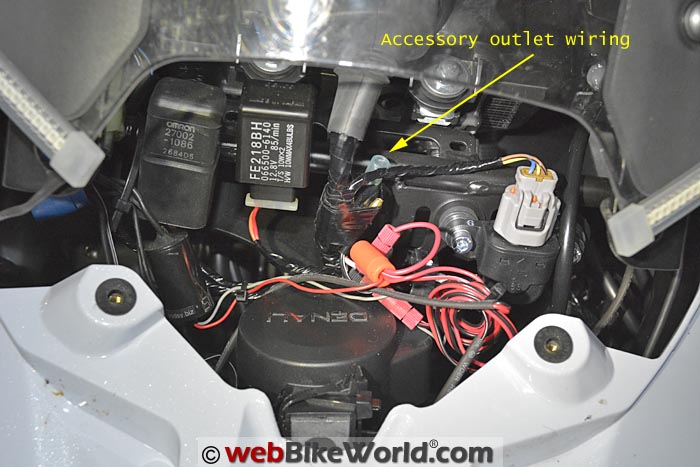
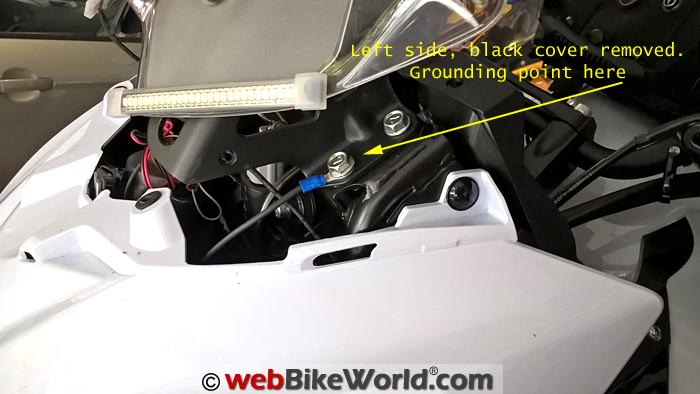
The 2015 Versys 650 has a built-in power and ground lead right underneath the easy-to-remove black plastic section on the fairing, under the windshield and the leads are taped together, they’re designed to connect to the optional accessory outlet that can be mounted on the dash.
Here are a couple of photos above; note also the good grounding point under the bolt holding the windshield brace.
By the way, the Versys 650 also has another ready-to-go and taped connection down on the left-hand side in the fairing. It’s for the optional LED light bar sold by Kawasaki for this bike as an accessory.
They make it pretty easy for you, one of the nice things I’ve noticed about the bike. The wiring is all nicely protected and aligned and zip-tied also, apparently a characteristic of Kawasaki design and manufacturing that is a definite step above my experience with Suzuki.
AdMore LED mini-controller can be connected to make the LEDs function as turn signals.LED Turn Signal Mini-Controller
The photo above shows the pair of “mini controllers” that come with the AdMore kit. These can be used to convert the LED arrays for use as turn signals or as running lights (for conspicuity) plus turn signals.

We have always promoted the philosophy of “one light, one function” here at webBikeWorld, which we believe helps to avoid confusion about what message a light is giving to others in traffic.
For example, a brake light that doubles as a running light is not a good idea, because it’s more noticeable when a light goes from off to fully on (brake light) than from on to on just a bit brighter.
If you want to go all out, you could install a second set of AdMore LED arrays on the hand guards or elsewhere, configured as turn signals only.
If the arrays were placed on the hand guards and turned on and off with the turn signals, that could be a powerful increase in visibility when the turn signals were engaged.
There have been some studies that have postulated that it is difficult for oncoming traffic to judge the size, speed and distance of an oncoming motorcycle due to its narrow width.
So if you’re looking for a “wider is better” solution, installing the AdMore LED arrays out at the widest part of the motorcycle — on the hand guards — has the potential of increasing visibility or depth perception of the bike to oncoming traffic.
Mounting the LED Arrays
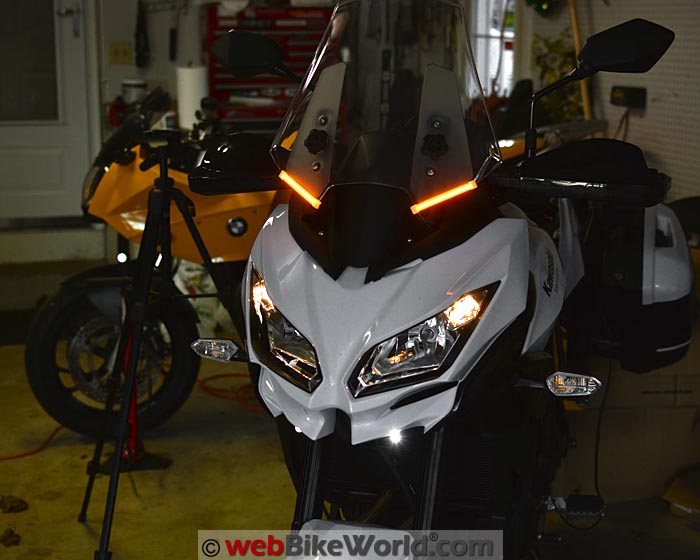
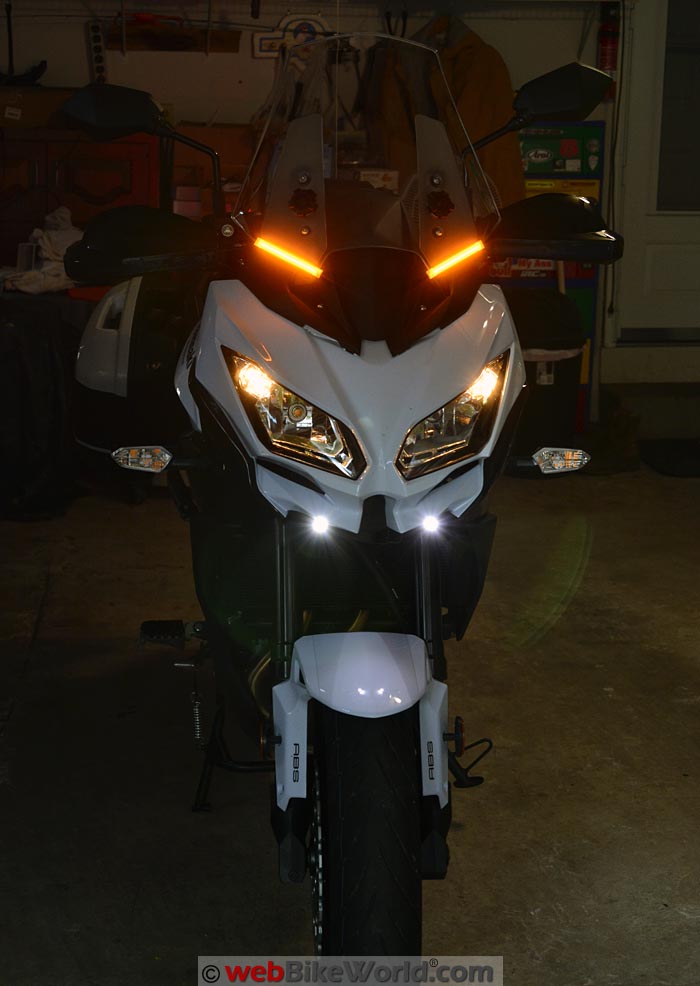
After playing around with different possible locations, I decided on the lower half of the windshield on the Versys.
This locates the LEDs nice and close to the switched power and ground and the slanted orientation sort of meshes with the angular looks of the new Versys.
Note that before I mounted the LEDs, I connected the wiring as noted above. I think that’s the way to go, otherwise if you attach the LED strips first and then try to make the connections, you’ll risk pulling the just-installed LED strip.
Also, on the Versys, it’s easy enough to remove the windshield, which then gives you full access to the rear of the instrument binnacle for connecting the wires. Once that job is complete, re-install the windshield and you’re ready to install the LED strips.
The AdMore LED strips attach to the hand guards, windshield or anywhere else with the heavy-duty 3M double-sided tape on the back side, with a peel-off protector.
I used some rubbing alcohol on a paper towel to thoroughly clean the bottom edge of the windshield, then I used the industrial-strength Steinel Heat Gun (review) on its low setting to warm the area where the LEDs were to be mounted. I have found that this really helps when using double-sided tape.
After the area was dry and warm, it’s a simple matter of peeling the 3M protective tape and pressing the array to the windshield. It’s best to try and get this right the first time; you don’t want to lift and stick again.
Doing so may decrease the ability of the double-sided tape to stick.
Then, simply press the LED strip in place and hold it for a few seconds, pressing gently along the length to make sure it sticks. After that, it’s best to let it sit overnight to ensure that the glue sets properly.
Conclusion
Although this particular AdMore Amber LED Array kit was designed for installation on the Barkbusters Storm hand guards, the LEDs can also be used as conspicuity lights or turn signals and can be mounted anywhere on the bike where you can find the space and have access to switched power and ground.
The LEDs are surprisingly bright and that, combined with the amber color, give the Versys a lot of “here I am” visibility.
They’re very easy to install and the only two issues are the flimsy connection where the wires enter the LED strips and the price, which really does seem about three times higher than it should be.
Note also that AdMore makes several other types of LED arrays, some with red and amber lights and some designed to be mounted in the rear as combination brake lights and/or turn signals or for top box or pannier mounting.
Owner Comments and Feedback
See details on submitting comments.