Not really, although their value on modern motorcycles cannot be understated.
And as such, being able to evaluate a variety is never a bad thing.
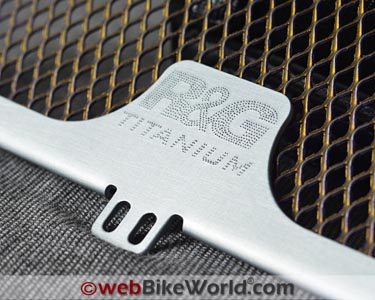
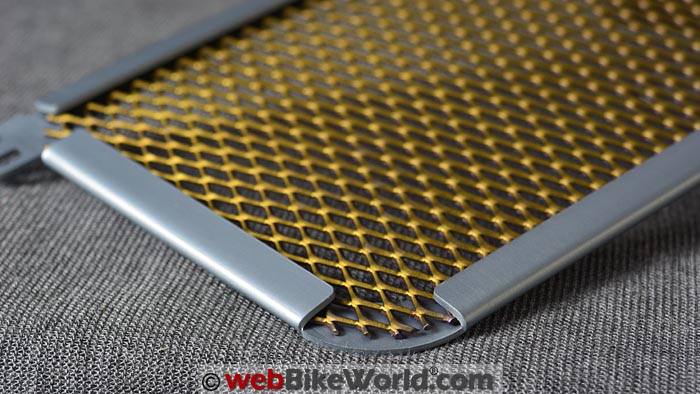
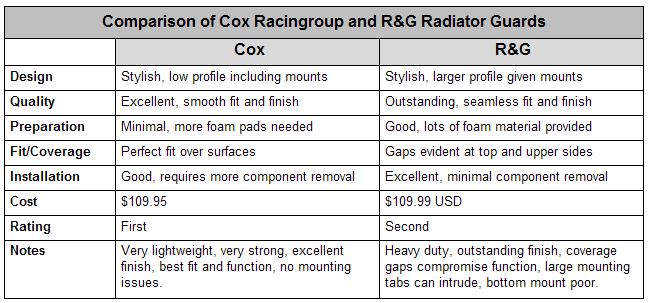
The R&G Racing radiator guard is another quality piece, made from pressed aluminum with finished edges and a hard finish.
This means that it should provide long-term durability, protection and looks.
Like other radiator guards, the R&G piece has a straightforward design that facilitates and simplifies installation on the BMW S1000XR (review) and other bikes, although the bottom fitment method could be improved.
Fitting the R&G radiator guard is really quite easy.
It needs only the absolute minimum of hardware and very few bodywork panels need to be loosened or removed.
This is unlike some of the other guards that do require the major body panels on the motorcycle to be completely removed.
And on another small design note, the fit of the R&G piece isn’t as good as the Cox Racingroup radiator guard (review).
The R&G guard leaves a narrow gap at the top; not that the guard is too small, but rather the large top mounts are a bit off, at least on the piece we installed.
But again, the fit is better than I’ve seen on some other brands of radiator and oil cooler guards.
Bottom line: the R&G radiator guard is a very valuable protective product at a reasonable price — a price far less than the cost of a replacing what is a very large, very expensive radiator.
NOTE: Since this review was published, it has come to our attention that installing an oil and/or radiator guard may void the BMW warranty if there are problems from engine overheating.
Editor’s Note
The matching R&G oil cooler guard for the BMW S1000XR has just been released.
I took a couple of quick photos (below) and we’ll post an update to this review once it has been installed.
The R&G aluminum radiator guard. The R&G titanium oil cooler guard.Introduction
We have several R&G (Racing Technique, Ltd.) products to be reviewed in the coming weeks.
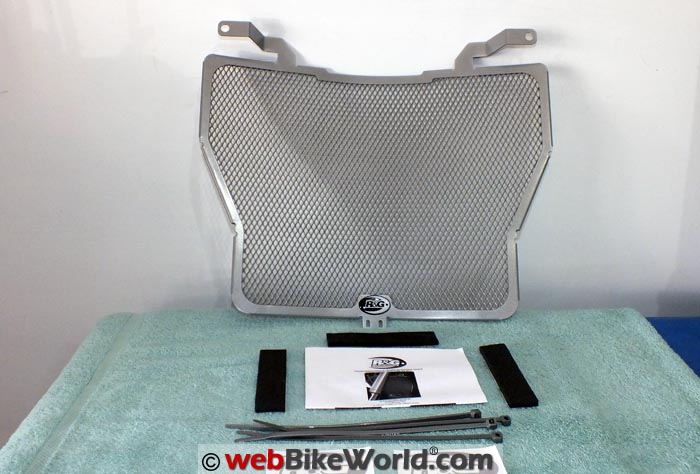
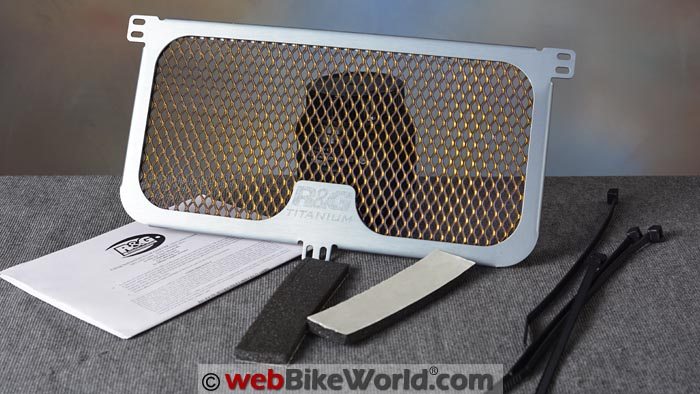
The R&G Radiator Guard Kit (PN RAD0195) is a shaped and stylized component that is available in several colours.
This particular radiator guard is made of pressed aluminum and has a titanium-coloured coating. The aluminum version is also available with a black or red finish and the guard is available in stainless steel.
The stainless steel versions of the radiator and oil cooler guards are “ruggedized”, with a thicker 1 mm thick slotted plate instead of mesh, which is more suitable for off-road use.
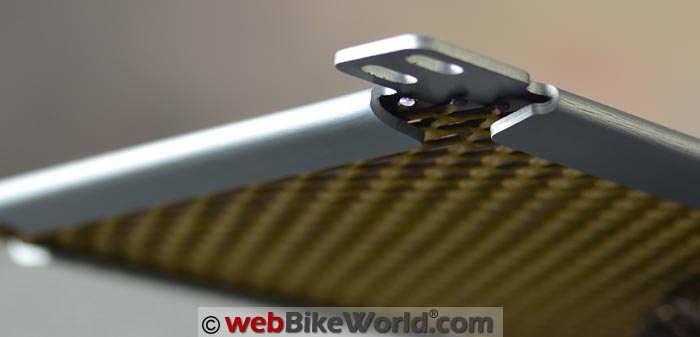
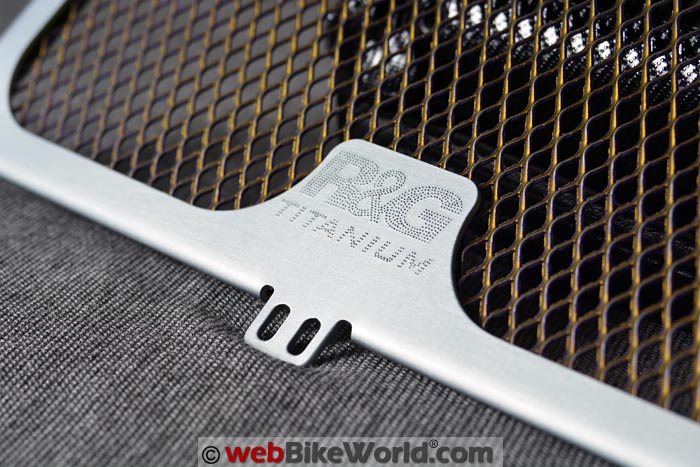
Large shaped mounting tabs at the left and right upper corners of the guard are the principle means of attachment.
On the BMW S1000XR, these tabs share the left and right upper front mounting points of the fairing side section panels, with the OE M5 x 20 mm (LC) hardware re-used.
(For a description of the standard modern BMW mounting hardware, see the BMW S1000XR Fairing and Panel Removal article).
The third mounting point is at the bottom centre of the radiator. It requires the use of one of the supplied zip ties, which is passed through two side-by-side slotted holes located on the bottom of the radiator guard.
This pressed aluminum version has a seamless frame that is slightly heavier than the Cox acingroup Radiator Guard reviewed in Part 1 of this series.
It’s rare when an owner will have more than one radiator guard to compare and I think the R&G version has what could be considered a more solid feel.
Cutting the foam pads in preparation for mounting the guard.Preparing for Installation
With just five simple bulleted lines of text for the basic instructions that come with the R&G guard, you might think that installation is simple.
For all intents and purposes it is…or could be, as we will see.
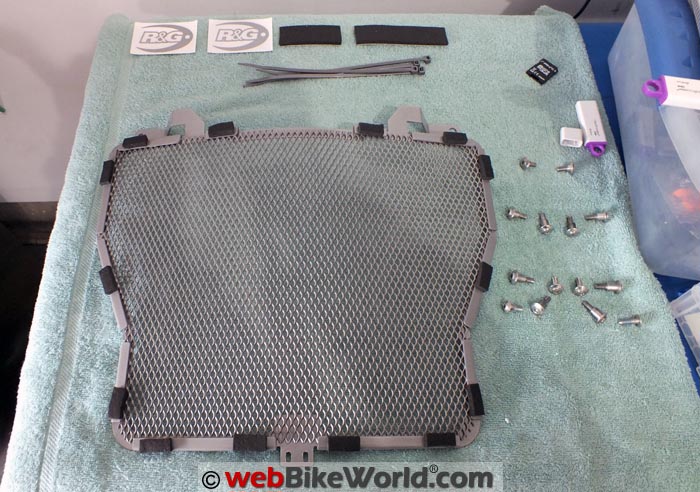
The kit contents include the guard, three 100 mm long adhesive foam strips, four 20 cm long dark silver zip ties and the double-sided instruction sheet in English and French.
Tools Required
For the BMW, you’ll need basically the same tools we listed in the Cox Racingroup review: a T25 Torx tool (either a T-handle, screwdriver, nut-driver or socket) and long needle-nosed pliers and side cutters to pull and cut the zip ties.
Fitment of the R&G radiator guard is, like most of the R&G pieces I have installed so far, a straightforward project and more time will be spent in preparing the bike than the actual mounting exercise.
Foam pads installed on the back of the radiator guard.Installation on the S1000XR
Given how the R&G radiator guard mounts — and even though the included instructions recommend removing the fairing side sections on the BMW — there is no real need to do so, at least not completely.
And for those readers who have reviewed the steps described in the BMW S1000XR Fairing and Panel removal posting, the essential preparatory work will be a piece of cake.
The only complication could be if other installed accessories need to be disconnected or removed first — something becoming a fact of life quickly on my S1000XR as other accessories are added.
A preparation summary for the S1000XR would be something like this:
Remove the engine spoiler and trim panels.
Loosen the front of the left and right fairing side section panels by removing the top and bottom front M5 x 20.5 mm (LC) screws.
With this work done, the fairing side section panels can be pushed out at the bottom and to a lesser degree at the top, creating access and work space for mounting the radiator guard.
If more access is desired the single upper front and two tank cover screws for the fairing side section panels can be removed and the front of the fairing sections pulled out of their push-pull mounts.
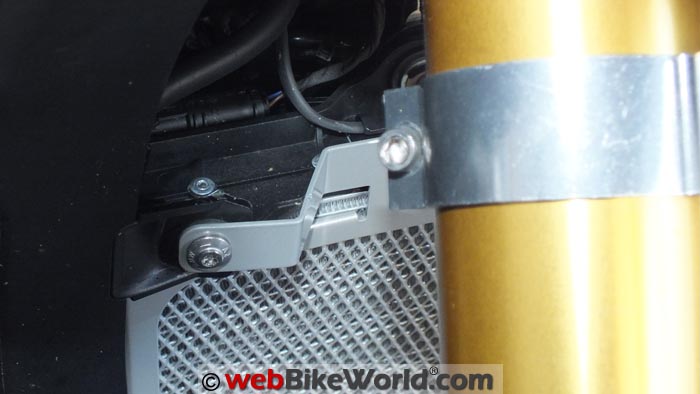
The mounting tab can interfere with fork-mounted accessories, such as lights.Installing the Radiator Guard
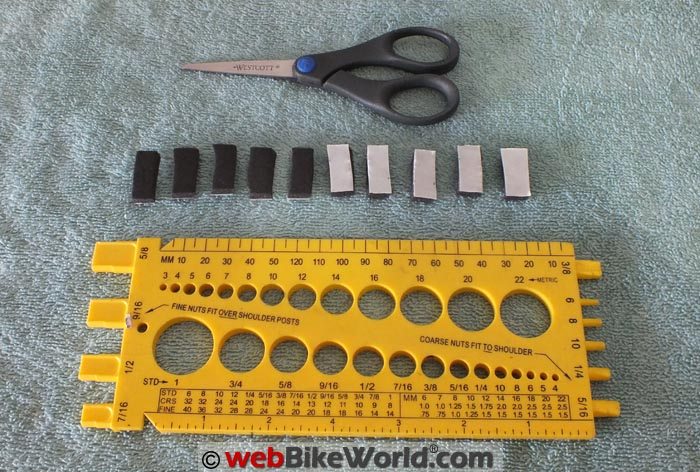
First up is the foam pad installation. After first placing the guard on the bike for a test visual to make sure everything would fit, I placed the guard face down on the workbench.
The 14 foam sections, each 10 mm wide, were cut from two of the supplied adhesive foam strips, then applied evenly onto the back frame of the radiator guard.
This provides clearance and cushioning between the guard and the easy-to-damage radiator surface and it provides some cushioning if a rock hits the guard.
Next, align the radiator guard in place over the radiator.
Then take one of the provided zip ties and thread it through one of the slotted holes in the bottom tab. This goes around the back of the OE radiator frame in a loop and out the other hole.
Then zip the ends together but do not tighten yet.
Note: this is far easier said than done, because it is a finger-twisting exercise, but it’s better done now rather than later.
Next, position the left and right mounting tabs over the front upper mounting points and start the OE M5 x 20.5 mm (LC) screws through the radiator guard tabs and the rubber grommets of the mount into the back flat insert nuts, but don’t tighten the screws yet.
With the top mount hardware screwed in but not tightened, next tighten up the bottom zip tie and cut off the excess.
Now tighten the top mounting screws to a torque value of 2 Nm (1.48 ft. lb.).
Re-install the body panels, check that all work is complete and you’re done.
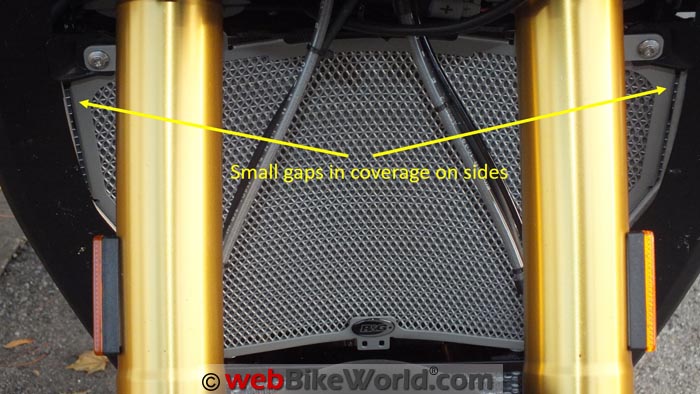
Small gap at the top of the radiator guard. Small gaps at the sides of the radiator guard.Observations
The R&G radiator guard is nicely shaped and it’s also very well made. It has what appears to be a durable finish that should provide long-term protection for the radiator.
The guard fits cleanly over the radiator but it doesn’t quite reach the edges (see observations below). It is cushioned by the numerous foam pieces that are easily replaced if necessary.
Fit and Alignment
The R&G guard doesn’t quite fit correctly on the BMW. It leaves a gap of about 5 mm from the top of the radiator, which exposes a small strip of the radiator itself.
Because the guard doesn’t quite align correctly at the top, it hangs down off the bottom of the radiator by the same amount.
This means that the foam strips along the inside bottom of the guard don’t contact the radiator completely, so they aren’t doing much in those sections.
If the top mounting tabs of the guard were narrower and cut lower and if the mounting holes were elongated vertically, the guard would have more adjustability and this could make for a better top-to-bottom vertical fitment.
And on the unit we fitted, small gaps in coverage are apparent towards the top on either side, possibly due to a minor shaping issue or somewhat misaligned mounting tabs.
Tips on Mounting
While the instructions state that the lower zip tie should be added after inserting the top mounting bolts, it’s actually easier to insert the zip tie first, before inserting the upper mounting bolts.
That’s because access to the bolts from the rear (between the headers and the radiator/oil cooler frames) is tight.
In considering alternatives, a potential solution might be to elongate the centre tab on the radiator guard and shape it so that the back edge would latch onto or over the frame piece at the rear, or something similar.
Even though the radiator guard is, for the most part, quite solid even without the lower zip tie attached, the point remains that the zip tie should be used for all the right reasons. But I suspect that more than a few owners will either omit it or look for a workaround of some sort.
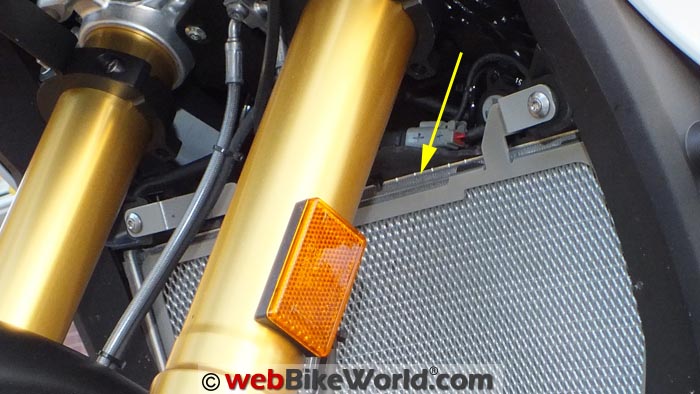
Upper Mounting Tabs
As identified in Observation 1 above, the upper mounting tabs are very functional but perhaps overly large. I confirmed this while trying to get the guard to coexist with a set of prototype Ohmics fork mounts that support an LED light bar.
The large radiator mounting tabs interfere with the edges of the fork clamps, which prevents full lock-to-lock movement. That’s not good and not an acceptable configuration.
Removing the very functional prototype fork clamp mounts and the light bar didn’t take long and doing so allowed the R&G radiator guard to be properly mounted with full unobstructed movement of the forks.
Of note, however, is that two other BMW S1000XR radiator guards I have use smaller top or bottom mounting tabs with simpler, lower profiles and neither interfere in any way with the prototype fork mounts or with another smaller set of fork clamps I have also tried.
But on the flip side, the R&G radiator guard is the easiest to install and remove.
R&G Oil Cooler Guard
The R&G oil cooler guard is also made from aluminum; this one has a titanium finish. The oil cooler guard took a bit longer to develop but it’s now available for sale. This one just arrived; here are some photos of the details.
Conclusion
Other than the rather clumsy solution for the bottom mount and the overly large upper mounting tabs, the R&G radiator guard is a very well made, nicely finished and a totally functional product.
R&G typically offers a variety of options regarding most popular accessories and the radiator guard is no exception.
The Black, Titanium or Red powder coated finishes, as well as the stainless steel variant make for a difficult choice.
And don’t forget the matching oil cooler guard (on its way and will be included as an update), also available in Black, Light Blue, Dark Blue, Titanium and Red finishes.
Part 1: Cox Racingroup Radiator and Oil Cooler Guards Review
Also: BMW S1000XR Blog
In This Series:
▪ R&G Racing Aero Frame Sliders Review
▪ R&G Racing Boot Guards Review
▪ R&G Racing Fork Sliders Review
▪ R&G Racing Swingarm Sliders Review
▪ R&G Racing Radiator Guard Review
Master Listing of All wBW Motorcycle Product Reviews
Owner Comments and Feedback
See details on submitting comments.
From “J.W.” (January 2016): “Based on your recent evaluation I decided to buy the R&G radiator guard. I decided on R&G because I wanted to look at the installation instructions before purchasing. Cox did not respond to my email and the R&G instructions were available online.
Bottom line, it doesn’t come close to fitting properly. The bike is a CBR 250R and the radiator frame is on the side of the radiator so the guard must be wide enough to sit on the frame.
The guard sits between the side frames and mounting it would necessitate having it rest directly on the radiator which I am reluctant to do. Just my 2 cents.”
UPDATE From “J.W.” (January 2016): “OK, I take back what I said about the R&G radiator guard. I ordered a Cox guard and they both fit equally well. I just didn’t realize they were supposed to rest on the core.
Bottom line is that the Cox attaches with 4 zip ties whereas the R&G bolts to the top mounting bracket and secures at the bottom with zip ties and for that reason I would have to judge the R&G a superior product for this bike.
I also wonder whether a product like this is so bike specific that you can’t generalize as a result of a comparison test.”
Editor’s Reply: It’s always good to have more information about a product, despite the fact that it may or may not fit on a specific bike. The information conveyed in the comparison reviews gives potential owners a range of issues to think about and consider, so the information provided in the reviews and owner feedback like yours is always extremely valuable.