When Rick first approached me about installing a headlight assembly on my 1999 BMW K1200LT I was a little bit hesitant.
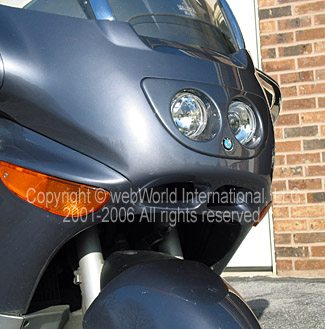
After all, the headlight assembly is a complete change from the BMW’s large single lens to what I thought was a foreign-looking device with two smaller lamps set into a surround and painted to match the bike’s color.
I liked how the stock lens continued the smooth lines around the nose of the big K12.
But, I thought “What the heck, this set up could always be an improvement over the stock light”. In my opinion, motorcycle lights should be like Las Vegas: big, bold, bright and plenty of ’em. Day or night, you can’t have too much light…
But — why would someone — indeed, why would a company named Ducati Designs — go through the trouble of designing and manufacturing a replacement headlamp assembly for BMW’s Flagship of the Fleet?
What’s wrong with the stock unit?
I’ll tell you what’s wrong: in my honest opinion, BMW’s stock low beam is a joke.
The design provides a weak low beam pattern that has an abrupt horizontal cut-off which fails to provide any illumination of the inside of a curve when cornering.
This is why threads about improving the LT’s original equipment lighting is a a common topic on the LT discussion groups.
It seems like the first thing an LT “newbie” questions is the inadequate headlamp illumination.
Everything from converting to HID (High Intensity Discharge) for either the low, high or both beams to adding lights on the front forks, under the “wings”, inside the front edges of the front fairing opening or wherever a spot can be found is up for discussion and has been tried by one owner or another.
And I am one of them, having spent lots of time and money on converting my LT’s lights.
Prior to installing the Ducati Designs headlight upgrade, I was running an HID on the low beam (which made a dramatic improvement).
I also installed a PIAA high beam bulb and als a pair of Motolights on the front forks.
This may explain why I was a little hesitant about trying yet another lighting system, and thinking that anything less than HID was a step backward, but you never know unless you try, right?
And one of the first questions I had was — what do Ducati guys know about BMW lights??
Installation
Ducati Designs, LLC is a small design consultation and manufacturing firm based out of Beaverton, Oregon that specializes in high-performance accessories and upgrades for Ducati motorcycles including replacement headlight assemblies.
It seems the company got started in 2001 and started delivering its first significant products in 2002.
The owner is a Ducati rider with a desire to improve the Italian marque’s original equipment headlights. For more information, see the webBikeWorld article documenting an installation of a new headlight on a Ducati ST2.
Ducati Designs apparently welcomes suggestions and criticisms to create more desirable products.
My guess is they heard complaints from the BMW K1200LT owners about the stock lighting problem and figured they could also work their magic on the Big K Guy.
Rick got the new lights to me just as I was in the middle of doing a major service to my bike, which worked out great since I already had most of the fairing pieces (or “Tupperware” as we like to call it) removed.
The only other piece that had to come off was the nose cone, which is no big deal once the two side panels are off. I’m not going to detail the procedures for removing the fairings, because that would cause this review to be way too long.
Upon removing the Ducati Designs unit from the box I was really impressed with the craftsmanship, quality and precision of construction.
The main mounting plate is zinc-plated steel, and stainless and aluminum fasteners are used throughout.
The surround, or nacelle, that blends the lights into the bike nose cone is fiberglass painted to match the bike’s color and it is a perfect color match for my bike, even though it has 116,000 miles and is now over 6 years old.
The supplied wiring harness consisted of high grade 10 gauge wires used at the battery connections merging into two pairs of 14 gauge wire, each pair running to a lamp module.
By using larger diameter wiring they are able to minimize any voltage drop across the length of the wire which would reduce the output of the lamps.
Compare that with the stock wiring, which uses a much smaller 18 gauge wire which can result in as much as a 25% reduction in lamp output because of a 1.5 volt drop at the bulb.
This condition is a common problem in the stock wiring on many bikes.
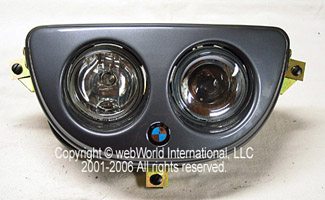
There are two 90mm (3 ½”) DOT approved Hella modules with magnesium free-form reflectors and housings, and the lenses are clear tempered glass.
The low beam is a projector type and the high beam is a free-form reflector, each with its own distinct pattern for its application. Each uses a simple H9 65 watt bulb for easy replacement.
There was even a small BMW roundel in the lower center of the surround that added a very nice touch.
A big plus for Ducati Design’s setup is the fact that each lamp can be replaced individually, along with the surround/nacelle, if damaged, whereas the expensive BMW unit has no replaceable components except for the bulbs.
Which brings me to the Ducati Designs warranty: “Ducati Designs headlight and wiring harness products are warranted to be free of defects in both materials and workmanship for as long as you, the original purchaser, own your bike.
The warranty applies to all components of your Ducati Designs product and includes the lighting units, lenses and seals, wiring harness and mounting hardware.
Ducati Designs, LLC will, at no cost to the original purchaser, repair or replace any components found to be defective…. Bulbs will be replaced at no charge if they fail in the first year of use.”
This sounds to me like a darn good deal. There are a few exceptions to the warranty, of course, but nothing unusual, just common sense stuff like if it’s damaged from you crashing the bike.
So let’s get into the conversion:
The stock BMW headlight’s up/down angle can be adjusted by the rider by rotating a knob on the right side of the dash area that’s attached to a cable that runs down to the headlight assembly.
This adjustment is for compensation of loads on the bike that can cause the front of the bike to point upwards resulting in the headlight being aimed too high.
This cable is not used with the Ducati Designs unit and is simply secured to the bike’s frame along the harness with tie straps, although I later found that I missed having this available, because sometimes it was necessary to make an adjustment on the fly.
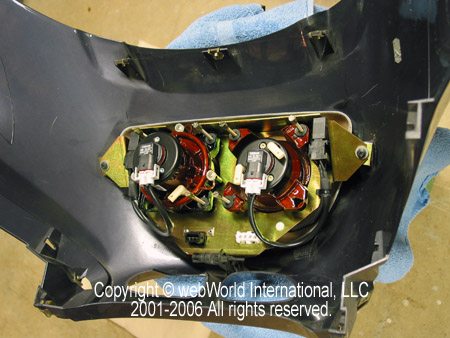
With the nose off, the stock headlight is held in place with only three screws from the back side.
The only prep work necessary prior to fitting the Ducati Design unit into the nose cone was to insure that there were no burrs or raised spots where the new unit would be mating against the panel.
The instructions show the use of a small electric grinder, but I found these burrs were easily removed with just a piece of light sand paper.
After ensuring a clean surface, it was only necessary to affix four foam pads to the backside of the nose cone where the Ducati Designs unit would be mating up before setting the light unit in place.
With the new unit held loosely in place by the same three screws (one which holds the mount for the ambient temperature sensor) that held the stock unit in, it only needed to be centered before tightening the screws progressively.
Next it was out to the bike to perform the necessary wiring. The only wiring needed was to run the supplied power and ground harness that would be carrying the current needed to power the lights.
The stock headlight power supply connector and wiring is used only to trip a pair of relays that handle the actual current to operate the lights.
And this female connector plugs right onto a matching male one located on the back of the new unit for a “plug and play” arrangement.
It was never necessary to cut, splice or tap into any wiring for this installation. Very nice!
The supplied wiring harness had its own four pin connector, was protected with a 20 amp weather-tight fuse holder and was hooked directly to the battery.
The instructions showed running the harness up the seat mount tube on the left side of the fuel tank and then along the top left side of the tank eventually ending up on the right side behind the nose.
I originally routed it that way, but then decided that route could cause some frustration when removing and reinstalling the fuel tank.
So I opted to re-route the harness along the tubing that passes down the left side of the bike and then right up to the back side of the headlamp area. This worked out well and didn’t require routing around the forks.

The new harness was held loosely in place with tie straps until the nose cone was back on and the necessary slack was provided to ensure things were tension free.
After that I ran a quick test to ensure everything worked properly before reassembling the bike.
Note: even though the power supply comes straight from the battery, the relays will cause the lights to turn off during the start sequence to reduce any unnecessary load.
Performance
With the bike back together it was just a matter of aiming the two lights. This was fairly simple, since all that was needed was to place the bike about 25 feet from a vertical surface.
I simply used the inside of my garage door. While keeping the bike level with my weight on the bike, I had my assistant (my wife) take the first measurement from the center of the low-beam lamp directly down to the ground.
She then measured from the center of the “hot-spot” of the light beam on the garage door to the floor.
This second measurement needs to be 1.5” to 2.5” less than the first. This is corrected by simply turning a screw on the back of the lamp assembly in or out as needed.
I set mine to the lower limit of 1.5” to provide the most illumination. If it’s too high, I’ll know because other drivers will be flashing their lights at me and then I can tweak it a bit more.
The high-beam is set the same way, only this one is set with only a 0.5″ to 1.0” difference. I used a towel over the low beam to more easily discern the high-beam light pattern.
Throughout the entire installation I found the instructions to be very easy to follow with excellent illustrations..
Another concern was how this changed beast would be received by others. What would be the response to this “two-eyed” conversion from other K1200LT owners? Everywhere I went, including an intentional trip to the dealer, it got nothing but approval.
Everyone thought it looked good and were amazed at the color match. The dealer even expressed an interest as an alternative replacement to the stock unit.
The purpose of this review was not to compare the arrangement by Ducati Designs to my HID unit, but to compare it with the stock BMW headlight. To compare it to the HID would not be comparing “apples to apples”.
But Ducati Designs reports that their arrangement provides 75-80% of the luminous intensity of HID. That’s pretty darn good for halogen lighting.
There is one important difference though: HID upgrades are illegal. As a result, most of the HID conversion suppliers are offshore.
Enforcement has been negligible so far and I haven’t heard of any bikers being pulled over because of their HID lights, but nevertheless, know that the HID conversion is illegal and the Ducati Designs headlight upgrade is perfectly legal.
So what’s it like out on the road in the dark? I found the Ducati Designs low-beam to be better than the stock low beam, but, like the stock lamp, was lacking some illumination to the sides.
This was easily corrected when I turned the Motolights back on, which is why I installed them years ago.
But let me say this about the Ducati Designs high-beam: WOW and I mean WOW!
When I turn that baby on, it lights up farther down the road than I thought was possible.
How that much light comes out of one 90mm (3.5″) lamp is beyond me, and it’s not just a pencil type beam either, it’s nice and wide and easily lights up 3 lanes on the slab.
Commuting during the winter months was a good way to test the lights and that high beam is outstanding!
Conclusion
If you need to replace the stock headlamp assembly or are looking for an improvement to the stock headlights on your K1200LT with out hanging on a bunch of extra lights and stay legal in the process, then the system by Ducati Designs just might “light up your world”.
Or maybe you’re just one of those that like to make your bike different from all the others.
Not only does it have a unique look, which sort of grows on you, it has it all over the stock headlamp assembly in illumination and the ability to replace individual parts should they fail or break or having to replace the entire unit for something as simple as a cracked lens.
Plus, the installation is not difficult once the “Tupperware” is removed! And that high beam’s out of sight!
| wBW Review: Ducati Designs BMW Headlight Upgrade | |
|---|---|
| Manufacturer: Ducati Designs (defunct) | List Price (2006): $575.00 |
| Colors: N/A | Made In: U.S.A. |
| Review Date: February 2006 | |
Owner Comments and Feedback
See details on submitting comments.