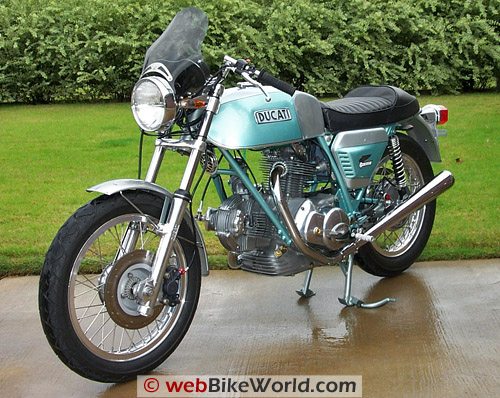
Not too long ago I completed a custovation* of my bevelhead 1974 Ducati 750GT. In every way, this is a marvelous example of early Italian sport bike engineering — except for the battery charging system.
It’s weak and does a poor job of charging the battery. The main fault is the weak alternator. The rotor has weak magnets that can’t produce enough energy at street speeds and with high loads, like a headlight.
A number of people have worked on the problem over the years. Around 2002 Willy Gonnason went to great length to record his work along with others experiments and findings in a comprehensive web site (see below).
Some tried rewiring the stator, someone tried to re-magnetize the feeble magnets, but in the end replacing the rotor paid the biggest dividends.
A rotor from a 1998 Ducati ST-2 offered the best performance improvement, but the bad news is that the rotor is scarce and when found they are very expensive.
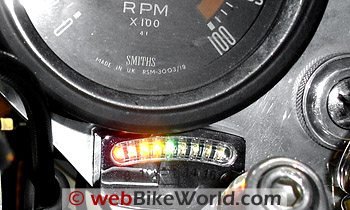
Fast forward to today. The Texas Duke still had low charging issues. I measured the charging profile and memorized the RPMs so when riding I could try and keep the battery charged. I even installed an LED voltmeter to try and build riding confidence. But in the end there just isn’t enough power.
The Fix
Earlier this year Road and Race (see below), specialists in classic Ducatis, came up with the next best thing to the ST-2 conversion.
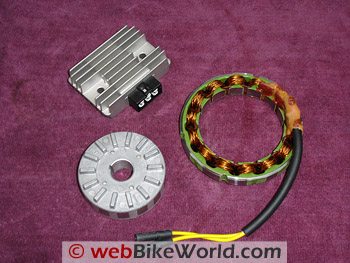
They developed a complete kit including a new rotor made with rare-earth magnets (most magnetism per unit) a low resistance stator and an integrated rectifier / regulator, and it bolts on.
The results were very good as shown in the graphs below. The voltmeter shows decent charging at low speeds and has enough oomph to run a halogen headlight.
The setup costs about $725 US including shipping from the Land Down Under.
If you have a good running bevelhead twin and maintaining battery charge limits your riding, then look into the alternator conversion kit.
It worked for me and the results are shown below. What follows is a straight forward how-to for the conversion.
Conversion How-To
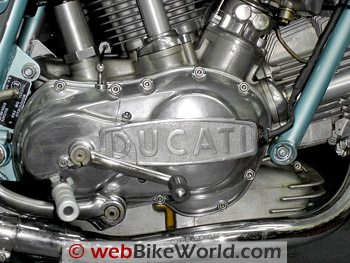
It starts and ends on the right side of the engine.
The Road and Race replacement charging system for the Ducati round case 750GT significantly improves low RPM charging capability so safe leisurely rides can be taken in confidence with the headlight on.
The conversion to the new system is easy and takes less than 3 hours.
The kit consists of a powerful rotor made with rare earth magnets. The relative magnetic strength of the new rotor is about 1.5 times greater than the stock rotor. The stator is a two-wire design that has about half the internal resistance of the stock stator. These two charge system elements are responsible for the higher power output as established by Michael Farady over 200 years ago.
In addition, the rectifier / regulator circuit is an efficient design and connects directly to the bikes existing electrical
system.
Step 1
-
Remove the seat. Disconnect the battery and remove any cable ties to free the existing alternator power cable.
-
For convenience remove the clutch actuator cover.
-
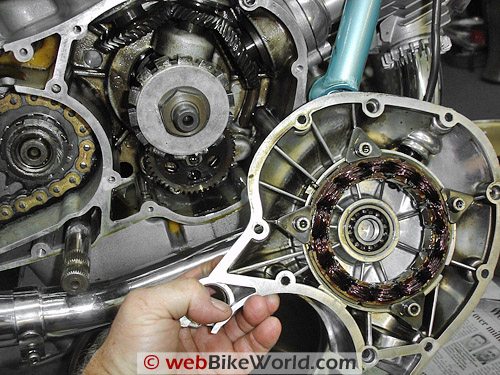
Remove the stator case cover from the bike by removing the hex head screws. The cover has a bearing that holds the end of the rotor shaft so removal is helped by tapping around the cover with a soft mallet while pulling on the cover. Set it aside for stator installation. Be careful not to damage the thin case gasket so it can be reused.
Step 2
-
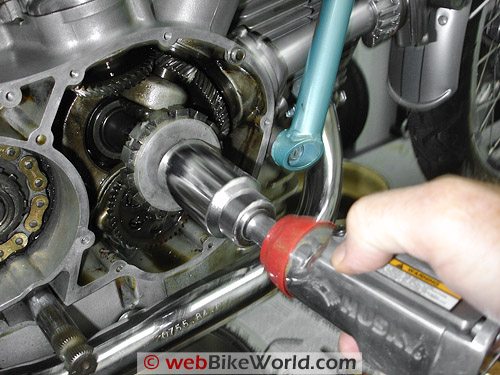
Remove the holding nut from the rotor shaft (standard right hand thread). First bend the thin anti-spin washer and tap it flat. With a 30 mm socket and butterfly impact wrench remove the nut. If you don’t have a butterfly impact wrench, shift the bike into top gear and lock the rear brake.
-
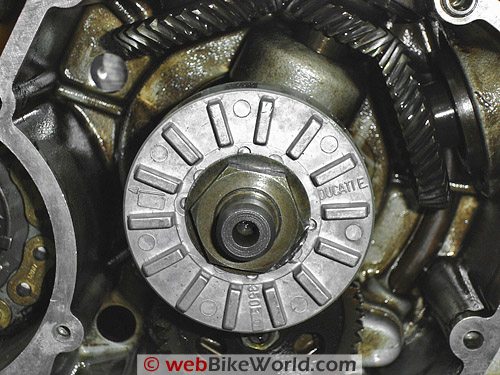
Remove the old rotor. The spacer washer that fits behind is not needed with the new rotor, so do not install the spacer.
Step 3
- Install the new rotor. Start the 30 mm nut by hand and tighten up carefully with the butterfly. If a wrench is used, tighten the nut and tap the wrench with a small hammer to chinch the nut. Bend back the anti-spin washer.
Step 4
-
Remove the stock stator from the cover and install the new stator.
-
Align the wires so they exit the grommet hole without strain.
-
Connect the new power cable this time. Skin back the outer insulation enough to allow enough wire to make a ground connection. Connect the ground wire under one the near stator mounting screws with a ring lug supplied with the kit.
-
Connect the other two wires in the power cable to the stator wires.
-
Cover the junction of the stator wires and power cable with heat-shrink tubing to keep water out of the connection.
-
Install the cover on the bike, gasket first. Ease it into position ensuring the gasket is also in position. Tap home with the mallet, install the screws.
-
Install the clutch cover if removed.
Step 5
-
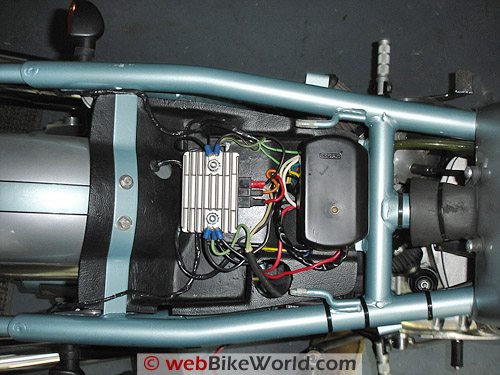
Route the power cable up the right front frame tube, under the tank and into the regulator compartment.
-
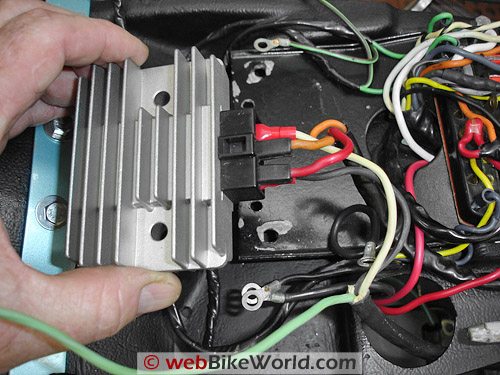
Remove the regulator and follow the R & R connections instruction.
-
Connect the opposite end of the stator ground wire to a convenient location on the regulator mount.
-
Be sure to connect a ground wire from pin #3 of the new regulator to frame ground otherwise it won’t work…guess how I know!
Step 6
-
Secure the regulator the bike
-
Secure the power cable to the frame with tie-wraps.
-
Reconnect the battery and install the seat.
Charging System Performance
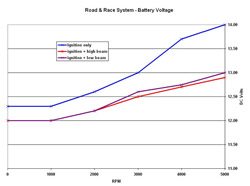
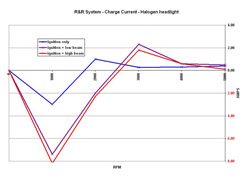
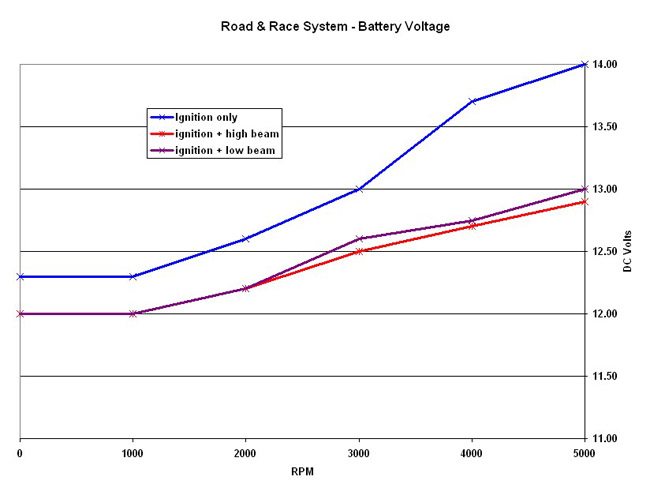
The graphs show performance of the R &R charging system installed on a 1974 round case 750GT with Dyna ignition system and coils. The headlight is halogen.
| Ducati 750GT Alternator Charging Graphs – wBW Lightbox – Click photo to view. | |
|
|
|
| Battery Voltage | Current Charge |
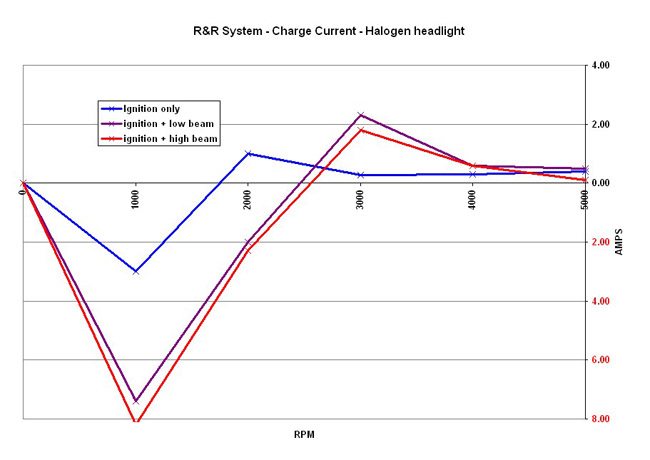
Ignition Only
At idle, about 1000 RPM, the system is not charging the battery. This is not a problem since a good battery has plenty of energy capacity to power the bike and lights during idle.
At 2000 RPM the battery is being charged. At 3000 RPM charge current is reduced and remains relatively flat out to 5000 RPM. This indicates the regulator proper operation when compared to the battery charge voltage.
The regulator is providing enough charge current but not an excess that could otherwise damage the battery. Battery voltage increases with RPM up to about 14 volts DC at 5000 RPM.
Ignition and Low Beam
Current demand is significantly higher than ignition only. At idle, about 1000 RPM, the system is not charging the battery.
At about 2300 RPM battery and charging system current are in balance. Charging increases to 3000 RPM then the regulator takes over limiting the charge current. Battery voltage increases with RPM up to about 13 volts DC at 5000 RPM.
Ignition and High Beam
Current demand is significantly higher than ignition only. At idle, about 1000 RPM, the system is not charging the battery.
At about 2500 RPM battery and charging system current is in balance. Charging increases to 3000 RPM then the regulator takes over limiting the charge current. Battery voltage increases with RPM up to about 13 volts DC at 5000 RPM.
References
-
Michael Faraday established the magnetic field concept in physics.
-
Ducati Round Case Alternator Conversion – Willy Gonnason
-
Kuryakyn LED Battery Gauge – Custom Dynamics
-
Bevelhead Alternator Conversion Kit – Road and Race
*Custovation is a combination of customizing, and renovation. Not a restoration, which means to bring back to an original condition. Custovation has a more specific meaning: CUSTOMIZE – to make or alter to individual or personal specifications combined with RENOVATION which is to restore to an earlier condition, by repairing or remodeling.
Owner Comments and Feedback
Not all comments will be published (details). Comments may be edited for clarity prior to publication.
From “J.H.” (5/09): “I enjoyed this article and it’s proved very useful as I’m having trouble with my 750ss Replica. Joe’s instructions are incomplete and miss out the fact that you have to remove the kick start lever before you can remove the alternator cover.
A simple task you might think, but if you thought the alternator was the weak point on a 750 bevel then think again, the kick start bolt is probably the worse design on the whole bike bar none, I could take the engine out of the frame quicker than refit the bolt by myself.
I recommend two people one to hold the sprung loaded kick start in position while the other person pushes down and turns the bolt. The threads on the bolt are a horrible coarse thread that for me seems to destroy itself every time I try and fit it. Maybe I’m just unlucky but I’m reasonably experienced with the spanners and this job is a nightmare.
Also, Electrex in UK offer a replacement Rotor for the GT and Sport, I bought one but am returning it as it just doesn’t fit onto the crank end. Why not? Because it doesn’t have the keyway slot cut into it to stop it revolving on the shaft, therefore it won’t slide on. I hate companies that offer replacement parts that just don’t work, there are loads of Ducati bevel suppliers out there like this so buyer beware.”