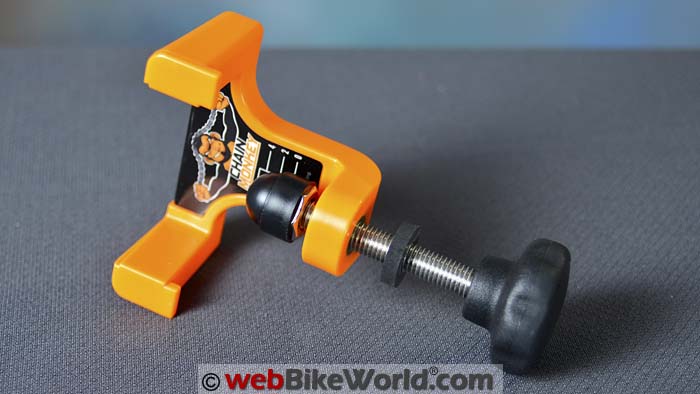
The Chain Monkey is a tool to help set the correct motorcycle chain slack during a chain adjustment.
It’s made from plastic with an adjustable metal screw.
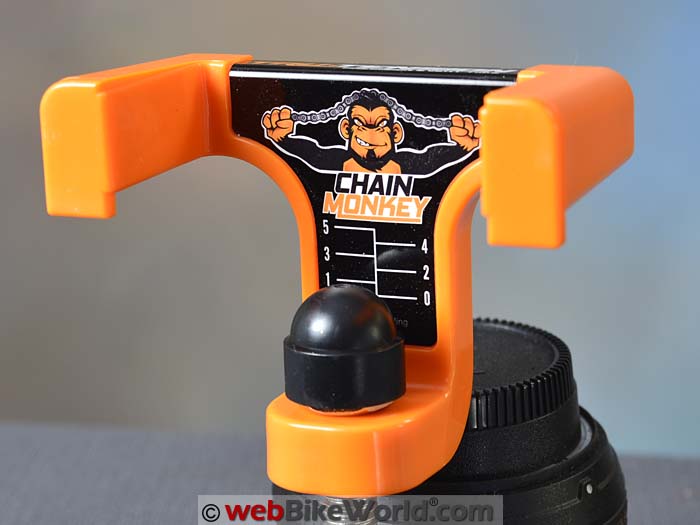
Follow the instructions in the kit and set the bottom of the nut to your correct optimal chain slack number.
Then tighten the rubber stopper on the bottom.
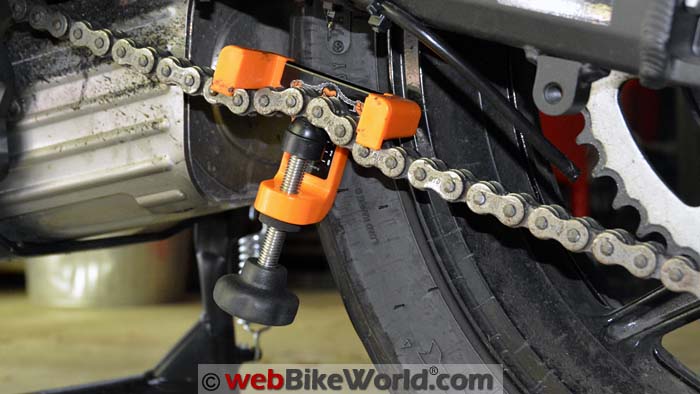
Unscrew the threaded rod, place the Chain Monkey over your chain and tighten until the rubber stopper meets the plastic.
This puts a kink in the chain.
Then adjust the chain by using the nuts on the swingarm. Adjust until the chain is very tight, then tighten the swingarm nut(s).
Remove the Chain Monkey and the chain should be within spec.
Problems?
There are a couple of degrees of freedom here: how closely the Chain Monkey is set; whether or not the rubber stopper has moved and how tight to make the chain using the motorcycle’s adjustment screws.
But, with some practice, it’s not too difficult to get it right the first time.
Also, the black plastic tip that pushes on the chain wears very quickly. I noticed this right away even after the first use.
So while the Chain Monkey isn’t a perfect solution, it does have a few advantages. The alternative is using the Ol’ Standby method described below: use a millimeter rule to measure slack, then adjust, then check.
So the Chain Monkey can theoretically eliminate one step in the process.
Worth it? Probably so, especially if you do a lot of chain adjusting.
Here’s a Quick Look in photos:
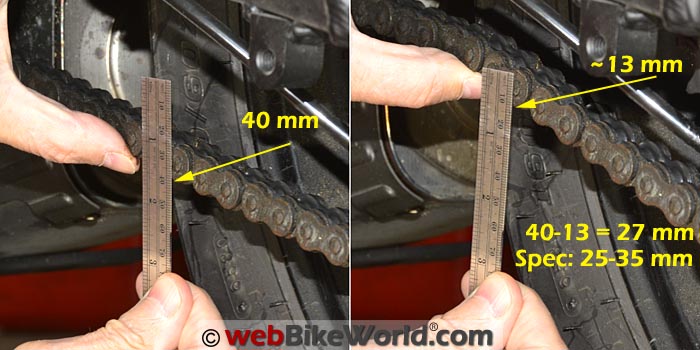
The Chain Monkey is made from solid plastic with hollow plastic arms. Measuring chain slack the traditional way, with a millimeter rule. Hold the rule steady by resting the hand against a tire or other item. Line up a major index on the bottom of a chain plate (photo left); in this case, the 40 mm mark. Pull up on the chain with the other hand while keeping the rule steady (photo right). Read the number (13 mm here) and subtract from the first to get the amount of chain slack. Follow instructions in owner’s manual; most bikes should be on the side stand, not center stand.Measuring Chain Slack the Old Fashioned Way
“Old Fashioned” means using a rule to measure chain slack, as in the photo above.
“Burn” and I covered this in great detail in the article “How to Adjust a Motorcycle Chain“, so be sure to reference that and please feel free to add any tips that you might have.
Note that it’s important to follow the instructions in the motorcycle owner’s manual for positioning the bike and for the correct amount of slack.
Most motorcycle manufacturers recommend placing the bike on its side stand (also, most motorcycles don’t come with a center stand).
Usually, it’s recommended to measure at the tightest part of the chain, which means you have to rotate the wheel around and measure several times to find the tight spot.
Since I’m a lazy son-of-a-gun, I never do this. They give you enough variance anyway in the amount of slack, so you should be fine by hitting it somewhere in the middle of the range.
A common chain slack measurement is 25-35 mm, for example.
In the old school method, you hold a millimeter rule and place one of the easy to remember (and easy to subtract from) index points at the bottom (or top or center) of the slack chain.
Pull up on the chain while holding the rule steady and read the difference. Subtract from your first reading and you have a rough idea of the chain slack.
In the photo above, the rule was held so the arbitrary 40 mm mark was even with the bottom of the chain.
Pull up on the chain without moving the rule and read the mark aligned with the bottom of the chain again, then subtract from the first reading.
40 mm minus 13 mm = 27 mm of slack, which is within specifications of 25-35 mm for this bike, the 2015 Kawasaki Versys 650 LT (Blog).
Disadvantages of the Old Fashioned Method
The old fashioned method works fine other than it’s a bit clumsy.
- First, having the bike on its side stand can make it difficult to get down underneath to access the chain.I’ve worked on some bikes where the combination of the way the bike leans over on its side stand and a big silencer makes it really difficult to get underneath without putting the bike on a lift.Double or triple that anxiety when you have to move the rear wheel around a couple of times to find a tight spot on the chain or to double- or triple-check your chain adjustment work.
- Then, there’s the matter of moving the rear wheel when the bike is on the side stand.You can try something like the Rollastand rear wheel roller we reviewed or there are several other inexpensive wheel rollers you can buy here.They’re not easy to use and be sure to take a lot of caution when doing so but…they’re better than nothing for moving the rear wheel for a chain adjustment and/or chain lube.
- And finally, you have to be pretty good at eyeballing the millimeter scale or rule to find and check the correct amount of chain slack.Sometimes it’s difficult to hold the rule steady while you stretch the chain up and down, especially considering number 1 above.
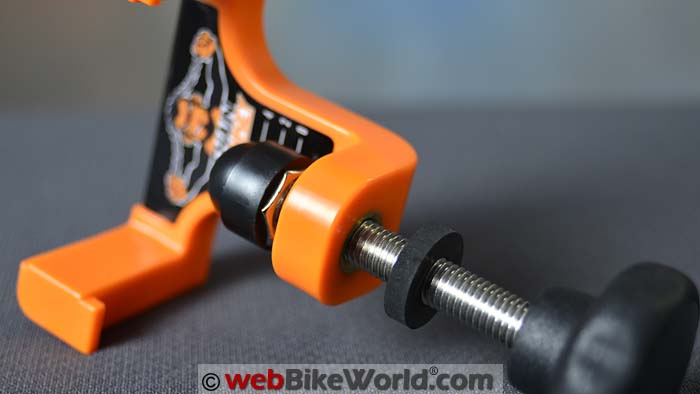
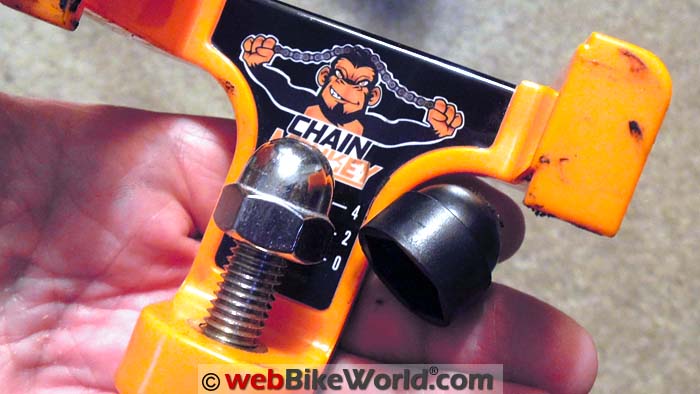
Close-up of the business end of the Chain Monkey. Note the unused tip on the black plastic or nylon nut cover. The Chain Monkey can be set for a variety of chain adjustment specifications. The Chain Monkey fitted on an adjusted chain.The Chain Monkey System
The Chain Monkey is made from molded plastic with two “arms” that hang over the top of the chain made from hollow plastic.
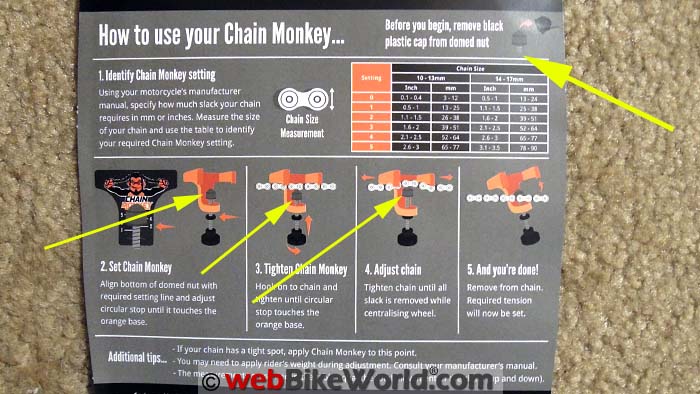
The kit comes with instructions in the package; it’s too bad they didn’t include the setting table as a sticker on the back of the Chain Monkey.
The instructions in the kit are pretty easy to follow.
- First, measure the height of one of the side plates on your motorcycle’s chain. It will probably measure either 10-13 mm for smaller chains or 14-17 mm for the common 520 chain.
- Next, look on the Chain Monkey chart and match the desired chain slack for your bike. In our example, the manufacturer recommends 25-35 mm of slack.
- Set the bottom of the nut on the Chain Monkey to the correct optimal chain slack number found on the chart.
- Move the rubber stopper on the bottom of the Chain Monkey so that it meets the bottom of the Chain Monkey tool.
- Next, unscrew the threaded rod, place the Chain Monkey over your chain and tighten until the rubber stopper meets the plastic.Tightening the screw via the knob on the bottom pushes the rounded plastic cap into the chain and puts a kink in the chain.The instructions are vague on this, but apparently it’s important to place the round black plastic cover in between two chain links, not underneath a single link.
- Now you can adjust the chain by using the nuts on the swingarm. Adjust until the chain is very tight, then tighten the swingarm nut(s). This is where it gets tricky — how tight is tight enough (see disadvantages below)?
- Tighten the swingarm nuts to the torque spec, remove the Chain Monkey (don’t forget!) and the chain should be within spec.
UPDATE: A webBikeWorld reader pointed out that there is a small and hard to see instruction on the back of the package that reads: “Before you begin, remove black plastic cap from domed nut”.

I did not see this and all of the photos or video on the Tru-Tension website show the Chain Monkey being used with the black plastic cap in place.
It’s not clear why they would even put the black plastic cap on the domed nut if the cap isn’t supposed to be used? The instructions should definitely be more clear about this.
SURPRISE! There’s a domed metal nut underneath the black plastic cap. Other than one hard-to-see instruction that I missed on the back of the package, all of the photos, instructions and videos on the Tru-Tension website show the Chain Monkey being used WITH the black plastic cap in place. Apparently, the Chain Monkey can be used either way. SURPRISE! There’s a domed metal nut underneath the black plastic cap. Other than one hard-to-see instruction that I missed on the back of the package, all of the photos, instructions and videos on the Tru-Tension website show the Chain Monkey being used WITH the black plastic cap in place. Apparently, the Chain Monkey can be used either way.Disadvantages of the Chain Monkey System
- First, you still have the problem identified in #1 of the Old Fashioned method above: the bike is on the side stand.Fitting the Chain Monkey over the top of the chain can make this even more difficult on some bikes.
- There’s also the issue of how closely the bottom of the nut on the Chain Monkey aligns to your chosen setting number and being able to see far enough underneath to align the nut with the correct setting.
- Then, the rubber stopper isn’t the best way to set the stop.If you’re not watching what you’re doing, you can move the bottom of the nut past your set mark, although admittedly with some practice, it’s not too difficult to get it right the first time.They should have used a metal nut, double nut or better yet, a Nylock nut that holds position. Fortunately, you can add this yourself.
- Also, the black plastic tip that pushes on the chain is too soft and it wears very quickly.UPDATE: Apparently, the black plastic cap is supposed to be removed, although none of the Tru-Tension photos or online video show this!Fortunately, it doesn’t really seem to matter whether the cap is used or not. Perhaps using the cap helps cushion the pressure on the chain links?UPDATE 2: Tru-Tension says “The Chain Monkey can be used with or without the cap but we have stated to remove it before use in the instruction as it can then be used to protect the domed nut during storage.”
- Probably the most significant issue is the “how tight is tight enough?” problem.When you tighten the Chain Monkey to the specified number on the tool, the chain becomes very tight to begin with when you’re even half-way or more to the limit of slack.This makes it difficult to know how much more adjustment is needed on the swingarm adjustment bolts.Chain Monkey chain adjustment can vary at least as much as 5 mm of slack, so it does take some practice to understand all the variables for your particular motorcycle.
- It’s expensive at a $34.99 list price.
Conclusion
While the Chain Monkey isn’t a perfect solution, it does have a few advantages.
Once you get the feel of it on your specific motorcycle, you can usually set the chain slack in one trip underneath the bike.
There are enough variables that you’ll have to practice a few times to get a feel for how tight to make the chain with the swingarm nuts.
But once you practice, you should be able to hit somewhere in the correct tolerance every time.
Also: Tips on Adjusting a Motorcycle Chain
Owner Comments and Feedback
See details on submitting comments.
From “R.T.” (October 2016): “After reading your review on the Chain Monkey — an answer to a question no one asked.
I see you had it on your Versys, my 2016 like yours clunks bad about half the time. So after you check the oil and clutch free play and everything else, like shift linkage (Kawasaki goes into detail about that in the shop manual).
The drum roll…tighten the chain to 26 mm. It is still in spec and BINGO! No more clunk.
Seems that the drive train slack was causing it in mine anyway. The bike came at 30 mm, right in the middle of the spec and clunk.
It didn’t go out of spec until 1,200 miles to about 38 mm.
I was going to bring it back to 30 mm but thought it worth a try and it worked. Now I’m a happy camper, because after 50 bikes I really like this one and it might be my last full size bike.
I’m 66 and have been riding 52 years, 400 thousand plus miles and that was the only thing the I didn’t like about it.”
From “H.F.B.” (October 2016): “I thought they ask to remove the black plastic cap.” Here is a .pdf copy of the instructions.
Editor’s Note: Tru-Tension says “The Chain Monkey can be used with or without the cap but we have stated to remove it before use in the instruction as it can then be used to protect the domed nut during storage.”