The Roadgear Deluxe Jumper Cables are sized to work with petite motorcycle batteries and their Lilliputian terminals.
If there’s one thing that defines life in the 21st Century, it’s the number of choices we have and the decisions to be made.
That goes double for motorcycle gear.
Take something as simple as jumper cables, for example.
Jumper cables are jumper cables, right? Apparently not…
I never thought much about the topic, to be honest. There’s a pair of heavy-duty automotive jumper cables hanging about somewhere and I figured that was that.
But there was one small problem: until recently, they had never been used on a motorcycle battery.
Good thing I didn’t need them in an emergency because, as I discovered, they don’t work. The jaws of the “alligator” clamps are much too big to fit on the puny terminals of a motorcycle battery, buried deep under the seat.
Which is where the Roadgear “Deluxe” Jumper Cables fit in — literally and figuratively.
I had this pair floating around in a drawer for some time but never quite found a use for them, which means I never did get around to reviewing them.
An experiment with a 250 Watt stator in the DR650 (blog) changed all that.
Here’s what happened: Chris and I installed a nearly-dead battery in place of the fantastic littleShorai LFP (review) to see if there was a discernable difference between the original equipment 200W stator and its replacement.
The original Bikemaster battery was reading only about 10.5 Volts, so the big 650 cc single just shrugged its shoulders when the key was turned.
We needed a set of jumper cables to provide some assistance from the Ballistic LFP battery still kicking around the garage (and still holding 13.5V after all this time!).
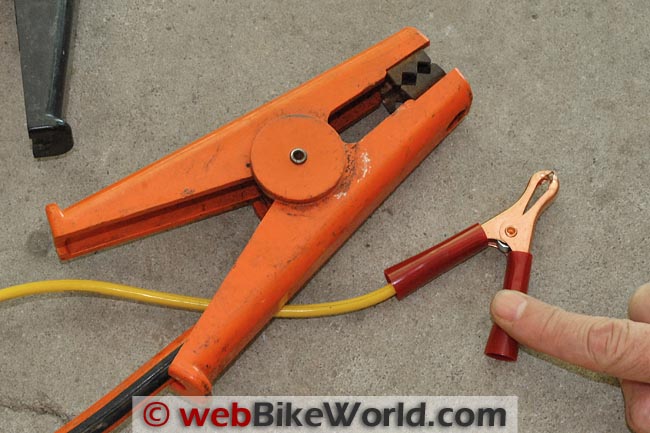
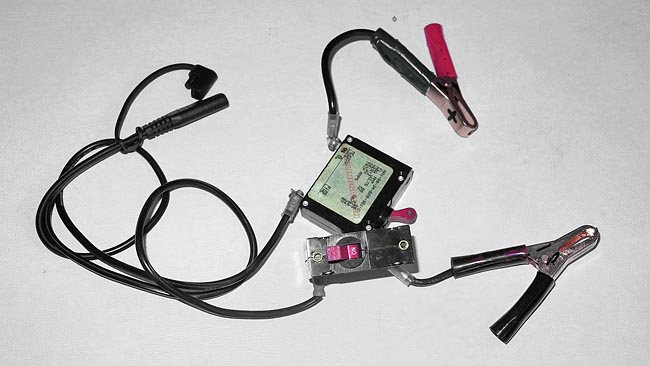
The monster-sized Sears cables shown in the following photo were way too big for the job, and that’s when I remembered the Roadgear set.
Size of the Sears automotive jumper cable on the left, compared to the Roadgear motorcycle jumper cable.Roadgear Deluxe Jumper Cables
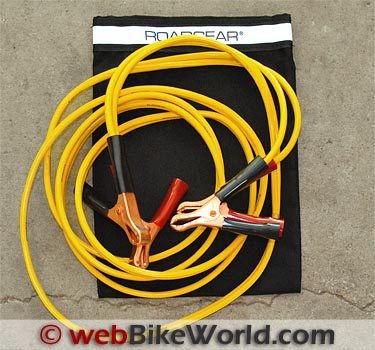
The Roadgear Jumper Cables are designed to fit mini-sized motorcycle battery terminals while still having enough reach to clip to a car battery if needed. The set is 9 feet long and made from a flexible pairing of 10 gauge wire, claimed to remain flexible down to minus 55 Fahrenheit.
They fit perfectly on a motorcycle battery — even the Ballistic LFP battery with its non-standard terminals.
By the way, there’s a lesson here: if you own a set of jumper cables, make sure they fit the battery on your motorcycle before you actually need to use them.
The Roadgear Jumper Cables are a simple device — four alligator clips press-fit onto some wire.
Anyone could make a set, but by time you bought the four ‘gators, a roll of wire and got it done, you’d probably have spent the 20 bucks it costs to buy these anyway.
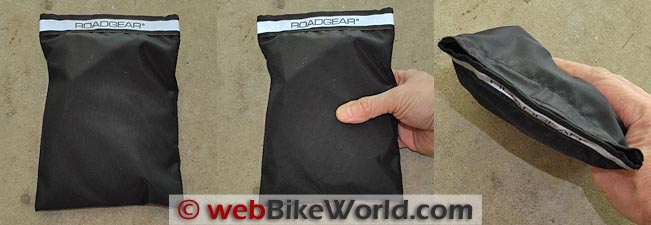
And, you wouldn’t have the nice Roadgear carrying bag, complete with the Roadgear reflective label. Nor would you have a two-year warranty.
That’s right — Roadgear guarantees the jumper cables for two years. But honestly, will anything go wrong? If you use them once in two years, that’s one time too many. Until the time you really need them, when you’ll be glad you have them.
The Roadgear Deluxe Jumper Cables are made in the U.S. and come with a carrying case and 2-year warranty.Roadgear Jumper Cables – Details
Yes, you can easily find very similar-looking jumper cables for sale just about anywhere you look. And some are priced at half the cost of the Roadgear version. But you probably won’t get the guarantee or the carrying bag for that money.
Now I should note that one of the pleasures of owning a Suzuki DR650 is that everything on the bike is easily and readily accessible — including the battery.
This isn’t the case on many bikes. Even the tiniest set of alligator clips may not fit on your battery terminals simply because the battery is inaccessible.
There are a couple of solutions to this problem. First, if your battery is that well hidden, you’d be well served to fit the bike with an SAE-type connector (sometimes referred to as a Battery Tender connector).
Then you could build your own jumper cable with an SAE connector on one end and a pair of alligator clips on the other.
I have one of those and I use it to recharge electric fence batteries — clip it on the battery and simply plug it into the Battery Tender and that’s it.
Or, you could spend $95.00 and buy a special connector. One part of the harness connects directly to the battery and the other end plugs to the special Powerlet connector and then clips on the battery that will be used to jump-start the bike.
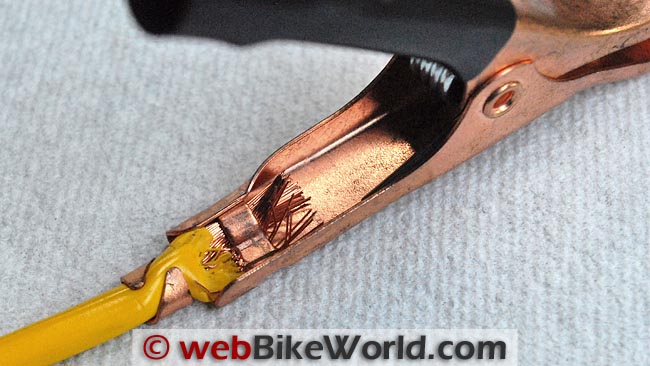
The 10 gauge wire is crimped to the alligator clip but this hasn’t caused a problem.The Roadgear Jumper Cables are claimed to be made in the U.S.A., but I wonder if that means the cable and the clips too? I kind of doubt it…
Roadgear usually has all of its bags and cases made in the U.S.A., but the carrying case provided with the jumper cables does not have the typical “Made in U.S.A.” label. I guess we’ll have to take them at their word.
The only potential downside of the Roadgear Jumper Cables is that the alligator clamps are crimped to the wire and not soldered. It’s a tight fit, so I don’t think it will cause a problem.
And for the number of times you hope you (don’t) have to use these things, it’s not like they’re going to get a lot of wear.
If you’re really fussy, I suppose you could heat it up and melt some solder on the connection.
How to Use Battery Jumper Cables
Cribbed from Roadgear, here are some good tips on using jumper cables. First, be super careful when working around batteries. Never stand directly over the battery.
Check the polarity labeled on the battery posts and make sure you know which is positive and which is negative (ground on all modern vehicles). Note that some older bikes may have a positive ground!
Also, check to make sure that the battery voltage is the same on both vehicles. Make sure the motorcycle isn’t touching the car or motorcycle that is offering the charge. Turn off the ignition. Put both bikes in neutral if you’re using another motorcycle for the charge.
Connecting and disconnecting the cables (per Roadgear):
- Connect one red clamp to the terminal post marked positive (+) on the bad battery.
- Connect the other red clamp to the positive (+) terminal post on the good battery.
- Connect the black clamp to the terminal post marked negative (-) on the good battery.
- Connect the other black clamp to a good electrical ground on the bike, that is, (an unpainted part of ) the metal frame.
- After the jumper cables are hooked up correctly, then start the bike with the good battery. Then start the other bike, do not crank for more then 15 seconds at a time.
- Once the other bike is successfully started, remove the cables in reverse order, being careful in that the clamp ends do not come into contact with each other!
Conclusion
The Roadgear Jumper Cables aren’t really all that much different than any other pair of motorcycle battery jumper cables you might find. But they do have the two-year warranty, which has to count for something.
And the carrying bag which, when you think about it, is necessary to keep the cables clean and also for handy storage on the motorcycle.
Here’s a secret tip: you can buy the jumper cables directly from Roadgear for $24.95. Or, you can buy them through the wBW Amazon.com store link for $19.95 and you’ll be ready for anything. Well, almost anything…
wBW Motorcycle Battery & Charger Reviews | Maintenance & Repair Articles

| wBW Review: Roadgear Deluxe Jumper Cables | |
|---|---|
| Manufacturer: Roadgear | List Price: $24.95. |
| Colors: N/A. | Made In: U.S.A. |
| Warranty: 2 years. | |
Owner Comments and Feedback
See details on submitting comments.
From “T.G.” (September 2011): “This is the best answer I have found to jumping bikes via the pigtail connection-especially when you have both bikes with them aboard — gets weird but this helps.
I carry 2 sets of pigtails with jumper clips-to-SAE-connectors, but this one will pop and save the system (25 amp fuse, a 7.5A was too small for jumping).
Might blow a fuse on the bike but this will prevent fried wires. I always check with a volt meter for polarity even with this set up.”
From “E.L.” (September 2011): “Concerning the instructions for connecting jumper cables: many bikes have frames of aluminum (main frame) and steel (subframe).
Sending electrical current through such a frame can cause corrosion at the mixed metals connections. It’s probably not much of an issue for the momentary connection of jumper cables, but it’s something to be aware of.
Also, steel frame members are usually painted, which makes for a poor electrical connection. Thanks for all your hard work and the wonderful site, it’s been of great value for me!”
From “T.G.” (September 2011): “I recently had the opportunity to recycle some Monster speaker cable and made up a pair of jumper cables very much like the Roadgear ones you reviewed.
I went to Radio Shack and purchased 2 jumper clips of the correct size and then crimped them on the end of one side. On the other I used a “SAE” connector that is like the one for the Battery Tender.
It comes with the battery tender and is used to connect the Battery tender TO-TO, that’s right, the battery.
So if you use the Ring one that goes from the battery to the tender you will have this one left over. So now is the tricky part.
You take the Roadgear or your home made cables with jumpers on both ends and then you will proceed to hook up the red to red, black to black. If you’re not lucky enough to have a fuse in on the system you will get reversed polarity and fry, melt or ignite the jumper cables.
Caution readers to make sure that you have this polarity issue figured out.
I solved it by connecting the SAE connector to the end of my small motorcycle size Jumper Cables. (Tourmaster makes a set as well in a little bag that are a bit thicker than Roadgear).
Bottom line here is to make darn sure if you’re going through the SAE connector that polarity is correct. I carry a small volt meter always on my bike in the bag with the jumpers. Don’t ask me how I know.”
From “A.B.” (September 2011): “I’ve had multiple bikes over the years and none had a battery that was easy to get to without a bunch of tools. The small jumper cables you have might work fine on a bike that can carry a lot of stuff but I prefer to use something a little different.
Most of us already have a charger permanently hooked to our bikes battery so why not use that connection? I did a quick search and found someone making just this.
It’s a thicker gauge wire than what the Battery Tender cables are but uses the same connection. You install the cable on your battery just like the Battery Tender one and it’s compatible with your existing charger.
If you need a jump you just use the other end of the cable on a car battery and plug it into the charging port (www.e-zjump.com).
I know if you are out touring you should have tools with you but sometimes you battery just dies on a ride. Plus, I have nowhere to keep any tools to even get to my battery on my Ducati monster.
Of course, instead of buying from the company above you can always just make one of these cables. That’s what I did years ago.”