 Wanderlust is rampant and addictive. To look into the dreamy eyes of anyone bored with their routine job, yearning to “take a break” is a sight in itself. With motorbikes being attached to machismo and independence, they are the perfect vehicle to stage a getaway. The air hitting your face as you speed along–that is paradisiacal.
Road trips, or more specifically bike trips, to explore unseen pathways have been the dream and passion of people of all ages alike. There’s nothing better than revving up the bike and moving away like there’s no tomorrow!
But when your tires go flat while you are isolated from the entire world, that is when the dream turns into a nightmare. So before you ruin the perfect day by ending up with a flat tire, you better have these tips handy!
STEP 1: Never leave the house without a repair kit!
Of course, with tubeless tires and better bikes the possibility of a flat tire is lesser but it is still there, and why would you want to take a risk?
Pack your kit before you leave, because you won’t find a garage in those beautiful places where nature will be your only companion. After all, the reason you are going there in the first place is to be away from civilization. So before you end up getting eaten up by one of the animals there, make a little effort towards saving your day, and saving your life!
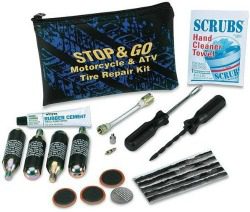
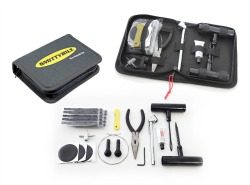
Here’s all that you will need:
- A screwdriver
- A tire plug
- A tire sealant
- Some soap solution
- A rasp tool
- An insertion tool
- A lug wrench
You may use an air compressor, but it will be cumbersome to carry.
STEP 2: Inspect
Check your tire closely–you are looking for holes, cracks, and scratches.
Apply some soap solution on the tire and rub it to obtain a lather. If it happens that you see the bubbles bursting, that is the spot you need to fix.
STEP 3: Clean up the area
Use the rasp tool to punch a hole through the breach and clean up the area. The rasp tool is almost always provided by the company when you purchase your repair kit.

 STEP 4: Fill up the tire
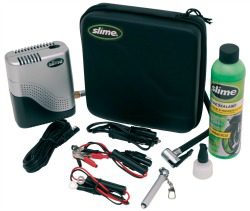
Now there are many options for you to try when it comes to filling tires up. There are air cartridges which mainly consist of carbon dioxide, air compressors, and bike pumps.
Air compressors are highly inconvenient to carry as they take up a lot of space. They also need electricity to function efficiently, which makes it a bad choice.
Bike pumps, although light, reliable, and foolproof, will take a lot of time to fill air into the tire. So unless you have a place where you can stop by, even this option isn’t a feasible one.
Carbon dioxide cartridges and sealants are a blessing for lone passengers. They are easy to carry, convenient, effective, and less time-consuming. You should try to use them the same way you would use an air compressor to fill your tire up.
STEP 5: Sealing the tire
You may fill the tire with skill, but the more important aspect of fixing your tire is sealing the breach in continuity. Manufacturers have now come up with innovative products to help you with your on-road fiascos.
These include:

- plugs
- sealers
- adhesive plugs
- rubber stoppers
The Stop and Go system is another tool which uses a pointed plugger to create the appropriate opening and then the plugs are inserted into the area. There is no risk of the plugs coming out while riding. This is not a permanent solution of course, but it will help you till you find a mechanic to fix your tire.
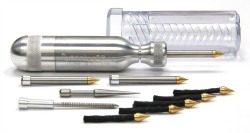 There is another product called a Dynaplug, which is a metal plug filled with tire sealant. It will release the sealant at intervals and keep the tire in a working condition till you reach a place where you can get it repaired by a professional.
The conventional plug is a thermoplastic semi solid material that you apply onto the surface of the tire which needs to be fixed with the help of an insertion tool.
Fix it, so that it fits snugly into space. You may also apply some adhesive.
FOR TIRES CONTAINING TUBES:
Tires containing tubes need more work since you need to remove them from the rim of the bike and then dismantle the upper tire first to attain the tube. If you stick to the following steps, you will emerge victorious.
- Put the stand on the bike.
- Remove the tire from the rim of the bike using a screwdriver. Make sure you don’t damage the tire bead while doing this. Do not ever put the removed tire in muddy areas as they will cause damage to it. Try using a lubricant if it is very difficult to get the tire out.
- As you remove the tire, inspect the tube for any breach in continuity–any holes or broken areas. You may immerse the tube in water to check for the air bubbles escaping through the broken area. Also, you can apply soap solution to check for bubbles.
- Fix the broken area using adhesive. Make sure you do not leave out any area uncovered. You can mark the area if you want to be sure.
- Fill air into the tire using a compressor or a pump. Make sure you do not fill extra air into the tire as it may burst due to excessive pressure.
- Place the tire into the tube and screw it into place onto the tire rim.
Now that you have had your first lesson is mechanics, take your bike out and go for a ride!