
The Skene Design P3 LED brake lights are small but powerful.
They come with brackets for mounting on the license plate bolts.
You can buy the lights separately or with a programmable controller.
The IQ-260 controller has 10 different programming modes, accessible at any time.
Flash the brake lights 4 times and programming mode is engaged.
Then flash the lights 1 through 10 times to engage the function of your choice.
This includes everything from the patented Skene Design conspicuity flicker to emergency flashers.
Or, just program the lights to turn on with the brake light only.
The mounting arrangement is somewhat fragile, but with care, they should be fine.
We mounted the Skene P3 lights on a Kawasaki Ninja 1000 and BMW F800S and that information is included below.
Introduction
By coincidence, we both bought a set of Skene Design P3 brake lights recently. My goal was to augment the brake lights on my new Kawasaki Ninja 1000 (review).
Rick was adding a pair to the BMW F 800 S (Blog), which already has a set of Skene Photon Blasters (review) in the front.
Since the installation of the rear luggage rack on the Ninja 1000, I felt that the rack could obscure the view of my tail lights and brake lights from taller vehicles like SUV’s or trucks.
But in today’s crazy road environment, with texters and idiots live video streaming while they drive, you can’t have enough auxiliary lighting on a motorcycle.
Skene Design P3 LED Brake Lights
The Skene P3 lights appear identical to the Photon Blasters and, in fact, the Photon Blaster LED array serves as the basis for the P3 brake lights.
It’s a bit confusing, but Skene Design makes the array in white, amber or red that can be purchased separately or in kits.
The lights can then be combined with one of the Skene Design programmable controllers to create various modulation and light sequences and/or add the special Skene conspicuity flickering to the lights.
The P3 lights can also be used as turn signals.
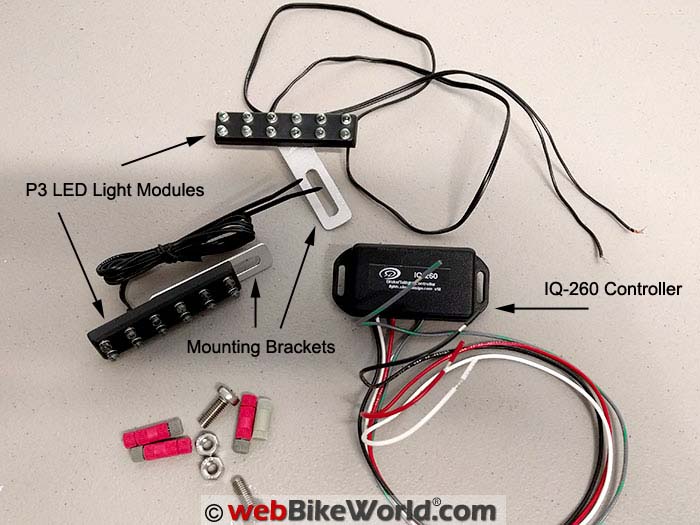
The LED arrays are small rectangular units, usually purchased in pairs, but multiple lights can be added and/or controlled by the Skene Design IQ-series programmable controllers. Each rectangular array consists of 12 individual LEDs.
The P3 lights are auxiliary brake lights, so they glow red. The kit includes two of the 12 LED light units with mounting brackets, the IQ-260 programmable control module, a pair of license plate screw/nut fasteners, Posi-Locks, and several zip ties.
Each P3 light module measures 76 mm by 16 mm wide and it’s about 9 mm thick. The IQ-260 programmable controller measures about 76 mm by 35 mm wide and it’s about 15 mm thick.
The P3 lights are designed to augment a tail light or brake light system rather than replace it and the suggested configuration is to mount them to either side of the license plate using the included hardware.
The Skene Photon Blaster/P3 modules and the mounting brackets aren’t the most heavy-duty lights you’ll find, so you don’t want to knock them around much.
Most owners mount the lights on or near the rear license plate, using the same bolts that hold the license plate on the bike.
As long as the lights aren’t too exposed to anything that might bump against them, they should stay in place.
I wanted to have the P3 lights not look like an add-on, but the Ninja 1000 doesn’t really have too many locations for a solid mounting.
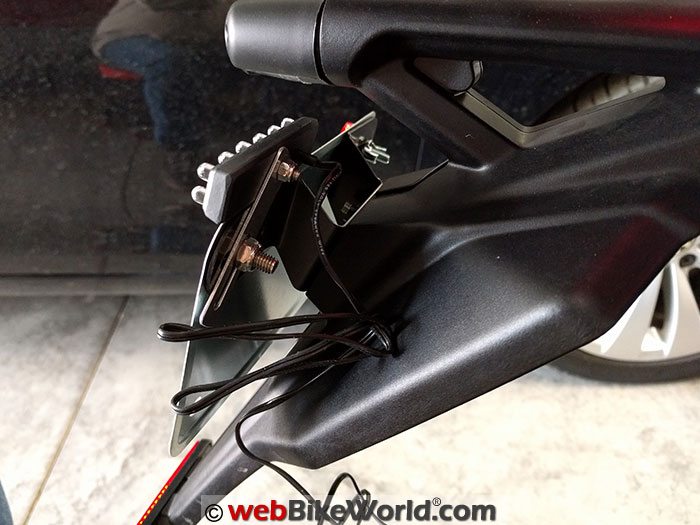
To be somewhat different, I ended up mounting the lights across the top of the license plate holder (what a rebel!).
The configuration looked pretty good after a test fitting, so that become the plan. Rick mounted the P3 lights on either side of the license plate on the BMW F800S.
The next step was to decide on the wire routing and finding a place for the IQ-260 control module.
After a bit of looking around under the seat I decided to mount the control module under the wire bundle to the left side by the sub-frame on the Kawasaki Ninja 1000.
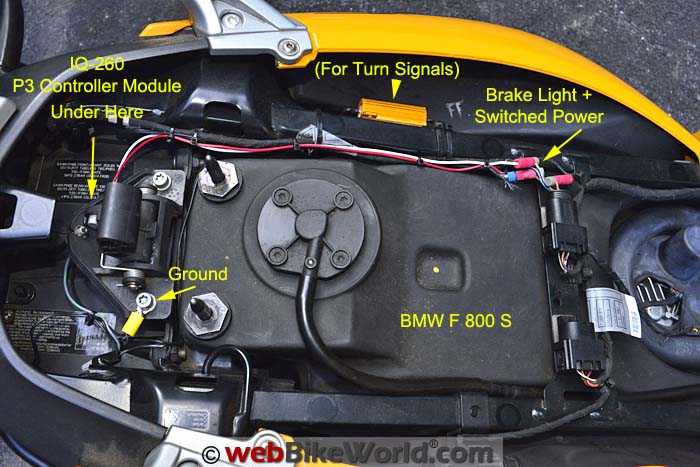
Rick hid his controller under the seat lock on the BMW F800S (see photo).
On the Ninja 1000, the wire bundle put enough pressure on the module to hold it fast in place while still making it easy to remove later if needed. On the BMW, Rick added some double-sided tape to hold the control module in place.
P3 Lights Specifications
- Current Draw: Tail light 100 mA, brake light 390 mA instantaneous, 150 mA continuous.
- Operating Voltage: 9 – 16 VDC.
- Maximum Allowed Current: 6 amps for P3, 6 amps per side for P3-TS.
- LED Intensity: Controlled by an internal current regulator to maintain brightness even under low voltage conditions.
- Angle of Half Intensity: 15 degrees.
- Wavelength: 612 nm.
- BMW CAN-bus compatible with BMW 2-phase brake light firmware with single-filament brake light as a tail light, as used on the R1200RT and other models.
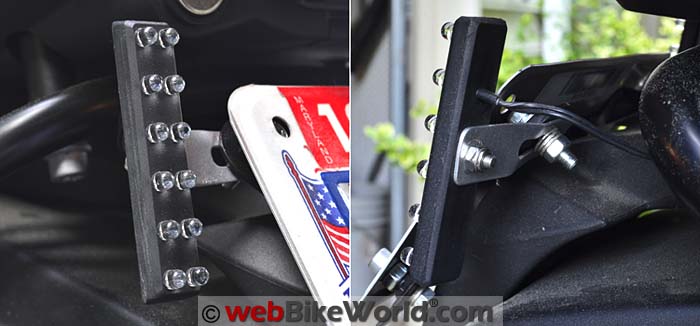
Skene P3 mounting bracket on the Kawasaki Ninja 1000. Skene P3 mounting bracket on the BMW F800S.Wiring t he P3 Lights
With the module in place and the destination for the lights determined running and connecting the wiring was next.
The P3 lights can be configured in a variety of ways, using the programmable controller. The most basic function would be as either auxiliary brake lights only or brake lights with running lights.
The light can be modulated several ways also, either using the special patented Skene Design conspicuity flickering system or with steady light with no flickering.
But first, the wiring. My intent was to implement both the brake light and running light feature.
The wiring is straightforward and the diagrams included from Skene Design make the procedure clear.
I ended up spending more time on finding clean routing for the wiring from the lights into the tail section than actual time making the connections.
Each P3 module has a paired wire, power and ground.
If you’re using the IQ-260 controller, it has 4 wires. the gray/green wire connects to the silver power wires from the P3 lights. You can connect these using a Posi-Twist connector (purchased here).
The red wire from the IQ-260 is the power wire; splice it into a switched power wire on your bike using the supplied Posi-Tap.
The white wire from the IQ-260 is to the brake lights, again using a Posi-Tap.
The black wire from the IQ-260 is the ground, use a Posi-Tap to connect to a ground wire on the bike or connect to any good ground. The two copper colored wires — one from each P3 light — are also connected to ground.
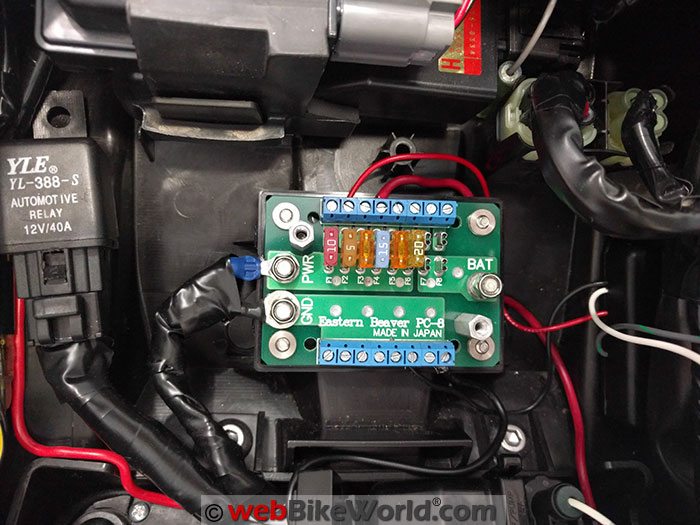
On the Kawasaki Ninja 1000, the connections were easy and were made by connecting switched power and ground from the IQ-260 controller to a nearby Eastern Beaver PC-8 fuse panel installed days earlier.
Wires were trimmed so not much excess was left sitting under the seat.
Wiring the P3 lights to an Eastern Beaver PC-8 fuse panel on the Kawasaki Ninja 1000.Kawasaki Ninja 1000 Wiring Notes
As it turned out, Kawasaki had an open brake light connector already waiting in the tail, presumably for the factory luggage where an extra brake light might be connected.
A quick crimp on a bullet connector allowed me to plug the brake light power to the control module.
All that was left was to connect the power lead from the P3 lights to the control module. I routed the wires from the P3 lights on top of the rear fender and into a gap where it mounts and into the interior of the Ninja 1000’s tail.
The power connector from the control module was then wired to the power lead for the lights and the ground wires were combined and then run to one of the available grounds on the fuse panel.
To clean up the routing of the wires on the fender I had run the wires in an open channel in the plastic fender.
I then covered this channel with black electrical tape and used zip ties at either end of the run of tape to help reduce the chance of the tape peeling up. So far it has stayed in place.
Skene P3 wiring on the BMW F800S.BMW F800S Wiring Notes
The ground wires were connected to a ground under a bolt in the frame (see photo) using a “U” type spade connector.
The rest of the wires were tapped into the bike’s ground, switched power and brake lights, easily accessible under the seat.
On the 2007 BMW F800S, the wires are: brown = ground; black/silver = brake light; red/silver = switched power.
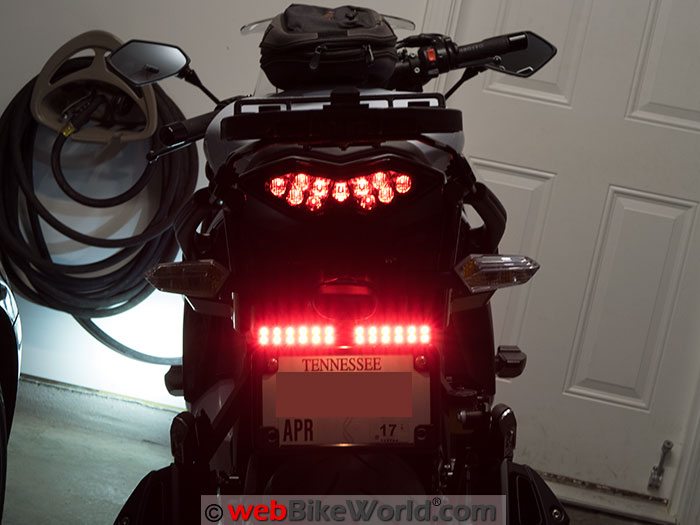
Skene P3 lights on the Kawasaki Ninja 1000.Programming the P3 Lights
The control module offers several features such as brake light flashing and other way to increase visibility.
Programming mode is entered by flashing the brake lights 4 times in succession. The brake lights will then flash 4 times to confirm you’re now in programming mode.
Note that you only have 4 seconds once programming mode is started to start the programming.
Programming is done by flashing the brake lights from 1 to 10 times, using the chart or “cheat sheet” that comes with the IQ-260 controller:
Brake Light Modes:
In programming mode, tap the brakes 1 time: steady brake light, no flashing.
2 times: Brake light flashes 4 times, then stays on.
3 times: Brake light flashes rapidly between low and high brightness 4 times then more slowly 4 times, then stays on (this is the default setting).
Emergency Flasher Modes:
4 times: Emergency flashers, 4 medium repeating flash.
5 times: Rapid repeating flash.
6 times: Quad flash (quick flash four times, repeated).
Note: The emergency flasher is disabled upon application of brakes. Emergency mode is saved on power off. This allows you to switch your motorcycle to parking light mode and remove the key without disabling the emergency flasher.
Tail Light Modes:
In programming mode, flash the brake light 7 times to toggle the conspicuity flicker on or off (default is on).
8 times: Enables normal tail light brightness (default).
9 times: Enables high tail light brightness (for poor weather conditions such as heavy rain or fog).
10 times: Turns the running light mode off; P3 lights then become brake lights only.
Learning how to use the programming features was a relief, as I thought the lights might be defective when I first powered them up and they flickered rapidly in a somewhat alarming fashion and I thought perhaps I had wired something up incorrectly.
After viewing the lights for a few minutes with this feature on I decided to change this to just a solid tail light. Tapping out the sequence on the brake lever easily turned this off.
While it does grab attention to have the flicker, I found it hard to look at after several seconds and wanted to look away from it. My concern was that I don’t want to have something that could influence drivers to look away from my bike when behind it.
The default setting for the brake lights is to have the flash quickly when the brake is first applied and then go solid. I thought this would be a good attention getter and I have had other add-on lights in the past that did this and felt it was a good idea.
In the case of the P3 Lights I ended up disabling this feature too.
To me the lights are so bright when the brake is applied that they are more than sufficient in the “attention getting” department.
By the way, the P3 system can be expanded with up to 6 additional red light modules on the system. There is also a TS model that support up to eight modules per side and includes turn signal functionality.
There is even a TS+ system that adds a voltmeter option.
Rick uses the P3 lights as auxiliary brake lights only. He also found that the conspicuity flicker that works well for the white Photon Blasters in the front seemed out of place in the rear. He is not using the running light feature, so the P3 lights turn on only when the brakes are applied.
Skene P3 wiring on the BMW F800S.Brightness
The P3 lights are very bright. The tail light mode of the P3’s is brighter than the factory taillight above it.
Needless to say, the P3 lights are very, very bright when engaged in brake light mode and much more noticeable than the factory brake light alone.
I didn’t feel that the factory tail light was wanting in output until I added the P3 lights. Now I’m really glad to know the the P3 lights are installed.
It is important to keep in mind that LED lights like those used in the P3 modules are rather directional, so they should be mounted so that they have a parallel or slight tilt upward from the road.

Too much tilting up or down will make them much less effective as the brightest part of the beam doesn’t reach the line of sight of a driver behind you.
Conclusion
The Skene Design P3 lights work well and are very bright compared to the factory LED tail light.
The positioning over or around the license plate provides much needed additional visibility for a motorcycle brake light that may have otherwise been reduced by the installed top case rack.
I do have to say that the P3 lights and their plastic housing are very lightweight to the point of feeling a bit delicate. It could be that they are designed to be that light, since weighty items on a license plate holder could become a problem over time.
Still, the mounting brackets are a bit on thin side and overall the longevity/durability of the lights remains to be seen, considering the fairly high list price of the P3 light kit.
Skene Design provided good literature for installation and their website provides a lot of details and support information. The fact that Posi-Locks were included for installation is a nice touch.
Also: Skene Design Photon Blasters Review
Owner Comments and Feedback
See details on submitting comments.
From “B.G.” (August 2016): “I have these on the front and back of 4 different cycles right now. The oldest installation is 4 years.
My installation consists of 2 ea. LEDs up front, facing forward (for oncoming traffic), and attached to the turn signal. Two more up front, facing sideways, as “marker” lights, and attached to +VDC (full bright, no flicker).
Out back, it’s again 2 facing rear, and 2 facing side. However, these 4 are on the controller for flicker, and for integrated turn signal.
I feel I’m well lit up, and have the same experience as the other posters here. Cages back off quickly at a brake “flash”.
It’s pricey at about $300 per install (x 4 bikes!), but cheap insurance when I consider how much I desire to be seen in traffic.
I’ve had two failures of LEDs in the 4 years of ownership.
The LED wire is “thin” gauge, the insulation not the best, and can break easily. I use black tape reinforcement around edges and corner transitions of the wiring.
Mr. Skene has been very responsive and generous in replacing these for me under warranty. I’m very happy with the ownership experience I’ve received from his company.
All in all, I like these things a lot. I feel much safer out there, and pay the price to get it.”
From Jerry Skene, Skene Design (July 2016): “Thank your for posting a review of our P3 Lights on your site. Your explanation of the programming method was very thorough.
I would like to explain, however, the science behind both the conspicuity flicker and the rapid flashing brake light.
I can understand why you may have felt that the conspicuity flicker was distracting while you were installing and programming the lights.
When viewed from a few feet away, the lights are very bright and the flicker is extremely noticeable. Any brake light when viewed from few feet away would be too bright to be comfortable.
P3 Lights function is to alert drivers on the road who are much farther away than a few feet. If you turn the flicker on and step back 50 feet, you will see that if you look directly at the lights the flicker is greatly reduced.
At 100 feet or so it will be gone entirely. Unless, however, you look away from the lights. When you do this you view them out of your peripheral vision, so the flicker will now be noticeable.
This happens because the flicker frequency we use is designed to be visible to the optical sensors (rods) in our retina’s peripheral region, and not to the different type of sensors (cones) in its central region. These sensors respond too slowly to notice the flicker.
Our lights, both P3 Lights and our front-mounted Photon Blasters, are both designed like this, so they attract the attention of those who are not paying attention. Once the driver looks at us, however, the flicker disappears.
This is important as it prevents target fixation, where the driver keeps looking at the lights to the point where they may drive towards them rather than in their lane. This does not happen at all with our design.
Regarding P3 Lights’ brake flashing, we intentionally selected a specific flashing rate in the default brake flashing sequence that has been shown in independent studies to reduce the reaction time of the driver behind us.
The 10 Hz flashing pulses have been shown to reduce reaction time by 0.2 seconds. At highway speeds this equates to a 17 foot reduction in stopping distance.
When added to the 0.2 second faster turn-on speed of an LED light compared to an incandescent tail light, the rider with P3 Lights set to the default flash mode has an additional 34 foot safety zone behind his bike compared to the rider without P3 Lights.
There is a considerable amount of science behind our design, as well as many, many comments from our past customers that back up the real world effectiveness of this system.
I’m confident that if you reenable both the conspicuity flicker and the default brake flashing mode you will see a noticeable change in the behavior of traffic behind you.
Regarding the thin aluminum mounting bracket, this has been designed such that it is easy to bend to the correct angle, as you described in your article.
To allow this and also ensure its reliability, we manufactured it from a very tough aluminum alloy that is malleable but not brittle. We have never had a failure of this bracket.”
From “AJ” (July 2016): “I am a fan of the Skene products and have had them on the last five bikes.
The hardest part of the installation for me is where and how to mount them but not the wiring. My mounting typically involves homemade brackets and unusual locations.
As to the flickering and/or brightness causing those behind to not look at you I can tell you my experience has been different.
At a stop I am always keeping an I on the mirror and as someone approaches the flashing brake light is applied, amazing how cars approach much slower and stop well away from me.
On the road I can’t tell you how many times a car has come up and appeared to be about to tailgate me and suddenly drops back many car lengths, it’s like magic! Have never had one break or fail.
Thanks for your efforts, I never make a motorcycle related purchase without checking here first.”
From “G.K.” (July 2016): “Getting other drivers’ attention feels right. What about regulations and limitations of human seeing?
Is there a legal definition of too bright AND will too much brightness of certain frequencies harm other drivers ability to visually process the view ahead of them? Something to ponder.”
Rick’s Reply: Good question, I thought of that also, there’s a point in the front that you can have so much light that it blocks the turn signals on the motorcycle, or the oncoming driver looks away, which isn’t good either.
Someone needs to do some scientific research on this. Many states in the U.S. have laws prohibiting lights that “dazzle” oncoming traffic. What this means, however, is unknown and probably up to the discretion of the local law enforcement.