
Introduction
The INNOVV C5 Helmet Camera wasn’t unexpected really, in that it is a logical adaptation of the rugged versatile INNOVV C5 Moto-CAM reviewed late 2017 – two of which continue to cope with the ups and downs of adventure-oriented/off-road activities.
It does make for a bit of déjà vu though, in that one of the original C5 systems received for evaluation was put to use as a helmet-mounted POV camera for a couple of months in the fall of 2017 for off-road assessment and it worked just fine.
INNOVV doesn’t have a huge product line, focusing instead on developing, evolving, and supporting good (useful) baseline products. And that is reflected in the marketing of the C5 Helmet Camera.
The original C5 units, both hard-wired per se on to home fleet motorcycles haven’t even so much as hiccuped since being installed, no matter the weather (and temperatures), issues that the original K1 suffered from.
And with the minor change in power connectivity has brought much more versatility for this small multi-component system. Mount the lens on a helmet, find a safe convenient spot for the DVR, provide a USB power supply, and go for it.
The INNOVV C5 Helmet Camera
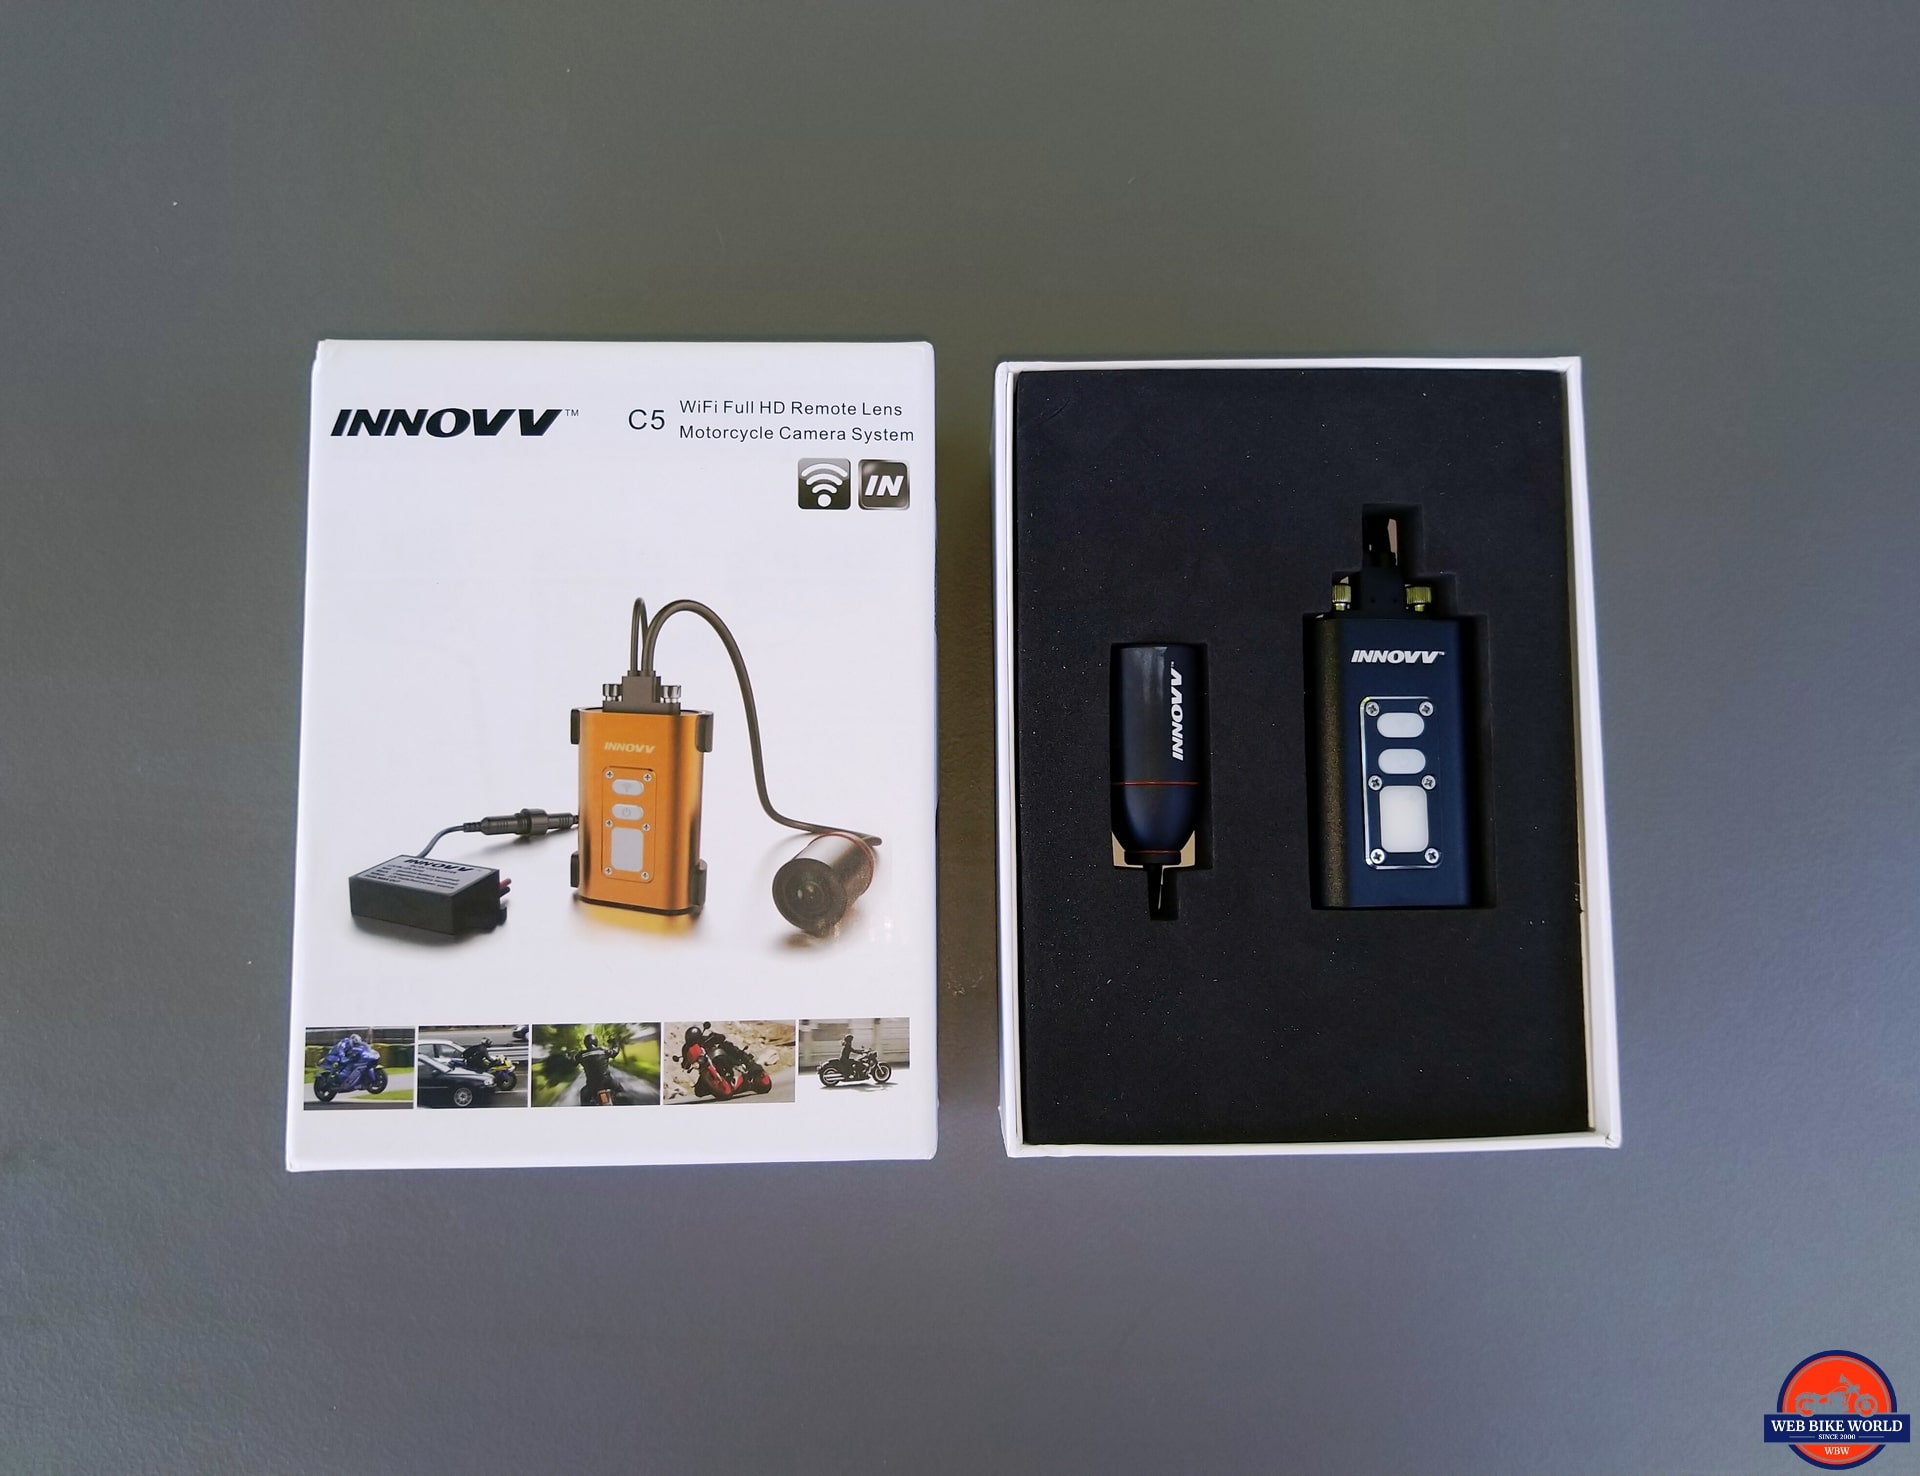
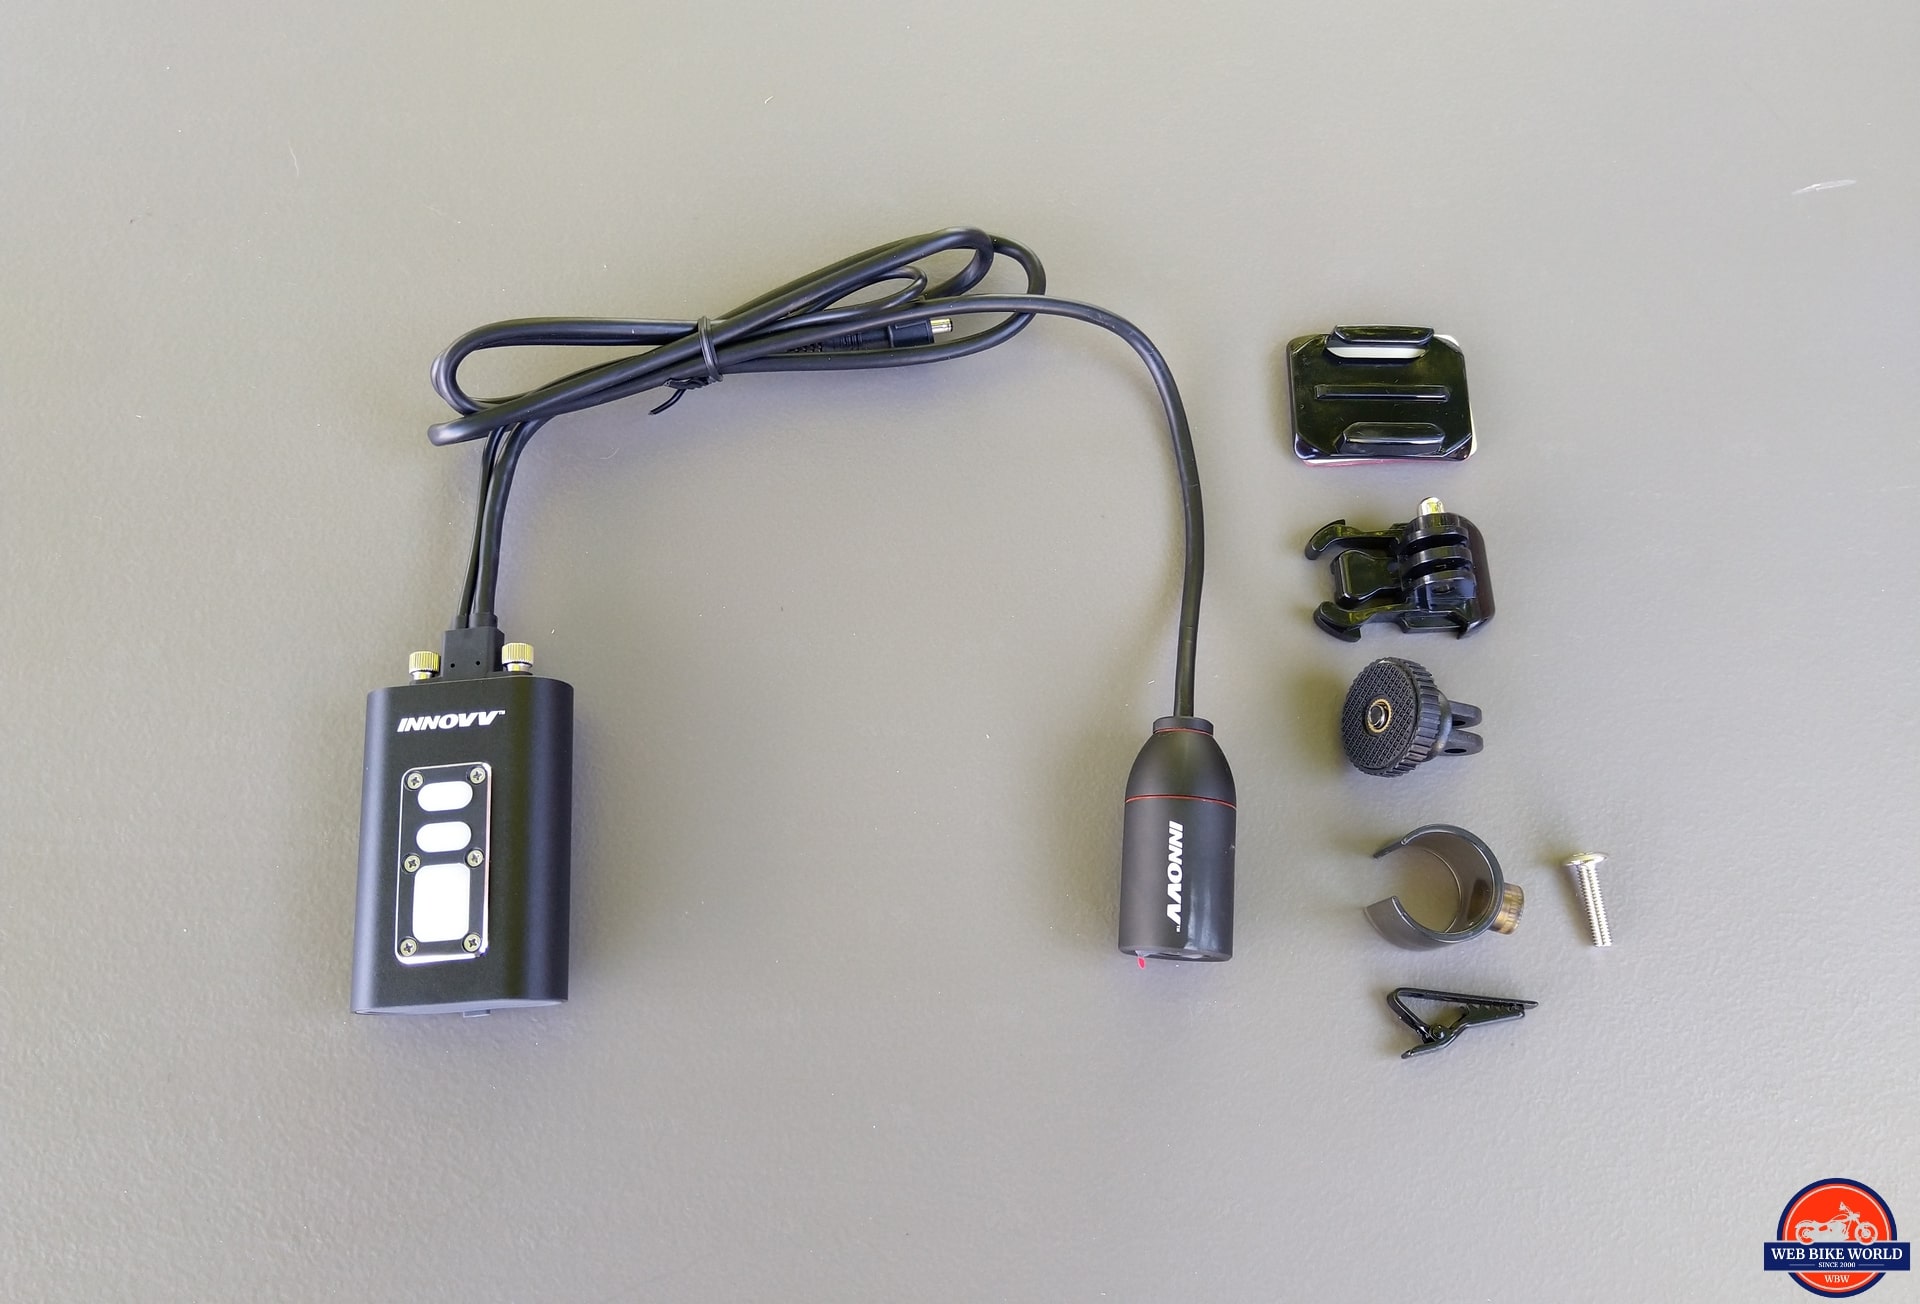
The same ruggedized C5 components are used: small round hardened lens, heavy-duty USB-C cable, ruggedized aluminum module DVR, and power adapter cable.
There are only two changes really, one being the use of a coaxial to USB power cable adapter and the second related to length options for the lens harness (cable).
Video wise, resolution settings of FHD P30(1920×1080), HD P60 (1280×720), and HD P30 (1280×720) are available – along with Loop Video of OFF (continuous record) and Loop Video ON with one, three, five or, ten, minute loop options.
Overall, as validated with the continued use of two original C5 systems, this Helmet Camera variant should be as equally capable of withstanding heavy-duty use under a mix of elemental conditions.
The DVR module functions the same way, as does the (local) WiFi connection. Users have the option of using either depending on where the module is mounted or carried and the circumstances.

Kit Contents
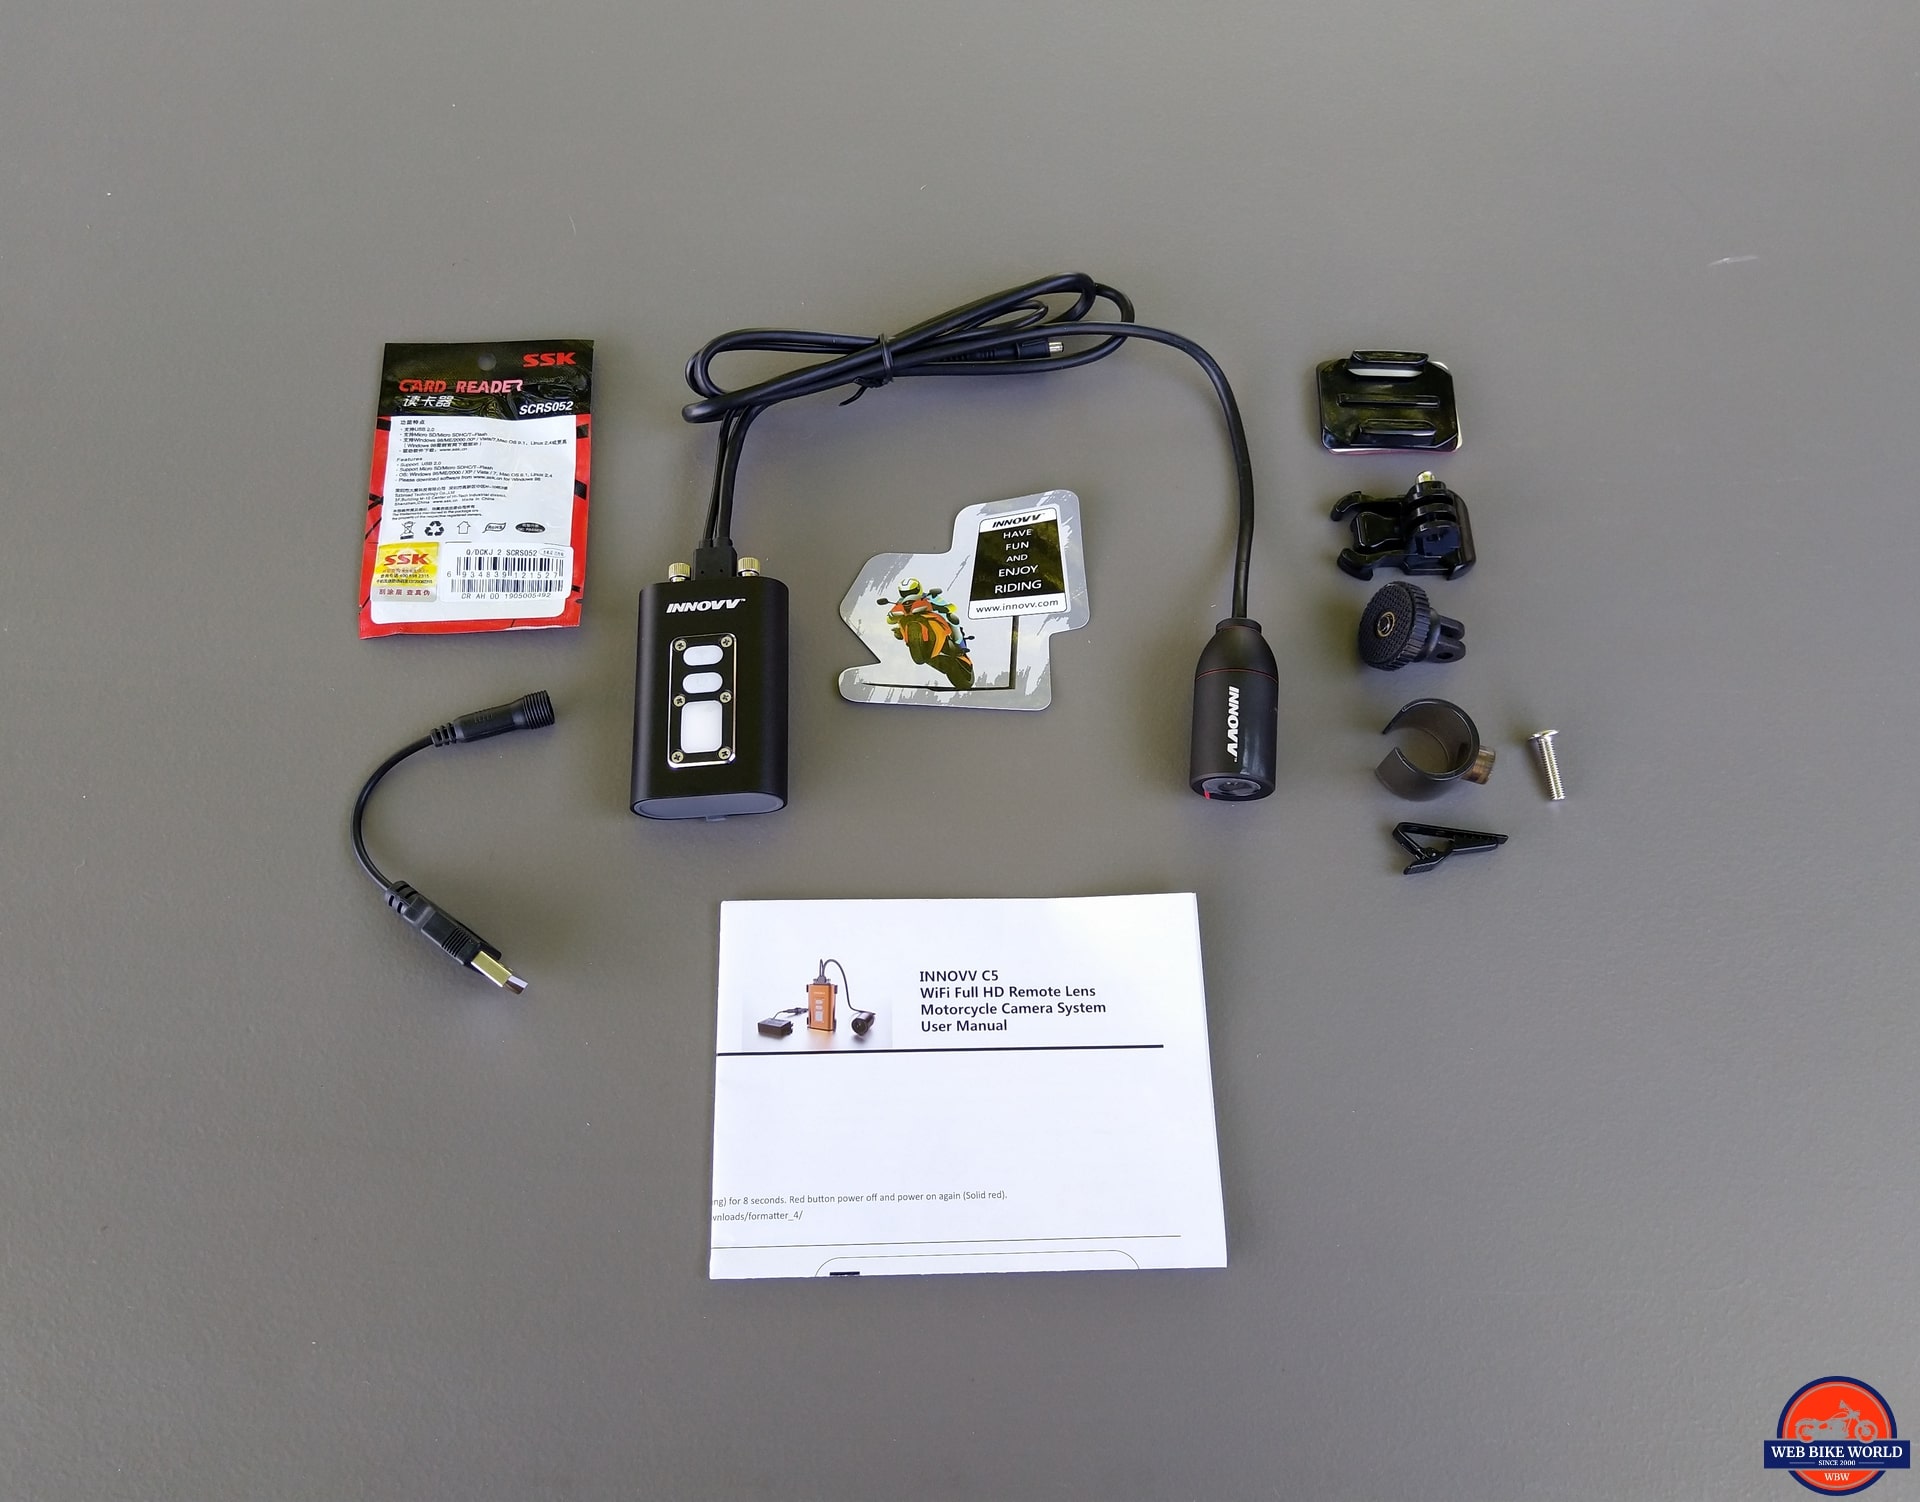
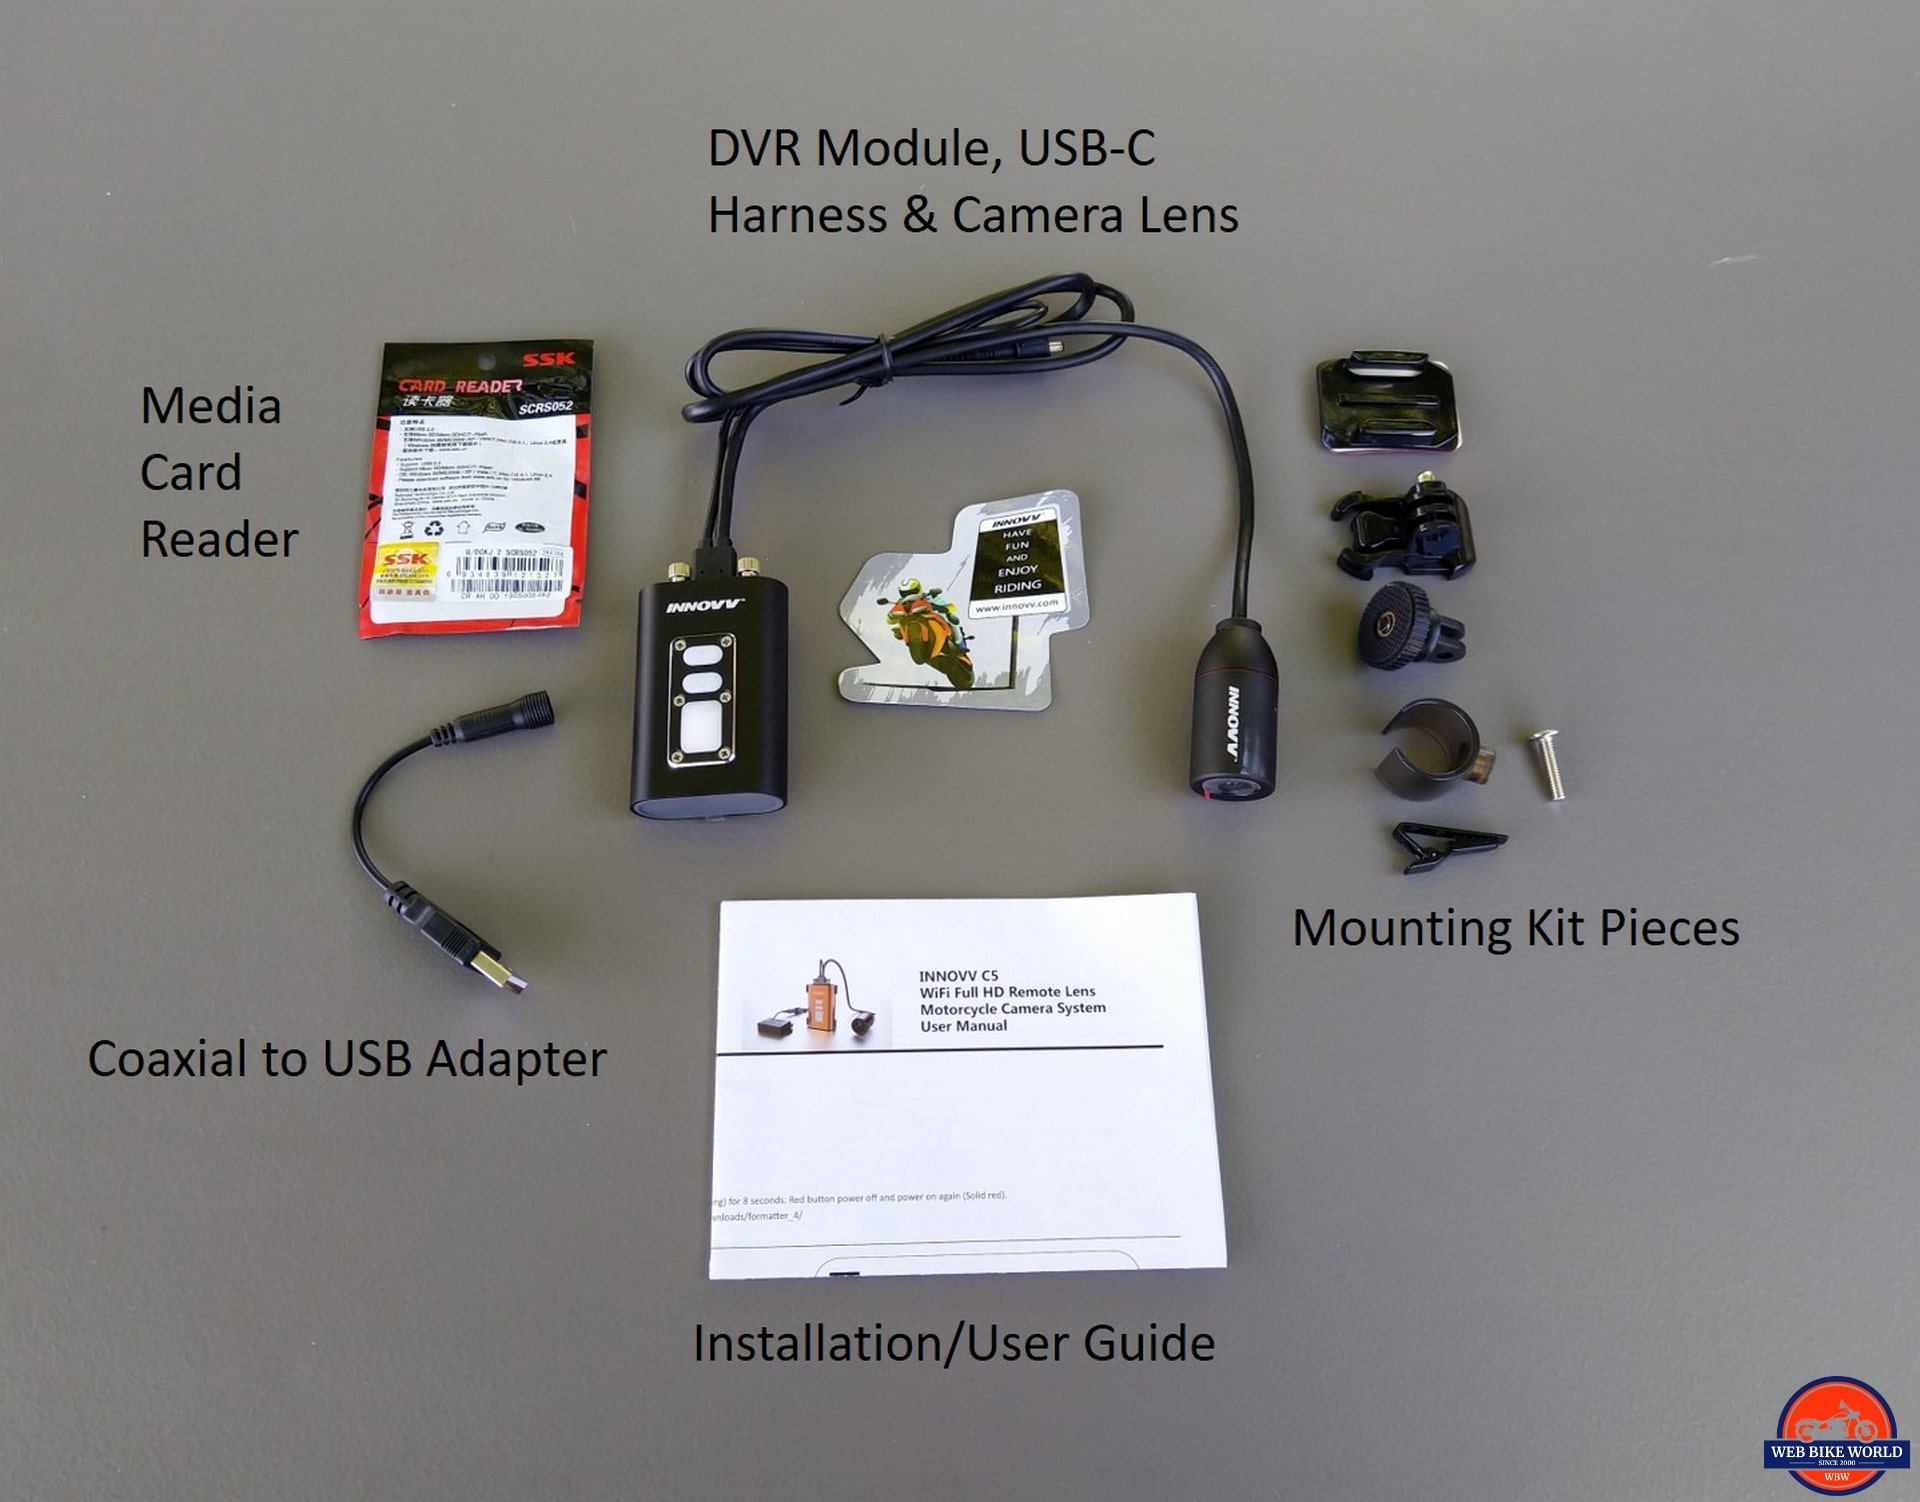
Retail Box Contents:
- Round 120-degree field of view lens with integrated USB-C and Power Harness
- DVR module
- Coaxial Connector to USB adapter
- Plastic Lens Holder with 0.25 threaded receiver
- Flat snap-fit connector plate
- Adhesive backing pad
- Snap-fit buckle with interlock
- Pivoting interlock mount with universal 0.25in threaded (locking) mount
- Clothing pinch clip (for cable management)
- Micro-SD card reader with security line
- Double-sided folded Installation Guide/User Manual (for original C5)
System Components
Other than the Coaxial to USB power adapter section, and omission of the 12V/5V DC power supply and a simpler lens mounting kit, the C5 Helmet Camera components and related functions are the same as for the original Moto-Cam variant.
Lens
In having early opportunities to try the (new) standard round lens when INNOVV began testing them for the (pending) C5 and (subsequently) for the K2 model, their adoption is certainly seen as a good thing. Even though the original (Borg) cube modules had a certain hard look to them.
Even after being involved in one or two incidents where some damage to the accessories was incurred, the sleek round pieces came through just fine – the housing was scratched but the hardened lens was not – tough pieces indeed.
Harness & Power Adapter
The main harness section runs from the round lens module and at the end of its 1.8m length is a sturdy sealed cap housing both the lens cable and a thinner but nonetheless sturdy 42cm long power lead terminating in a coaxial jack.
This coaxial jack is then mated to the socket end of the 15cm (end to end) adapter with the other end being a USB-A connector that can be used with any 5V USB source.
USB-C connector & USB-C port on DVR
Both leads run into the sealed USB-C connector housing. When this connector is inserted into the port on the top of the DVR, it is very sturdy and weather resistant. When the two thumbscrews are inserted and tightened up, it is waterproof.
There are three cable lengths available for the INNOVV C5 Helmet Camera:
- 0.5m (1.6ft) for pocket location side or upper chest pocket
- 1.0m (3.3ft) for waist or back mount location, and
- 1.8m (5.9ft) for remote power or USB outlet access
DVR Module
The Digital Video Recorder or DVR module is made by aluminum extrusion. Nicely rounded it fits easily to the hand and is stowable in almost any size pocket or pouch.
With the USB-C connector installed and tightened up, it is totally waterproof, at least at the top. The bottom silicone cap covering the external ports provides a good seal but more ‘weather-resistant’ than waterproof.
The silicone protective cap covers the 3.5mm port for an (optional) external microphone, the internal microphone pinhole, an inverted micro-USB port, the reset pinhole, and the micro-SD media slot.
The three (two actually) front face control tiles are touch-friendly and each has its own color. The top one is the (Green) WiFi connection/status button, the middle one is (Red) for power/recording button and the larger White tile is not used.
Mounts
The essentials are provided, although some spare pieces would be good. Although for the most part, all the pieces and literally hundreds more in all shapes, sizes, and function are available in stores and online at reasonable prices
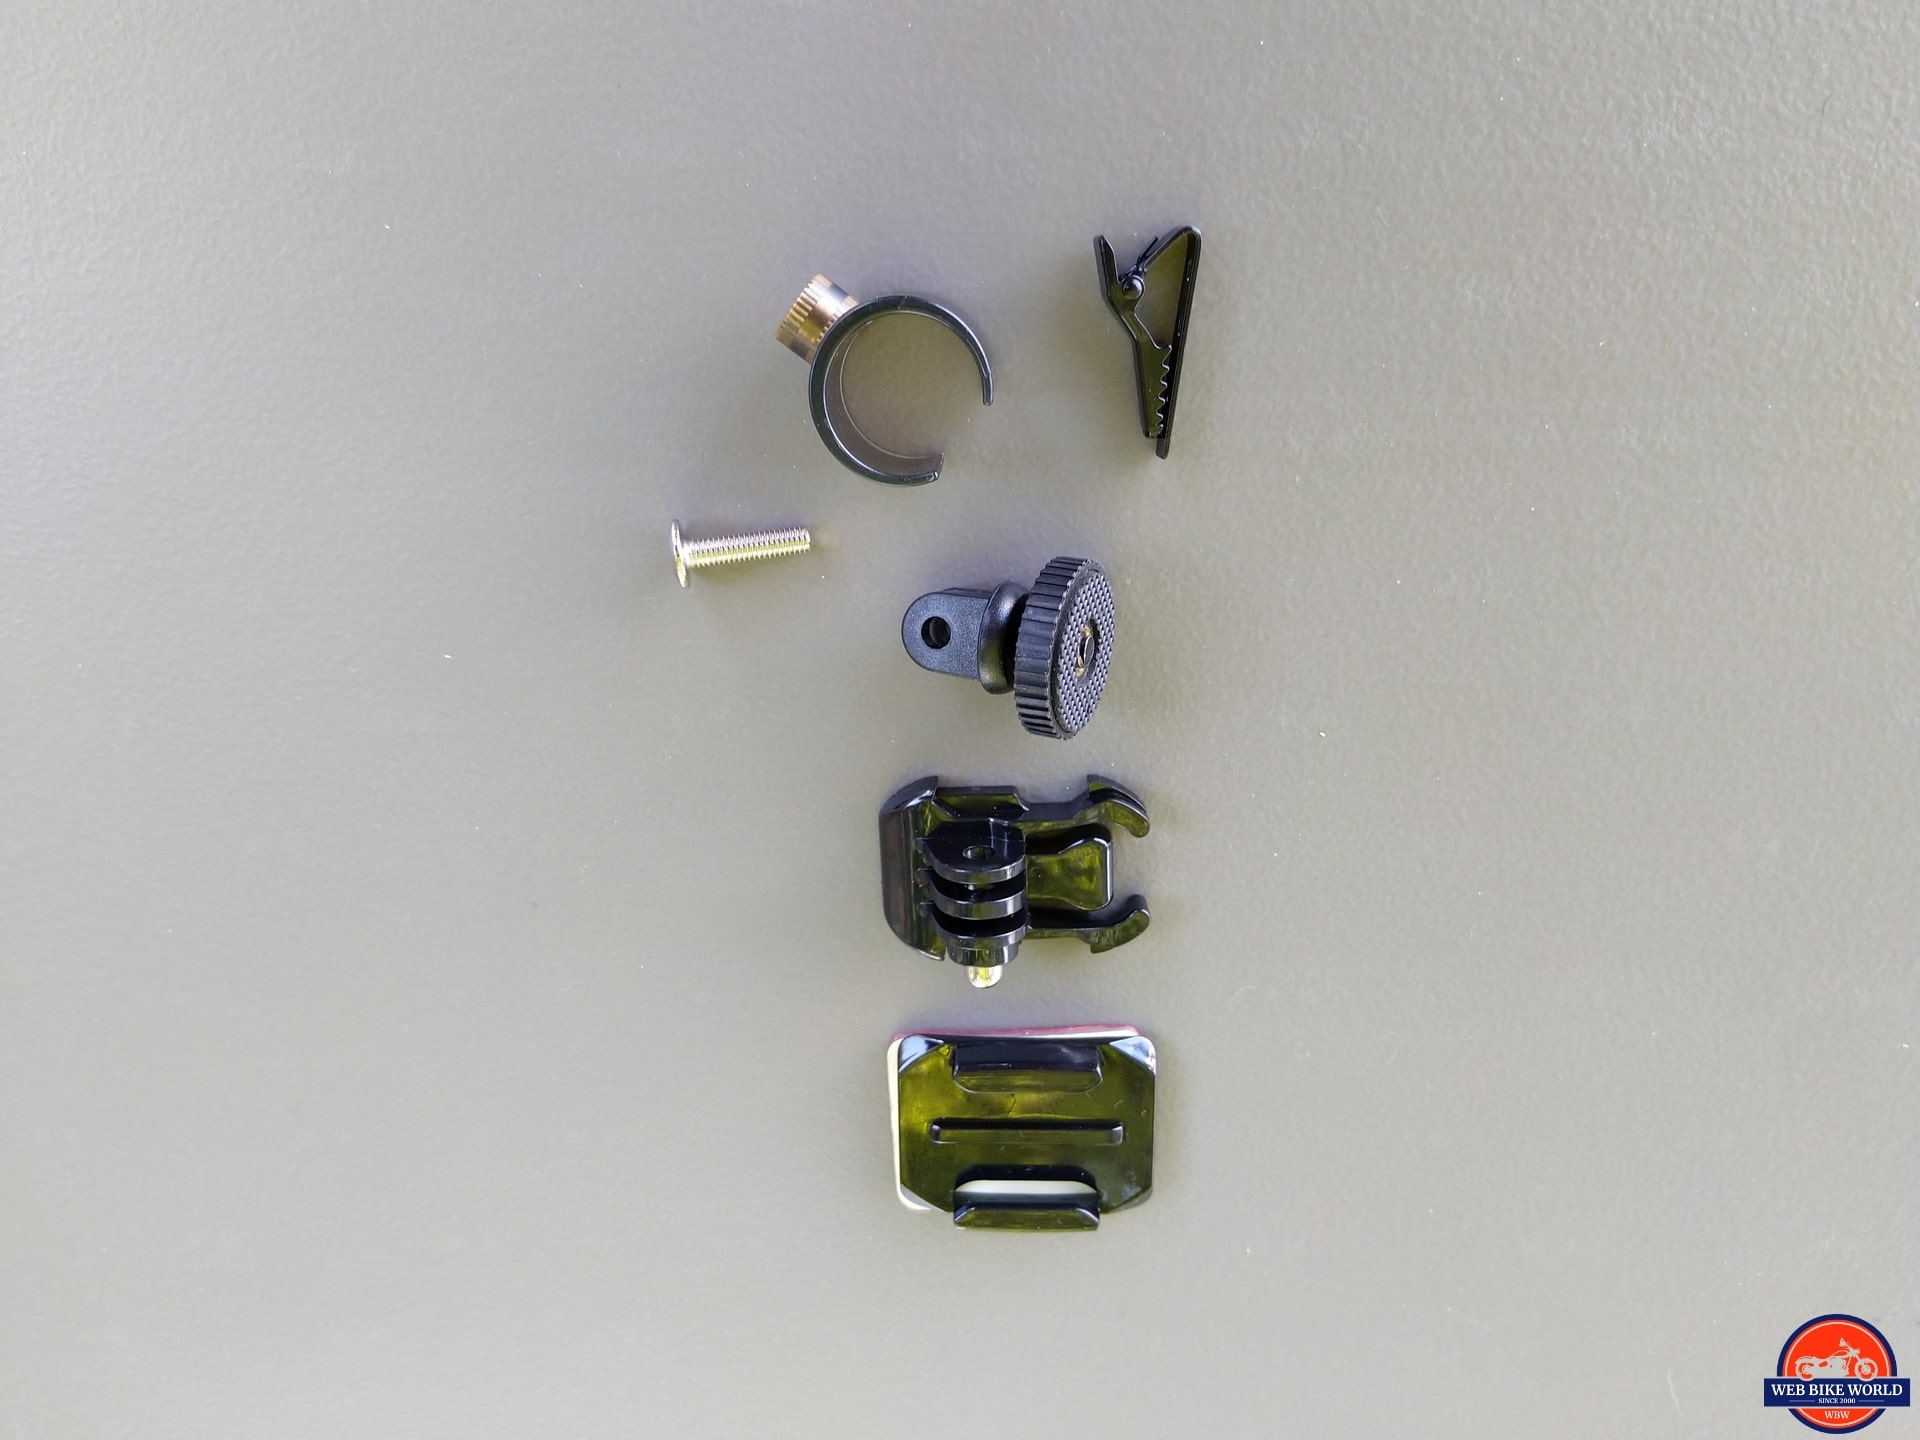
In the mounting bag is (top to bottom):
- Plastic lens holder with 0.25 threaded receiver
- Flat snap-fit connector plate & adhesive backing pad
- Snap-fit buckle with interlock
- Pivoting interlock mount with universal 0.25 threaded (locking) mount
C5 Helmet Camera Specifications
(from INNOVV)
- DVR Size 70 x 46 x 21mm (2.7 x 1.8 x 0.8in)
- DVR Colour, Black or Golden
- DVR Material, Aluminum
- IP Rating, IP65 (dust and water protection)
- WiFi Key, Green LED
- Power Key, Red LED
- Micro-USB, charging (DC 5V, data transfer)
- SD Card Slot, supports up to 128GB
- External Mic Port, supports external microphone use
- Internal Mic, supports internal microphone
- Remote Lens with integrated harness
- Lens Specs
- Case Size, ~ 25.5 x 54mm
- Case Colour, Black
- Case Material, Aluminum
- IP Rate, IP68, dust, & water protection
- Cable, USB 3.0 data transfer, Type-C connector with thumbscrews
- Cable Length Options: 0.5m, 1.0m, & 1.8m
- Camera System
- Operating temp -20C to 70C
- Storage temp -20C to 70C
Installation
In considering helmet fitment (or other spots), one needs to consider the best placement. This placement can vary depending on whether the user is the rider, passenger, or perhaps in the chair so to speak. Just keep any installation a safe one.
Lens Mounting
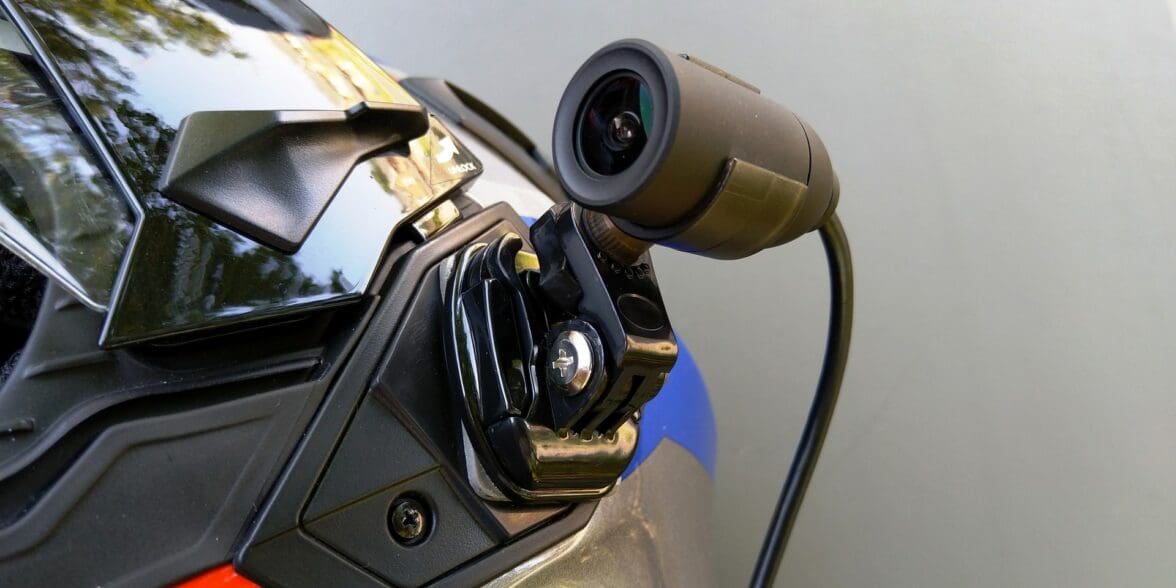
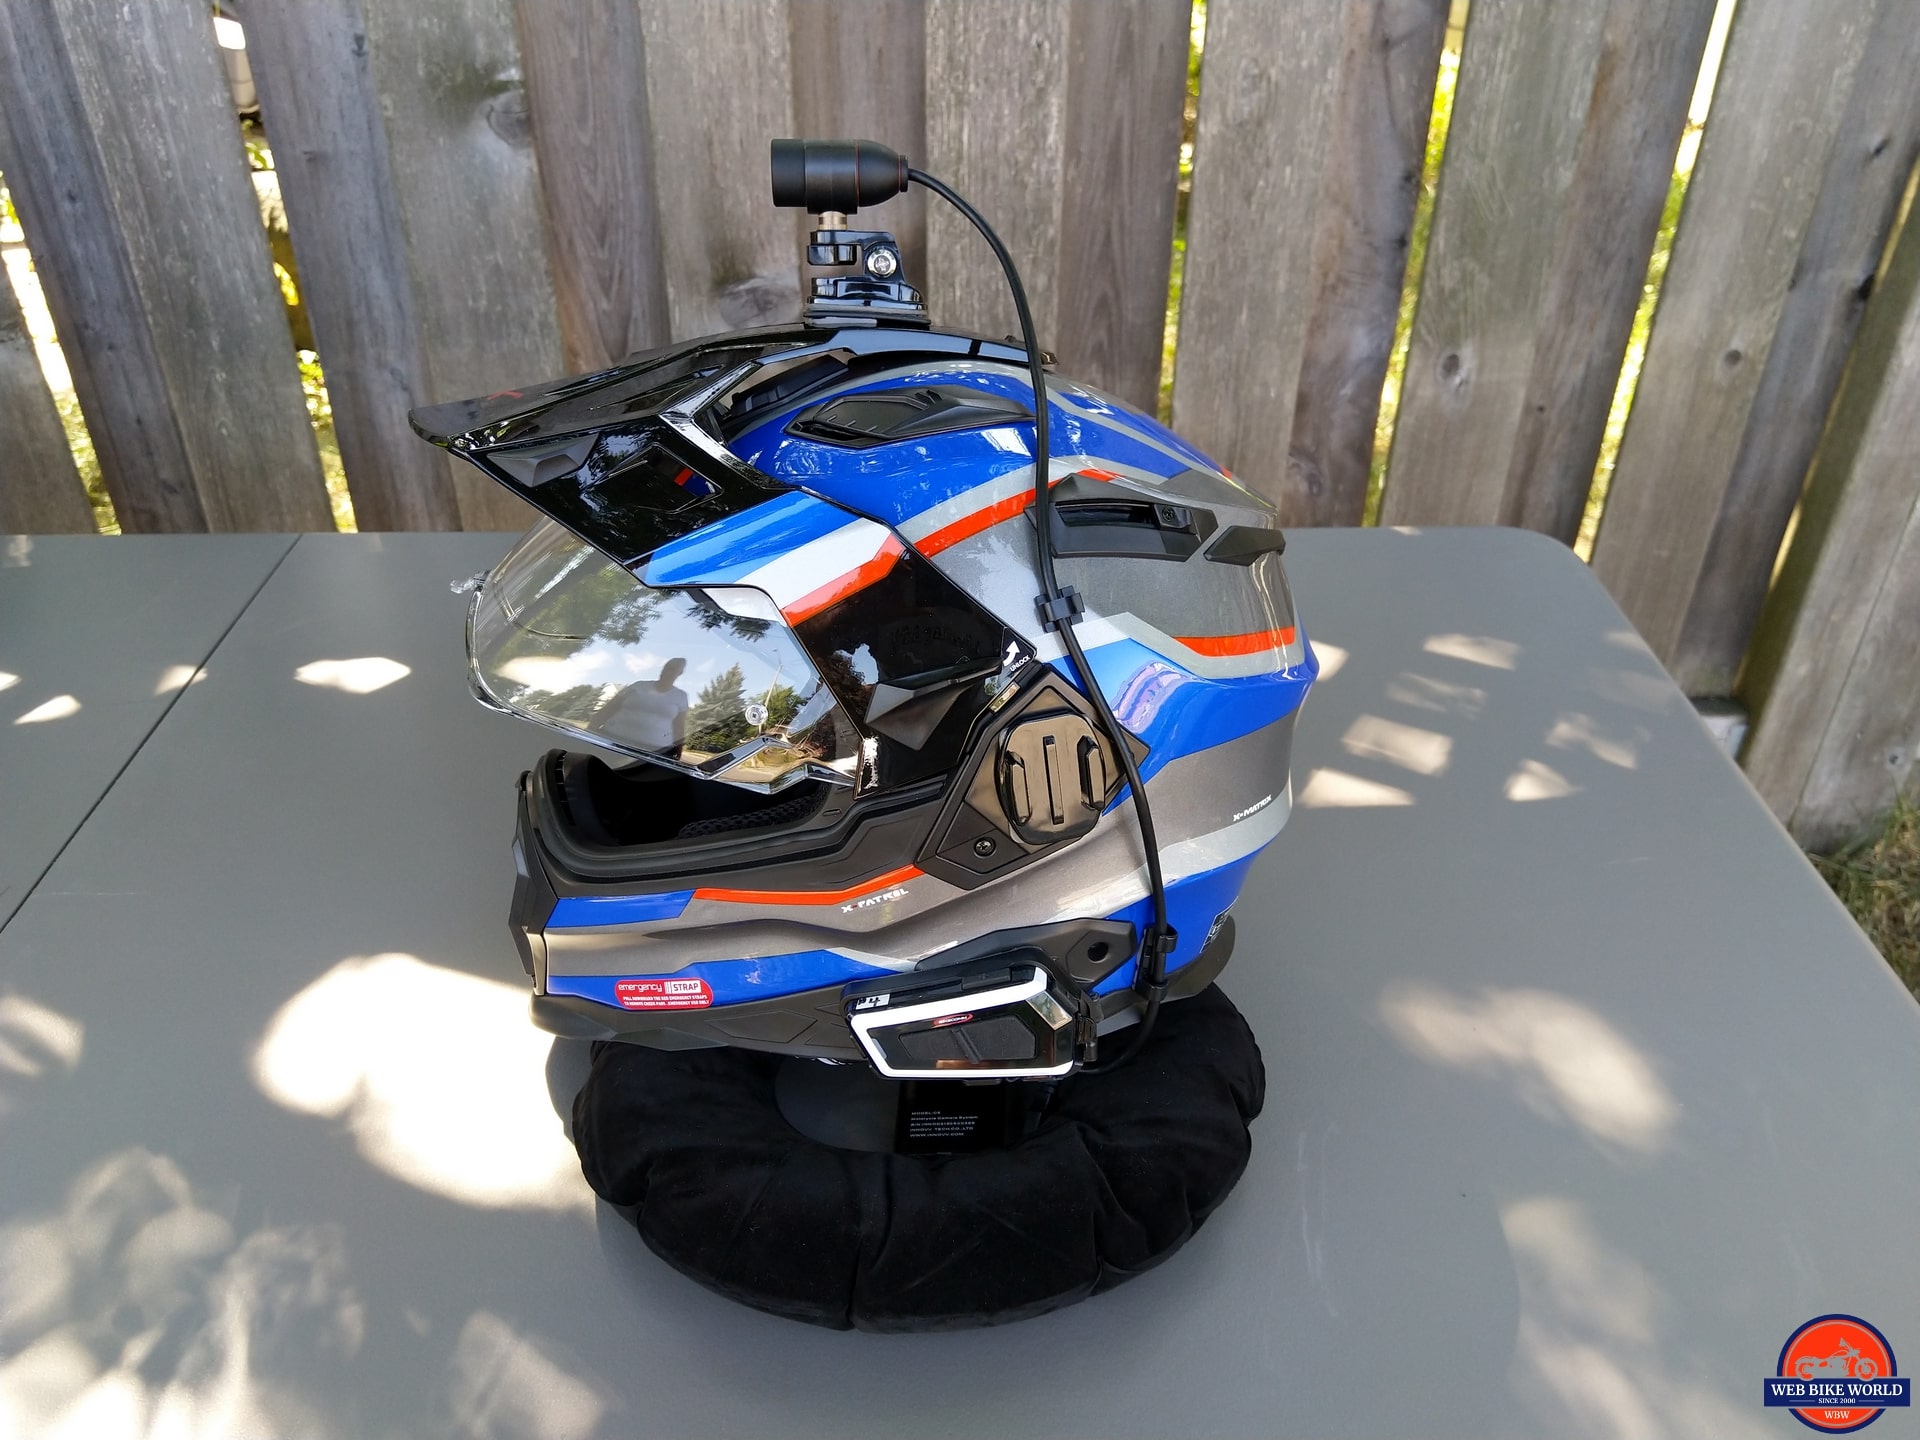
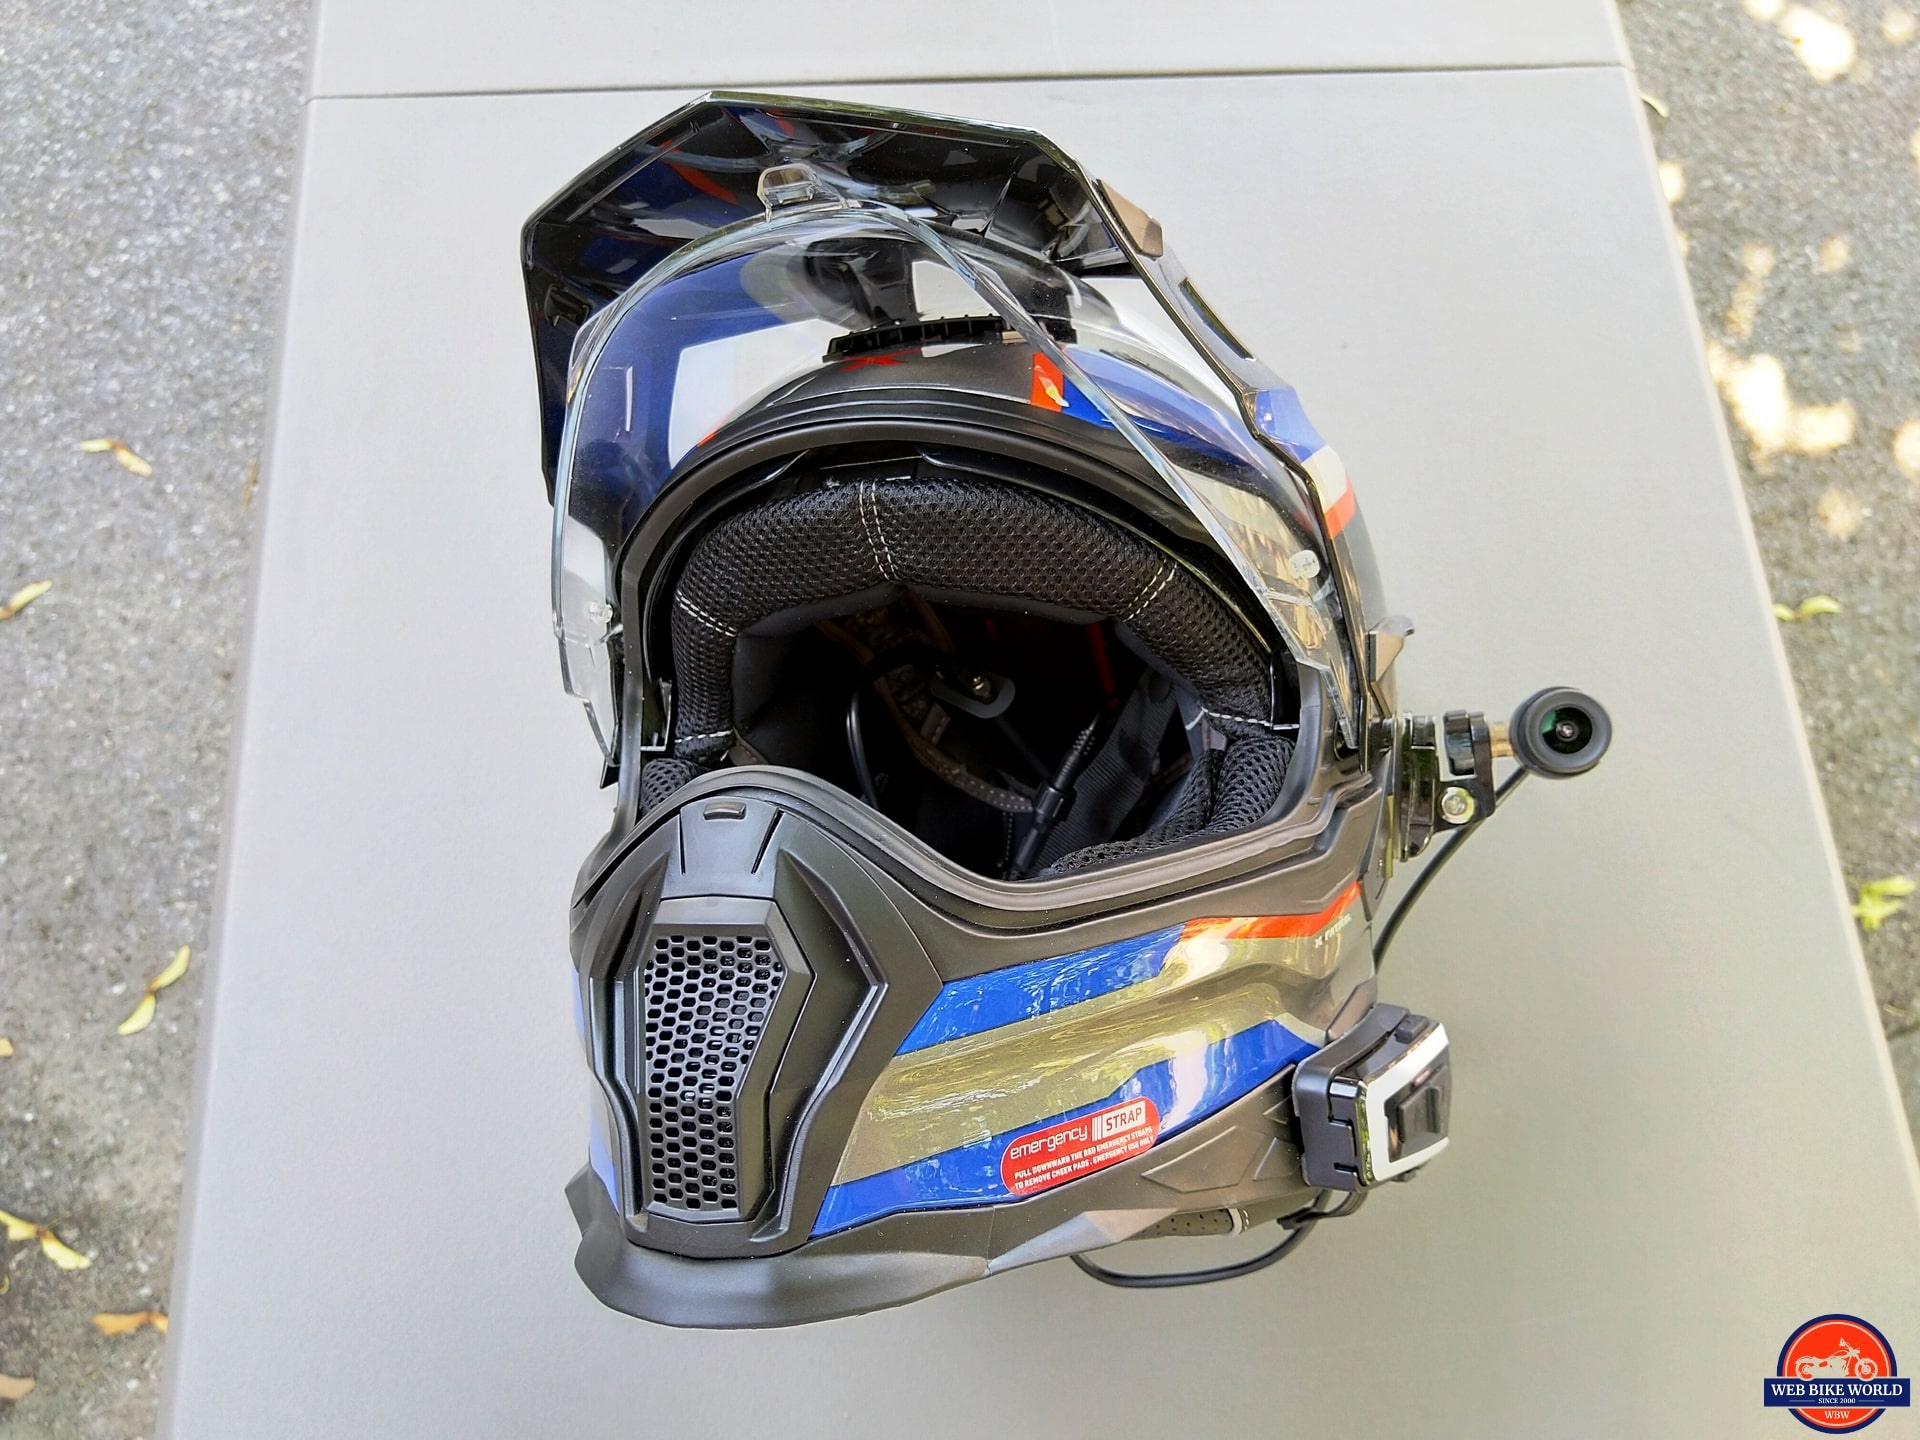
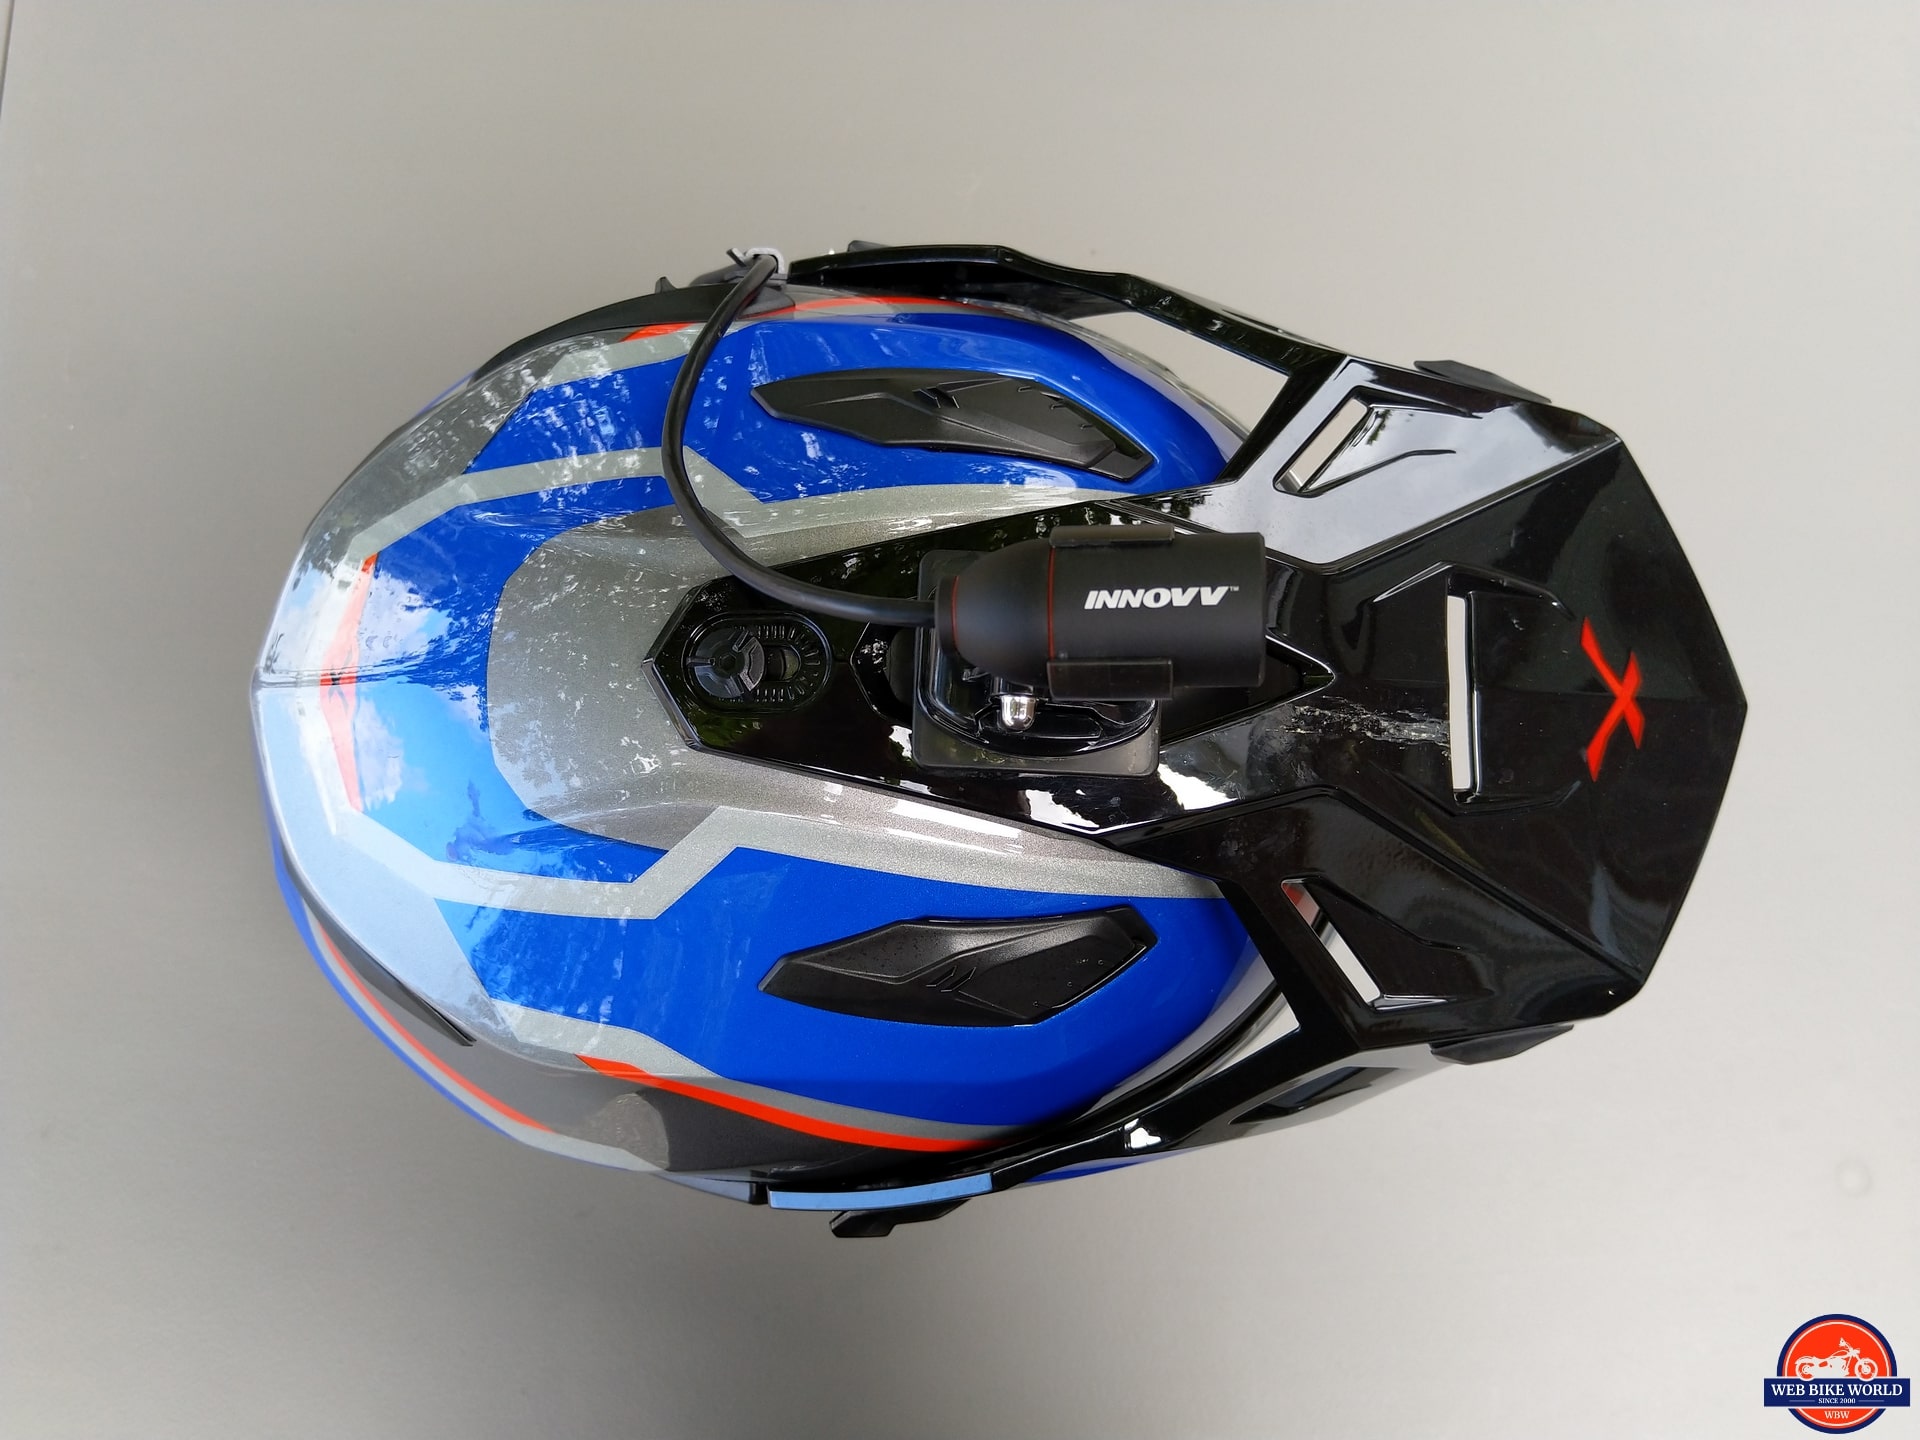
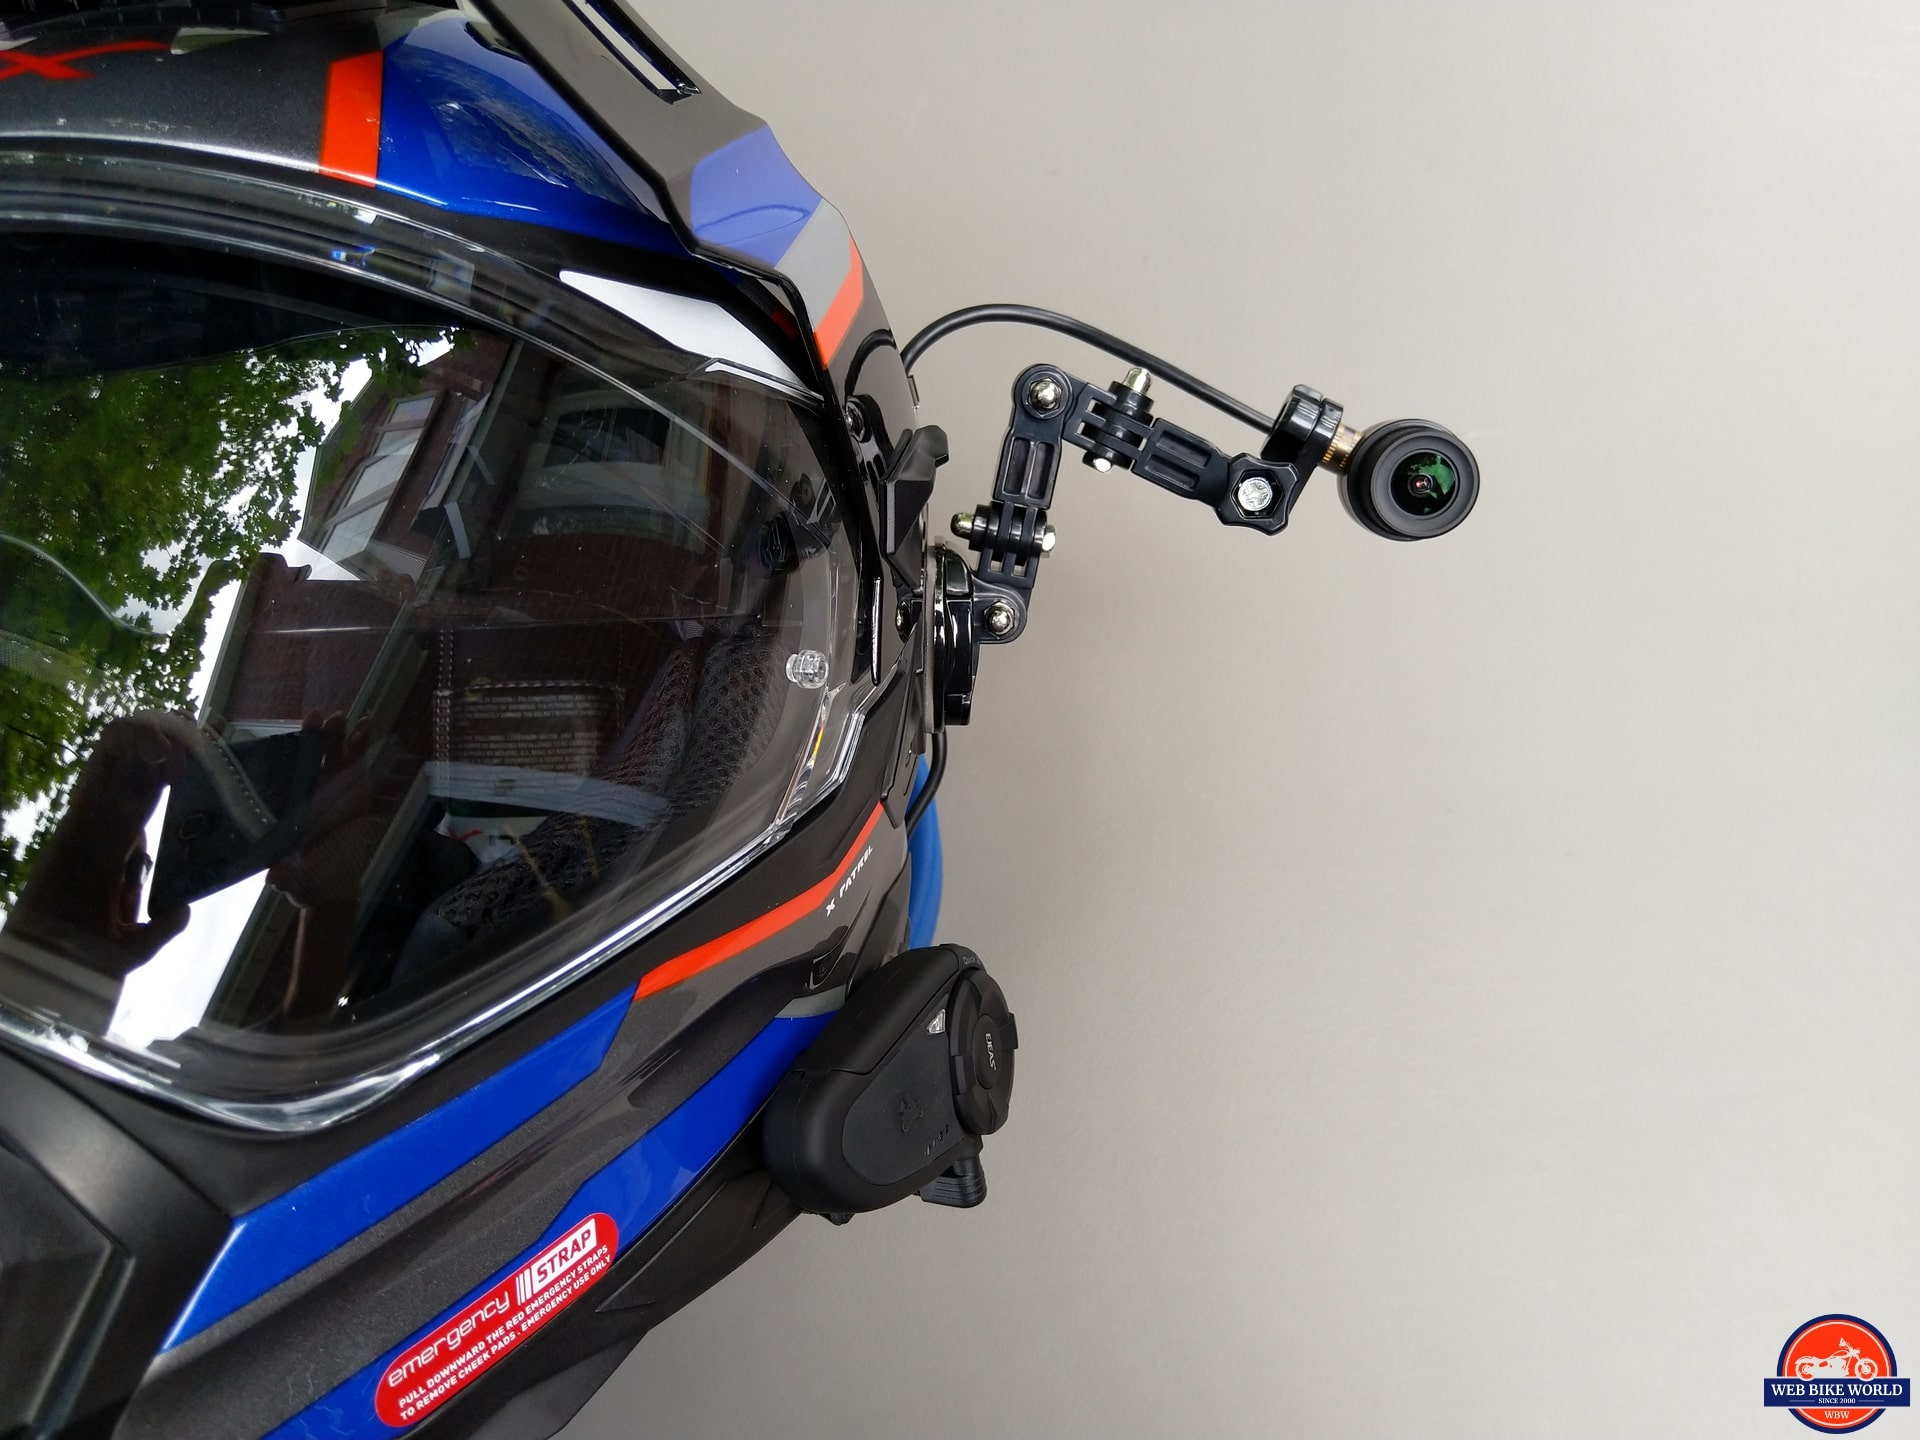
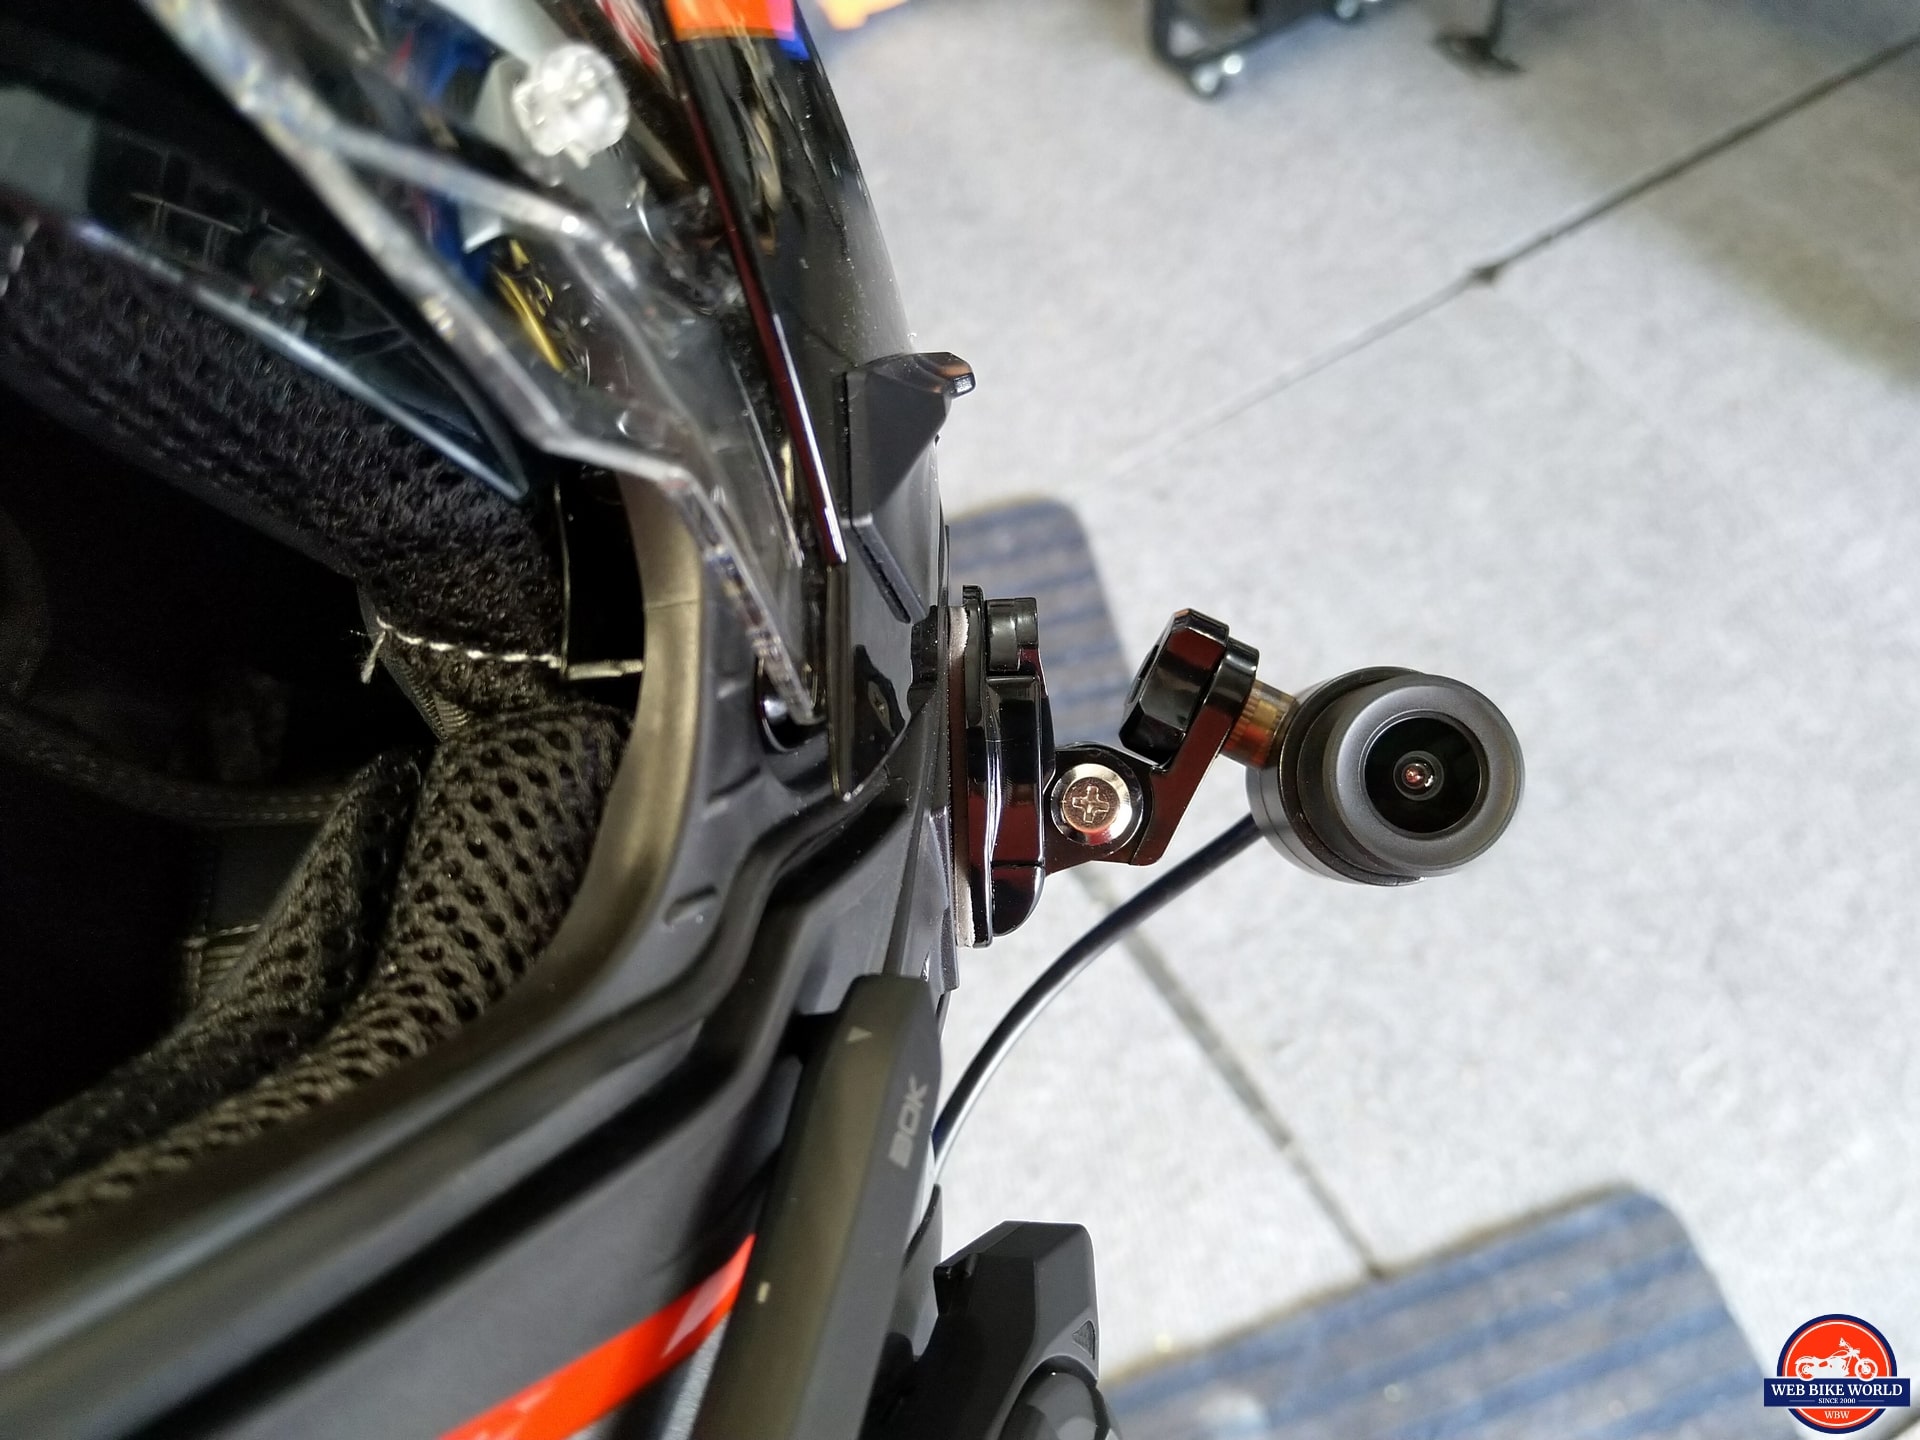
The initial host for the C5 Helmet Camera was the NEXX X.WED2 X-Patrol – it is my preferred adventure travel lid and has two sturdy side plate mounts and one less sturdy top mount, all provided courtesy of the NEXX multi-piece accessory kit.
A couple of Really Useful Boxes on the shelf filled with various Go-Pro style and universal device adaptation mounts and pieces provide more than a few options to work with.
But the supplied kit pieces were used first. The snap-fit plate, with its adhesive backing pad-mounted, got installed to the left side mounting plate that sits behind and slightly below the plastic cover of the visor mechanism. The mount got to cure for 24 hours.
X-Patrol with Snap-Fit Plate Mount
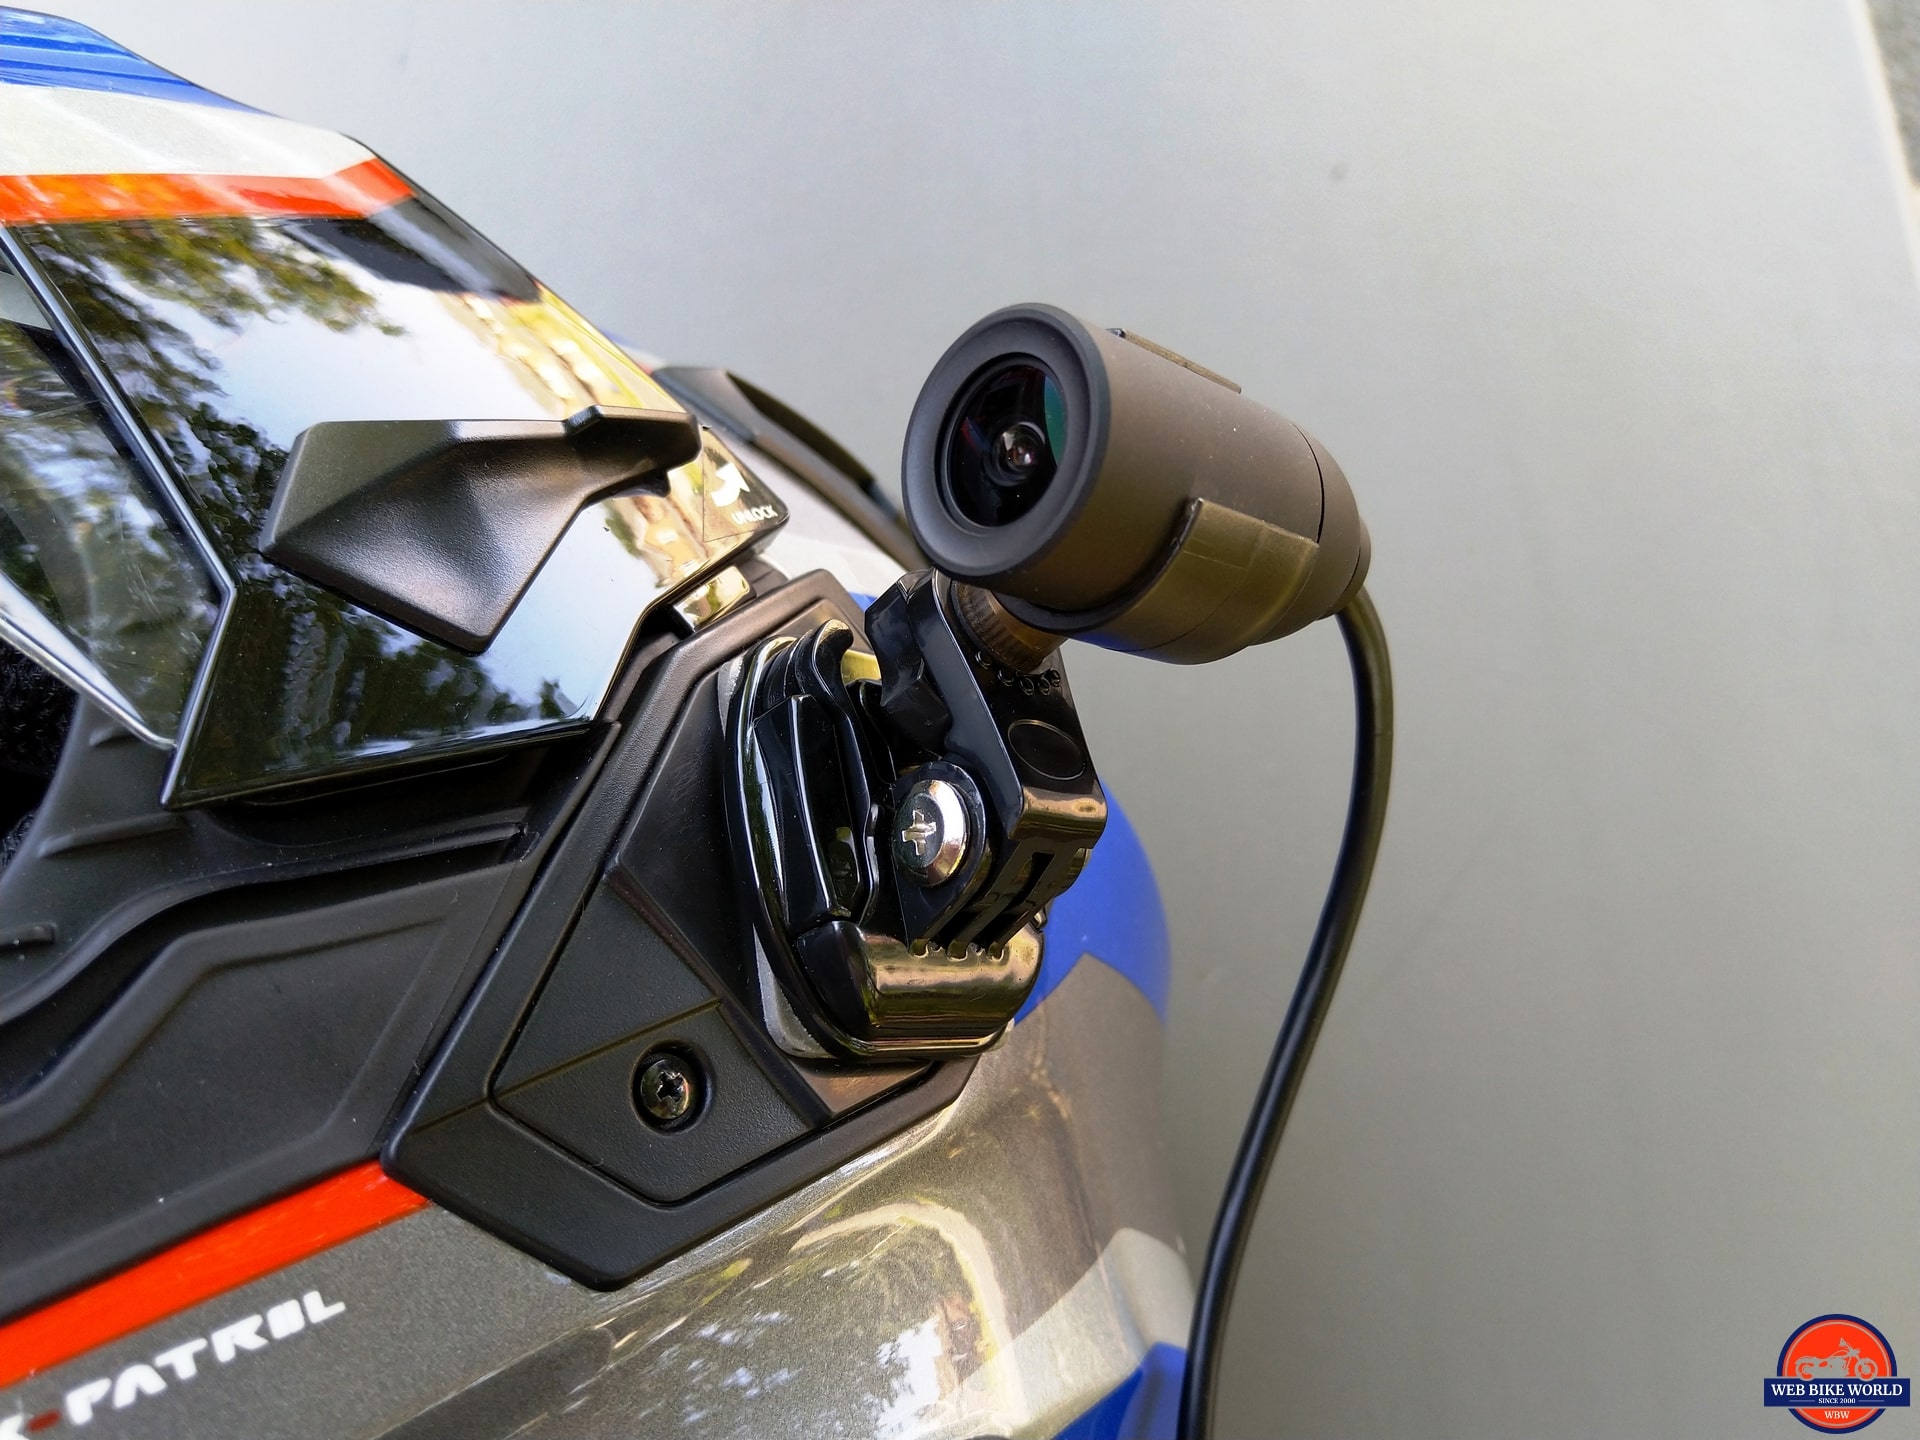
The next step saw the lens carefully fitted into the thin plastic lens holder by spreading the plastic sides of the holder apart just a little with light pressure and working the lens in from the back until the back of the holder sits about where the lens seal is. The orientation of the lens waits until its mounted positioning is known.
With this bit of careful work done, the housing can be threaded over the waiting 0.25in thread on the pivoting interlock piece and just snugged up a bit, for now, with the adjuster wheel tightened slightly.
Now the screw from the buckle piece is removed, the two interlock pieces fitted together in the desired orientation. The hardware is reinstalled and again, just tightened enough for friction to keep things in place.
Finally, the lens, holder, and buckle assembly slides into the waiting plate mounted on the helmet. The plastic pieces are quite strong and more than up to the task of coping with the weight and stresses of the small light C5 lens.
Orientation
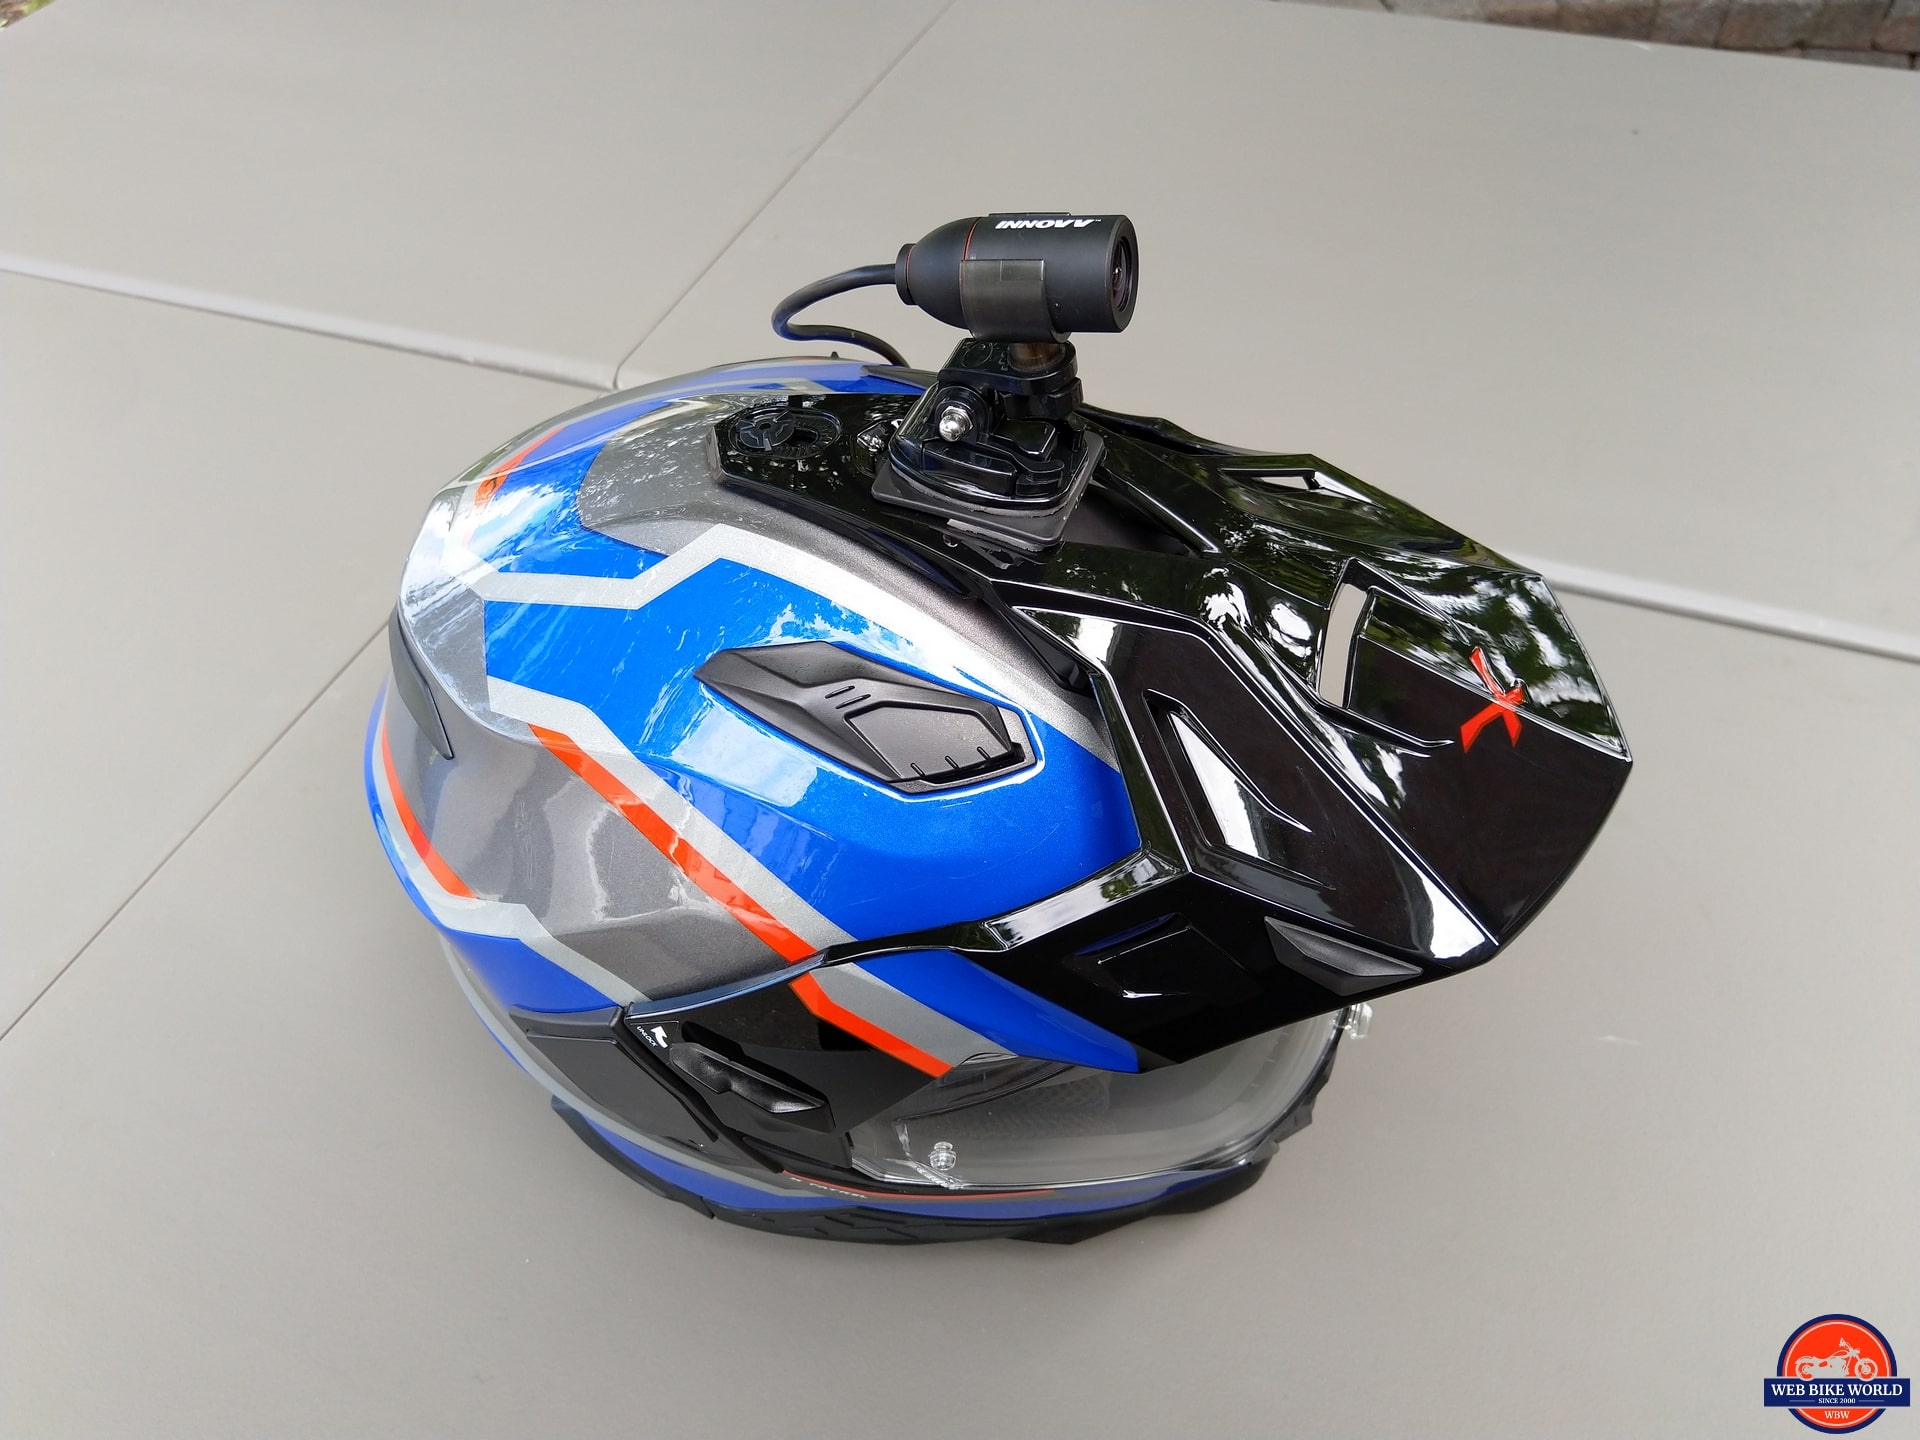
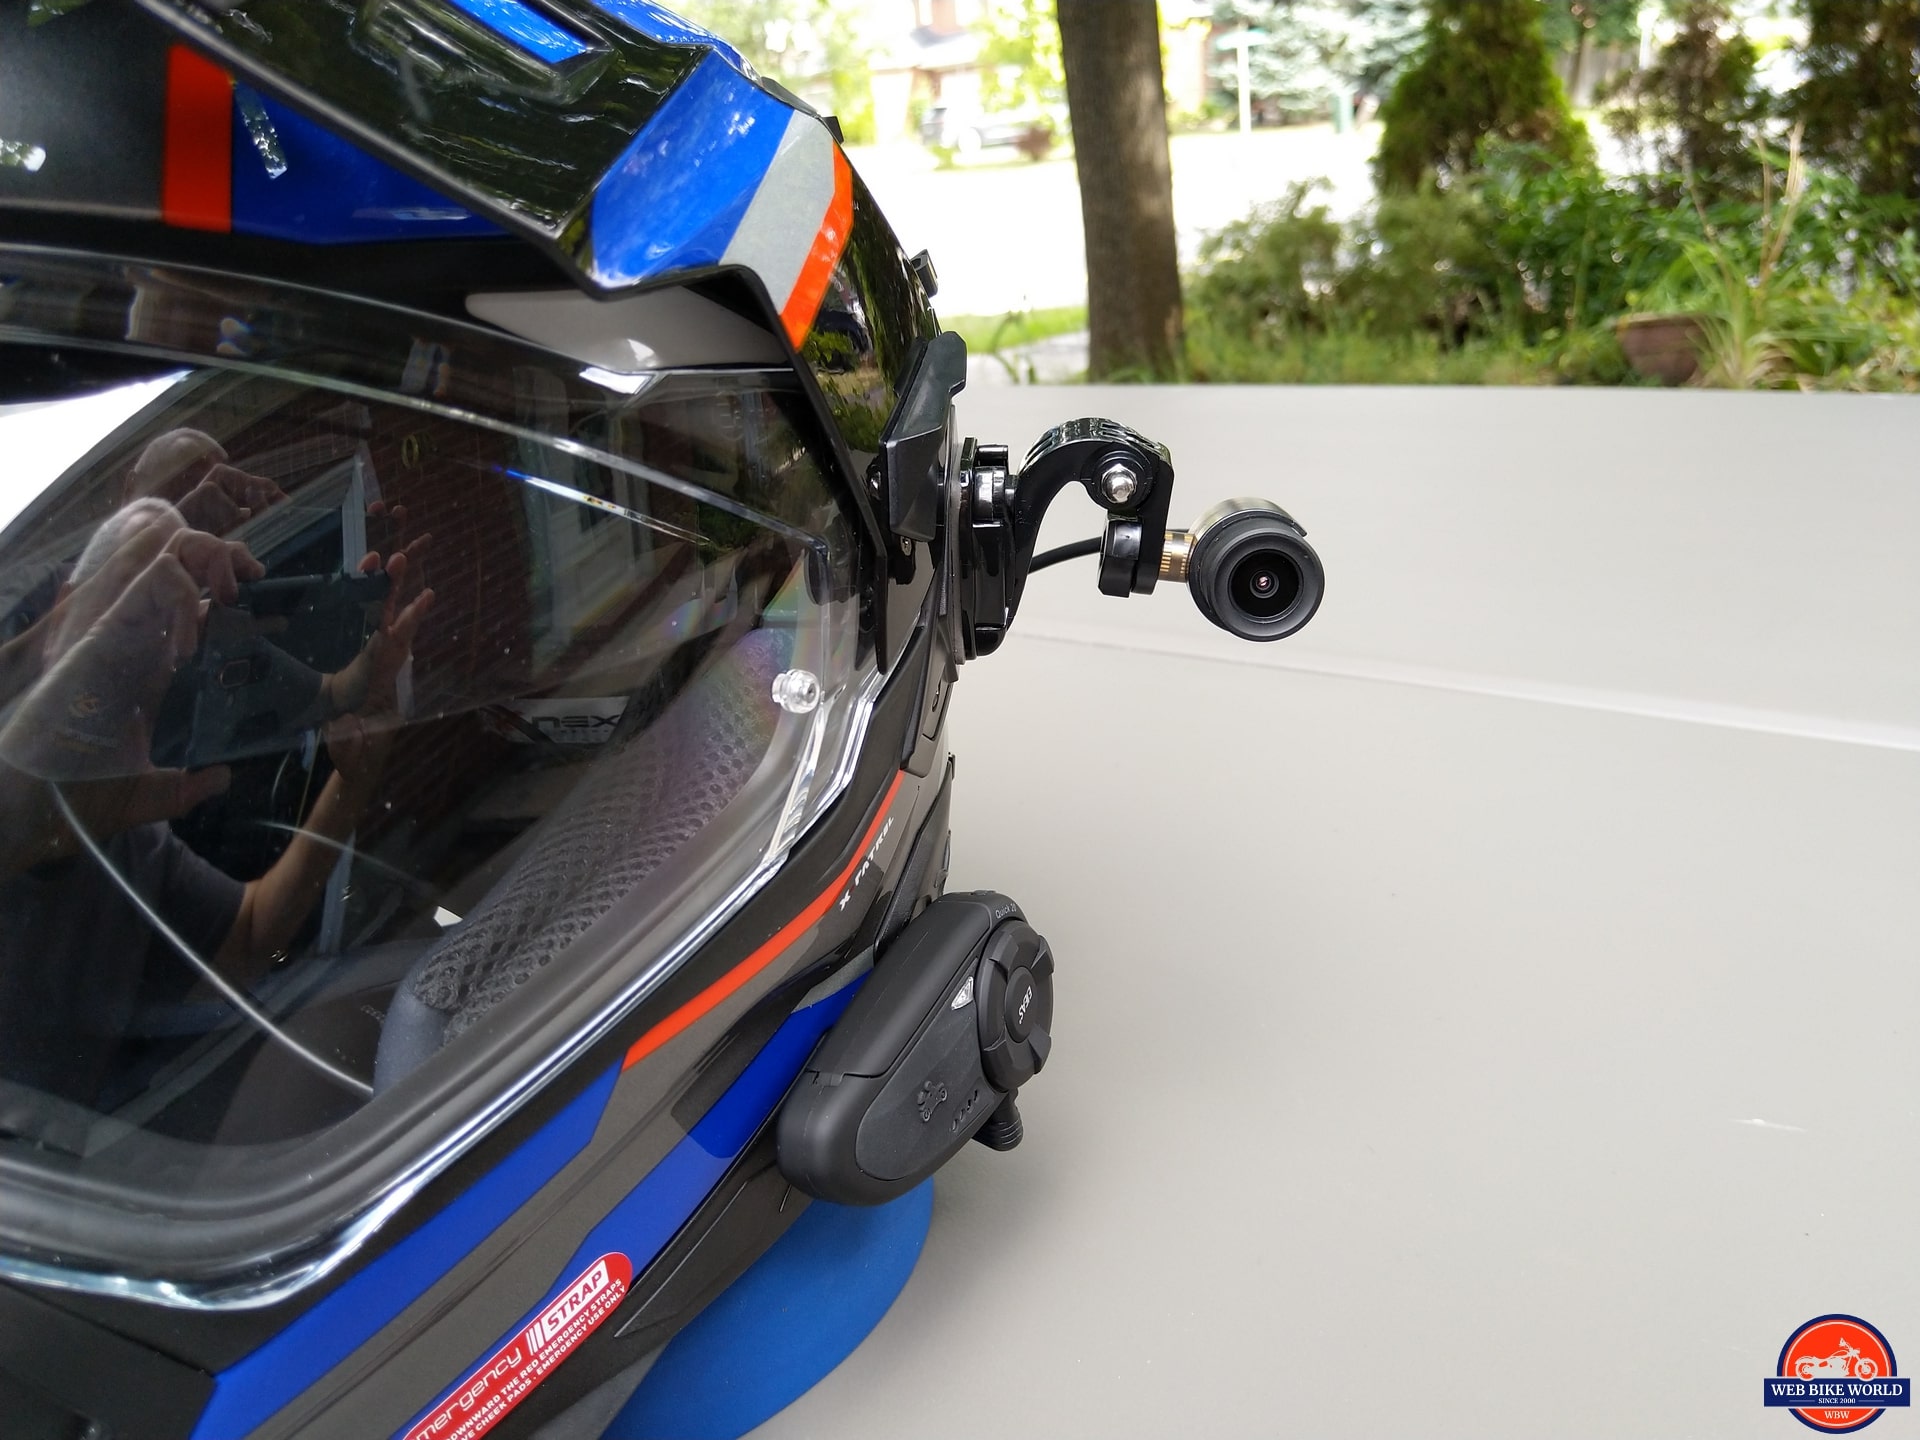
With the pieces fitted together, the pivot section can be exercised up or down depending on the desired proximity to the helmet and components. No matter its orientation, the overall mount is small and very low profile.
Of course, the orientation of the camera lens needs to be done – the INNOVV lettering on the lens is ‘Top’ for orientation purposes, so make sure the lens is rotated as required. Now the hardware is tightened fully and the system powered up for a live view.
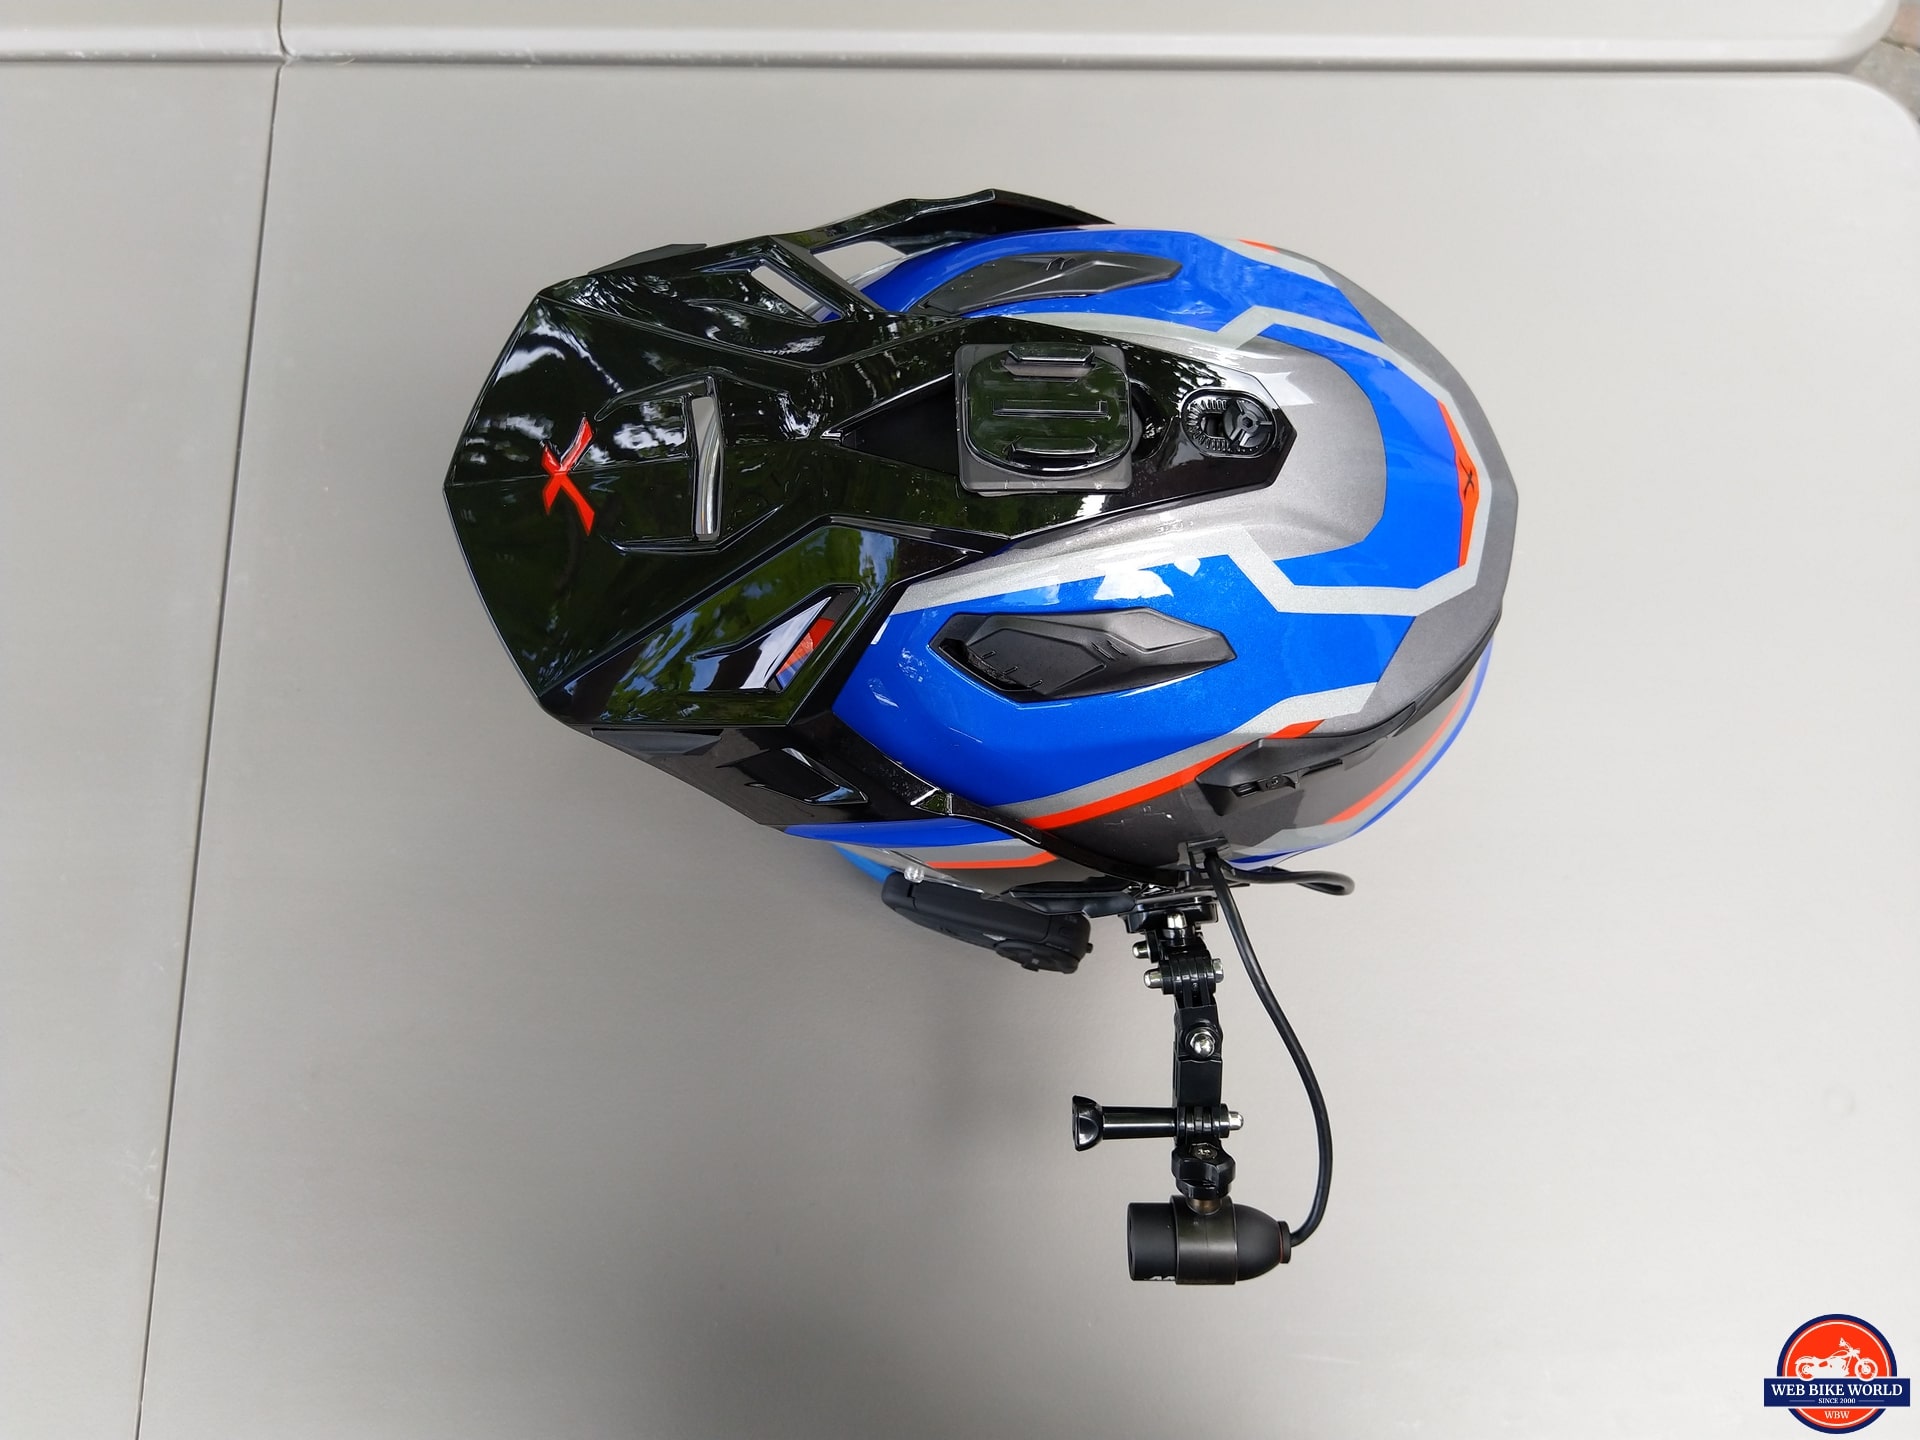
X-Patrol with Small Loop Mount
In general, at least with the NEXX X-Patrol, the side mount orientation was OK, although the edge of the helmet and part of the peak are seen in the view. Extending the short pivot out almost eliminates the pieces from view. The top mount, of course, provides a birds-eye view… for some strange reason.
DVR, Harness & Power Supply
While not absolutely necessary, in wanting to keep the installation tidy and everything secure, once the lens mounting is done a couple of small adhesive cable supports are installed on the outer shell of the helmets. They are typically on the left-back quarter so the harness is not intrusive or flopping around.
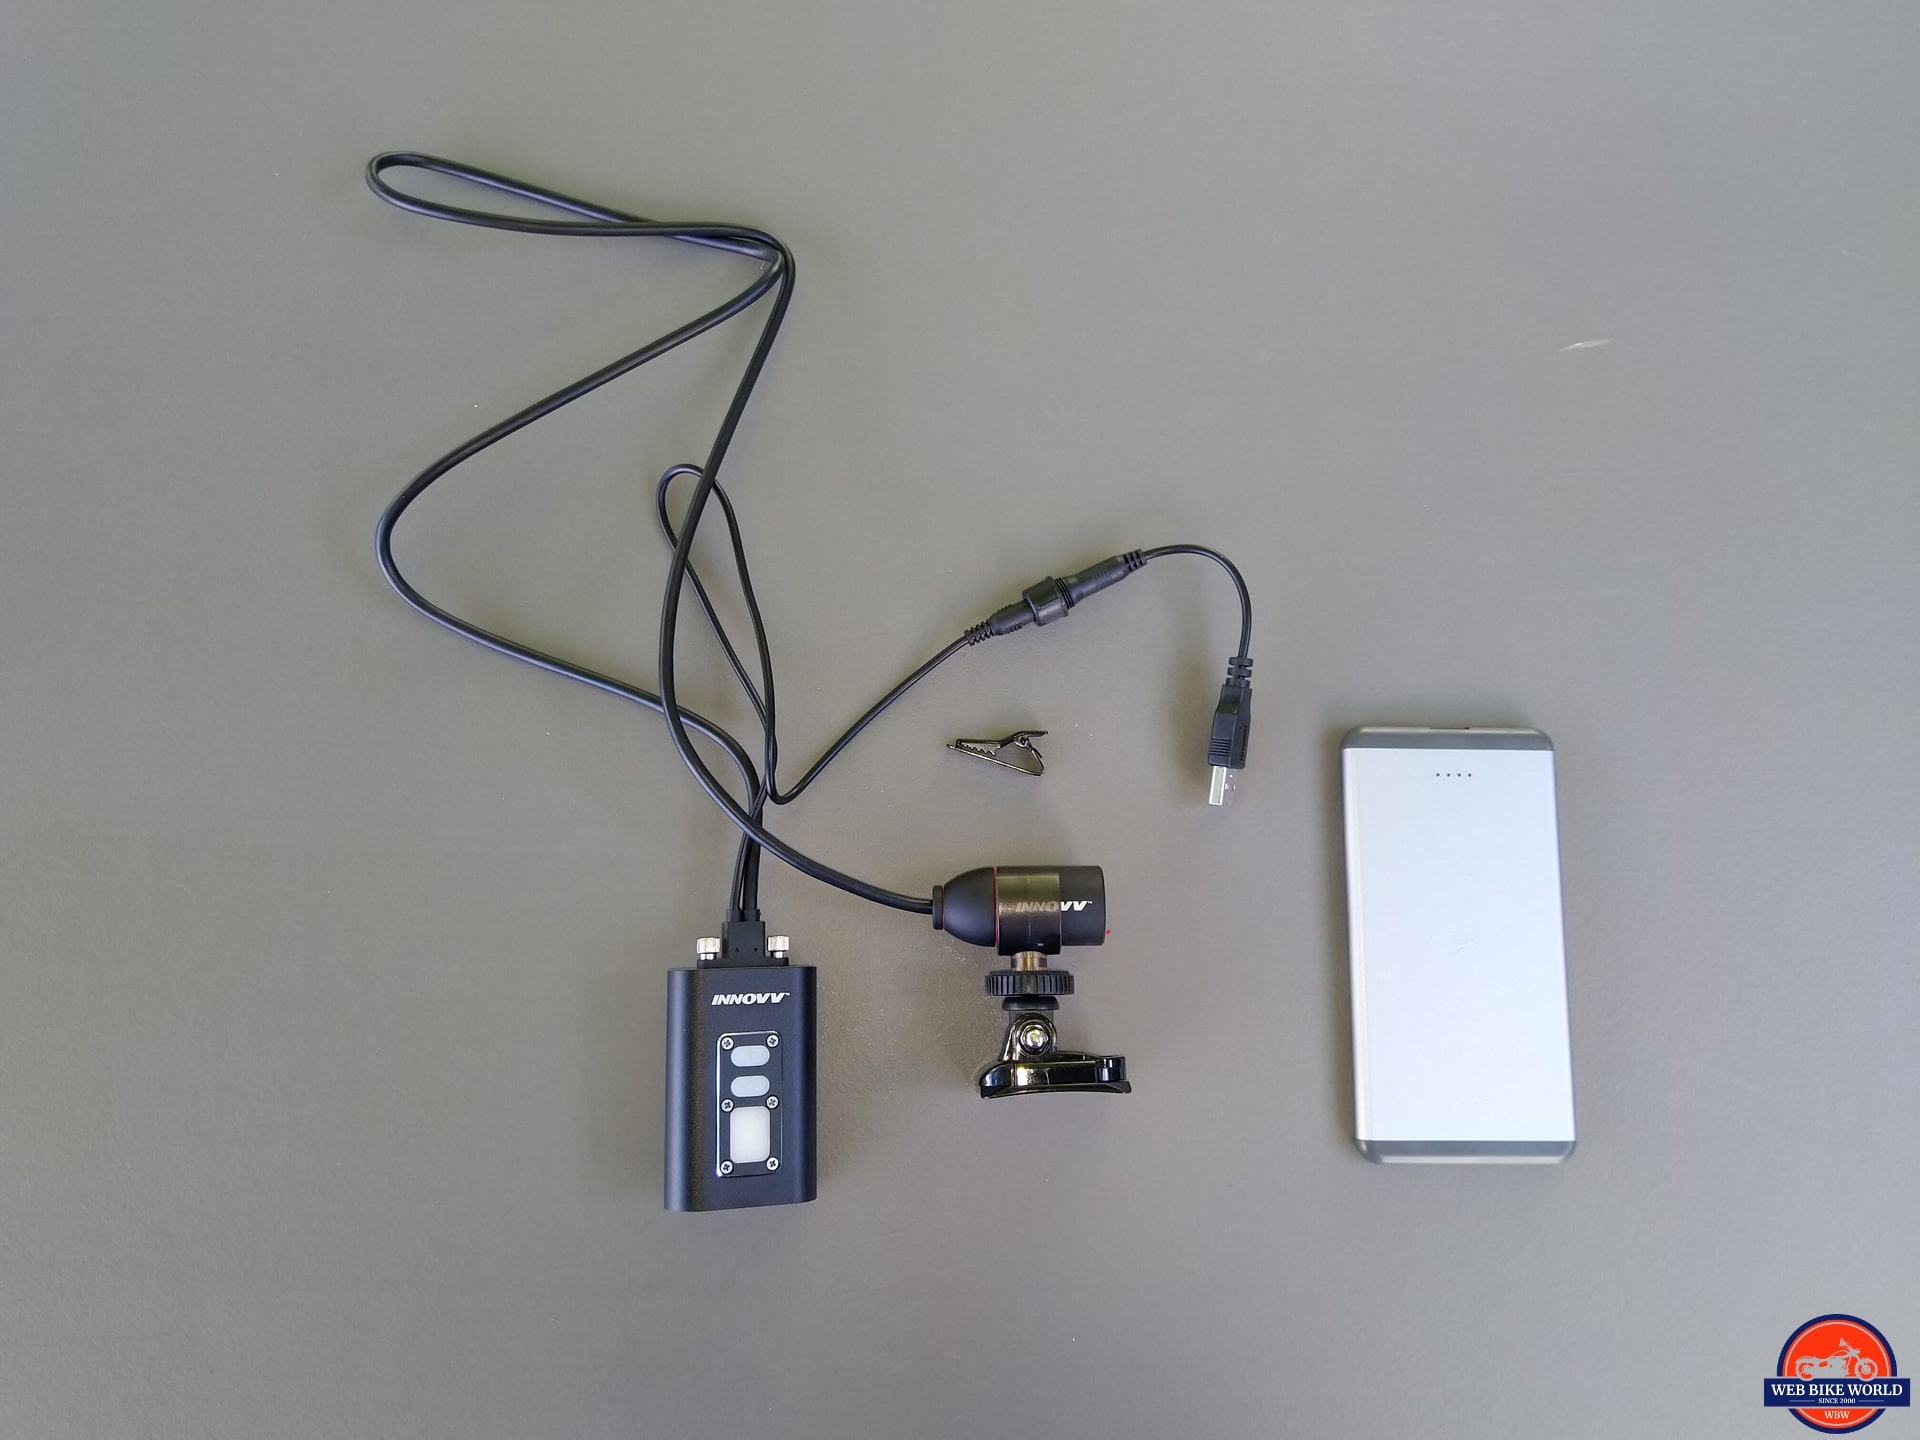
With the DVR module and a small 6000mAh USB power brick nestled in the outer left vertical zipped pocket of the KLIM Induction Jacket the whole setup is unobtrusive. With the helmet in place, the system is all carried on the body per se.
Everything fits nicely including, a bit of excess harness. Neither of the modules seems to produce a lot of heat, the pocket is frontally mounted and behind a layer of air flowing mesh.
Different Mounts & Locations
Different locations with varying mounts (longer, multi-jointed, etc.) have been used, as well as waist-bag housing for the DVR and USB power brick. Some of the placements and storage configurations work well, some not so much. Use your imagination, just keep it safe.
Connectivity & App
WiFi Connection
As with many/most other POV camera systems using WiFi, it is a ‘local’ connection, so no Internet or external data connectivity is provided.
With the C5 Helmet Camera powered up, its local network is identified as ‘INNOVV_C5_xxxx’ and the default password is a hard one – ‘12345678’ With this entered, the connection is made and the WiFi light goes from a flashing Green to a steady Green.
Relatedly, while getting the INNOVV WiFi connection up and running, you may find that (any) primary data/cellular service needs to be dealt with between the camera WiFi and its app. This happens occasionally with the INNOVV connections and almost always with some others, like the Sena Camera app.
Failed connection? – If the camera WiFi connection isn’t taking or the camera app is not launching or loops back to the network connection screen, possible workarounds are:
- Disable the specific data service (many newer devices provide selectivity under settings or connected device settings)
- Make sure the network connection app/screen is closed
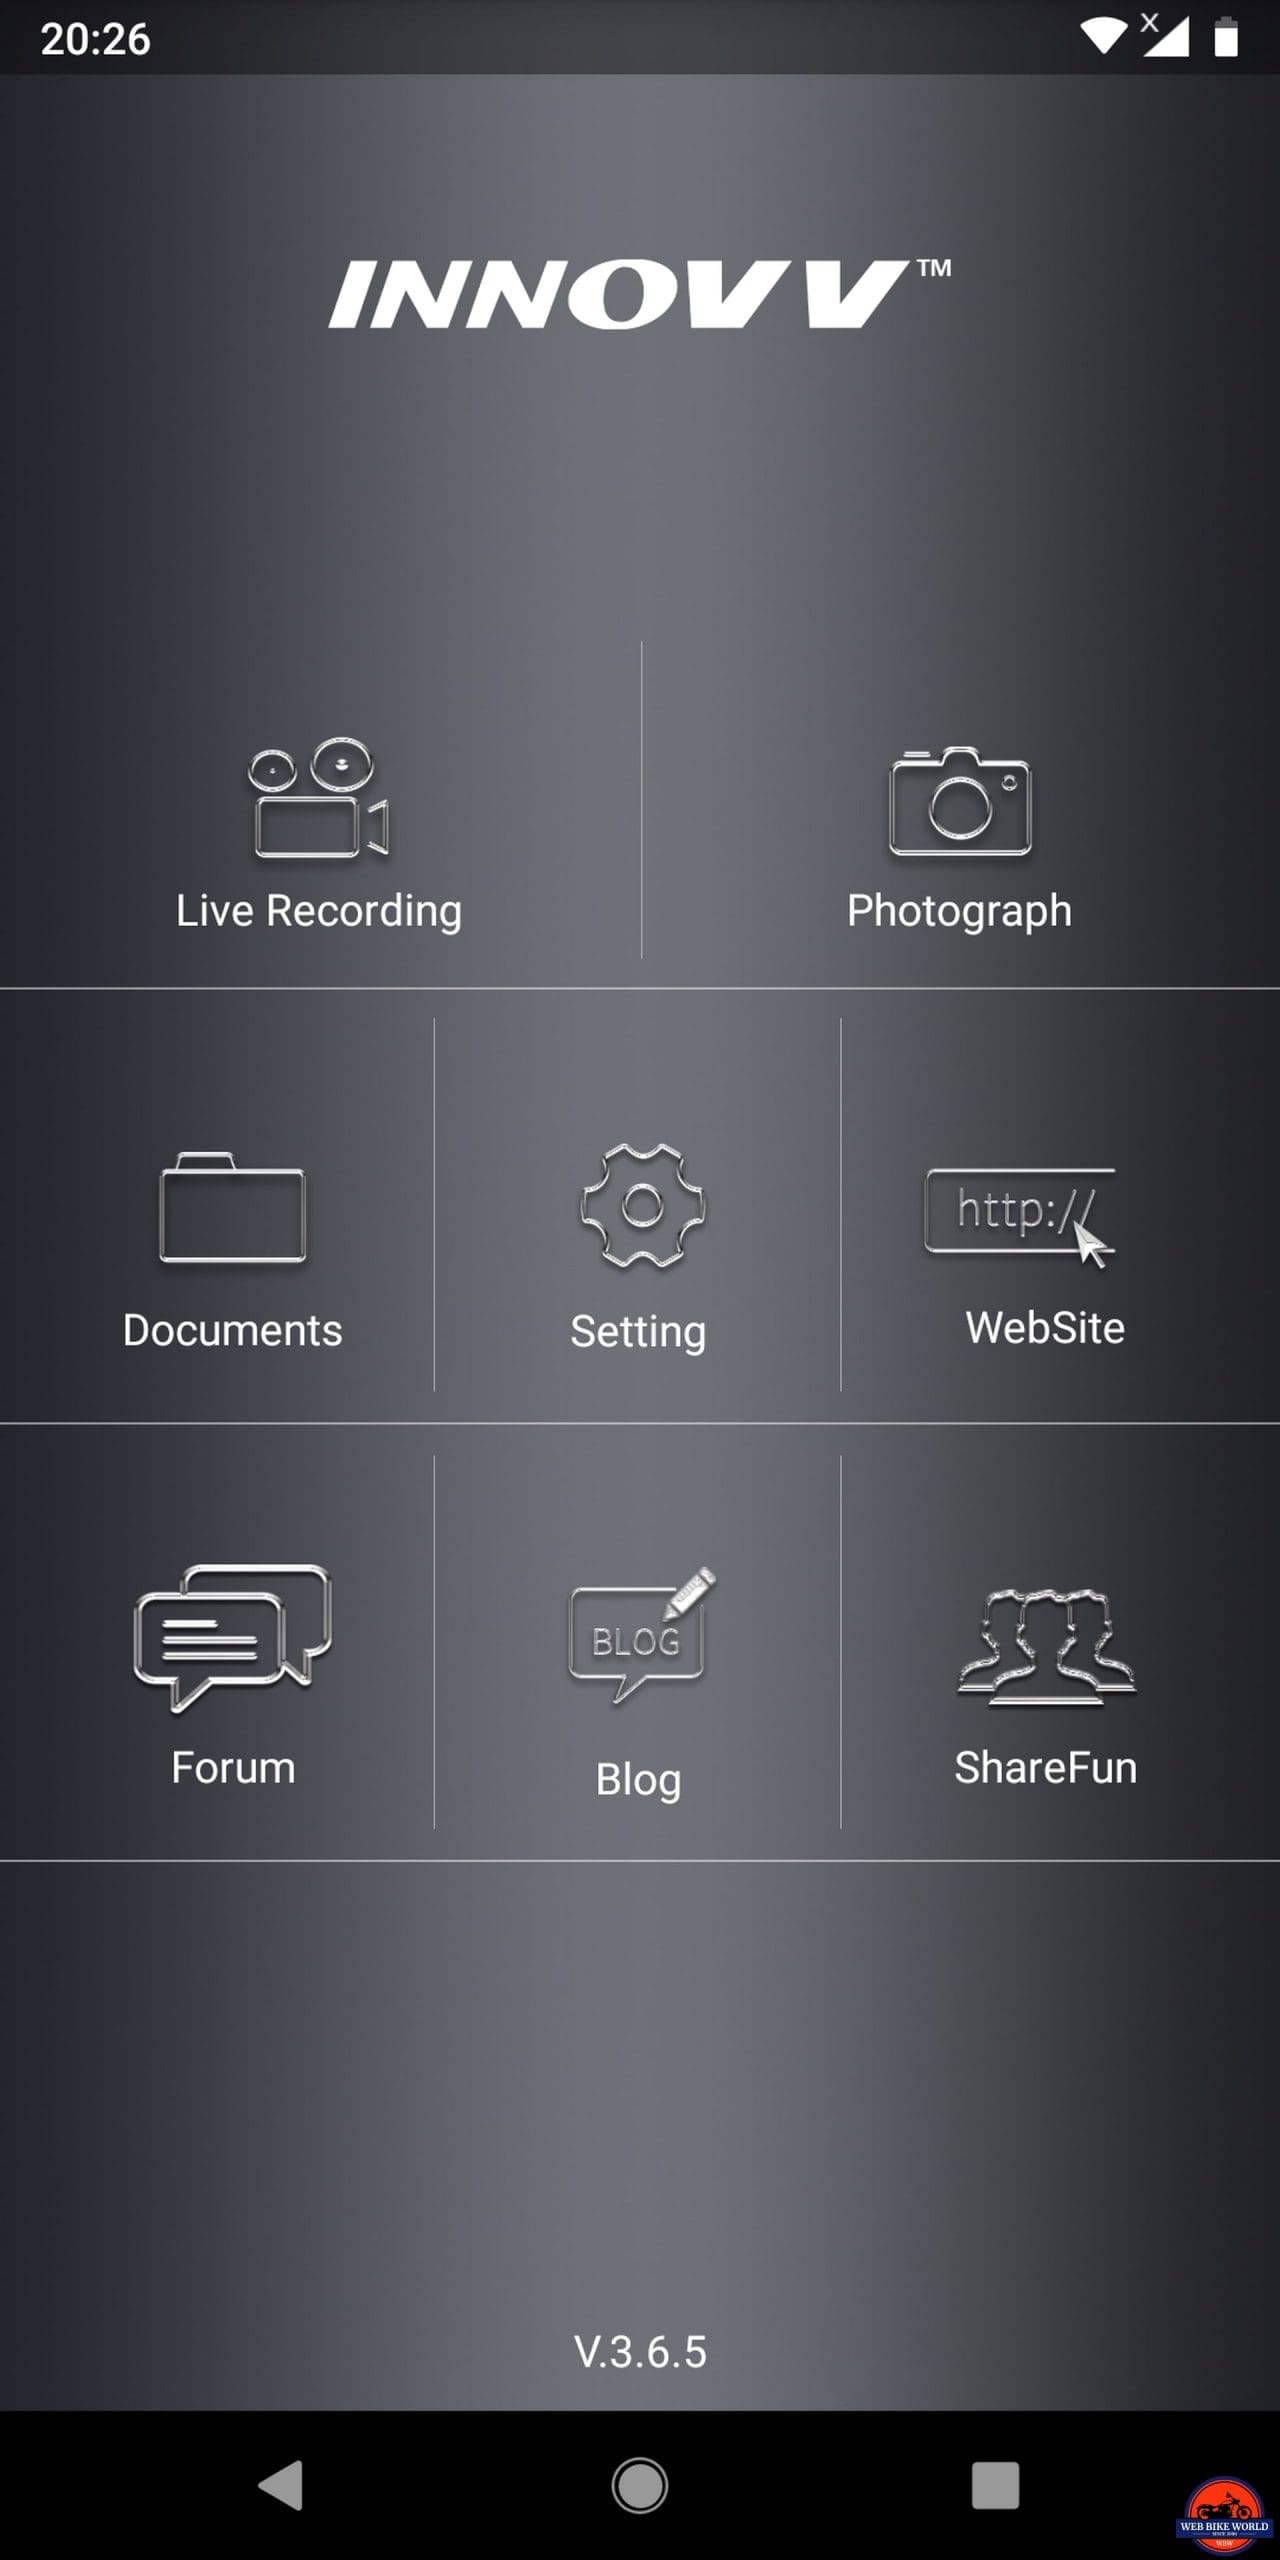
INNOVV C5 Camera App
The INNOVV C5 Camera app is available from the respective iOS and Android download sites or by scanning the QR codes on the INNOVV product page. You will find that some permissions are needed – downloading videos/photos from camera to device being one, location another…
Once installed, the camera powered up and WiFi connection made the app is launched and with a couple of splash screens presented, the Menu screen appears – choosing the middle Gear Wheel (Settings) button invokes the multi-page list of the available settings.

Spending some time going through each of the settings and finding out what options are offered is good, and if in doubt, the WiFi and Camera Settings Section below should help.
If not sure regarding ‘Frequency’ and ‘G-Sensor’, the 60Hz setting for NA is best while it is recommended the G-Sensor be set to Off. It is housed in the module rather than the camera lens (like the original K1) and the feature is very sensitive. Unless the C5 is used mounted statically on the motorcycle, it is not needed.
WiFi & Camera Settings
- WiFi Name – INNOVV_C5_****
- WiFi Password – 12345678 (default)
- Settings
- Resolution – 1080p 30fps, 720 60fps, & 720 30fps
- File Format – TS
- Loop Video – 3min (default), Off, 1, 5, & 10min
- Time Lapse – Off, 100, 200, & 500ms
- Frequency – 50/60 Hz
- G-Sensor – Off, Low, Mid, or High
- Video Flip – On/Off
- Audio – On/Off
- Date & Time Display – On/Off
- Memory Card State – Inserted, Empty
- Remain Space – Remaining memory on card
- Memory Card Formatting – Yes
- Video Stamp – Click to Input
- Power Off – Shut off camera
- Time Sync – Sync camera time with your device time
- File Path – Path/folder for file storage on device
- Firmware Version – Current firmware version
- App Version – Current app version
- System Reset – Reset C5 to factory settings
Function & Performance
Like the original INNOVV C5 Moto-Cam System review posted on wBW in December 2017, this latest iteration or rendition is far from complicated. Although as always, reading any included media and or scoping out the more detailed information posted here is recommended.
The C5 DVR module features three interactive tactile tiles: the top one glows Green and is for the WiFi feature; the middle one glows Red and is for the camera itself; and, the larger lower control (White) is seemingly inactive/no longer used
Red LED Tile
With power supplied and a short boot-up time, the Red LED lights up and starts flashing indicating that the camera has started recording automatically.
Pressing this button once stops or starts recording manually. Pressing the Red tile for three seconds stops recording and powers the system off or, conversely, powers the system back on.
Green LED Tile
WiFi control. With power, the Green LED flashes once per second in its broadcast/seek mode. Once connected the LED goes solid Green. Press this tile once to disconnect WiFi, pressing it again (may) see the local network reestablished, but it’s a hit n miss thing.
Bottom Ports
The 3.5mm port on the left is for the (optional) external clip microphone and it does indeed work well if fitted inside the helmet (front or side).
The micro-USB port is supposed to be used to provide power so the micro-SD media card can be read, and files downloaded. Indeed after a few seconds the INNOVV C5 ‘drive’ is displayed and the Photo and Video folders show up on the PC screen.
But, as found on the original C5, this is about as good as it gets. Selecting a file and initiating ‘cut’ or ‘copy’ just gets the wheel spinning and eventually it all times out.
The small pinhole on the upper right is the Reset switch – inserting a paper clip or something equally small and pressing the recessed switch once resets the camera system. It does boot up automatically again.
Management by App
Keeping the app in the foreground provides for Live View or monitoring of the camera’s view. The screen display can be set for portrait (default) or in touching the quadrant-arrows, flip the view to landscape mode.
When recording, the small Red dot in the upper left corner of the screen flashes once per second and is always on when recording is stopped. Pressing the larger Red with Circle control on the bottom Stops or Starts recording.

On the Road Performance
Putting the INNOVV C5 Helmet-Cam through its functional paces to assess its features and related performance requires some riding – the more the better usually. Although our heat and humidity make moto-wheeling more of a chore than normal; early morning or late evening rides are good.
First things first – mount the INNOVV C5 Helmet Camera on the desired helmet and orient it for the desired general field of view. The first step can be done with the helmet off or on, whereas the second step is done with the helmet on the head…
Continue by powering up the camera using the desired USB means, typically one of the travel USB power packs. The DVR module goes through a short boot-up, then the Red LED starts blinking signaling that recording is ongoing and the Green LED blinks as it awaits a WiFi connection.
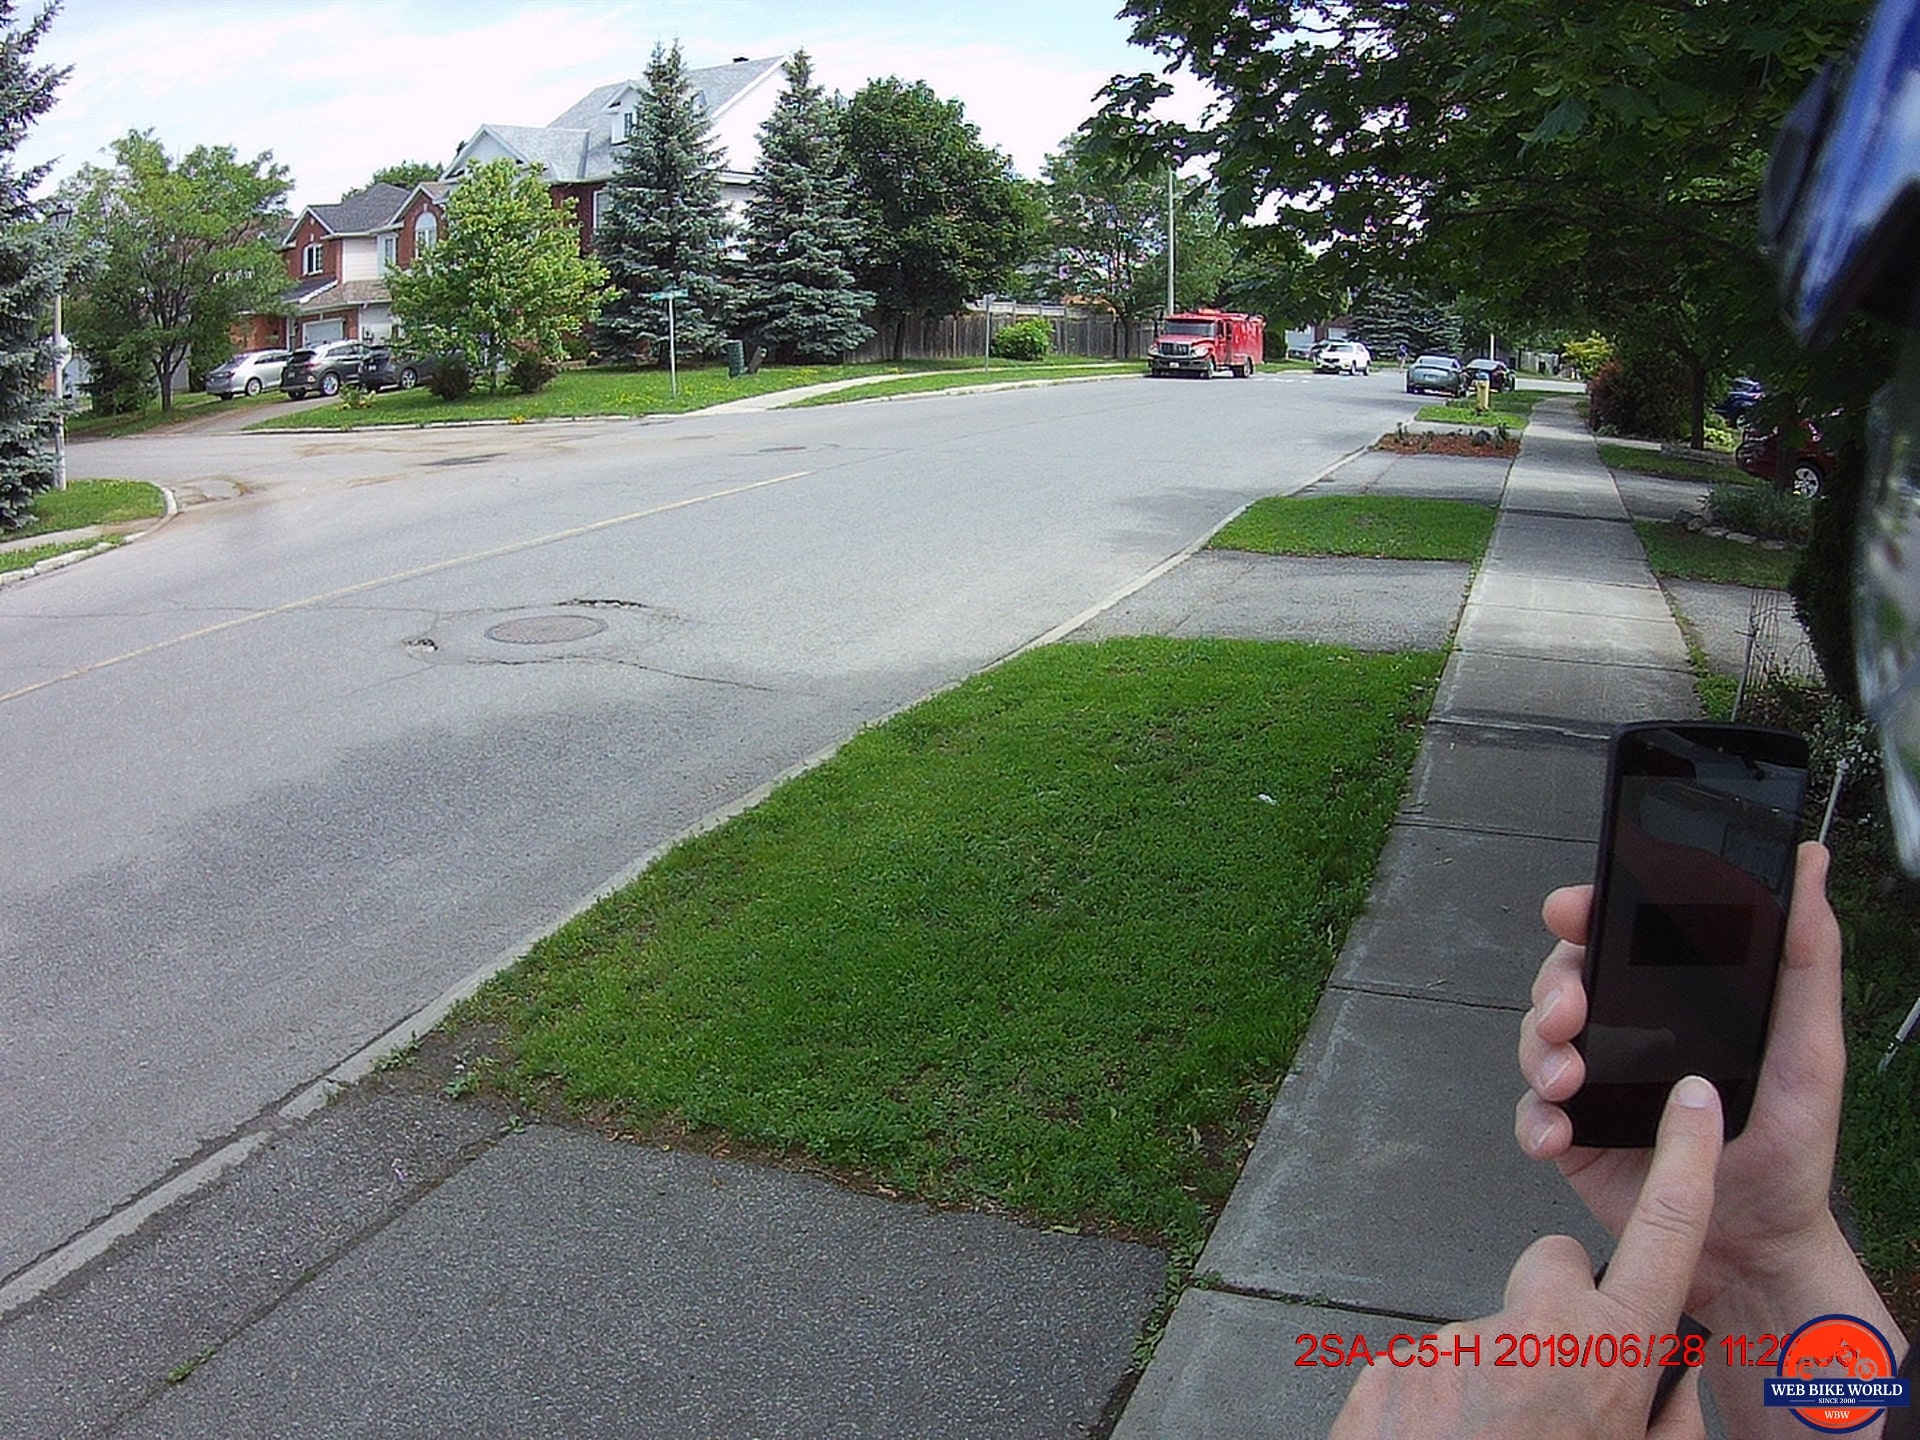
With WiFi connected, the Green LED stops flashing. At this point the INNOVV C5 app is launchable, providing desired setup adjustments to be made or in going directly to the video Live View screen, or Photo Mode – either of which allows more specific aiming of the camera lens.
If the device is mounted for easy access and the app is kept in the foreground, all the action ahead is viewable on the live view screen. The user can stop or start recording, switch to photo mode or go back to another layer in the app as desired. Just do it safely.
Point of View (POV)
The thing to remember is that it is truly a point of view device – where goes the head, goes the helmet and, the lens. If used to a fixed point of view from an onboard hard-wired system, a helmet-mounted POV camera can take some getting used to.
As a POV capture device, video and photos are more direct in capturing the rider’s perspective of what is happening – all tending to make playback a more vibrant and possibly, emotional experience.
Handling
When stopping for breaks, the helmet is removed and set down with the system or the camera mount is released from the plate mount. This action, that if done carefully, will maintain camera orientation when its remounted.
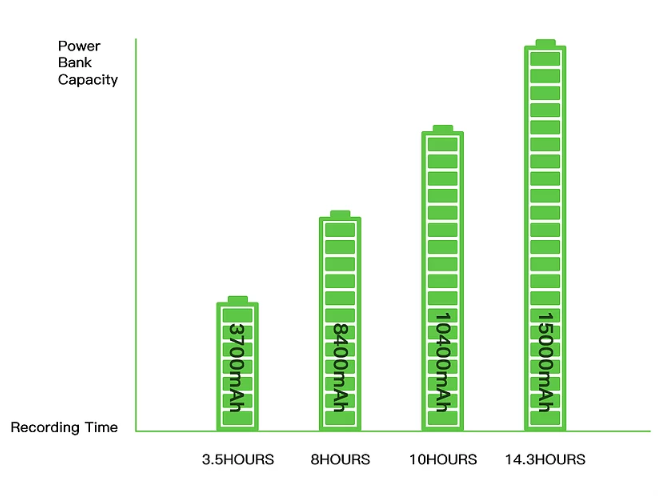
A bit more care and effort are needed with a multi-piece portable system, but after a day or so it all becomes a routine and the convenience of not having to worry about battery status or changing batteries is appreciated. The 6000mAh USB brick is good for at least 6 to 7 hours of use without fully depleting the supply (see the INNOVV chart below).
The 1m long lens connection lead is good for most configurations, with the 1.8m option providing more flexibility regarding placement of components, e.g. – on or in a tank bag or handlebar holder (like the plastic cradle supplied with the original C5 kits).
Media Performance
Video
The Helmet-Cam video is very good overall as the videos that were taken at 1080p 30 and 60fps show (video submissions). And there are lots of C5 video samples online.
1280×720 – 30fps
1920×1080 – 30fps
1280×720 – 60fps
The C5 copes well with lighting changes – sunny, overcast, in/out of cloud cover, heavy terrain, etc., so the video quality remains quite stable. Recording at 720p and 60fps typically provides the best definition video.
And like the K2 systems, the C5 handles low light and nighttime conditions without issue, although some types of overhead lighting and very bright oncoming traffic can disrupt the recorded view. But it is all more than usable, particularly when in traffic.
Photos
Going back to the menu screen and selecting the still camera tile boots into the photo mode – pressing the large circled Red button takes a photo, or series if the time-lapse feature is set. The Time-Lapse app settings allow 100, 200, and 500ms timings.
Audio
Isn’t a strong point in the C5 media toolbox. In having worked through the issues with the original C5 and early K2 models, onboard audio is poor – more noise than voice for the most part. I have found though that with the DVR in a top pocket, audio is better, picking up most of my travelogue points.
If better audio is needed, then the external microphone option works quite well, although again, not nearly as well as an internal microphone pick-up on most BT headsets. I have one of the INNOVV external microphone pieces here and it does get used when some decent dialoguing is needed.
Conclusion
We said, in the original C5 review, “Bottom line: Although not without previously identified issues, our experience with the C5 single-channel system indicates that it is all it claims to be – with the potential to satisfy a lot of users across a broad spectrum of applications”.
The words stated then apply equally to the newest variant, the C5 Helmet Camera. One could expect them to based on the repackaging with a couple of very useful changes that do much to satisfy the “broad spectrum of applications” and realize more of its potential.
For those who didn’t take a hard look at the original C5 Moto-Cam, this latest variant is deserving of some attention. It has far more inherent versatility and not just as a motorcycle helmet camera either. Think of the possibilities. Portability is good.
Bottom Line: Like the original, the C5 Helmet Camera variant should be one durable piece of kit. For the price, its an investment bargain. Highly recommended.
Pros
- Modular, lightweight, ruggedized sealed components
- High data rate USB-C lens connection
- App much improved
- 128/256GB+ media support
- USB power interface for portability
- Proven reliability & durability
Cons
- DVR bottom seal still a concern
- Using external mic impacts elemental integrity
- Live view lighting adjustment for video no longer available
- Needs ultra-fast media for best results