A CAN Bus Accessory Connection Manager
The HEX ezCAN acts as an interface to easily connect accessories to a motorcycle with a CAN bus system.
Accessories such as lights, horns, brake lights and other devices are connected to the four “channels” or output circuits in the ezCAN.
The user can then program the output of each channel for a customized and very flexible solution.
It can also be programmed to enhance the functionality of lights, horns, accessory brake lights and other devices.
The ezCAN is small and lightweight and connecting it does not void the bike’s warranty.
It’s easy to install the ezCAN and to connect accessories, which can then be configured and managed using a built-in micro-USB connection and Windows or Mac software.
Many different accessories can be connected directly to the appropriate output channels on the pre-wired ezCAn, minimizing the need for bulky wiring harnesses and other related components.
The ezCAN is currently available for the BMW R 1200 GS (2013-2017), the BMW R 1200 GS Adventure (2014-2017), the BMW R 1200 R/RS (2015-2017) and the BMW R 1200 RT (2014-2017). Other versions will become available soon.
This is an extended two-part review of the HEX ezCAN.
Part 1 includes a description and installation tips.
Part 2 of the HEX ezCAN review includes information on adding accessories and overall observations in use.
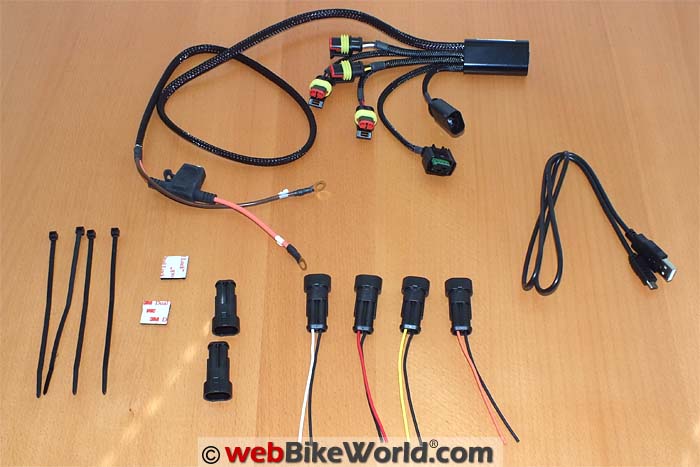
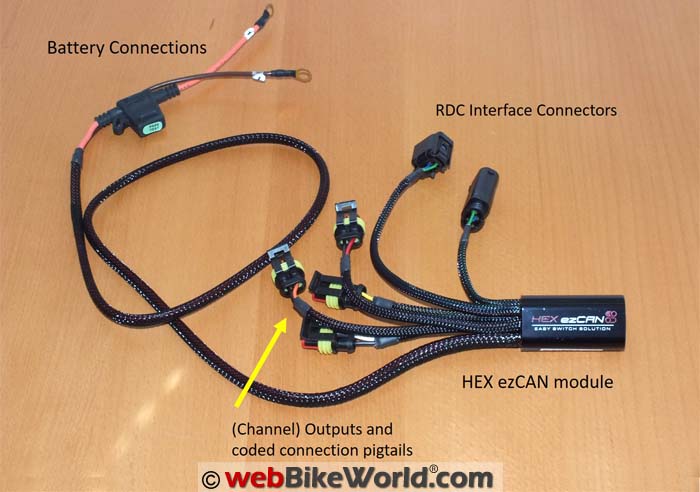
 The HEX ezCAN kit components.
Background
The first HEX ezCAN to be released is designed for the BMW R 1200 GS and R/RS motorcycles and it is optimized for LINbus and Multi-Function-Controller equipped machines.
Beemer enthusiasts the world over know HEX Code as the developer of the GS-911 product (USB, Bluetooth or WiFi), which is an innovative and invaluable diagnostic tool.
The HEX GS-911 allows owners to peer into the onboard system to view and save control unit information.
It also allows the owner to read and clear many fault codes, reset service reminders, view live sensor values, perform component calibration and output tests and other tasks.
As BMW Motorrad evolves their motorcycles, HEX Code evolves the GS-911 and the list of supported models (old and new) continues to grow.
Also evolving is the ability of the GS-911 to browse and peer into the subsystems and electronic controllers that make BMW motorcycles among the most advanced on the market.
It is the presence of these advanced electronic subsystems and their controls that provide the interface and user interaction points for devices such as the Clearwater CANopener (review) and a new product called the CANSwitch Series 3.
All of these power control systems are designed to interface with modern CAN bus systems to monitor or interpret data from the onboard system and then use this data to manage programmed features and output of the connected accessories.
Clearwater uses either the BMW RDC (Reifendruckkontrolle, or Tire Pressure Monitoring System (TPMS)) module interface (or the Alarm interface depending on the CANopener variant).
The CANSwitch and HEX ezCAN use the RDC module interface.
All three also utilize the BMW Multi-Controller (aka Wonder Wheel) and other onboard controls to activate and manage accessories connected to their systems.
This virtually eliminates the need for additional dashboard switches, relays and bulky wiring harnesses.
The Clearwater Lights CANopener, CANSwitch and HEX ezCAN are similar in some ways but they also each take their own paths regarding what accessories can be used and how those accessories are managed.
HEX ezCAN Overview
The HEX ezCan provides a simple means to monitor onboard system data using the BMW RDC module (Reifendruckkontrolle, or Tire Pressure Monitoring System) used for the TPMS (Tire Pressure Monitoring System) module or its onboard harness.
Like the other CAN-compatible systems, HEX ezCAN is completely passive, listening and interpreting onboard system instructions and functions.
This allows the ezCAN to manage accessories connected to any of the four channels (output circuits) through software programming and use of onboard controls including the BMW multi-controller.
A typical ezCAN installation is fairly simple and virtually any type of accessory of any brand can be connected.
Configuring your accessories with the ezCAN using the provided software allows you to take advantage of OE onboard controls for flexibility and output enhancements.
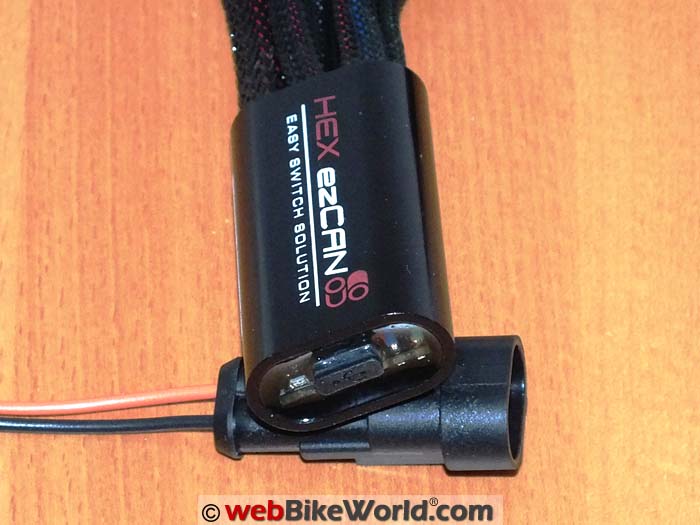
The slim oval ezCAN module includes a micro-USB port with a separate sealing cap (not tethered) and a small status LED on one end with the flying leads for input and output integrated at the other end.
Programming the ezCAN is accomplished via the USB interface connected to a Windows or Mac environment PC running the downloadable ezCAN software.
Once connected, the ezCAN software provides the ability to create an initial setup through the selection of (currently) one of three Profiles.
Each Profile sets a specific mapping of connectable accessories for each of the four output channels with output customized via the user interface.
ezCAN Wiring Harness
Seven flying leads are integrated into one end of the ezCAN module, including:
- Positive and Negative 80 cm long leads to connect the ezCAN to the motorcycle battery.
- Two-connector inline interface to connect to the bike’s RDC (TPMS) (~17 and 10 cm long).
Accessory input leads on the ezCAN include:
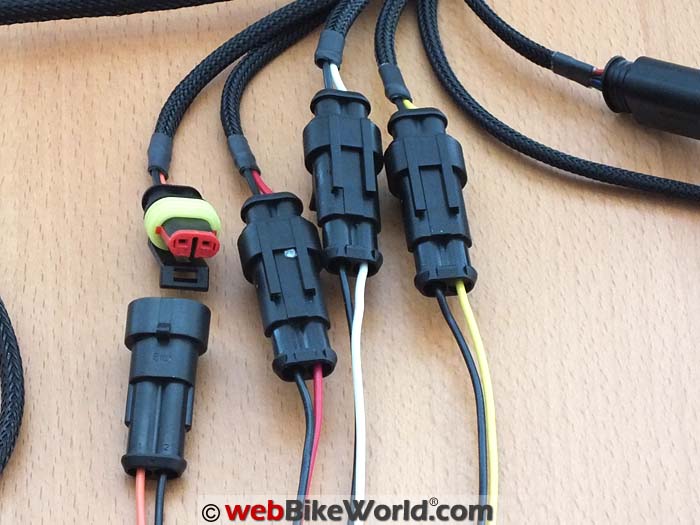
- Two TE brand Superseal connectors corresponding to the Red and Orange channels, high-output, each 14 cm long.
- Two TE brand Superseal connectors, corresponding to the Yellow and White channels, low-output, each 8 cm long.
- Four TE Superseal (AMP-style) cap connector pigtails are also provided for connecting accessories to the colour-coded channel receptacles.
Other Items Included
Two blank cover caps for protecting unused connectors along with four medium zip ties and a micro-USB cable round out the contents of the small well-packed pressurized re-sealable zip-lock pouch, which is easy to carry, store and has a professional appearance.
Basic information about and rudimentary connectivity details for the system are printed on the outside of the sealed pouch.
Everything else you might need to get the ezCAN up and running is available on the HEX website.
A good video with an overview of the ezCAN and its (typical) installation on a GS is key information for first time users and it pays to view it once or twice prior to installation.
As the ezCAN system gains a wider user base, more and more online material is emerging; the FAQ page provides much of the detail, including connector specifications, about the system that many users will desire.
All of the leads are wrapped in PET sheathing for protection and the connectors themselves are robust pieces that can be rebuilt or replaced if needed and the specifications can be found under the FAQ section of the website.
Overall, the size and slim profile of the ezCAN module and of its leads makes for a visually attractive system and, it doesn’t take up much space overall.
Channel connectors. (L to R): Orange, Red, White, Yellow.Functional Management Options
There is far more to the ezCAN system than meets the eyes.
So before getting into the details of installation and configuration, some insight into each of the functional groupings and the “what”, “how” and “when” are good things to know to get the most from the system.
ezCAN Settings Options For Front-Facing Auxiliary Lights
The ezCAN programming allows various features and functions for auxiliary lights, including:
- Fuse settings.
- Low beam day and night brightness control settings.
- High beam day and night brightness control settings.
- The ezCAN can be programmed to allow the auxiliary lights to be used as turn signals, with an on/off option that turns off the opposite side auxiliary light to prevent washout of the turn signal (Note: may not be legal in all regions).
- Strobe with horn option can strobe the auxiliary lights when the horn is used.
Note that this feature may not be legal in all regions and the use of flashing lights to another vehicle may signal the wrong intent of the motorcycle, i.e., “go ahead and pull out” rather than “don’t move, I’m coming through”).
- Strobe setting for the flash to pass function can be set to strobe the auxiliary lights three times rapidly by activating the high beam or flash-to-pass toggle quickly three times (ditto on notes above).
- Inverse hazard flashing can be set to alternate flashing between OE hazard lights and auxiliary lights for greater conspicuity and to minimize washout of the OE flashers (Note: may not be legal in all regions).
- Auxiliary lighting flash intensity control can be adjusted for daytime output from 0 to 100%.
- Auxiliary light on/off toggling can be set by pressing the turn signal control button for three seconds.
- Auxiliary lights can be dimmed by holding the multi-controller on the BMW to the left for 5-6 sec and then rotating it to adjust the light output up or down within 10 discrete steps.
ezCAN Settings Options For Rear Tail Lights and Brake Lights
- On or off and light output control can be controlled for both front and rear facing auxiliary lights on the motorcycle.
- Using the turn signal control button will turn ALL connected auxiliary lights On or Off. Cycling the ignition will turn all the lights back on.
- The ezCAN also acts as the fuse for front and/or rear lights.
- Auxiliary rear tail and brake light brightness.
- No Flashing option (emulates standard brake light output).
- Flash on braking option flashes the brake light(s) while braking (above the speed set in “Extra”, default is 15 km/h), with output per the three following options:
- California (legal) flashing: flashes four times at 4Hz, then remains on.
- Emergency Stop Signal (ESS): flashes during deceleration (above 50 km/h and if deceleration greater than the threshold set in the “Extra” settings) regardless of rider braking.
- California (legal) with Emergency Stop Signal: combination of California legal brake flashing and Emergency Stop Signal during non-braking deceleration.
Accessory Function Options
- Fuse setting of individual output channels. For example, the fuse range available for auxiliary lighting is 1, 2, 3, 4, 5, 7.5, 10, 15, 20 and 25A, whereas the default fuse range for the rear facing or accessory circuits is 1, 2, 3 and 4A.
- Channel time-out delay settings of 0 to 30 seconds once ignition has been turned off.
HEX ezCAN Installation
Both the 2015 BMW R 1200 GSW and newest addition to the home fleet, a 2017 BMW R 1200 GSW Rallye received an ezCAN, providing the opportunity to evaluate a wide variety of accessories that are installed on the bikes.
Some consideration is required for positioning and orientation for power and for the RDC (Reifendruckkontrolle, or Tire Pressure Monitoring System) interface connectivity.
Also, positioning and access to output and input leads all need some consideration before actually installing the ezCAN, including access to the micro-USB interface on the ezCAN module.
The battery leads from the ezCAN are ~80 cm (31 inches) in length, which should be more than long enough for many installations.
But if the ezCAN module needs to be installed at the far end of the motorcycle, the leads might prove to be too short.
I think that if the main ezCAN battery leads were 90 cm to 100 cm (35 to 40 inches) instead, more installation flexibility would be provided.
And yes, the RDC or tire pressure monitoring system (TPMS) module may be located differently on the motorcycle from year to year and model to model, while the RDC wiring harness may be on the left, or the right…just follow the leads.
This means that the RDC module and other accessories and related wiring harnesses in the under-deck area can get crowded.
Also, another 4 cm to 8 cm or so in length here on the ezCAN wiring would allow even more flexibility (literally) in locating and routing the leads.

Thankfully, the ezCAN module itself doesn’t take up a lot of space and the flexible flying leads can be manipulated to facilitate placement when space is tight, even if it’s not mounted under the main deck area.
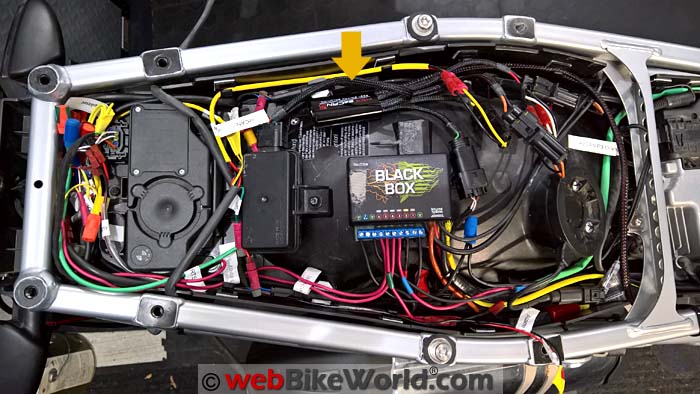
On the 2015 BMW GS, moving the RDC module to a back pair of mounts in front of the OE Alarm module allowed my Arboreal Systems Neutrino Black Box V2 (review) to be relocated.
It now sits fully exposed but fully accessible in the deck cutout.
A Note on ezCAN Fuse Control
The ezCAN also acts as an electronic fuse for your accessories, so no additional fuse installation is needed for lights, horn(s), etc. connected to the ezCAN.
Electronic fuse settings are set directly from the channel configuration screen in the ezCAN software (described in a later section).
The actual settings available are based on the active profile and output channel.
For example, the fuse range available for auxiliary lighting is 1A, 2A, 3A, 4A, 5A, 7.5A, 10A, 15A, 20A and 25A.
The fuse range available for rear facing brake lights, tail lights or accessory circuits is 1A, 2A, 3A and 4A.
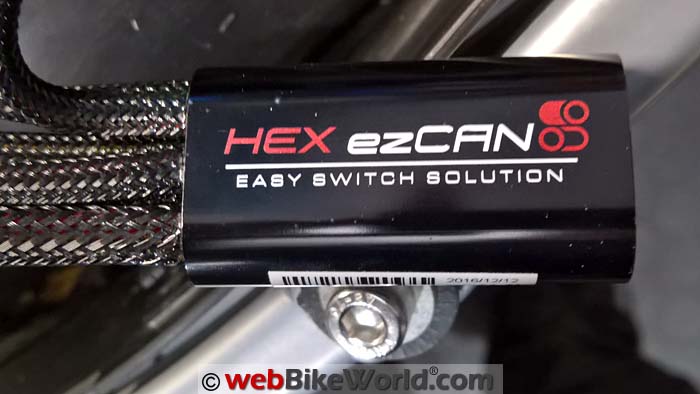
HEX ezCAN location under the seat.ezCAN and RDC Wiring Considerations
Flipping the relocated RDC module 180 degrees puts its connector facing left, so the ezCAN module sits to that side while still being accessible from the cutout.
This is important when the micro-USB connection is needed for programming.
With the 2017 BMW Rallye, the Clearwater CANopener module and harness sit on the left side while the ezCAN module and leads reside on the right side, matching up with module connector orientation.
Adding the ezCAN in-line with the onboard system is easy.
Remove the OE connector from the RDC module, insert the appropriate HEX ezCAN plug into the RDC module and then plug the second ezCAN connector into the open RDC connector.
No RDC module?
Locate the RDC CAN bus connection harness along the right or left side of the deck.
Then remove the black cap and plug the appropriate HEX ezCAN connector into the harness, then use the cap to cover the unused HEX ezCAN connection.
The battery leads route over to the right side staying clear of the under-seat proximity antenna for the keyless ignition.
They then run forward under the OE accessory fuse housing on the right side, under the cross-over tubing and to the right of the rear ESA module into the battery area.
With the OE ground lead removed from the battery and isolated (safety first, always), remove the Yellow or Red plastic cap from the accessory terminal located to the right and just above the OBD connector.
Add the ezCAN’s positive lead ring connector to the terminal and retighten it, then add the negative lead ring connector to the negative battery lead and restore the battery to active service.
Two zip ties and three adhesive cable holders fastened to the plastic keep these leads, and others, secured and mostly hidden once the battery covers and seats are reinstalled.
Total elapsed time to get the ezCAN ready for the accessories? About 20 minutes with minimal muss and fuss.
But before carrying on with the next step — connecting your accessories — let’s take a look at the HEX ezCAN software.
NEXT: PART 2 HEX ezCAN – System Configuration and Use
Owner Comments and Feedback
See details on submitting comments.
Other WebBikeWorld Accessories Reviews