Configuring and Using the HEX ezCAN
Installing the HEX ezCAN Software
This is Part 2 of our extended HEX ezCAN review.
The HEX ezCAN software is available in Windows and Mac versions.
Once the software has been downloaded and installed, the HEX ezCAN owner has the means to configure the four ezCAN outputs and manage the available functional options.
I used the HEX ezCAN Configuration Tool v1611.5 running under Windows 10 for this review.
I have not tried the Mac version.
Note that first you must install the ezCAN on the motorcycle, as described in Part 1 of the HEX ezCAN review.
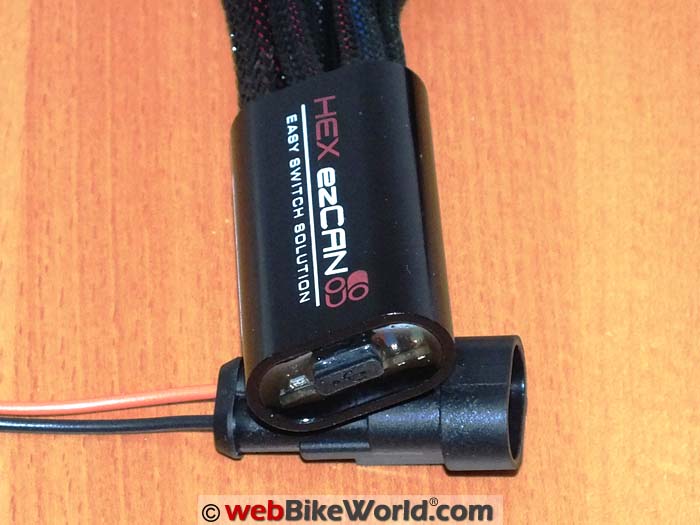
Then you can connect the ezCAN module to your computer using the included micro-USB cable.
The small LED near the micro-USB port lights up and the PC (typically) audibly verifies the new USB connection (it may want to install a driver).
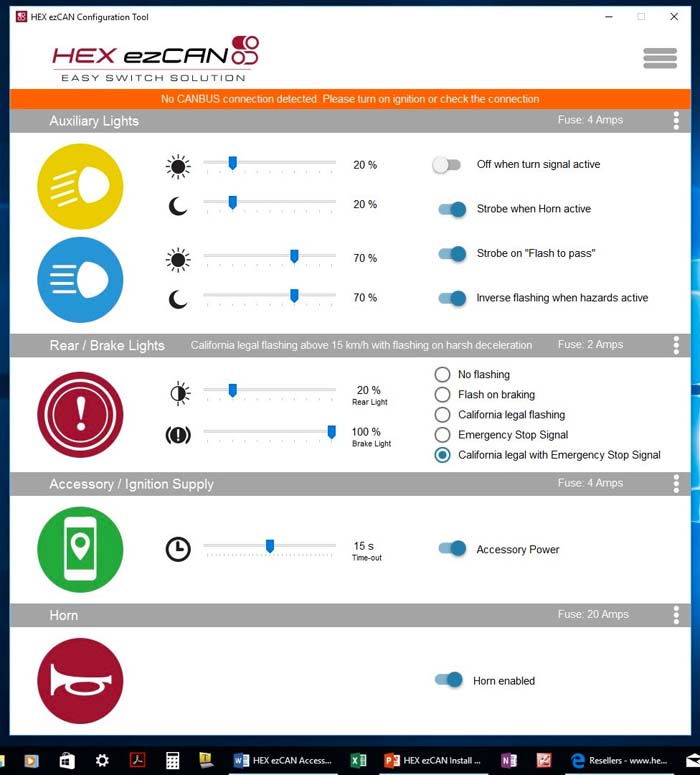
The main ezCAN software splash screen will then display a “Device not connected. Please connect the USB cable.” message.
Turn on the bike’s ignition, at which time the screen will reset, the banner disappears and the interactive display is now live.
Connected or not, the software can be launched to allow exploration of the main and secondary screens using the main Menu Icon (3 horizontal lines) in the upper right corner, along with the Info Tabs (3 vertical dots) on the far right of each channel section.
And don’t forget the electronic fuse settings…
A wealth of information is provided between the main and menu screens and pop-up boxes or the HEX ezCAN website is another excellent resource whether you are new to the ezCAN environment or not.
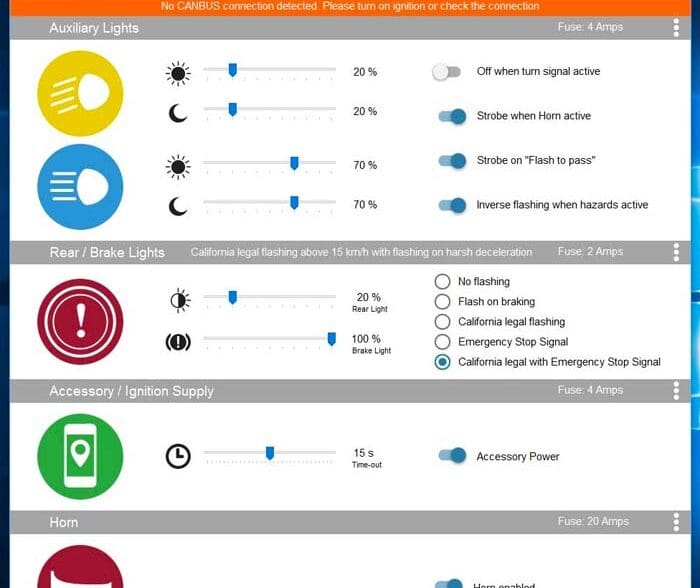
HEX ezCAN software main entry screen.HEX ezCAN Software Notes
The main splash or default screen shows the first of three configuration or channel mapping profiles as way of introducing the user to the system in a visual manner.
(NOTE: The color of the wires on the ezCAN — red, white, yellow and orange — correspond to what HEX calls “channels”).
Other profiles are likely to be provided through software updates, which are largely based on feedback from early adopters and a growing user base.
Clicking on the upper right menu icon reveals a listing of five items, all briefly described as follows:
Diagnostics: With the system connected and the ignition on, this screen provides dynamic real-time readings from all four channels of the ezCAN system, ambient temperature (Celsius) and voltage measurements for battery and CANbus circuits.
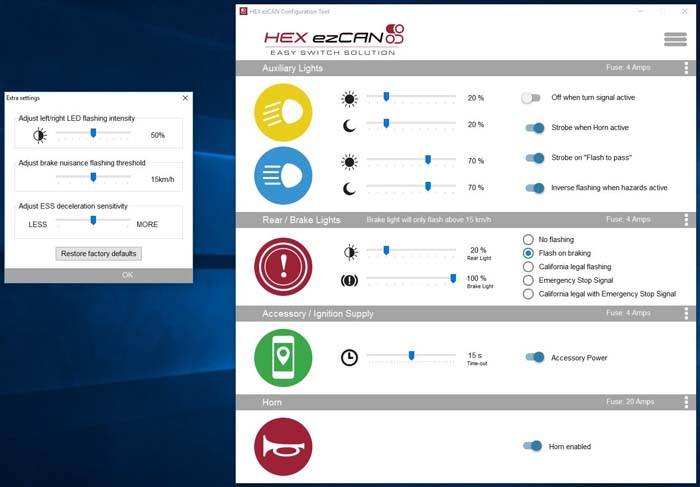
Extra Settings: This menu item is easy to miss but shouldn’t be as it provides key fine-grain configuration management for various adjustments, including:
- Adjusting the left/right LED flashing intensity (0 to 100%);
- Adjusting the brake nuisance flashing threshold from 0 to 30 km/h (0 to 18.6 mph);
- And adjusting the ESS (emergency stop signal @4Hz) deceleration sensitivity (LESS to MORE).
Channel Configuration: Used to select the best or preferred configuration of the four output circuits to meet requirements.
From the main screen, click on the icon and then “Channel Configuration”, which will open up the smaller Channel Map Configuration screen.
Select one of the three (current) profiles or mapping scenarios (all are icon-based facilitating visualization).
Upload Logs: A pop-up screen explains the process to add ezCAN log files to an archive (.zip) file for voluntary forwarding to the listed support email.
Clicking on “OK” closes the screen and automatically opens the system folder containing the latest ezCANconfig file.
About: This is a pop-up identifying the HEX ezCAN Configuration Tool version (v1611.5) and copyright.
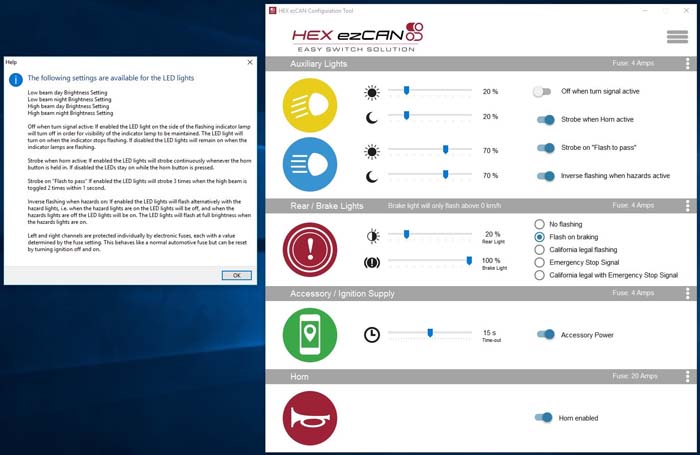
Info Icon: The information icon to the right of each Channel Configuration section is another valuable access point.
Each pop-up screen identifies individual setting and output options (described earlier in the Functional Management Section) for the respective channel and thus the accessory.
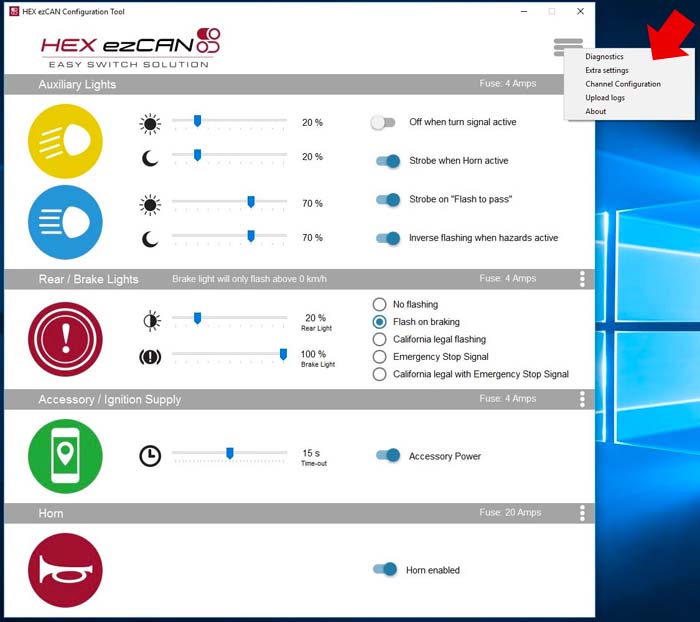
HEX ezCAN software, main menu at upper right, noted by red arrow.Using the HEX ezCAN System
To illustrate how it all works, we’ll describe a configuration using Profile 3 or mapping as the “standard” accessory configuration, appreciating that yours is likely to be different.
From the main or default screen, click on the upper right Menu Icon and then select Channel Configuration.
From the pop-up menu, select the third (lowest) option; the big checkmark will then appear to the left of the option icons. Press “OK”.
The main screen reappears (possibly repositioned) and now shows the configuration and basic feature options for the four output channels and connected accessories:
- Red Channel (10A Continuous/25A Peak for 20s) for my Stebel Hi-Output horn (review).
- Orange Channel (10A Continuous/25A Peak for 20s) for my Clearwater Darla LED Lights (review) as DRLs.
- Yellow Channel (4A Continuous) for the Auxiliary Tail/Brake/Deceleration mode output.
- White Channel (4A Continuous) for two USB power ports I have installed.
Alternatively, the Profile 2 mapping has Horn, Accessories, Auxiliary Lights 1 and Auxiliary Lights 2, while Profile 3 mapping features Horn, High-Output Auxiliary Light Set, Rear Auxiliary Brake Light and Accessories.
Remember that the mappings and icons are representative; the actual accessory powered and managed by the respective circuit is flexible, but only if supply and control parameters are not exceeded.
HEX states that additional mapping profiles are likely down the road based on lots of feedback from early adopters and a growing user base, so be sure to send your feedback and suggestions to their development team.
Other ezCAN Accessory Connections
As an illustration of the ezCAN’s versatility regarding accessory connections, here is a listing of the accessories I have installed and successfully tested between the 2015 BMW GSW and 2017 BMW GSW Rallye motorcycles:
- Two Stebel Hi-Output horns (review).
- Set of Denali DM1 micro-LED lights (review).
- Set of Clearwater Darla LED Lights (review).
- Set of Clearwater Erica LED lights (review).
- Set of ADVmonster LEDs (M30 spot and M44 flood combination).
- Generic 2.5 inch combination light set (10 degree spot and flood).
- Generic 4.25 inch light set (flood pattern).
- USB Outlets: The 3BR Waterproof USB ports (review) 2.1A and Ohmics 2.4A USB outlets.
- Admore Lighting LED Lighting Strips (review) (Red and Red/Amber).
- Admore Lighting Light Bar (original six-wire and new five-wire version).
HEX ezCAN software, Orange Channel information screen.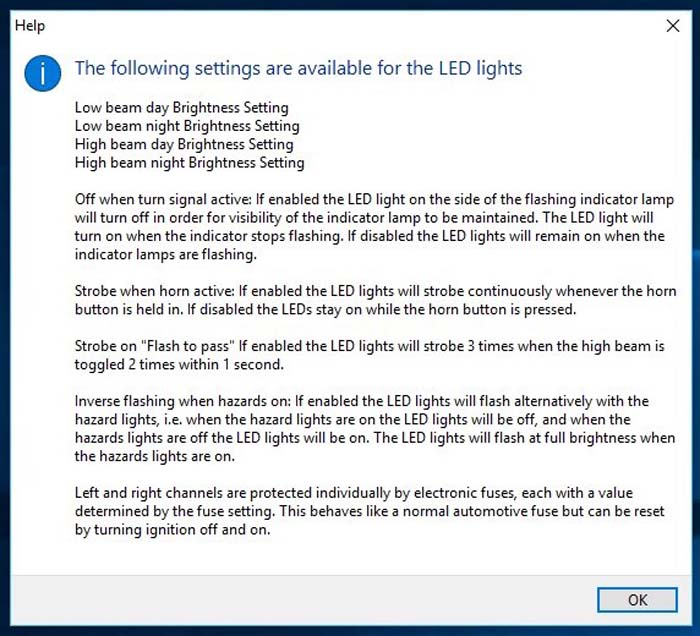 Close-up of LED light information screen from left side of first photo above.
ezCAN “Channel” Notes
The white, yellow, orange and red wires you see in the photos of the ezCAN represent the “Channels” that can be used to connect various accessories.
Red Channel
The Stebel horn that I installed between the front forks is an ideal accessory for this output channel.
It also provides a clear demonstration of the advantage provided by the ezCAN because then you don’t need a bulky multi-part horn relay wiring harness.
After disconnecting the original relay wiring harness lead and ground from the bottom of the horn where I had installed it, I made a new harness set using red and black 14AWG wire housed in PET expandable sheathing.
I then added heavy-duty female flat connectors on one end, connected it to the horn and ran it back to the ezCAN.
I used a pair of blue 14-16 Posi-Lock connectors to join the positive and negative wires of this new two-wire horn harness to the red and black wires of the Red Channel pigtail on the ezCAN. It sounds simple and it is!
Turn on the ignition, wait a couple of seconds, then cover your ears and push the OE horn button and you get a very loud and immediate blast from both the Stebel and stock horns. Ouch! And all of this with no relay delay.
Orange Channel
Under ezCAN Profile 3, the orange channel facilitates connection of a single or pair of front facing auxiliary lights (matched or not).
Output options can be configured using the ezCAN software and control options available by the onboard TSC (Turn Signal Controller) and the BMW MFC (“Wonder Wheel”) controls.
To turn the connected lighting on or off, press the TSC for 3-4 seconds.
Once on, hold the MFC to the left for 5-6 seconds and then rotate the control to adjust the light output; there are ten discrete steps with 10% increments between each.
The 2015 BMW GSW has its Denali DM1 LED lights connected to this channel and the lights can then be controlled by the TSC and the MFC controls.
A second set of LED lights, like the ADVmonster M30/M44 spot/flood combination, could also share this channel, but they would then also be controlled along with the DM1 lights.
What must be remembered is that with the current ezCAN firmware, dynamic On/Off and Output Control is provided for all auxiliary lights, front or rear.
Using the TSC will turn all connected auxiliary lights On or Off and cycling the ignition will turn all the lights back on.
My typical settings have the Denali DM1 lights set for 20% output for low-beam daytime use and 40% for nighttime, with day or nighttime output at 90% for high beam.
These are low mounted DRLs (Daytime Running Lights), so there is no need to utilize the “Off when turn signals are active mode”.
However, the “Strobe when horn is active” or FTP (Flash to Pass) modes are active settings, as is the “Inverse flashing” (with four-ways); you have lots of choices.
Yellow Channel
In doing a fair bit of work on product reviews involving products that allow the brake lights turn on when the bike is decelerating (“dynamic braking”) and emergency stop signal products, this channel and its features is very welcome indeed.
Connecting and using auxiliary rear-facing lighting for tail, brake (and deceleration) output provides added visibility, increased conspicuity to following traffic and an enhanced safety envelope (check to be sure this is legal in your region).
The BMW aluminum panniers I have mounted on the 2015 feature a set of high-output Red and Amber auxiliary LED strips and output was originally provided by the Auxiliary Wire found on the follow-on RevC variant of the Ohmics MotoBrake (review).
Accordingly, it didn’t take long to move the existing left and right wiring harnesses with their weatherproof connectors over to the ezCAN Yellow Channel.
I then programmed the output parameters so that tail light output set is 30% and 100% for the brake light with the flash mode set for California legal with Emergency Stop Signal (ESS) output for ongoing traffic and highway testing.
Although I’m still evaluating the light sensitivity, the ESS seems to work well at 50% for the big GS Rallye and my riding style.
I set the brake nuisance flashing threshold for 15 km/h to minimize (potential) aggravation of following slow-moving traffic.
These settings are accessed by clicking on the Main Menu and the Extra Settings in the ezCAN software.
More on Yellow Channel Brake Light Features
Keeping a major output differential between tail and brake output serves to provide an ongoing visual clarification between the two light types.
And with braking or significant deceleration, it provides a more significant “trigger” visual to following traffic for optimal effectiveness.
As described in a previous section, brake light output (rider or deceleration-based) can be configured in the ezCAN for one of five modes: no flashing, flash on braking, 4Hz California-legal flashing/pulse, emergency stop signal or 4Hz California-legal with Emergency Stop Signal.
Both the Info and Extra Settings (under the main menu) screens provide the means to fine-tune speed and deceleration-based output for discrete riding environments, although unfortunately there is no mobile app to provide dynamic management.
The ezCAN brake/deceleration/emergency output is similar to the Clearwater Lights Billie Brake features.
But the Clearwater Lights CANopener has the advantage, as its output can be changed using motorcycle controls (once stationary); the ezCAN needs to be connected via the USB port to the computer running the ezCAN software make these changes.
White Channel
Under Profile 3, this accessory channel provides a continuous 4A output circuit, which is ideal for powering single or multiple devices using an SAE, DIN, USB or other type of connector.
With one 3BR 2.1A USB port mounted and wired in to to the Neutrino Black Box V2, I used the opportunity to install an Ohmics 2.4A USB outlet also, with both harnesses connected to the White Channel pigtail using two Posi-Twists.
HEX ezCAN software, additional fine-tuning of settings via pop-up on the left.Function and Performance of the ezCAN
The current three profiles provided by the firmware allow a good accessory mix regarding features and output, with further versatility provided in allowing some mix-and-match configurations that have differing load requirements
This type of configuration is supported with the two high-power channels, as the loads can be divided up as needed between the two; e.g., 15A on one and 5A on the other (but don’t forget to change the electronic fuse settings).
The two low-power channels don’t have the same flexibility and are rated at 4A per channel.
All the LED lights I have installed work well.
These are generic and proprietary, expensive and inexpensive and configured for independent or paired use under the three Profiles and the appropriate channels They all work well when connected to the Pulse Width Modulation (PWM) output of the ezCAN.
The Denali DM1 LEDs and Clearwater Darla LEDs mounted on the 2015 and 2017 BMWs respectively function primarily as fork-mounted DRLs and augmentation lighting when needed.
Both sets function cleanly from the lowest to highest output settings without any flickering even at the lowest settings.
The ADVmonster M30 (spot) and M44 (flood) LED combination set that have been in use on my various motorcycles for 3+ years (and more than a few kilometres) also perform without issue when connected to the ezCAN.
This includes when they are used as single units on individual channels or when paired; this combination is a reliable low-cost setup for DRL or augmentation use made even better with the ezCAN.
Generic LEDs, such as the inexpensive OZ LED Mini Trail Lights (review), worked very well overall and get a passing grade.
The only observation I have is that On/Off toggling and output adjustment steps aren’t always as smooth or definable with the inexpensive generic lights as with the Denali, Clearwater and ADVmonster lights.
I have also tried two generic LED light models measure 6.35 cm (2.5 inches) and 11.0 cm (4.25 inches) in diameter with 750 and 1800 lumens output respectively.
They typically sell for around 50.00 CAD per unit, have IP68 ratings and seem to get used for various powersport and industrial applications.
At the upper end of the output scale that I have tried with the ezCAN are the 6000+ lumenClearwater Erica LED lights (review), mounted on the BMW Rallye.
They work very well when used on separate high-power channels under Profile 1 and almost as well when connected as a pair under Profile 3.
The only observation for the Erica LEDs was a slight pulsing or flickering when set to the lowest two output levels but this disappeared as output was increased.
This issue is not seen when the Erica LEDs are connected into the CANbus system, their original and usual point of control.
Power to the Accessory channel can be set to remain on for a specific period (0 to 30sec) after the ignition is turned off, which is a useful feature also found in the Neutrino Black Box and other power management systems.
Conclusion
The HEX ezCAN Accessory Manager is an impressive entry to the BMW CAN-compatible market.
And like the HEX GS-911, the ezCAN is likely to become a well-known and well-used product, especially if HEX continues to improve it like they have done with the GS-911.
Throughout this review and along with continued use of the two ezCAN systems, I have found a number of interface, configuration and system tweak observations for the system.
I have forwarded all of them to the HEX ezCAN development team and they have always acknowledged receipt.
Based on replies received from the ezCAN team and their positive posts on various forums, I don’t think it will be long before we see enhancements and additional features offered through firmware/software updates.
One thing I could hope for is the ability to dynamically program features and outputs; this could be done as a simple wired On-The-Go (OTG) connection and smart device app or optimally with a wireless WiFI or Bluetooth link.
One needs only to look at the MotoBrain (review) or the Neutrino BB V2 (review) that are excellent examples of how to dynamically manage power distribution and accessory output using a smart device, wireless link and app.
And to answer what seems to be an often-asked question: can or do the Clearwater CANopener and HEX ezCAN system coexist? The answer is, so far, is yes.
But having said that, some observations still need to be addressed regarding both systems.
And there is a caveat of sorts in that the CANopener5 variant (originally from the short-lived BMW S1000XR Project Bike) uses the OE Alarm interface, while the ezCAN resides on the RDC connection.
HEX Innovate has done a good thing in bringing the ezCAN to market.
Retailing at $169.00 USD or about $230.00 CAD, it is well-priced way to get started on the accessorizing (or farkling if you will).
Bottom Line: Whether you have favourite accessories already installed or you are still shopping, ezCAN will add new life to them regarding output options and management. Think of it as an investment in flexibility and safety.
PART 1: HEX ezCAN Description and Installation
Owner Comments and Feedback
See details on submitting comments.