The decision to upgrade to aftermarket wheels for your motorcycle is usually made for one of two reasons: appearance or performance enhancement.
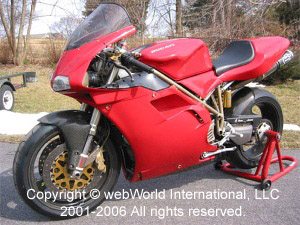
In this case, I was searching for both but with an emphasis on performance. My motorcycle is a 1996 Ducati 916SPA. This model was a limited production run of homologation bikes built by the factory specifically to race in the AMA Superbike Series for Fast By Ferracci when Freddie Spencer was their hired gun.
Despite a host of engine and running gear upgrades added to make these same alterations legal for the race bikes, the rims were the same cast aluminum hoops used on the standard Strada. I was interested in upgrading the capabilities of the bike, but my intent was to keep this track day bike street legal.
The traditional approach for wheels has seen the use of various metals for the composition of the wheels themselves. The material of choice for original equipment is usually aluminum, while most upgrades go with magnesium. However, I was looking for something a bit more unique without sacrificing durability. This led me towards a composite material and in this case, carbon fiber.
The two major players in carbon fiber motorcycle wheels in the U.S. are BlackStone Tech and Dymag. Dymag has been making aftermarket motorcycle wheels for the past 30 years but is best known for their magnesium rims. BlackStone Tech is a relative newcomer to this market and sells carbon fiber wheels exclusively.
There is some controversy surrounding the use of carbon fiber wheels for motorcycles. See this discussion thread on the Speedzilla site for photos, comments and thoughts on the pros and cons of carbon fiber vs. forged aluminum vs. cast magnesium wheels.
When I originally began my search, I had not made a decision as to which brand to purchase nor even what material. I conducted my research by first finding out what my options were then what was available in the market. After much deliberation, I eventually ruled out the BlackStone Tech wheels based on their lack of time in this market.
In my opinion, they actually made the best looking wheels with their 5 spokes and what appeared to be about an inch thick layer of clearcoat over the visible carbon fiber surfaces. However, I could find no one with any experience with the wheels and their cost per set was nearly $3,500. This left the Dymag wheels as my first choice.
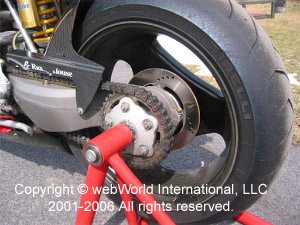
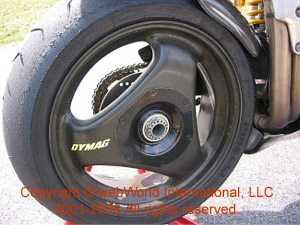
While roughly the same cost, they have been on the market in many countries since 1994 with no reports of problems or issues involving their construction or design in regular use. Dymag also makes a wheel made of magnesium spokes with a carbon fiber rim; however I made the final decision to go with the full carbon fiber, 3 spoke wheels with magnesium hubs.
At the time of my purchase, the newest entry to this market was forged magnesium wheels. Previously, most high-performance motorcycle wheels were cast from magnesium. While manufacturing processes are beyond the scope of this article, the forged wheels are slightly lighter than their cast counterparts without sacrificing strength, but again, this was a new technology to the market and I was not prepared to do their R & D for them.
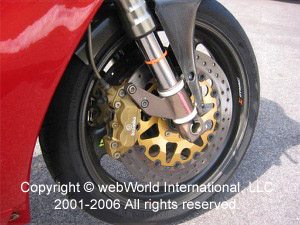
The 3 spoke wheels I chose are of a one piece design meaning the entire rim and spokes are made from one laying of material in a single mould. The hub carrier and hubs are then bolted to the spokes.
 Another advantage in fitment is that both front and rear wheels are supplied from the factory with bearings and spacers and are engineered to accept stock rotors, axles, sprockets and cush drives. They are essentially a bolt-on application and available in 17” diameters of various widths.
For this application, I chose the stock 3.5” wide front and 6” wide rear. This allows for either a 180mm or 190mm section rear tire depending on preferences. I generally stick with the 180 to lighten up the handling with no noticeable reduction in the legendary Ducati stability in corners.
 They also meet BS, JWL and DOT-E test standards for road use. However most race sanctioning bodies do not allow carbon fiber wheels although they do pass technical inspection by all of the track day promoters that I am aware of.
The main benefit of switching to aftermarket wheels is to reduce weight. It has been shown that a reduction of 2 lbs. of unsprung weight is the equivalent of as much as a 10 lb reduction of sprung weight.
Add to this the reduction in gyroscopic effect, which improves handling in cornering making it easier to turn into the corner along with improved acceleration, as there is less mass to accelerate.
The approximate weight of the stock Brembo made wheels on a 916 are 9.76 lbs for the 3” front wheel and 13.3 lbs. for the 5” rear without wheel bearings, sprockets, tires or rotors for a total weight of just over 23 lbs. The Dymag carbon fiber wheels are 4.88 lbs for a 3.5” front and 7.1 lbs for a 5.5” rear for a total of about 12 lbs. Almost half the weight for ½” larger wheels!
When shopping for the wheels, like any other product, it is best to look at multiple sources in order to obtain the best price and service. I have seen prices for these wheels range new for $3,300 to as much as $3,720.
Significant discounts can be obtained by monitoring sites for sales over certain slow periods during the year and watching for overstocks, etc. Purchasing used wheels is another possibility, especially with high-end wheels as they tend to be well taken care of or used on show bikes that have had little actual use. After considerable searching bargain hunting, I was able to obtain my wheels for less than $3,000 and even received an extra set of stock stainless brake rotors for the front wheel along with a new set of Metzler Sportecs already mounted!
After receiving the wheels came the chore of switching them for the stock units. After being assured that no modifications would be necessary and this was a direct bolt on affair, I decided to do it myself. This chore is made much easier with the use of front and rear stands.
I started with the rear wheel because with the single-sided swingarm, the fitment of the new wheel should be quite easy. As it turned out, the hardest part at the rear was holding the rear brake to keep the wheel from turning while I removed the single large 46 mm (1-13-16″) nut holding the Ducati’s rear wheel in place.
The easiest way to do this is to have a helper step on the brake pedal while turning the nut. After removing the nut, washer and spacer, the wheel pulls right off. This led to the discovery that 4 studs protrude from the hub into the 4 equivalent holes in the wheel.
The stock wheel has machined slots between each of these holes, probably designed to save weight. As a friend of mine discovered at the track one day on his 996, if you are not careful, it is very easy to place the studs in the slots instead of the holes.
This can cause some severe damage to both the wheel and hub if not caught soon enough. However, Dymag avoids this problem all together by machining holes all the way around the wheel where it slides on to the studs.
Essentially idiot proof, even from me, as any of the holes can be used when sliding the wheel on. Once on, replace the spacer, washer, nut and retaining ring and you are done. Make sure to tighten the wheel nut to the correct specification with a torque wrench. At this stage, I always used safety wire on the retaining ring in order to prevent any possibility of the nut backing off.
The only problem I had during this stage was when I was tightening the nut. The wrench slipped as I was removing from the nut causing the socket to hit my brand new magnesium hub which abruptly chipped the black paint. No serious damage but now they no longer looked new.
Moving on to the front, the procedure is almost as simple. Remove the brake calipers from the fork leg mounts being careful not to stress the brake lines. Then loosen the pinch bolts, slide the axle and pull the wheel. I was going to use the stock cast iron rotors on the new wheels instead of the stainless rotors that came with my wheels.
You must be very careful after removing the wheel as the rotors extend out beyond the sidewall of the tires and could easily be damaged by laying them on the ground or dropping them. I used two pieces of lumber, each laid parallel on the ground, wider than the diameter of the rotor but close enough to support the tire laying on top of them. This kept the rotor off the ground while removing the opposite side rotor.
Remove the rotors from the stock wheel and using the same bolts, attach the rotors to the carbon fiber wheel making sure to use the same rotor on the same side of the wheel as it came off the bike. Torque the rotor carrier bolts after using Loctite and anti-seize compound on the threads.
This process is very important as I found when taking off my original wheels. This was the first time the rotors had been removed from the stock wheels and I stripped 2 hex head bolts trying to remove them after the steel bolt seized in the aluminum wheel. It was neither pretty nor cheap to have these removed by a professional.
I then put everything back together, while praying that all parts would line up. Much to my amazement, as advertised, the spacer and speedometer sprocket lined up perfect, the axle went right in after a new coating of grease and the brake calipers slid on to the rotors and lined up right with the holes in the lower fork legs and on the rotors.
The next big area of concern relates to tire mounting, removal and balancing. A friend of mine in our club, Mid-Atlantic Ducati, had his own equipment to do tire changes and since he could take his time and I could watch the procedure, I figured this was the safest way to assure there would be no damage to the wheels.
The tires I chose as replacements after several track days on the Sportecs were Dunlop 208GP’s. Dunlop tires have a reputation of being difficult to mount due to their extremely rigid sidewalls. In order to make it as easy as possible, we left the tires out in direct sunlight prior to the change in order to soften up the tires for easier mounting.
The old tires came right off with standard removal procedures. Once the new tires were sufficiently warmed up, the mounted up quite easily with no undue stress or leveraging on the carbon fiber rims. After a full season of track days, the Dunlop tires began to slide around so I decided to replace them with Pirelli Supercorsa’s, a DOT legal racing tire. These were purchased at a track day sponsored by Mid-Atlantic Ducati in concert with Cornerspeed at VIR with mounting included in the purchase price.
The tire change was done by the Pirelli supplier at the track. While I was a bit nervous when he said he had never even seen carbon fiber wheels let alone mounted tires on them, they went right on without a hitch and like the prior set of Dunlops, took a minimum of weight to balance.
The next concern I had was in caring for the wheels. While Dymag suggests no special maintenance or cleaning regimens, I make it a point to use very mild detergents and chemicals near the wheels. They do have a protective clearcoat over the carbon fiber however I make sure to get the corrosive brake dust and debris completely off the rims before they get a chance to do any damage. After 2 years, I have noticed no visible damage, discoloration, fading, chips or cracking.
But now to the real question – How do the wheels perform? I must admit, I am neither the fastest guy on the track nor the most aggressive but I did notice a significant difference and since switching wheels, I moved from the Intermediate group to Advanced in NESBA (a national track day promoter.)
The bike felt significantly lighter in motion with much less effort in turning and no apparent change in mid-corner stability. While I don’t know if it was the wheels or just getting more comfortable on the track, I began experiencing wheel spin on turn exits from the rear tires. While this was a bit unsettling the first few times it occurred, it was very controllable and provided little actual drama. My lap times have dropped noticeably since the wheels were installed no doubt assisted by the move to softer compound tires.
In conclusion, I am very happy with the results of the wheel swap. While the performance gains were enough to justify the change alone, the positive comments I get from people who see the wheels makes the efforts all the more enjoyable. I wholeheartedly recommend the update to lightweight aftermarket wheels whether your preference is to improve performance, appearance or a combination of both.
Note: For informational use only. All material and photographs are Copyright © webWorld International, LLC – 2000-2011. All rights reserved. See the webBikeWorld® Site Info page. NOTE: Product specifications, features and details may change or differ from our descriptions. Always check before purchasing. Read the Terms and Conditions!
Other WebBikeWorld Accessory Posts