The Hot Grips can be difficult to install.
But they work well, providing lots of heat.
They include a two position switch.
The draw is 15-18 Watts each at maximum power.
The motorcycle riding season can be extended to take advantage of those cool, crisp late fall and early spring days.
A good set of heated grips will help to keep your hands warm, which can make all the difference in the world.
Heated grips can help prevent the hand numbness and fatigue associated with cold weather riding, which allows you to ride longer and to have much better control over the motorcycle.
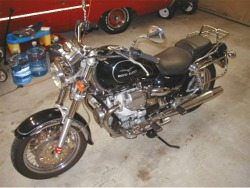
I wanted to add this luxury to my 2001 Moto Guzzi California Special, so I decided to research the available options.
The webBikeWorld “Hot Hands” heated grips review is one option, but I wanted a permanent solution that would look like original equipment.
About Hot Grips
Hot Grips (Plainfield, New Hampshire, USA) has been making heated grips in the U.S.A. since 1981.
They seemed like the best choice because they’ve been in business a long time and they also manufacture original equipment heated grips for several different motorcycle, snowmobile and snow-thrower brands.
I purchased a set of their Soft Rubber heated grips to use on my Guzzi. The grips come with a three-year replacement limited warranty (Although I can’t find any information about the warranty on their website – Editor).
Heated grips are available for many different motorcycle makes and models, including all the Japanese bikes, BMW, KTM, Ducati, Moto Guzzi and Cagiva, Triumph and more.
The grips are also listed by size, so you may be able to find a pair that will fit even if your motorcycle isn’t listed.
I ordered their soft Hot Grips (Part number KW-475-875, $110.00; a Mini Switch Housing ($20.00) to mount the switch that turns the grips on and off; and a packet of their two-part epoxy, which is necessary to install the grips on the handlebars, ($3.00).
The shipping was $8.00, bringing the total to $140.00, which is a reasonable price for a set of permanently installed heated grips.
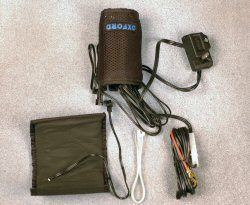
The Hot Grips kit comes with:
- Two grips.
- Two sleeves to be used under the left grip.
- Double throw switch.
- A resistor.
- Two part epoxy.
- Instructions.
I consider myself to be mechanically inclined, but installing these grips was not an easy task. If you don’t have a lot of patience or mechanical experience, you may be better off having them installed at your local dealer.
The installation took me about three hours, not including the heated grip that I destroyed on the first try! I ended up having to order a second throttle grip, which cost me an extra $53.00. Not a job for the faint hearted!
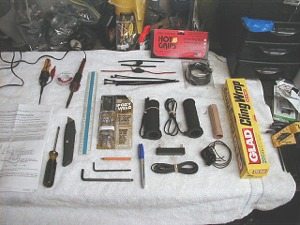
Several tools are necessary for this project, and it’s a good idea to gather them all in one place prior to starting. The instructions recommend soldering all connections, which offers the path of least resistance to two connected wires.
These puppies use 15-18 watts when set on high so any resistance from crimp connectors may affect the performance of the grips.
The grips are fastened to the handlebars with high-temperature epoxy. The epoxy is used to prevent the grips from sliding off the handlebars after they become hot.
Most normal adhesives will not work at the temperatures sustained by the grips; the adhesive will fail and the grips will become loose.
The Hot Grips website includes excellent and detailed instructions, so my advice is to download the appropriate pages and read them at least once prior to purchase so that you can develop a better understanding for the installation.
They also have instructions for temporarily mounting the grips, which might be an option if it’s anticipated that the handlebars will be switched. The instructions in this article describe permanent mounting only.
This article is written as a supplement to the original instructions, rather than as a replacement. Here’s a tip: before the installing the grips, make some notes on the best routing for the grip wiring and also determine how to connect the grips to the motorcycle’s wiring harness.
Here’s a list of the tools that are needed to complete the installation:
- Soldering Iron & Solder.
- Test Light.
- Screwdrivers and Allen Keys.
- Ruler.
- Zip Ties.
- “Sharpie” permanent marker and a pencil.
- Knife.
- Cling wrap.
- Some crocus cloth, sand paper or a large file or rasp.
You may also want to have some extra wire on hand; a fuse holder with a three amp fuse; some shrink tubing if you’re very fussy about electrical installations; mineral spirits or 3M trim adhesive remover and some wooden sticks for mixing the epoxy.
Before Starting
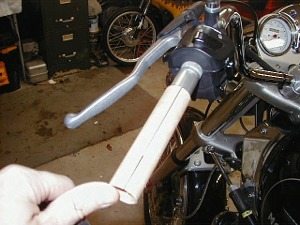
I decided to install the grips first instead of the wiring. I started with the left grip because the left side is fixed, so it’s easier to install than the movable throttle side.
The left side grip on a motorcycle has a smaller inside diameter than the right hand (throttle) side. The throttle side is larger because there must be a rotating sleeve under the right side so that the throttle can be turned.
Most pairs of non-heated motorcycle grips either come with two difference inside diameters or they’re made pliable enough so that one of them can be stretched over the throttle sleeve.
The Hot Grips all have the same inside diameter, which is large enough to fit the throttle sleeve, but is too big for the left hand side. So Hot Grips supplies a sleeve that is designed to fill the gap between the handlebar and the grip on the left hand side.
Hot Grips recommends fastening the grips to the handlebars using high-temperature epoxy. They manufacture the grips and the left hand side sleeve larger than needed to account for the thickness of the epoxy.
The epoxy will set very quickly, so make sure everything fits before mixing it, because you’ll have to move quickly and there’s no time for second guessing! My kit came with two identical grips and a hard sleeve, which fills the gap on the smaller left hand side.
The original equipment Moto Guzzi grips leave something to be desired; they’re made from foam but at least they slip right off the handlebars.
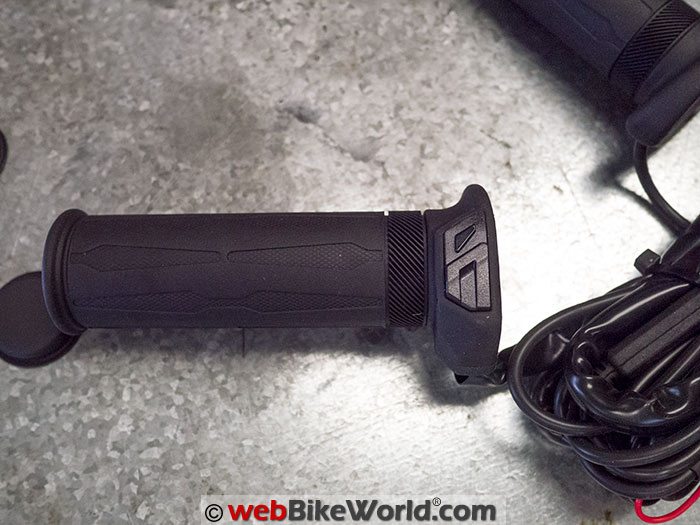
The outside of the Hot Grips are made of a nice rubbery material, and the inside is made from a hard Nylon or plastic which contains the heating elements.
Even though the outside of the grip is pliable, the inside does not stretch, so do not force the grip on to the bar or throttle, and do not hammer them on with a piece of wood.
Remove the bar-ends and the old grips. You can have Hot Grips pre-drill the ends of the heated grips at no extra charge so that you can fit the bar end over the grip if desired.
The factory used some type of adhesive to hold the grips on my bike, but I was able to remove it with mineral spirits. By the way – make sure to cover the fuel tank to prevent any drips from the solvent or epoxy.
Hot Grips sells a package of high temperature epoxy, so you may as well purchase it from them when you’re buying the grips.
Epoxy can be purchased locally and the cost is about the same, but buying it from Hot Grips saves the extra trip to the auto parts store.
My garage is cold so I soaked the tubes containing the epoxy in warm water for five minutes to make it more pliable and to help ensure the correct setting time.
Installing the Heated Grips: Left Side
Before installing the grips, first try a test fit between the grip and the sleeve to make sure they are loose.
The left grip and sleeve was a perfect fit, so no additional fitting was required.
Observe where the wire comes out of the grip and mark the grip with a permanent marker so that you end up with the correct orientation. The wire can be oriented below the handlebar, which effectively hides most of it from view.
Open and mix the epoxy; if it isn’t at room temperature, you may need to warm it slightly to make it flow better.
Once the epoxy is mixed it must be applied and the grip fitted right away.
That’s why it’s important to have fitted everything together first to make sure it will work and to have all the necessary tools at hand.
Spread a thin, even coat of epoxy on the handlebar with a pencil or thin wooden stick, like a tongue depressor or a stick from an ice cream bar.
The directions warn in large bold letters to put the epoxy on the handlebar and not inside the sleeve or the grip.
Now press the whole thing together and make sure you line up your marks. I wiped away the excess epoxy before the final placement to keep it from oozing everywhere.
Try to get the grip located precisely the first time. The epoxy sets up within about 30 seconds, so if you need to relocate the grip, do it fast!
Do not try to pull the grip off or it will break. Do not test the bond or play with the grip during the curing process. The bar-end weight can be reinstalled after the epoxy has cured for an hour or so
Installing the Right Side (Throttle) Heated Grip
The installation of the heated grip on the throttle side is more complicated. Before applying the epoxy, make sure that the grip has a relatively loose fit over the throttle sleeve and that everything is lined up.
The epoxy is thick and it will fill the loose space between the handlebar and the inside of the grip.
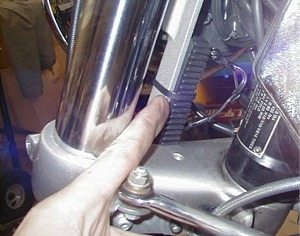
The throttle side on my Cali was tight and there were also some ribs that needed to be removed from the throttle sleeve, so it was necessary to trim it so that the grip would fit over it.
It took quite a while to trim the throttle sleeve so that the grip would fit. I used a sheetrock knife, a file and a two foot length of blue crocus cloth and sand paper to reduce the diameter of the throttle sleeve so that the grip would fit.
The goal is to remove enough material without gouging the throttle or without ending up with an oval shaped throttle sleeve. I was careful and took my time to avoid damage. I ended up removing about 1/16” or more off of the diameter.
Someone with access to a lathe might be able to do a better job of turning the diameter.
It’s important to dry fit the grip over the sleeve to ensure that the power wire that comes out of the grip does not interfere with anything when the throttle is twisted throughout its entire range.
Once the wire is positioned correctly, both the throttle and the sleeve are marked with the felt tipped pen.
Protect the switch assembly on the right hand side with some cellophane while the epoxy is being applied. Any epoxy that ends up on the switch assembly or inside the throttle could cause it to seize.
The freshly mixed epoxy must be spread evenly on the throttle. Be very careful to avoid contaminating the inside of the throttle and handlebar area with epoxy. Press the grip on to the throttle.
This has to be done quickly and with some force.
Sidetracked
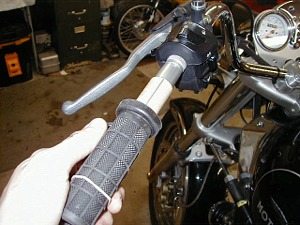
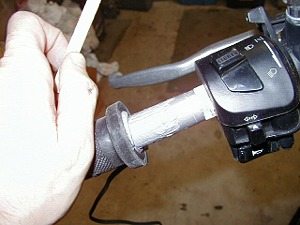
In the time that I used to take a photo the whole assembly locked up and would go no farther. When I went to pull it off the grip it split in half and was destroyed.
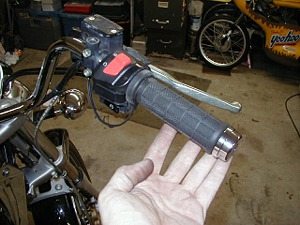
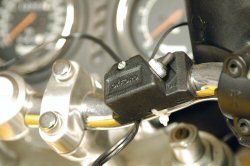
The finished product — looks great! The handlebar mounted switch. The resistor allows the grips to have a low powered setting.This delayed my installation by about a week. Once I removed the rest of the grip and filed off the epoxy, I spent another 45 minutes filing and sanding the throttle even further.
The replacement grip cost $58.00 plus shipping.
Rather than cursing or kicking my Moto Guzzi off its center stand, I remembered what I had read in “Zen and the Art of Motorcycle Maintenance by Robert M. Pirsig and I just moved on to the wiring phase while waiting for my replacement grip.
Photo on the top left shows the installed throttle grip.
Wiring
The instructions include a simple diagram that illustrates the grips wired in parallel; one side to ground, the other to the resister and switch.

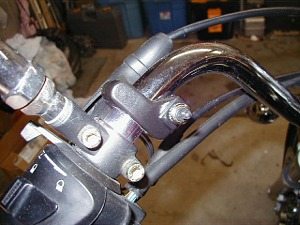
The kit comes with a switch, but an optional mini-switch with a housing is available for an additional $20.00 (photo middle left).
Some motorcycles have specific locations for mounting an accessory switch, so this may be your best option. The kit also has a resistor that’s used for the “low” setting.
Make sure you determine the best placement for the switch, resistor and wire routing before soldering everything together. I decided to zip tie the resistor to an aluminum bracket next to the left fork leg on my Moto Guzzi (photo bottom left).
To minimize the strain on the wire as the handlebars are turned, leave a gentle 180° loop with about a three-inch radius.
Twist the throttle through its entire range and check for binding. Cable ties can be used to secure the extra wire, but you should leave about 5-6 inches of clearance from the grip for best results.
The micro switch is pre-soldered. Attach it to the handlebar and run the remaining wires down to the resistor.
Ground out one side of each grip. The preferable location is somewhere on the frame.
Solder the other side of each grip to one side of the resister with an outer lead from the switch. The other resister side goes to the other outer lead of the switch.
There is no polarity, so either side can be used. Follow the clearly drawn diagram in the instruction sheet which is much easier than my description of it above.
The center lead from the switch goes to a 12 volt source.
Upon removal of the right side cover I determined that I wanted to tap into the headlamp fuse and avoid the fuel injection circuit. Try to wire them into a ignition-switched power source.
If the grips are wired directly into the battery, there’s a chance that the battery would be drained if the grips are left on.
It’s best to use a wiring diagram, which can be found online or in a service manual. I purchased a spade-style holder and 5-amp fuse.
Before buttoning everything up, turn the bike on and test the switch in both high and low. When the circuit is touched at the resistor, a distinct dimming/brightening of the test lamp should be noticeable.
Make a note of the switch position on you handlebar and mark it with a labeler or similar.
Make sure that the handlebars can turn all the way on each side and zip-tie all the wires out of the way. Replace the covers.
Conclusion
Once you’ve tried a motorcycle with heated grips, it’s tough to go back to riding without them. The two-position heat can take the edge off on a cool evening or really warm up your hands when it gets cold.
I’ve used the hot grips on my Guzzi for almost two seasons now without any issues. These grips really live up to my expectations.
More wBW Heated Clothing Reviews | Motorcycle Glove Reviews
| wBW Review: Hot Grips Heated Motorcycle Grips | |
|---|---|
| Manufacturer: Hot Grips | List Price (2005): $110.00 |
| Colors: Black | Made In: U.S.A. |
| Review Date: January 2005 | |
Owner Comments and Feedback
See details on submitting comments.
From “C.B.” (4/10: “I had Hot Grips on my 1991 ST1100 in 2003. In 2004 I thought they didn’t get hot enough for riding below 40 deg then the left side started getting gummy. I contacted them and they seamed like they didn’t care.
Since I live in New Hampshire I said that I could drive there and show them they got upset and told not to.
Now its been about 5 yrs later and the left side stopped working. I checked the continuity and there was none. The wires on that side were starting to show also. I contacted them again by e-mail and they replied that couldn’t happen.
I was surprised that JL got a positive response. I would recommend against hot grips myself.”
From “J.L.” (10/09): “I had these on my previous bike for 7 years and about 100,000 kms, no problems at all. Bought a new set for new bike in May 07 and in August 2009 contacted Hot Grips by email because the left grip was wearing out quickly and had gotten sort of gummy.
They replied the same day and said if I didn’t think they performing as they ought to, to send them back with $12 for shipping and they would send a new pair.
I took the left one off and sent it back, had the replacement in hand within a week. No hassles about proof of purchase just good service.
These guys stand behind their product, and based on my experience with the first pair I’m pretty sure this was just a fluke with the second set. The right one is fine.”
From “A.W.” (10/08): “Last spring I got a pair of hot grip heated grips for my ST1100 Honda. After ten thousand miles the left side grip wore to the wires and the throttle side is not far behind.
I know I ride a lot, but I have never seen a set of grips go away that fast, from every day commuting. Even though the grips do have a three year exchange limited warranty, like a buddy of mine said “Who wants to change them there grips that often?!”
On the up side, they were nice while they lasted. Next time I will go to the dealer “you get what you pay for”, or just get a pair of heated gloves like the local BMW dealer has.”