Pressure is Pleasure: Compressed Air for the Custovation Shop
My love affair with compressed air started a number of years ago when I got an entry level oil-less air compressor for Christmas. Looking like a bloated red fire hydrant lying on its side, it made a deafening noise while it crawled its way to 125 PSI.
As the number of air tools in my shop increased, the demand for stored compressed air followed. The tools drained air from the tank faster than the littler compressor could keep up.
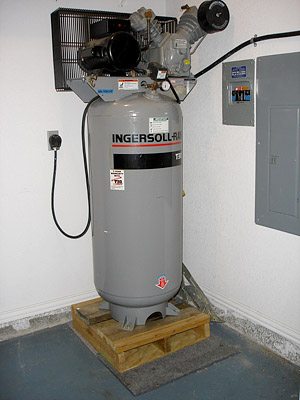
That noisy compressor was replaced with a quiet brute; a 5 HP, vertical standing, two-stage pulley driven reciprocating type unit sitting on top of an 80 gallon tank.
Finally the *Custovation shop had serious air pressure (PSI) with enough volume (CFM) to run any tool attached short of a jack-hammer.
The compressor is the best shop investment ever. But to keep the air supply at arm’s reach, several hose connections were added. In no time, it seemed the assortment of hoses connected to the compressor was spinning a web of their own. There had to be a better way.
The solution was a permanent hard-line connection with terminations at various places in the shop and second garage. With that in mind, the compressor unit could be placed almost anywhere, keeping the noise away from the work area.
Where to Buy Compressed Air System Basics
Check Reviews & Prices on AmazonSee More: Motorcycle Accessories, Motorcycle Tire, Motorcycle Helmets
Basic Fixed Air Line Layout
Compressed air distribution is a staple of every industrial operation so there’s a lot of information available on proper design and installation. I found the information from Sharpe Manufacturing invaluable; their “Ask Doctor Gun” air piping layout says it all.
The most important elements of the distribution system are:
- A 1″ main line-fall per 10’ to ensure condensate drainage to a drain leg.
- Inverted “J” connection off the main line to keep condensate and crud out of the connection drops.
- Flexible hose between the compressor and the hard-line. The hose prevents hard-line breakage due to vibration.
- Ball valve at compressor output so air delivery to the entire system can be shut down fast.
- Drain leg near the compressor and one at the far end of the system terminated in a 90° ball-valve.
It’s good practice to have at least one drop connection fitted with a regulator / dryer. That way you can adjust the tool pressure to spec.
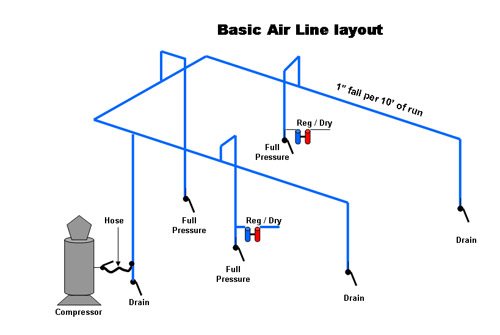 Compressed Air Line Layout. Courtesy Sharpe Manufacturing, Inc.
Plumbing It Up
Permanent lines are relatively easy to install and cost varies with the tubing used. There are two basic types of piping that can be used: copper tubing, black iron pipe but not PVC, and each has its pros and cons.
One consideration is corrosion; as the compressor builds up air pressure, it squeezes out water vapor and that condenses inside the line. Corrosion of the line is caused by water formed from the compression process.
Copper is durable over time and ranks high for cleanliness since it has no corrosion issues. However, cost is high and takes a degree of skill to install. Later modification to the distribution lines is a bit more difficult due to lack of tubing flexibility and soldering.
Black iron pipe is used in a lot of industrial applications with high pressures. It’s likely to corrode over time but has the lowest probability of tube breakdown due to high internal pressure.
Pipe is costly and requires a high degree of skill to install, namely using a pipe threading outfit to cut threads on the pipe ends. Later modification to the distribution lines is very difficult.
PVC is sometimes considered by do-it-yourselfers. It can seem low cost, easy to assemble and modify and has no corrosion issues. Its weakness is that it can fail dramatically if the pipe is hit smartly while under pressure and the joints can fail if not cemented properly.
Editor’s Note: See R.L.’s comments below regarding the dangers of using PVC!
Failing with any tubing means trouble, so don’t short-cut the assembly technique and protect the tubing from impacts.
Where to Buy Compressed Air System Basics
Check Reviews & Prices on AmazonSee More: Motorcycle Accessories, Motorcycle Tire, Motorcycle Helmets
Installing a Compressed Air Line
Whether you have a compact portable compressor or a 400 pound V-twin behemoth, hard air-lines can clean up your shop and add more enjoyment when using air tools. Besides, the sound of VRIPPPT, VRIPPT will put a smile on your face!
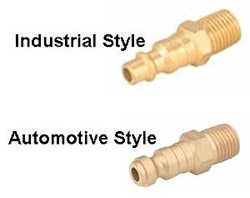
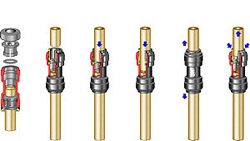
Couplers
There are several 1/4″ hose couplers available. Only use brass, since steel will rust. The two most popular styles are the industrial and automotive versions.
While there is no advantage of one style over another, provided they are quality made, the most popular style is the industrial. Just make sure that the female coupler is compatible with the male, an important factor in air couplers and life as well.
Hoses
Hose inside diameter plays a big role in proper air tool operation. The smaller the hose inside diameter, less air gets through the line.
Hose length is also a factor. As air is forced through the line, pressure decreases the farther the air has to travel.
For example, a 3/8” internal diameter hose has over two times the cross sectional area than a 1/4″ ID hose. So a 1/4″ ID hose will drop about 20 PSI in 20 ft. at 15 CFM. The same length with a 3/8” hose drops only 2.8 PSI.
Select a high grade 3/8″ all-weather 300 PSI hose for maximum air delivery and flexibility. PVC jacked hose is very durable and abrasion resistant.
Use a 1/4″ hose only for the shortest runs, like a short self-coiling hose near the tank or 1 foot main line.
Where to Buy Compressed Air System Basics
Check Reviews & Prices on AmazonSee More: Motorcycle Accessories, Motorcycle Tire, Motorcycle Helmets
Some Compressor Tips
- Use a swivel whip-hose end on your main hose to add maximum tool movement flexibility.
- A 1/4″ self-coiling air hose 25’ long, keeps the most used portion of the hose out of the way but ready for extended reach.
- Add a drop of air tool oil each time you use the tool to lube the internal turbine and more frequently if you use the tool for long work periods.
- If you are spray painting with an oil-less compressor keep the unit away from the painting area. Oil-less units are poorly filtered and overspray dust will ruin the piston causing it to seize in the bore. Guess how I know.
- When spray painting always use a disposable water-separator attached to the gun air input to prevent any water to enter the gun.
- Place a piece of carpet under the compressor to keep if from wandering off while running.
- Nothing really dries the air in a compressor line. It’s a matter of condensation so empty the tank water drain, line drains and any filters often.
- When making a transition from one type of tubing to brass fittings and quick connects, the female fittings can crack from over tightening, so tighten carefully. Use white Teflon tape on the brass threads for a no-leak joint.
- Close the tank ball valve when the air system is not in use to take pressure off the lines.
Five “Must-Have” Air Tools
All these tools are extremely useful but they can be dangerous if handled carelessly. Become familiar with the tools operation and NEVER use these tools without eye protection or when children are present.
I believe the guy who adapted the industrial air compressor for the home mechanic is a marketing guru for the air tool industry. He must have studied how the razor blade companies marketed their products, back-in-the-day. That marketing strategy was simple: hook the customer on the handle design, give it away and then charge for the replacement blades. GENIUS!
The point being, that after a motorhead / garage-mechanic / hobby dude buys a compressor, they will always divert their path through the home improvement store checking out the collection of air tools standing proudly on display. Yup, when that happens, you’re hooked. There’s no turning back. Once you’ve had air you can’t go back!
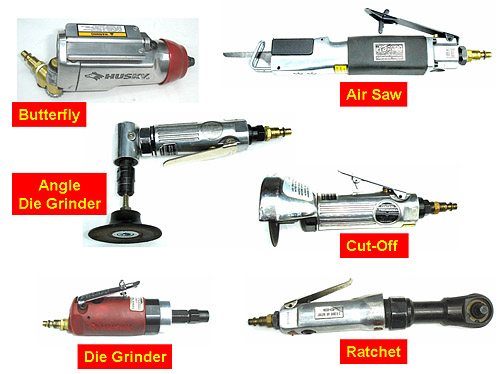
3/8″ Drive Butterfly Impact Wrench
The only tool that allows you to single handedly remove nuts and bolts from rotating shafts and other parts like fork leg sliders. The rapid high impact motion breaks the fastener free without having to jam the piece to prevent rotating.
High Speed Auto Body Saw
Makes cutting sheet metal, bolts and small metal stock a breeze. Just remember to apply a bit of oil to the cutting edge.
1/4″ Straight-Line Die Grinder
Great for work needing abrasive bit, small wire or synthetic wheel or polishing pad treatment.
Right Angle Die Grinder
When the guys at Orange County Choppers demonstrated the versatility of this tool for grinding and sanding, the market response was so strong, most places where sold out for weeks. They were right.
3″ Cut-off Tool With Blade Shield
Great for cutting through metal when a saw isn’t practical and having a rough edge cut isn’t important. Throws off a lot of sparks so watch you don’t burn something down.
3/8” Ratchet
After you spend your money on the above and have a few bucks left, consider this tool. It’s a production air tool suitable for repetitive tightening operations, but it does come in handy. Makes a great sound but has limited use since manual ratchets are a lot faster. It can be very helpful though if you have arthritic hands.
*Custovation is a combination of customizing, and renovation. Not a restoration, which means to bring back to an original condition. Custovation has a more specific meaning: CUSTOMIZE – to make or alter to individual or personal specifications combined with RENOVATION which is to restore to an earlier condition, by repairing or remodeling.
References
PSI and CFM are two important terms that determine the performance of a compressor. Using the water hose analogy, PSI (Pounds per Square Inch) is how strong the water comes out of the hose.
CFM (Cubic Feet per Minute) is related to volume of water coming out of the hose. So there can be high pressure at low volume. A strong stream but it takes a long time to fill a bucket because there is low water volume. The opposite is high volume (large hose) and the bucket gets filled quickly but there’s very low pressure.
In a compressor, high air pressure is desirable to run the mini-turbines inside air tools but they are voracious consumers of air, so the compressor must deliver a lot of air (CFM) at the high pressure. Small air tools need about 90 PSI at 6 CFM for the tool to be effective.

Any compressor delivering 135 PSI at 9 CFM or greater should be ok for most small air tools. When shopping for air tools, note that some use air more efficiently needing less CFM but they usually cost a bit more.
Want to Know More About Compressed Air?
- Check out the Sharpe Manufacturing, Inc. web site for excellent information about compressed air systems and shop air piping layouts.
- Ingersoll Rand has many air compressors, compressed air tools and more. Thanks also to Ingersoll Rand for some of the photos used in this article.
- Inexpensive air tools suitable for the home shop at Harbor Freight.
- Compressors are available everywhere and big ones at Northern Tool
Texas Joe’s wBW Vintage Bikes and Custovations: Compressed Air Basics | How to Re-build Spoked Wheels | 750 GT Alternator Replacement | 750 GT and Bevelhead Tips | Joe’s 750GT and Matching GT1000! | 1968 Royal Enfield
Where to Buy Compressed Air System Basics
Check Reviews & Prices on AmazonSee More: Motorcycle Accessories, Motorcycle Tire, Motorcycle Helmets
Owner Comments and Feedback
See details on submitting comments.
From “R”: “Very good comprehensive article by Texas Joe. After 27 years in the mills, mines and shipyards (all huge users of Compressed Air) I have a slightly different take on the theory of the design of Compressed Air (CA) piping and systems. I am now working in a small shop with a large air demand for big power hammers, air tools, plasma cutters, paint booth, etc.
Material: I definitely agree with R.L. about PVC piping in compressed gas service. One look at the 2/3 remainder of a 2″ Schedule 80 PVC tee, (the other 1/3 was never found!) would convince anyone as to it’s dangers. I think PVC pipe in compressed gas service should be treated as an explosion waiting to happen!
For a home or small shop, I like copper the best. Minor corrosion problems, good heat radiating qualities & it’s recyclable. By that I mean it’s frequently available from residential house demolition contractors, usually for about 1/10 to 1/2 of the price of new.
Type M is not as common around here, as it’s only used for LP heating water & LP gas connections. Domestic water systems generally use Type L Copper Pipe so it is the most plentiful. Pipe that’s straight is easier to install & certainly looks better hanging on the shop wall. Plastic domestic piping (all the different kinds) are not rated for CA pressures.
Black iron pipe (not galvanized) may be cheaper to buy but rusting both inside & outside has to be kept in mind always. It is commonly used for industrial CA systems due to cost in the larger sizes. Keep installation time & costs in mind.
Layout: (Refer to the drawing “Basic Air Line Layout” above for details). Think of a CA system as a water network, air cooling radiator and condensation removal machine. The air will always be there but most of the long term operating problems come from the water that gradually condenses out from the hot compressed air as it cools.
So I design the whole system for both air cooling and water drainage:
- Lots and lots of water traps (drain legs or boots) with drain cocks. The full pressure working valve on every vertical drop should always come horizontally off the leg (or side) of a tee in the drop rather than just from a vertical coupling at the bottom pointing down. The bottom vertical run of the tee should have a short length of pipe (maybe 6″) below it to hold any condensate (see the regulator/filter/dryers in the drawing above). A (small) drain cock on the bottom allows for (frequent) draining (blowing down). The fittings called “full pressure” as shown above will pass on any condensate to your tools.
- Drops should come off the header with a tee with leg vertical up so air can be picked up leaving the water behind. They should never come vertically downward from off the header. (see the “Basic Air Line Layout drawing above for details).
- Make the condensate drain lines from the main receiver tank very easy and very convenient to blow down. A lot of the heat of compression is given up in here, generating lots of condensate. Even take the blow down valve over to the back door so it can be done at the same time as the shop is locked up at the end of the day. 3/8″ pipe or larger should do the job (1/4″ will do but it just takes longer). Even hose will work. Perhaps an exhaust muffler will be needed to stay friends with the neighbours!
- The drawing above calls for 1″ drop per 10′ of run. Don’t be afraid to make it more than that.
- In order to cool the air sooner & reduce system condensate, the drop from the flex hose/compressor up to the header could be made from several runs of small pipe rather than one large one. For instance, a 1″ header could be fed from 3 or 4 runs of 1/2″ copper pipe. Water traps at the bottom please. More heat can be removed quicker, knocking out the condensate.
It’s not rocket science but planning ahead will make Compresses Air just a fact of life, not an occasional pain in the butt!”
From “R.L.”: “This article includes a lot of good information, however I’d strongly recommend against using PVC pipe for a compressed air supply. I’m not alone in that recommendation.
PVC was banned by OSHA in 1988 for use in above-ground gas delivery systems, unless it’s encased in a shatter-proof container (i.e. another, larger pipe over it). Its characteristics under pressure (and not) vary quite widely depending on the temperature. For a demonstration, place a length in a freezer overnight and then hit it with a hammer.
See this citation (there are lots more): from OSHA on PVC pipes and a great discussion by various engineers.
The pressure rating of 480 PSI is for non-compressible contents, such as water. Compressible contents use a different rating system. The problem isn’t the pressure rating, per se; it’s the failure mode, which you allude to in the article. PVC shatters instead of tearing like copper, rubber or iron does. Plastic chunks really suck to remove from beneath ones skin, or, God forbid, eyes.
Yes, many people have used it, and many people have never had a problem. But then, many people ride without a helmet, too.
Copper (Type L is good and what I have, M is too thin for this, K is great but expensive and hard to find) and iron pipe are excellent choices. There are air-pressure rated nylon piping on the market, too, but they’re kind of expensive. Quick-connect aluminum systems are out there, too. Awesome, but *really* expensive.
If cost is a big factor (when is it not? :), the truly poor-mans method is to use rubber or synthetic air compressor hose between drops, attached to the wall with plastic conduit clamps. Ugly and prone to water-pooling in the low spots, but very functional and safe, as long as it’s fastened at many points. Just make sure you inspect it regularly for wear.
Personally, I’d save up and do it properly.”
Other WebBikeWorld Accessory Posts