LED Light for Motorcycles
EDs are just about the perfect motorcycle lighting solution. LED lights use very little power, they’re not affected by vibration, they don’t get hot and the LED itself is virtually waterproof.
They’re also available in an array of colors and they can be grouped together to provide many different shapes and styles of custom-designed light.
Once you start experimenting with LED lights, it’s hard to stop. They can be installed on just about any motorcycle, even the old-timers with wimpy alternators.
We previously reviewed the LED 1157 bulb replacement and the LED flexible light strips from Custom Dynamics, so we just had to try their new “Hyper-Strips” flexible LED accent lights also. “Too much is not enough” is the motto of LED light fanatics, and the Hyper-Strips offer yet another way to go over the top.
Hyper-Strips are LED accent lights for motorcycles. They can be mounted just about anywhere: under the fuel tank, headlight, seat or any other location where the light will be visible but the LEDs will be hidden.
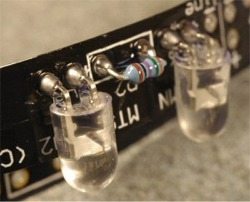
LEDs don’t light up by themselves, so they’re usually mounted on a printed circuit board that contains a few other electronic parts that help convert the electricity. The word “Strip” in Hyper-Strips refers to the unique flexible printed circuit board that’s used to mount the LEDs.
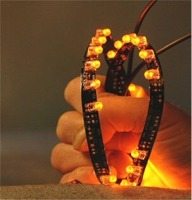
Hyper-Strips are available in a variety of lengths, up to the 12″ “Hyper-18″ kit shown here for under-tank mounting. This kit includes two 12” strips with 18 LEDs each and quick disconnects pre-installed. They come in 8 different colors, including amber, red, green, purple, orange, jade, white and blue.
Hyper-Strips are easy to install with minimal electrical skill required. The hardest part is deciding where to place them and in getting them secured on the bike. They can be spliced into just about any existing light wiring, or connected directly to the battery.
Custom Dynamics sells an accessory Hyper-Light installation kit that includes just about everything necessary to complete the job, including double-sided tape, cable ties, switches and spade terminals. And as long as you’re maxing out the glam factor on the bike, you may as well get one of their LED accent light remote control units, which allows the lights to be turned on and off from a distance to impress your friends at the local hangout!
Installing Hyper-Strips
Hyper-Strips can be mounted just about anywhere on the bike, limited only by your imagination. One of the best (and most popular) locations is under the fuel tank. I don’t have a cruiser with lots of chrome, but just about any type of bike is a target for customization lately, so why not a Thunderbird Sport?
 One of the best ways to find a good location for the lights is to experiment with the Hyper-Strips at night. Here’s a tip: the LEDs can be powered by one of those little square 9-Volt radio batteries, so you can experiment with all sorts of configurations before the lights are permanently mounted.
Try going out in the garage at night to experiment with the lights using the 9-Volt battery trick. Try different locations, using a couple of small pieces of duct tape if necessary to temporarily hold the lights in place.
Once a suitable location is found, use some type of marker (a felt-tip marker works well) to make some layout marks to use as a reference for mounting the strips. I didn’t do this at first, and realized my mistake after I had gone through all the trouble of removing the fuel tank and then realizing that I didn’t remember where to mount the strips.
I had just enough clearance between the central frame spine on the Thunderbird Sport and the fuel tank to mount the 18″ Hyper-18 strips, one on either side. This kit consists of two 18″ Hyper-Strips with 18 LEDs per strip.
The LEDs are mounted asymmetrically on the backing; that is, there’s a left and right side strip, so make sure you have the correct strip for each side. The LEDs should be facing inwards and pointing down for the best effect under the fuel tank.
 Once everything is laid out, the Hyper-Strips are ready to install. The mounting kit includes some high-quality 3M double sided tape and a couple of packages of 3M double-sided tape accelerator. The tape is about twice as wide as the Hyper-Strip, so I used a pair of scissors to cut a lengthwise section. (Note: Custom Dynamics recently informed us that the Hyper-Strips now have the double-sided tape pre-installed).
The accelerator packages are similar to those moist towelettes you get with fried chicken take-out, only instead of a towel, they use a sponge soaked in the special accelerator liquid. I cleaned the mounting surface first with rubbing alcohol and then applied the accelerator to the back of the Hyper-Strip and the mounting surface.
Carefully apply the double-sided tape to the back of the Hyper-Strips and then mount them on the surface. The accelerator is very efficient, so take care, because once the tape sticks to the surface, it’s stuck for good. The accelerator really works!
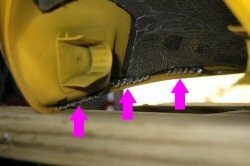
I ran each Hyper-18 strip lengthwise under the fuel tank, about as far out towards the edge as I could whilst still hiding the LED lights. The Hyper-18’s have about 36″ of 20-gauge wire and a pair of quick disconnects, which makes it easy to hide the wire up under the tank and back to the battery.
LED Accent Lights
Custom Dynamics offers a wide range of LED lights of all different types. In the true spirit of overkill, we also mounted some of their LED accent lights while we were at it.
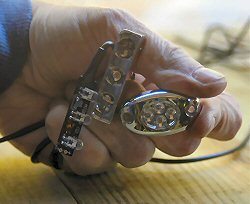
The photo shows three different types of accent lights. On the left is a three-LED Hyper-Strip. The middle unit is a three-LED chrome-plated plastic housing with three LEDs. The central LED points directly down and the LEDs on the side point left and right.
The unit on the right is also made from chrome plated plastic and holds 4 LEDs. These can be mounted under floorboards, behind a license plate or just about anywhere else you can imagine. We mounted the unit shown in the middle underneath the Thunderbird Sport’s headlight fairing, and the small Hyper-Strip found a home in back of the Thunderbird Sport’s side-mounted horn assembly.
These smaller LED accent light units are easy to install. Once a suitable location is found, clean the surface with rubbing alcohol, lay on some double-sided tape and stick ’em on. We spliced the accent light mounted under the headlight into the same wiring used to power the under-tank Hyper-Strips.
We used Posi-Lock connectors to do splice all the wires, because they work great and they will allow the wires to be disconnected if we have to remove the fairing or headlight for some reason. See the wBW review of Posi-Lock connectors for more information.
The accessory mounting kit includes a waterproof on/off switch and a fuse holder. These can be spliced in to the red, or power wire, again using Posi-Lock connectors. One of the nice things about using Posi-Locks is they can be relocated and reused if you make a mistake or find a better mounting solution.
The on/off switch can be located just about anywhere. I found a location under the seat in back of the Thunderbird Sport’s air cleaner trim and installed it using a small piece of double-sided tape.
As long as you’re going over the top, you may as well spring for the remote control unit. This is installed between the on/off switch and the LED lights by splicing the red wire to power, the black wire to a suitable ground and the white wire to the LEDs.
It’s a bit too late in the season around here to show off at the local hangout, but I plan on shining up the bike and waiting until some admirers are nearby and I’ll fire off the LEDs with a cool light show for maximum effect.
 It’s very hard to take photographs that do justice to the results. When the Hyper-Strips and LED accent lights are mounted correctly, they give off a neon-like glow that looks very cool. The LEDs used in the Hyper-Strips are very bright, and the darker the surroundings, the greater the effect.
Conclusion
LED lights draw very little power and they are virtually maintenance free, which makes them ideal for use on a motorcycle. It’s a lot of fun to experiment with different placements for the Hyper-Strips and accent lights.
They’re very easy to install and you don’t have to be an electrician to get them working properly. They really look good when they cast their glow on polished chrome, but they’re also suitable for sport bikes or naked bikes, and they even work great on the Thunderbird Sport shown here.
Note: For informational use only. All material and photographs are Copyright © webWorld International, LLC – 2000-2011. All rights reserved. See the webBikeWorld® Site Info page. NOTE: Product specifications, features and details may change or differ from our descriptions. Always check before purchasing. Read the Terms and Conditions!
| Product Review: Hyper-Strips Flexible LED Accent Lights | |
| Available From: Custom Dynamics | Suggested Retail Price: $19.00-$179.00 |
| Colors: Assorted colors available. | Made in: U.S.A. |
| Product Comments: Relatively easy to install. Available in amber, red, green, purple, orange, jade, white and blue. Hyper-Strips come in lengths from 3″ up to 12″. LED accent lights are also available in several different styles and colors. | |
| More: Motorcycle Lighting Page | Posi-Lock Connector Information | |