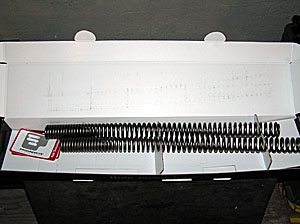
Installing Progressive Fork Springs on a BMW R65
After installing the Progressive Suspension 420-Series rear shock absorber on our 1986 BMW R65, we wanted to also revitalize the front end with a set of Progressive Fork Springs.
The new-found control at the rear accentuated the front end’s slightly vague feeling, so we checked the Progressive online product lookup guide, which recommends the 11-1130 model springs for this bike.
And get this (believe it or not): according to the sources we checked, the Progressive 11-1130 springs are also used in the 1988 to 1993 Harley-Davidson Sportster 883 and 1200; the 1987-1994 FXR and the 1935-1950 FXLR! Who said BMW and Harley don’t have a common heritage?
We also purchased a billet triple clamp from San Jose BMW for our R65, and we’ll report on that “one of these days” as soon as we can find the time to get it installed.
The problem is that our R65 has a different fork configuration than other BMW motorcycles of the same vintage, and we were not able to figure out how to install the new springs or the triple clamp.
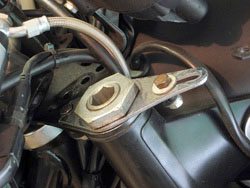
The top fork nut is 41 mm across (see photo left), and it’s threaded on to a 17 mm Allen set screw. We tried removing the nut, but no amount of force would budge it, even with a big cheater pipe on the end of the 1/2″ drive wrench. Something isn’t right, but we could not figure out what.
We’ve been scratching our heads ever since on this until wBW visitor “H.R.” sent us this information, based on an installation of Progressive Fork Springs on his nearly identical R65:
Where to Buy Progressive Suspension 11-1130 Fork Springs
Check Reviews & Prices on AmazonSee More: Motorcycle Accessories, Motorcycle Tire, Motorcycle Helmets
Progressive Fork Spring Installation on BMW Monolever Motorcycles
This article documents the installation of Progressive Suspension’s fork springs on my 1986 BMW R80RT Monolever. These forks are shared amongst the R- and K- series bikes of this vintage.
The design is considerably different from fork springs on earlier Airhead bikes. A common error (OK, my error) when first encountering this vintage of spring is to assume that all you need is the right size socket to fit over the fork cap nut.
The monolever fork features a fork cap which is held in by a circlip rather than threaded into the tube. An advantage of this design is that it is no longer necessary to use a “torque relief bar” when removing the fork caps to prevent misalignment of the forks, but it does require a bit more effort to get to the springs. Read on for details…
Tools and Materials
You’ll want the standard BMW tool kit if you’re lucky enough to have one. Some of the tool kits have the required 41mm (1-5/8″) ring wrench required for the fork cap nut. Mine didn’t and so I acquired a 1-5/8″ box-end wrench.
If you have the BMW wrench, you’ll need a breaker bar that fits over the wrench as the torque required to loosen the cap nut is considerable. A 41mm socket will not work, as you’ll just end up spinning the cap and nut assembly together in the fork tube.
 A 17mm Allen wrench is required to fit in the fork cap, or you can fashion one from a bolt and a few nuts as I did (see picture). You’ll also want some good penetrating oil, and a propane torch is very handy. My fork cap nuts were quite frozen after sitting on the bike untouched for 20 years (not counting a previous owner’s botched attempt at removal), and heat is a stuck nut’s best friend.
Aluminum foil is handy for shielding the local environment from the heat of the torch. Other than the box-end and Allen wrenches only regular hand tools are required. I found a 2-jaw gear puller to be a nice alternative to a helper at a couple of steps. A way to measure the fork oil in the stanchion is required, and you can get creative here. You’ll also want a bottle of fork oil handy as you’ll probably be changing it at the same time you do this procedure.
Preparation
A couple of days before surgery, apply your favorite penetrating oil to the fork cap nuts. These tend to be quite frozen to the fork caps and the longer they soak, the easier your job will be.
Start by removing the gas tank and handlebars. The bars just need to be unbolted from the top triple and can just dangle out of the way. While you don’t really have to remove the tank, you’ll have more room to work and you’ll avoid unsightly scratches.
After prying off the plastic caps on the fork tops, you’ll see the cap nuts threaded on the 17mm Allen screws. Now get out the torch and aluminum foil, shield any cables in the way, and get the cap nuts HOT. Hopefully you’ll see penetrating oil bubbling out of the threads. Keep heating. After they’ve cooled, you may want to repeat with more penetrating oil. If you’re changing the fork oil, go ahead and drain it now. Measure the volume of oil that drains out each side, and be sure to pump the fork a couple of times to expel most of the oil.
The Fun Begins
At this point it’s just a matter of inserting the Allen wrench or bolt/breaker bar setup and putting the box-end wrench over the cap nut. Then, applying clockwise torque to the cap and counter-clockwise torque to the box-end wrench, heave-ho! A helper would be handy here, each person cranking on one of the wrenches.
On my bike one of the nuts broke free fairly easily; the other was apparently unwilling to move. On the stubborn nut I reapplied heat and oil, then turned the cap+nut assembly clockwise as a whole (no Allen wrench) for about 1/4 turn. After doing this and reapplying counter-torque with the Allen wrench, the nut finally broke free.
With the cap nuts finally off, you’ll need to depress the fork caps an inch or so to get to the circlip that holds the cap in the fork tube. Jack the bike up under the engine to get the front wheel in the air.
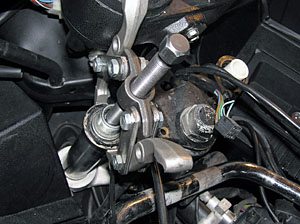
A helper is again handy here, as is patience, small screwdrivers or an icepick, and various curse words. If you don’t have a helper, a 2-jaw gear puller clamped to the top triple can be used to depress the fork cap while you fiddle with the circlip. (see photo). Once the circlips are out the caps pull right out of the tubes. Finally it’s simply a matter of pulling out the old springs. Congratulations, the hard part is over!
Where to Buy Progressive Suspension 11-1130 Fork Springs
Check Reviews & Prices on AmazonSee More: Motorcycle Accessories, Motorcycle Tire, Motorcycle Helmets
New Spring Installation
Before installing the new springs, it’s time to adjust the fork oil level. The new springs, due to their different winding, will displace a greater amount of oil than the stock springs.
Hard-core engineer types will at this point use a little calculus to find out the difference in displacement, but for us mere mortals, the installation guide simply recommends an oil level of 5 1/2″ from the top of the fork tube to the oil with the fork “collapsed”. A better word is “compressed”. Use a helper, blocks of wood, or your wife’s china to compress the forks fully against their stops.
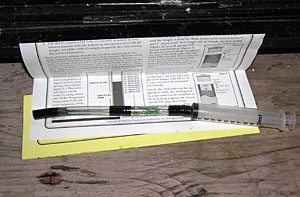 Now add oil to the proper level. As an alternative to Progressive’s $20 tool, I fashioned a fork oil level adjuster from a syringe, some vinyl tubing, and a wire to keep the tubing straight (see photo). Get creative here or buy the special tool, your choice.
The manual for my R80RT recommends an oil level of 320cc, and using the guidelines in the installation guide I ended up with about 290cc of oil in each tube.
The oil level in the forks is not as crucial as, say, the level in the engine sump, and it’s OK to experiment a bit here to dial in the response you want in the forks. Use more oil to make the ride firmer, and vice-versa to soften up the response. Plus or minus ten percent is a good starting point.
On my bike the old springs were installed without a spacer, but the installation notes that came with the springs said to use the spacers provided. The spacers are just 1″ PVC pipe, but be sure to install the provided washers between the spring and the spacer. The new springs were longer than my old sacked out springs, and it’s my opinion that the spacer is optional or can be trimmed, depending on whether you want a firm or plush ride. I opted to include the spacer.
Be sure to clean off the new springs first, mine had lots of “fluff” on them out of the box. Now using your helper or the gear puller, depress the cap nuts and reinstall the circlips. Finally reattach the cap nuts using the box end and “Allen” wrench. Having no way to measure the torque with the tools I used, I just used anti-seize compound on the threads and gobs of shoulder torque. Get them tight.
Road Test
At this point, it’s just a matter of bolting up the handlebars, reattaching the tank, and going for a test ride!
I found with the new springs and 5W fork oil, the ride was much firmer, but not uncomfortably so. Front end dive on braking was drastically reduced, and the handling is, while still stodgy old BMW in character, noticeably improved. Again you can experiment with oil viscosity and level to get the response you want from the forks, but I personally would stick with 5W and just under the stock oil level to start.
Enjoy your new springs!
| Product Review: Progressive Suspension 11-1130 Fork Springs | |
| Available From: Progressive Suspension Made in: U.S.A. |
Suggested Retail Price: $81.00 (pair) |
| Product Comments: Very nicely made shock absorber; looks like custom made. Chromoly steel; rebuildable. Nitrogen gas charged. Comes with cool-looking progressive rate springs in black or red. Internal bladder eliminates need for external reservoir. Five position damping adjustment. Threaded collar adjusts preload but collar is a bit stiff and doesn’t turn easily. Provides excellent ride characteristics and gives very smooth but controlled ride. Gives the bike’s rear end a “silky buttery” feel without wallowing. | |
| More wBW : Motorcycle Maintenance and Repair | Motorcycle Performance Parts | |
Note: For informational use only. All material and photographs are Copyright © webWorld International, LLC – 2000-2011. All rights reserved. See the webBikeWorld® Site Info page. NOTE: Product specifications, features and details may change or differ from our descriptions. Always check before purchasing. Read the Terms and Conditions!
Where to Buy Progressive Suspension 11-1130 Fork Springs
Check Reviews & Prices on AmazonSee More: Motorcycle Accessories, Motorcycle Tire, Motorcycle Helmets
Owner Comments and Feedback
Not all comments will be published (details). Comments may be edited for clarity prior to publication.