
Here’s a trick to help to make a pair of too-tight gloves fit more comfortably.
You may have found a particular brand or model of motorcycle glove that fits your hands perfectly.
If so, you’re lucky and you don’t need this article.
But if you’re like most of us, you have found a pair of motorcycle gloves that almost fits — if only the fingers were longer, or wider or the palms weren’t so tight…
Worse yet, the gloves might have been a gift or they can’t be returned or exchanged for some reason.
What to do? Believe it or not, you can indeed stretch the leather on a pair of gloves that are just a bit too tight and I’ll show you how in this “Penny Tech” article.
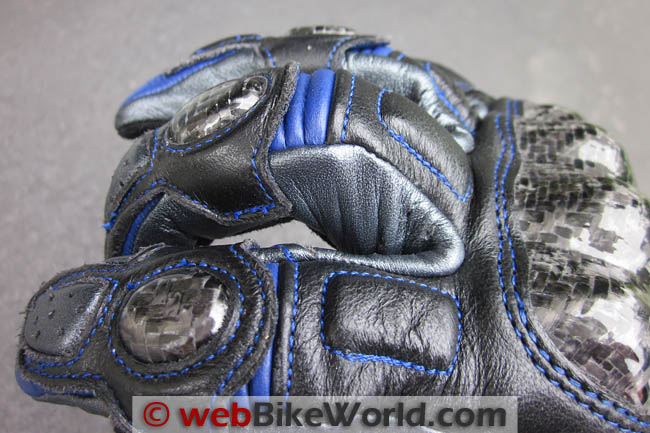
The subject of this demonstration is a nice pair of Alpinestars gloves I own.
The cut of these race-style gloves usually fits a wide variety of average hand shapes and the performance of the gloves is not an issue.
But I had a problem — my fingers are apparently thicker than normal and may palm is wider.
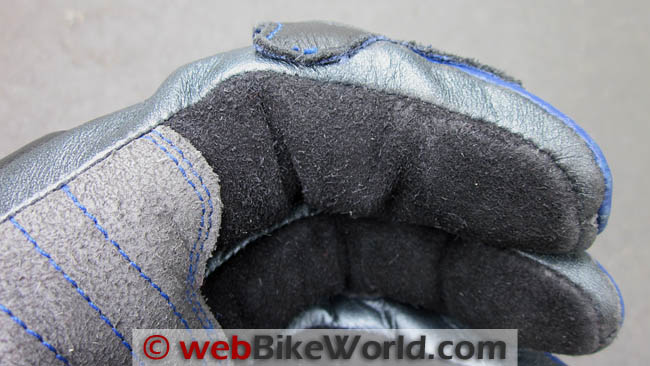
The gloves fit so tight that I could barely wrap my hand around the motorcycle’s grips when these gloves were new, so obviously they were not very comfortable, even though I liked everything else about them.
The poor fit can be seen in the following photo — notice the stretch lines that are developing at the sides of the glove under the knuckle as my middle finger is flexed:
How to Resize Leather Gloves
This article will describe a method I used to stretch these off-the-rack gloves to fit better. There are no miracles offered here, so you won’t be able to make a pair of size small gloves fit a size large hand.
If your gloves are so tight that you can’t even get your hand inside, this method won’t work and you may consider simply finding them a new owner.
Here’s my disclaimer: This process worked for me but there are many variables here, so do this at your own risk. Depending upon the type of material used for the stitching in your gloves (cheap gloves may use cotton), a soaking may or may not ruin the gloves.
I suggest you try this with a pair of inexpensive leather work gloves first because if not done carefully, you can ruin a very expensive set of gloves rather quickly.
But it worked for me; the fingers of my Alpinestars gloves shown in these photos were widened without lengthening them and the palms were also widened.
Resizing by Riding in the Rain
There are two common and relatively easy ways to stretch or modify a pair of motorcycle gloves to fit better.
The first way is to use some pretty old, cheap and proven technology — soak the gloves in water for about 10-15 minutes and then ride with them until they are dry.
This method has a downside, because that cold clammy feeling is not very pleasant and obviously this isn’t going to work on a cold day or when the length of the ride will be too short for the gloves to dry.
If you use this method, here’s a tip: wear a pair of latex gloves underneath to keep the black or colored dye from discoloring your skin.
Riding with a wet pair of gloves is actually a time-honored custom and once the gloves have become dry while your hands are working the controls, they will indeed be the gloves you will want to keep wearing because they’ll be nice and broken in to your hands and the motorcycle.
By the way, many pairs of gloves have been inadvertently re-sized this way — with or without the owner’s knowledge — during a rain ride.
Once your gloves have been through this “customizing” process and if they fit comfortably, then you can skip to the end of this article and read about applying a leather treatment to keep the gloves supple and maintain that wonderful custom feel.
Stuff ’em to Fit
The second common re-sizing method is to soak the gloves and stretch only the dimensions that need to be changed.
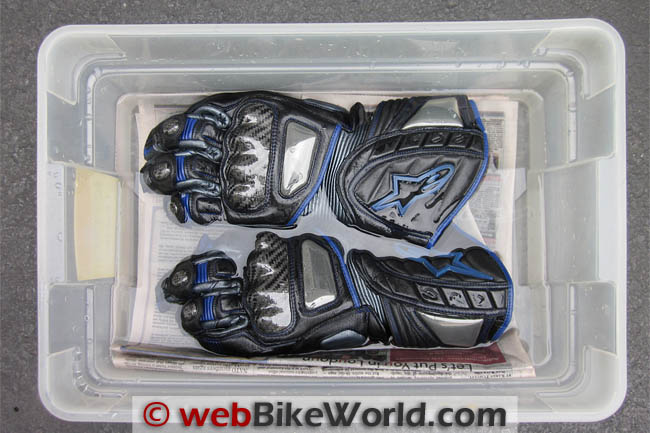
There are actually custom stretching and resizing tools available to do this, but since this is a “Penny Tech” article, I’ll describe how to get a perfect fit using only a newspaper, a length of thin rope and a bucket of water.
Start by putting the gloves and a section of newspaper into a bucket of water. Soak everything for at least 10-15 minutes.
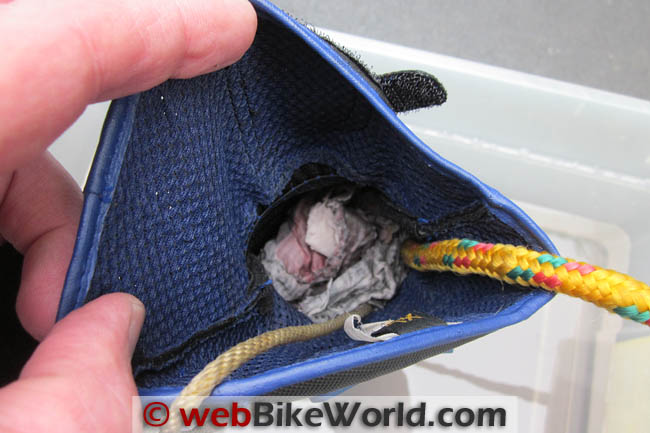
Next is a convenience step that you will appreciate later — work a loop of light rope down into the length of each finger of the gloves so that it loops down into the tip and back out.
When it comes time to remove the wet newspaper that has been packed into each finger, pulling the rope will help immensely to remove the wet paper plug.
Next, roll pieces of the soaked newspaper into small sausage-like rolls that can be manipulated into each finger of the gloves. Work each piece in one finger at a time.
If you want to lengthen the fingers, work the newspaper as you are holding the palm end of the finger. As you press in the wet newspaper the finger will stretch in length.
Conversely, if you want to widen the fingers but you do not want to change the finger length, hold the glove finger by the tip as you pack in the newspaper.
A tool like a 1/4″ or 3/8″ ratchet extension or a rod or wooden dowel can be used to pack in the newspaper. Use the tool to either push in the newspaper to stretch the finger length and then add more paper.
Or use it to expand the newspaper that has been inserted into the fingers to make the fingers wider, then add more wet newspaper in the middle.
Be careful to watch the stitching on the fingers and in the glove because there is a limit to how much the leather can stretch.
Once the individual fingers are filled, you can move on to the palm if you need to widen those also. The palm area of the gloves can be packed the same way.
Note the addition of a second (yellow) rope that will later make it easier to pull the newspaper stuffing out of the palm.
Soaking the gloves and the newspaper. Wet newspaper stuffed inside glove with rope to pull it out. Soaked glove with first two fingers and palm stuffed with wet newspaper.Set the first glove aside and repeat the process for the second glove. When done, place the gloves in a location that is not in direct sunlight and also avoid hair dryers or other methods of accelerating the drying process.
I left this pair on a bench on the porch of my house, where they had air movement and were in the shade.
After a couple of days, the leather will probably be a bit cool and damp, but essentially dry. Don’t wait too long, because the newspaper inside will continue to hold moisture and ultimately the leather will mold.
Gently remove the stuffing from the palm and fingers by pulling on the rope(s).
If available, a long drill bit will help scrape the last bits of paper from the interior of the glove. But be careful — the drill can also pierce the leather!
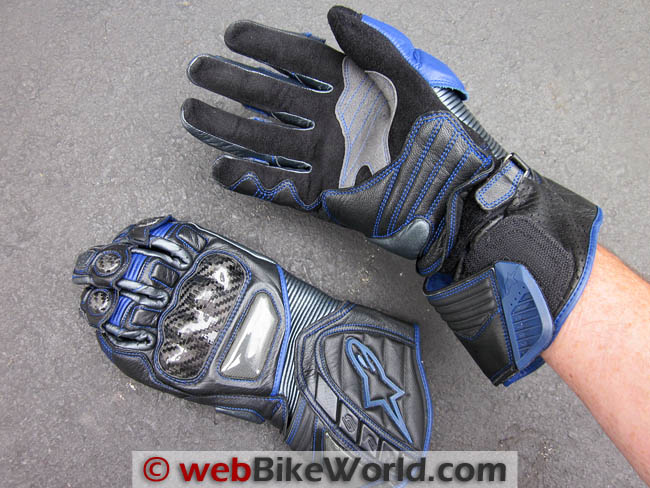
Try wearing the gloves to see how the shape changed and if they need to go through the process again. The left glove of this pair needed a second soaking to fit correctly and it was wonderful when complete.
Notice the lack of stretch lines at the knuckles in the following photo, as compared to the stretch marks in the first photo:
Gloves after resizing.Final Step: Treating the Leather
No matter which resizing process you use, an important step that most people miss is to work in a good leather treatment.

Leather treatments can be purchased at sporting goods or shoe stores and are frequently sold as waterproofing. Whether to use wax or oil on leather is a never ending debate.
Which ever you decide to use, the treatment will help to displace water when the gloves get wet again. This will help to keep the nice custom fit.
My favorite method is to use a hair dryer to slightly warm the dried gloves and then work in some old-fashioned beeswax that is sold under names, such as Sno Seal leather treatment (wBW store).
As the title of the article states, this is “Penny Tech”.
As with the stretching, the use of common sense is essential to application of leather treatments. Apply enough treatment to keep the leather soft and fill the pores, but not so much that it is continually leaving residue on your hands and the controls of the motorcycle.
After working in some of a treatment, blot off as much as possible with paper towels or shop rags. After all, too much of this good thing can make the grips and controls feel slippery, which would be dangerous.
Conclusion
It didn’t take much effort and it required only basic materials and tools to make these Alpinestars gloves fit like they were custom made.
Owner Comments and Feedback
See details on submitting comments.
From “P.L.” (June 2015): “I took this farther, to stretch leather shoes use alcohol. I took a pair of rubber cleaning gloves and stuffed the cleaning gloves into the leather ones then with paper.
I poured alcohol into the leather ones before stuffing. They dry much faster. Easy to pull out.
Don’t know why but alcohol will stretch leather. I then treated with leather conditioner.”
From “D.G.” (September 2011): “We have used the freezer to upsize boots in the past and it might work for gloves but have not tried it.
Given that ice expands at a certain point (as evidenced by crushed arctic ships and cracked northeastern swimming pools), this could be another approach. You’d have to have an inner glove filled with water and sealing it or propping them up would be a challenge but it should work. With shoes, you get about a 1/2 size increase with freezing.
You put zip lock bags with about 1/2 cup of water in them into the boots. Seal and tap/push to get them all the way down then open each bag and top off with water, then put in the freezer.
It usually takes about two days in a freezer, unless it is realllllly cold, to get a solid freeze. When thawing, prop the boots toe up next to a sink, add a flashing U to get the water to exit and keep things dry.”
From “K.T.” (September 2011): “I found your stretching gloves article and was surprised I didn’t think of it. I had a perfect fit on a set of gloves but the right one cut off my circulation after riding a bit, so it was just too perfect.
I found your article but my memory wasn’t good enough to remember to take the paper out in two days or the glove would mold.
So I soaked the glove in water, used fatter than my fingers screwdriver handles in the fingers and stretched the wrist part over a large metal container … TA DUM!!! Perfect stretch, dried in two days and nothing to remember.”