Clearwater “Glenda” LED Driving Lights
High-quality motorcycle driving lights with all the benefits of LEDs add excellent visibility and surprising power for their size.
Motorcycle lighting and the promise of improved visibility have been among the most popular topics for webBikeWorld reviews over the past 10 years.
Check out the right-hand column on the page you are now reading, which has links to some of our many reviews of motorcycle auxiliary lights, LED brake and tail lights and other devices for improving visibility.
More information is also available on the webBikeWorld Motorcycle Lights page and the LED Motorcycle Lights page.
We’ve published many reviews on rear lights, including LED brake lights, turn signals and auxiliary lights.
But recently our interest has been focused on improving the motorcycle’s front lighting for potential solutions that would allow oncoming traffic to more readily identify the bike and judge its speed distance.
For example, we reviewed the PIAA LED marker lights in September of 2008, which have promise, although their horizontal shape limits their use on many motorcycle styles.
I have also replaced the original headlight bulb on each of my motorcycles with a yellow bulb, in the hope of making the bike stand out from the background and to distinguish it from automobiles which may be using DRL’s, or Daytime Running Lights.
We prefer LED lights for use as front marker lights, for a number of reasons.
LEDs have a “white” light; they draw very little power; the generate very little heat; the LEDs last a long time and best of all, they’re highly resistant to the vibrations that can reduce the lifespan of incandescent bulb types when mounted on a motorcycle.
LED technology has improved dramatically since our first LED light article was published.
LEDs are even starting to be used for automobile headlights, and it’s possible that LED lights will soon replace incandescent bulbs in every vehicle type, including the two-wheeled variety.
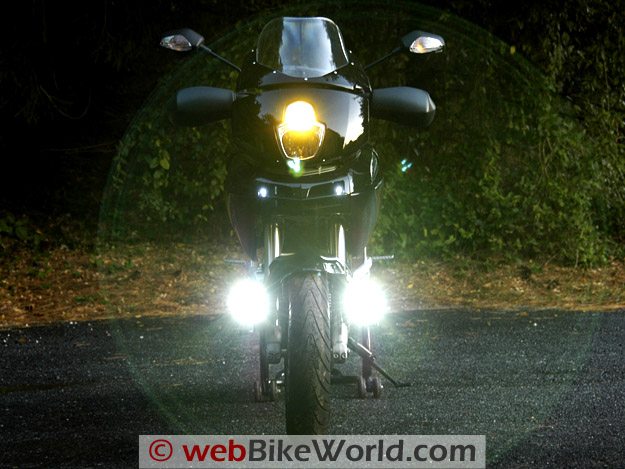 Clearwater motorcycle LED driving lights at full chat.
Where to Buy Clearwater Glenda LED Lights
Check Reviews & Prices on Amazon Check Reviews & Prices On RevZillaAlso Shop for: LED Lights and Bulbs, Auxiliary Driving Lights, Motorcycle LED Headlights
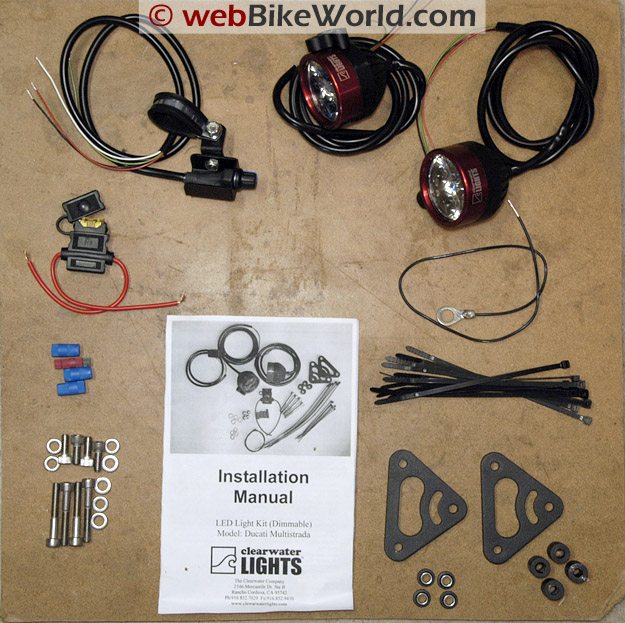
Clearwater High Power LED Driving Lights
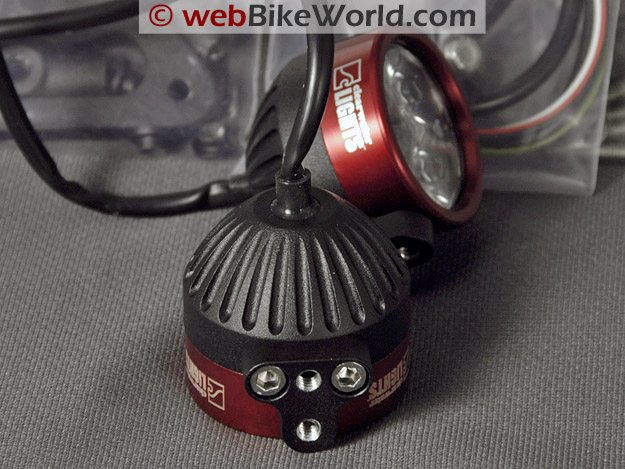
The Multistrada 620 was chosen as a testbed for the new Clearwater High Power LED lights. The Clearwater light kit includes a pair of robust light housing units and bezel, machined from 6061aluminum, according to the company.
The housings are powder coated, with an anodized aluminum trim ring covering the front. The mounting hardware is stainless steel.
The anodized trim ring is available in several colors, so the red ring shown here is replaceable by the other anodized color rings if desired. We ordered the red color as a nice contrast to the glossy black Multistrada paint.
Note that the light kit shown here has a prototype wiring system designed for the Multistrada 620. The light housings are the standard type used in other Clearwater LED kits, but the wiring kit was developed specifically for this review and will be refined based on our feedback.
Clearwater currently has lights for various models of BMW, Harley-Davidson, Suzuki, Triumph, Yamaha and Kawasaki with more coming soon.
The wiring harnesses are somewhat standardized, so it is possible that one of the existing light kits could be easily modified for other makes and models.
 The rear of the Clearwater LED light housing shows the powder coating, which is also used on the mounting bracket. The photo on the right shows the controller, which I mounted with double-sided tape inside the Multistrada’s fairing.
Clearwater LED Driving Light Kit
The kit includes the two lights and motorcycle/model specific hardware and mounting assemblies. The lights are designed to mount on the forks, similar to the popular Motolights and other types of fork-mounted driving lights.
The Clearwater kit is price-competitive with the Motolight product, so I’ll have to assume that many motorcycle owners are interested in this type of fork-mounted lighting system — I’ve seen many Motolights installed on all types of motorcycles.
The advantages of the Clearwater kit include low power requirements, a benefit to motorcycles with low-output alternators which could not cope with the power demands of non-LED lights.
Also, owners using heated garments and other power-draining accessories may be on the limit for their alternator output, so the Clearwater LED kit could add extra lighting with little extra drain.
Our kit also included an accessory dimmer switch, which I believe will now be provided standard with all kits. The dimmer allows the Clearwater LED lights to be dimmed all the way from off to full power and anything in between (see the video below).
I think the controller is a necessary and valuable accessory, because the lights are bright enough to dazzle oncoming traffic during the day. I dim this set down to about 1/4 power when riding in daylight, which provides just enough light to act as a highly visible marker light but doesn’t dazzle oncoming traffic.
The wiring supplied by Clearwater is surprisingly thin 22 gauge. The ability to use thinner diameter wire is one of the benefits of LED lights.
Since they don’t draw much power, the wire diameter can be reduced.
Clearwater says the wiring is military grade silver plated copper with Teflon insulation, which also reduces the overall wiring diameter while still providing the required level of insulation.
Each light draws only 1 Amp at maximum power, according to Clearwater, which is 12 Watts each for a total of 24 Watts.
Thus, the Voltage drop in a 4 foot section of wire is claimed to be less than 2%. This compares to the motorcycle headlight, which can draw 5 Amps but has only two times the capacity in the wiring, according to the company.
 Rear view of the Clearwater LED light housing with mounting bracket (L). Light housing installed (R).
Where to Buy Clearwater Glenda LED Lights
Check Reviews & Prices on Amazon Check Reviews & Prices On RevZillaAlso Shop for: LED Lights and Bulbs, Auxiliary Driving Lights, Motorcycle LED Headlights
Mounting the Clearwater LED Light Assembly
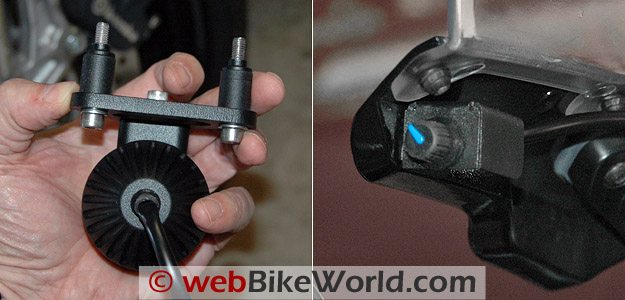
It was very easy to install the lights on the Multistrada. The two bolts that attach the front fender on to the axle casting are removed and the light mounting bracket is installed in its place.
Clearwater supplies a pair of standoffs to correctly locate the light housing; they are seen in the photo above, on the left.
Clearwater also provides a pair of “T” shaped washers to replace the nylon or plastic washers used by Ducati to protect the fender. The Clearwater “T” shaped washers are also seen in the photo on the left above.
The replacement washers must be located correctly into the holes in the plastic fender of the Multistrada and care must be taken when tightening the bolt to ensure that the fender doesn’t crack if too much torque is applied.
Just make sure everything is lined up correctly and the T-shaped washers are located in the fender hole and you should be fine.
I found it easier to first mount the light to the triangular shaped bracket provided as part of the kit, then mount the bracket to the fork; however, the rear screw that holds the light housing to the bracket is a bit difficult, but not impossible, to access when using this method.
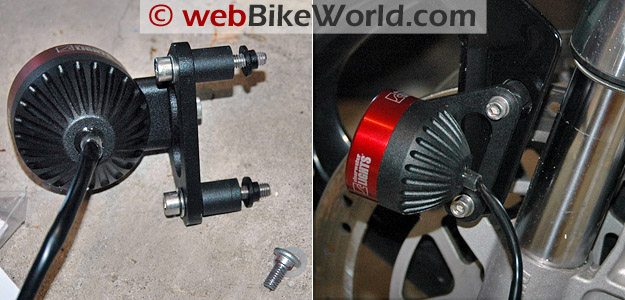
Note that the mounting bracket can be installed with the point of the triangle facing forward or rearward.
However, it didn’t look like there would be enough clearance for the movement of the upside-down forks on the Multistrada unless the bracket was installed with the triangle pointing forward.
I believe this also helps make the lights more visible, as it positions the light housings several inches closer to the front of the bike.
Also, the rear portion of the mounting bracket triangle has a curved slot machined through. This allows the light to be rotated for aiming.
Clearwater recommends mounting the lights so the front is at right angles to the ground when the bike is held straight up and not on the side stand or rear stand, which is how I mounted these lights.
The light pattern from the LEDs is wide enough that minor differences in mounting don’t seem to matter much.
Wiring the Clearwater LED Driving Lights
With the local webBikeWorld evaluation crew otherwise occupied, I was on my own with this installation. Uh oh!
I’ve mentioned this before, but I’m a total Nimrod at two things (at least): math and electricity.
So after I laid out the wires and parts, as seen in the next photo below, I felt that familiar churning in my stomach.
You know — the same one I used to get when that scary statement “Begin the Test” was announced and I’d flip over the Algebra exam (or Geometry or any other flavor of mathematics) and find myself flummoxed yet again by the hieroglyphics staring back at me!
This time, my predicament was made somewhat worse because the installation manual that came with the prototype kit wasn’t written for the Multistrada — at least I was able to figure that out right away!
So it took me a few calls to Clearwater to get the idea knocked into my little (very little) gray cells. And again, just like math, once somebody explains it to me, it’s embarrassingly straightforward.
I feel certain that the standard kit sold by Clearwater for BMWs and other makes will be easier to install, and anyone with more knowledge than me about matters electrical (i.e., just about anyone on the planet) should have few problems.
Splicing and Dicing
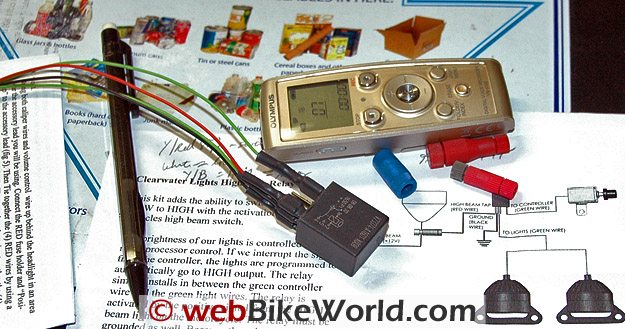
However, there are a lot of connections and splices that must be made for the installation. The lights have three wires each and the controller also has three (plus a white wire not currently used).
The wires have to be connected and — the most difficult part — two taps have to be made, one to a wire that’s “hot” when when the ignition is turned on and one tap to the motorcycle’s high beam.
The Clearwater LEDs normally will go to full power when the high beam is engaged on an H4 bulb system. Instead, I opted to use the high beam tap for the Multistrada, which turns the Clearwater LED lights off when the high beams are engaged.
It wasn’t easy to find either wire in the Ducati’s complicated and well-hidden (and protected) wiring harness and it took a couple of calls to Clearwater to figure this out.
But, since this was a prototype installation, now that all the hard work is done, the next customers should have much better guidance on how-to.ada’s fairing turned out to be a rather difficult proposition.
This would probably be even more of an issue with an unfaired bike due to the absence of a fairing to use for cover, and owners surely won’t want to see a rat’s nest of wires and brightly colored Posi-Lock connectors hanging out the side.
Tap That Power
As it turns out, the Multistrada has a wiring harness buried deep under the headstock that has the necessary wires. On this bike, the wires aren’t even covered by a sheath, for some reason. Here’s a photo:
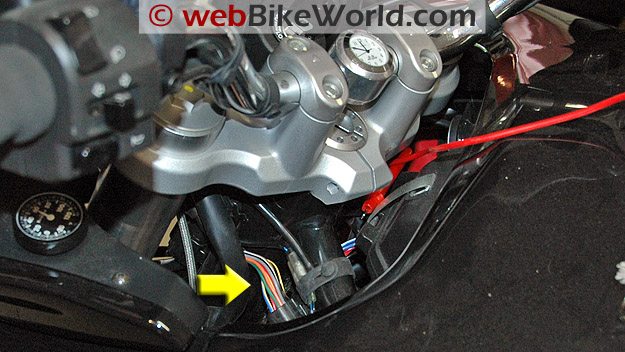 Arrow indicates the wiring harness in the Multistrada.
Owners should always check the wiring diagram and instructions for their particular bike, but on this Multistrada, the yellow/red striped wire is the wire that becomes “hot” when the ignition is turned on. So this is the wire that must be tapped for the Clearwater fuse block.
The yellow/black striped wire is the high beam, which is tapped for the Clearwater relay. This turns off the Clearwater LED lights when the high beams are engaged. And just as an FYI, the white wire is the low beam on this Multistrada.
I say “this Multistrada” because apparently Ducati is infamous for using different colored wires, even on the same model motorcycle, so make sure you confirm the correct wiring for your bike.
That all sounds easy enough (or maybe not). But believe me — it took me a couple of days and several calls to Clearwater to figure it out. Any Multistrada owners who are planning to install a kit will be the beneficiaries of this work. You’re welcome!
Where to Buy Clearwater Glenda LED Lights
Check Reviews & Prices on Amazon Check Reviews & Prices On RevZillaAlso Shop for: LED Lights and Bulbs, Auxiliary Driving Lights, Motorcycle LED Headlights
Wire It Up!
The rest of the connections are relatively straightforward. A suitable ground must be located, and I found a beauty. There’s a drilled and tapped hole in an aluminum plate under the battery, on the left side of the Multistrada, underneath the battery cover.
I’m not sure what it is, or why there’s a drilled/tapped hole there, but it works great as a ground. Here’s a photo:
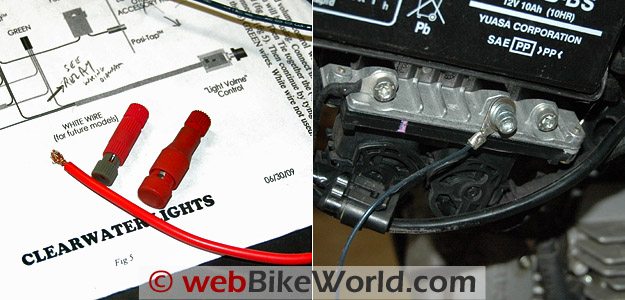 Clearwater included a small Posi-Tap (on left in photo left), but the larger sized Posi-Tap shown was necessary for the thicker gauge fuse wire. The photo on the left shows the ground wire attached to the block underneath the Multistrada’s battery.
Now for the basic wiring scheme: all the black ground wires must eventually find their way to the bike’s ground. The high beam tap (red) connects to the red wire on the relay.
The green wires from the LED lights are connected to the green wire on the relay and the green wire from the controller also must be spliced in.
There’s a separate green wire off to one side on the relay, and this is connected to the green wire coming off the controller.
The red wires from the lights are connected to the red wire coming from the “hot” wire tap, and the red wire from the controller also is spliced into this mix.
It may sound easy (or not) and it looks easy enough on the wiring diagrams supplied by Clearwater.
The only issue here is getting everything neat and tidy. I suggested to Clearwater that they provide a colored wiring block, which could theoretically have all the wires routed to it, plugged in and everything would work with a minimum of splicing.
One of the nice features of using Posi-Products connectors is they can easily be removed or modified and additional wires can be spliced in as needed, provided the connector is the correct size.
I initially wired everything together without cutting the provided wires, just to make sure I had it right. Of course, this looked a mess!:
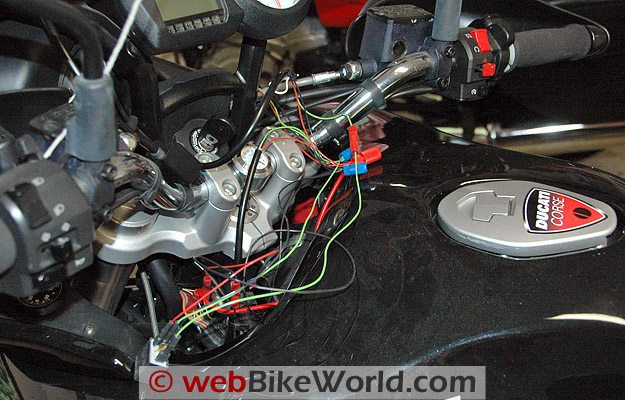 Temporary wiring trials. Before…
After some judicial cutting and splicing, I ended up with a more organized mess, shown in the next photo.
It’s important to make sure the handlebars and forks have enough clearance when turning, and I used cable ties to secure the bundle to the Multistrada’s frame tubes.
It still looused by Ducati is about 16 or 18 gauge, and the Posi-Taps for that size wire are relatively bulky. I may end up soldering a splice into the Ducati wiring harness to reduce the bulk.
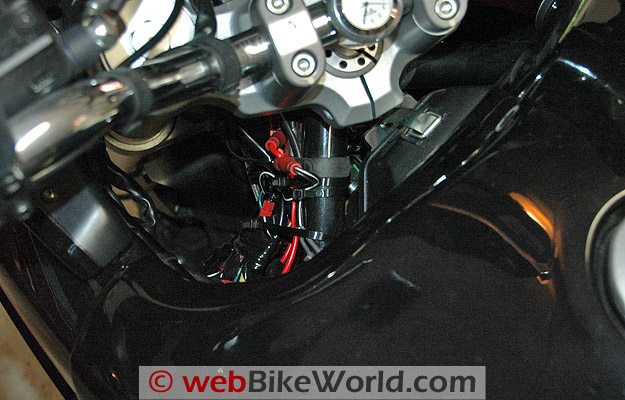 …and after.
Using the Clearwater LED Driving Lights
As usual, photos and video just can’t capture the full output of these lights.
They are very bright at full power; too bright I think for use as marker lights because they can dazzle oncoming drivers and reduce their ability to see the motorcycle’s turn signals.
So the controller is mandatory, in my opinion. It allows the lights to be dimmed; I keep them at about 1/4 power.
The controller comes with a rather clunky handlebar mount; instead, I put some double-sided tape on one side of the controller body and mounted the assembly to the inside of the fairing on left-hand side of the Multistrada (see photo above).
This allows me to easily change the light output settings, and by coincidence, if I line up the mark on the controller dial with the edge of the Multistrada’s windscreen, I get exactly the output I need during the day.
The relay provided with the Clearwater lights turns the LEDs off when the high beams are engaged. Otherwise, the LEDs throw a nice pattern along the front of the bike at night, and I find them to be useful for illuminating both sides in front of the bike when turning at night.
Clearwater makes a few different versions of their lights, and I find these to be most useful during the day to provide extra visibility to oncoming traffic.
I have no data to back this up, but I feel safer and since a motorcycle is much narrower than a car or truck, anything that can help oncoming drivers better judge the speed and distance of the motorcycle must be better.
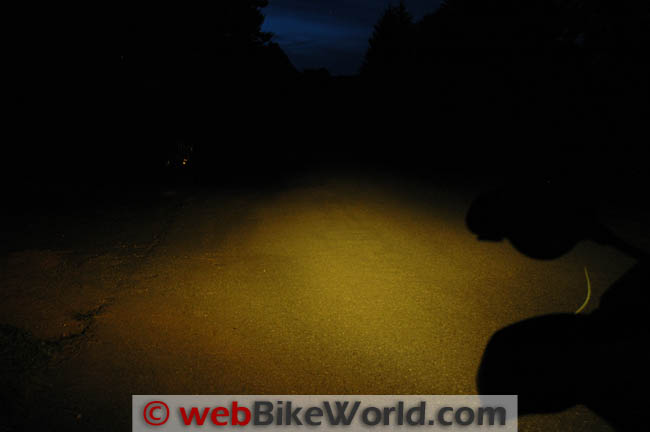 Multistrada low beam only (yellow light bulb, see review). Nikon D70, 46 mm, f6.3, 0.5″ shutter speed, ISO800.
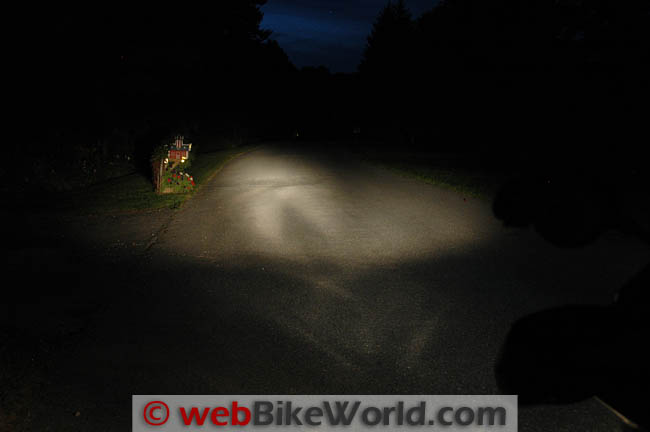 Multistrada high beam only. Nikon D70, 46 mm, f6.3, 0.5″ shutter speed, ISO800.
 Multistrada low beam with Clearwater Glenda lights. Nikon D70, 46 mm, f6.3, 0.5″ shutter speed, ISO800.
Cost
I wanted to add an update about the cost of the Clearwater LED lights because some readers were surprised at the list price. Note that these are definitely not your cheap Walmart-type lights.
Clearwater uses very high quality parts, such as a special LED lens/reflector system; special high-powered LEDs which are designed as driving lights and not just typical LED marker lights; and Mil-spec wiring with Teflon insulation and internally coated sheathing on the wiring bundles.
Also, the Clearwater light brackets are not generic; they are specifically designed for a custom fit, and the parts are both powder coated and anodized. .
The Clearwater lights are priced in he same range as the very popular Motolights, which are also fork mounted but use incandescent type bulbs.
Motolights has probably sold thousands of those kits, ranging from $400-$600, so there is a market for this type of lighting system.
Also, since the Clearwater LEDs have such low power requirements, it opens up an entirely new market for bikes that were not able to use other types of auxiliary lighting.
So if you consider how much it would cost to buy an auxiliary light set, like those made by PIAA or Hella, then design and fabricate brackets to fit to the bike, develop the wiring harness, beef up the alternator if necessary, the Clearwater lights really are price competitive.
Conclusion
The Clearwater LED motorcycle driving light kit is a very nice accessory for just about any motorcycle. Anything that helps make the bike more visible to oncoming traffic is worth its weight in gold, and this kit does just that.
It also provides a nice, wide pattern of low beam light at night, which helps illuminate the sides of the road when turning, which is very useful. The use of high powered LEDs and the variable controller really makes the Clearwater kit different and special.
The lights are surprisingly powerful — I honestly didn’t think LEDs could put out so much light — so be careful and use the controller so that oncoming drivers won’t be blinded!
See Also: Clearwater Krista LED Driving Lights Review
| wBW Review: Clearwater Glenda LED Motorcycle Driving Lights | |
|---|---|
| Manufacturer: Clearwater Lights | List Price (2009): $475.00 to $500.00 |
| Colors: Red, Black, Blue, Green, others. | Made In: U.S.A. |
| Review Date: October 2009 | |
Note: Item provided by a retailer, distributor or manufacturer with these Terms and Conditions.
Note: For informational use only. All material and photographs are Copyright © webWorld International, LLC since 2000. All rights reserved. See the webBikeWorld® Site Info page. Product specifications, features and details may change or differ from our descriptions. Always check before purchasing. Read
Where to Buy Clearwater Glenda LED Lights
Check Reviews & Prices on Amazon Check Reviews & Prices On RevZillaAlso Shop for: LED Lights and Bulbs, Auxiliary Driving Lights, Motorcycle LED Headlights
Owner Comments and Feedback
See details on submitting comments.
From “B.K.” (12/09): “I just installed a set of the Clearwater lights on my 09 Multistrada. It took some time to decide how to route the wires, I ended up stuffing most of the bundle directly behind the head tube.
I am very happy with the quality of the parts and with the results, and I really like the high beam dimmer bypass circuit. The people I ride with tell me there is no way to miss my bike in traffic now, which is the result I wanted.
I am riding with the lights at 50% power on low beam. I can’t comment on nighttime riding yet because I rarely plan to ride after dark.
Considering the performance, the fact the nice brackets come with the lights, and the low power consumption, I think they are a good deal.”
Other WebBikeWorld Motorcycle Lighting