ven base product has been turned into an excellent accessory lighting kit for motorcycle use.
Fully ruggedized and tested to survive the wear, tear and shock of typical motorcycle use, the Denali LED D1 light modules are the real deal.
For anyone concerned about power draw, effectiveness, on/off transition time, longevity and return on investment, this system will make most arguments moot and even better, it also creates a safer riding environment.
The requirement for good lighting on a motorcycle is just that, a requirement that should be a given at all times.
And what is also a given is that a large percentage of us will look at enhancing the stock lighting on our motorcycle(s).
Many of us to do it for the lighting performance gains and many of us do it for purely cosmetic reasons; whatever the motivation however, we tend to spend a great deal of farkling funds on illuminating goodies of all sizes, shapes and intensity.
How much do we spend? Well, one has to only look at the different types of motorcycle lighting accessories that are available to realize just how big and competitive the after-market lighting segment really is.
And what we do end up installing on our motorcycles is typically based on personal preferences, hard requirements and machine limitations.
The machine limitation issue is the one that can be tricky to deal with.
Many small- to medium-displacement motorcycles — along with a few big-bore machines — offer the absolute minimum in the lighting department.
And all too often this affects how much electrical power is available for accessories.
Having owned my fair share of motorcycles over the years, I have seen stock lighting systems evolve over the years from terrible (remember “Lucas, Prince of Darkness”) to a point now that on most of the latest motorcycles I have owned, upgrading or adding to the stock lighting system has not been a priority.
The lighting situation has changed over the past couple of years though, as I do more on and off-road adventure touring.
This is largely the result of having the versatile, nimble and favoured BMW F800GS (review) at the ready.
And it also may be due to the fact that a few decades of wear and tear on the old Mark I eyeballs has increased the need for better lighting.
In short, having additional light shed on the subject is now a greater priority for safety and for peace of mind — enter the Twisted Throttle Denali LED Lighting TT-D1 Kit.
Overview
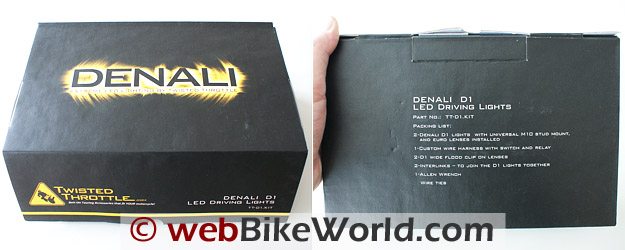
Something I noticed right off is the content listing printed on the bottom of the box and again on Page 1 of the Installation Instruction sheet.
This is information that I like to see: it typically indicates a certain level of quality control and really helps in verifying what is or should be in the package.
And before someone points out that the Denali LED Lighting Kit is based on an already marketedVision-X lighting product (originally designed for cars), that fact will be validated here and now.
Twisted Throttle has adapted and re-packaged a good product; this kit does nothing to dispel my feeling about that.
The basic Vision-X Solstice Solo LED lights were used as the basis for the Denali LED lighting kit, with some motorcycle-specific enhancements:
- An extra-long harness with a water-resistant switch.
- Longer LED module leads (60 cm [24 in] instead of the standard 15 cm [6 in]).
- Two sets of lenses (narrow beam driving light lens and wider fog beam pattern lens).
- A set of black powder-coated M10 mount brackets.
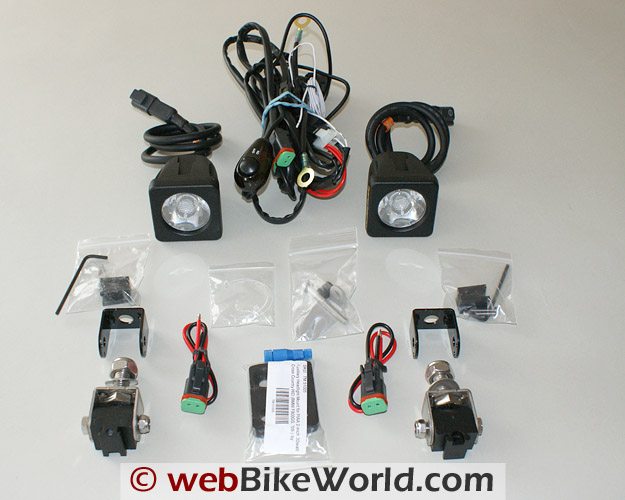
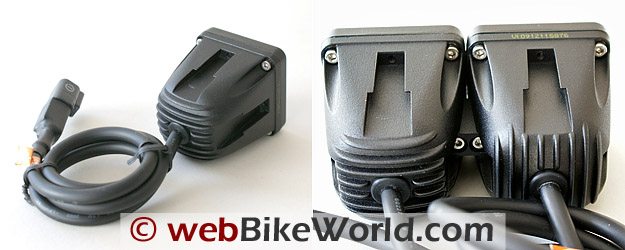
Parts Included in Denali LED Lights BoxIncluded in the Denali LED Lighting Kit
The kit includes two small (but heavy) individually boxed LED light modules.
Also included is a multi-piece wiring harness with light switch and relay; two sets of universal M10 mounts; fog beam lenses; two Omni-Link connectors; one 2.5 mm Allen wrench.
And finally, a small Posi-Tap (review); wire ties; and the previously mentioned installation instruction sheet.
All small hardware mounting items are packaged in small plastic bags to keep everything together. A set of pigtail assemblies, each with two-pin Deutsch connectors, were packed in the same bags as the black mount brackets.
These electrical components provide alternate wiring options.
While the standard mounting bracketry will do for many installations, having a custom fitment is always good.
To this end, the Denali kit can be augmented with optional auxiliary mounts and switch controls specific to a particular brand or model of motorcycle.
The vendor has an extensive application chart and there is likely a universal style or specific mounting kit available for most motorcycles out there.
The kit descrierical code rating equates to 6 = dust tight and 8 = immersion beyond one metre.
Further attesting to stringent design and production standards, the LED modules are also subjected to a 14 G Root-Mean-Square Acceleration vibration test (more).
This type and level of testing ensures sustained performance under “high impact” conditions. This is a major plus when the road ahead is rough or the landings hard.
Simple Can Be Good
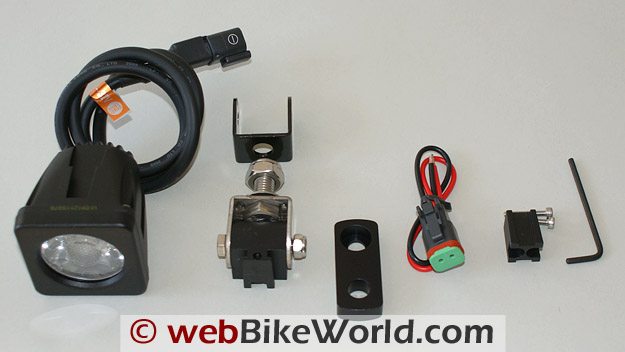
The Denali LED lighting modules incorporate a very simple and very effective mounting feature called the Omni-Link System.
A channel cut in to each side of the D1 module allows a small black aluminum mounting block, itself called the Omni-Link, to act as a ‘joiner’ between two modules.
This allows multiple Denali LED D1 light modules to be joined together with two small socket-head bolts.
The Omni-Link feature is a simple concept that allows many options for mounting multiple sets of lights, which is feasible given the low power requirements of each LED of only 10 Watts and 0.75 Amps.
The small changeable lenses on the Denali LED light modules are polycarbonate and press-fit into the front of the main module housing, oriented by two small tangs. A small rubber O-ring is installed in a recess encircling the lens.
A large diameter clear plastic cover (rock guard) fits up against the lens and O-ring assembly and is held in place by the removable aluminum face plate.
Four small socket-head screws installed at each front outside corner of the module pull the face plate, clear plastic guard and module together. Once the component sandwich is secured by the screws, it is totally sealed.
The aluminum plate also serves to dissipate heat in a radiant manner, keeping the outer cover clear of snow and ice in freezing conditions.
What I don’t like is the fact that the changeable lens is not as “easy to swap” as advertised and the four small socket head (2.5 mm Allen) screws holding the face plate on can be difficult to remove and replace.
I wouldn’t want to be doing it at night or without the proper tool. More on this later…
Performance Specifications
The compact aluminum Denali LED modules are home to ultra-bright LED light units. Each module has an extremely low draw (start-up and running) of only 0.75 Amps with a 10 Watt LED and a 900 lumens rating.
As such, they are a very efficient lighting unit.
For comparative purposes, a two lamp LED kit provides performance similar to a dual 55-Watt halogen kit and light output is slightly less or equal to that of typical HID systems.
And unlike HID units that require warm-up time, LEDs are instant on — at the flick of the switch.
The Denali LED units themselves are rated at a 50,000 hour life span, which based on eight hours of use per day works out to about 6,250 days or just over 17 years.
This helps explain the ten (10) year LED warranty provided by Twisted Throttle.
Technical Specifications
- Size: 2 x 2 inches square and 2.38 inches deep.
- Weight: Each module weighs 264g or 9.3oz. Total weight with bracket is 404g or 14.2 oz.
- Construction: Die-cast aluminum, black powder coated, face plate is 6061 aluminum.
- Power: Per module is 0.75A each with a 10 watt LED rated at 900 lumens.
- Light Output per Watt: 90.
- Light Output per Amp (Lumens): 1200.
- Total Watts: 10.
- Start Up Draw (Amps): 0.75.
- Running Draw (Amps): 0.75.
- Operating Life Span (Hours): 50,000.
- Beam Pattern: Euro lens = 15 degree pattern (beam); Fog lens = 25 degree pattern (dispersed).
- Standards and Certification: IP68 (dust tight and immersion beyond one metre).
- Warranty: Ten (10) year warranty against LED lamp failure.
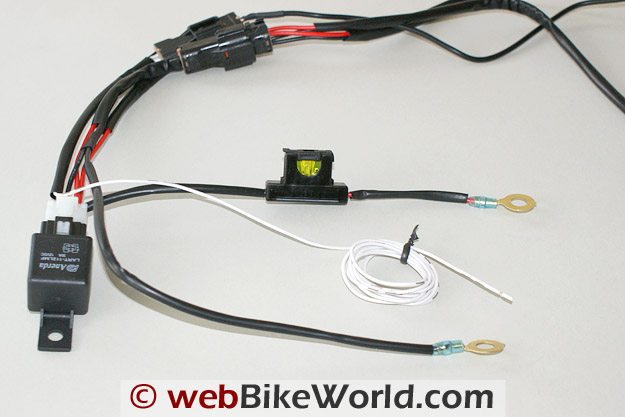
Denali LED Lights Wiring HarnessInstallation
With everything captured digitally for posterity and publication, I put all the pieces together to make sure it all fit.
Only two issues cropped up, the first being the 8 mm stud bolts that didn’t quite make it all the way through the bottom holes of the Techmount hanger brackets.
But after a few minutes of cleaning out each bottom hole with rat-tail file, the bolts moved through the holes smoothly.
The second issue involved a space conflict between the SW-Motech headlight guard mount and the Techmount components on the BMW F800GS; the brackets were pushing up against the bottom edge of the BMW touring screen.
Expedient solution: two 5 mm spacers were drawn into service to create the needed clearance between the bottom edge of the windscreen and the hanger brackets.
As clearances are still tight, a small piece of rubber windscreen moulding glued to each lower edge of the screen protects the plastic.
For the hanger bracket, headlight guard, spacer and headlight unit sandwich, I replaced the SW-Motech bolts with longer M8 x 45 mm socket head bolts (6 mm Allen).
Star-lock washers serve to keep the aluminum brackets from rotating against the flat edge of the headlight guard mounting point.
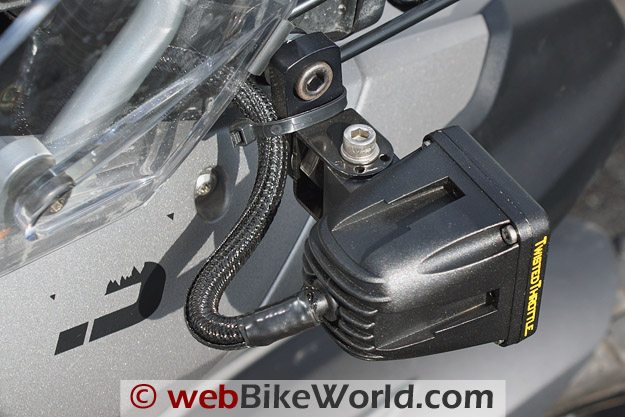
A vertical pivot bolt joins each Denali LED module to the black bracket to allow adjustment to the left or right.
As I try to use only stock Torx or Allen head hardware, each supplied 10 mm hex-head bolt was replaced with an stainless steel M6 x 45 mm socket-head (5 mm Allen) bolt and matching Nylock nut.
The main stud mounting point uses larger 8 mm bolts and Nylock nuts to secure the LED housing and bracket assembly to the Techmount hanger brackets. This mounting point also provides for up and down adjustment of the LED modules.
A 17 mm open-end wrench is needed to tighten these bolts up and as is the norm, I used medium thread-locking compound on everything.
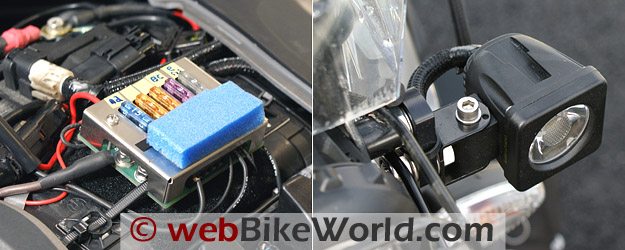
Centech AP1 auxiliary power fuse panel (L) and mounted Denali LED light (R).Wiring the Denali LED Lights
On to the wiring…the recommended configuration for powering the lights is to connect the switch power wire to the high beam switch or another switched source like the ignition or a power distribution panel.
A direct connection to the battery is not recommended; leaving the lights on or having them turned by someone could accidentally run the battery down.
All wiring for the Denali LED lighting system is heavy-duty and well sealed.
Quality Deutsch Industrial Products Division environmentally-sealed electrical connectors are used throughout.
The harness is multi-part with the main piece being the relay and power harness that terminates in two and four pin connectors, the battery leads and the power lead.
The two pin connector is for the handlebar mounted switch harness and the four pin connector mates to the extension harness.
The extension harness is actually a yoke that splits into two separate long leads or “arms”, each with its own two pin connector that mate up to the shorter lead exiting the back of the LED module.
With the relay and power harness renting space in the battery area, the module leads are actually long enough to reach the main four pin connector, but for connectivity purposes the extension lead is needed.
Accordingly, most of the extension harness wiring is currently wrapped and secured inside each of the side panels.
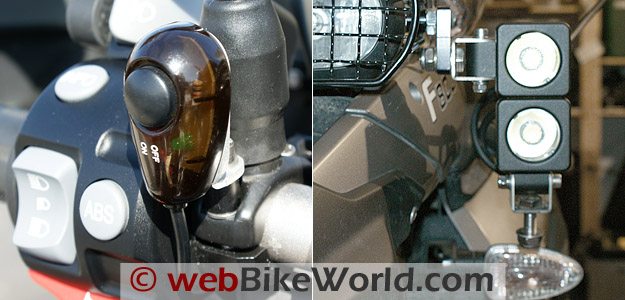
I mounted the sleek translucent On/Off switch to the left handlebar mirror mount using the supplied Techmount kit. Small LEDs beside the push button glow Green when OFF and Red when ON, both visible in daylight.
The switch does not look very heavy duty, but time and use will tell…
I added the white power lead for the LED relay wire to the existing Flexo F6 tube wrap installed some time ago to house the Centech Auxiliary Power Fuse Panel switched lead.
So bundled, both leads run down between the airbox and the side panel to the front underseat area, home of the diagnostin the faint Centech relay “click” indicating that an initial test is viable.
Pushing the LED handlebar switch results in a (very) loud click of its harness relay and instantly the interior side of the garage door was illuminated with a dazzling light — these things are bright!
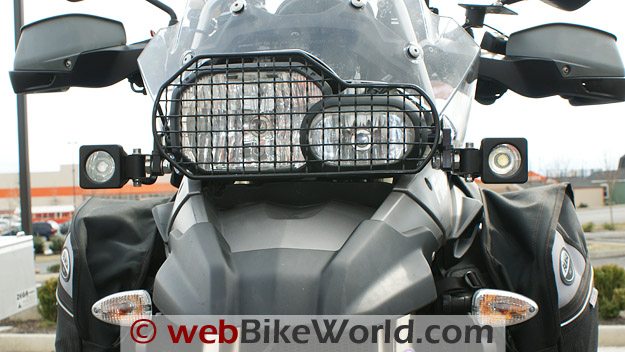
Denali LED on/off switch mounted on handlebar (L). Dual mounted Denali LED lights (R).Basic Alignment
My initial and somewhat hasty alignment of the lights with the installed Euro driving beam lens uses a simple procedure that serves to put the lights two to three degrees below horizontal.
There are many ways of doing this, but the first step of one expedient approach is to sit on the motorcycle and have the height from the ground to the middle of the LED lens measured.
This worked out to 98 cm or 38.5 in. With a relatively light-coloured plastic fence conveniently at hand, I measured up the same distance from the ground and marked that point with black tape.
I then moved the motorcycle so that the LED lights were 20 feet from the fence, my working distance.
With the motorcycle running and the lights turned on, I adjusted each individual light vertically so their beams were just below the tape marker.
The second adjustment was to point them both straight ahead and not converged on the tape itself. This is the starting point.
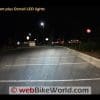
Each lens provides a distinctive visual beam. The “Euro” driving beam lenses provide a focused and long reaching 15-degree beam pattern whereas the fog beam lenses offer a wider, more diffused and shorter reach 25 degree beam pattern.
The Way Ahead
Adjustments are ongoing, based on the lens being used.
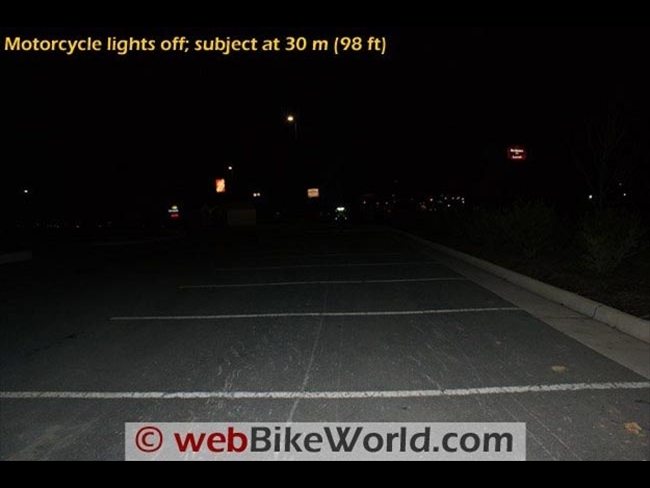
As the Euro lenses can easily punch a twin-beam hole out 100 feet and beyond, it is important that oncoming or preceding vehicles not be unduly blinded or bothered by the lights.
But by the same token, the lights need to do their job in illuminating the way ahead and helping better identify you to other road users.
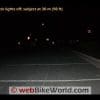
Having the LED lights installed with the Euro driving beam lenses is a great comfort factor when the sun sets or when the skies darken and inclement weather arrives.
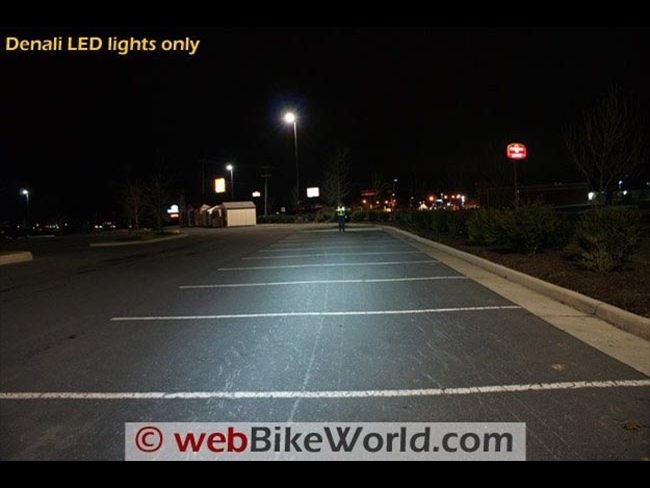
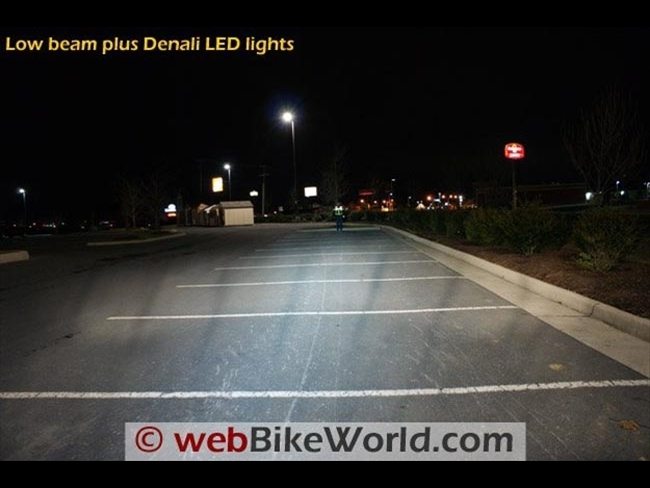
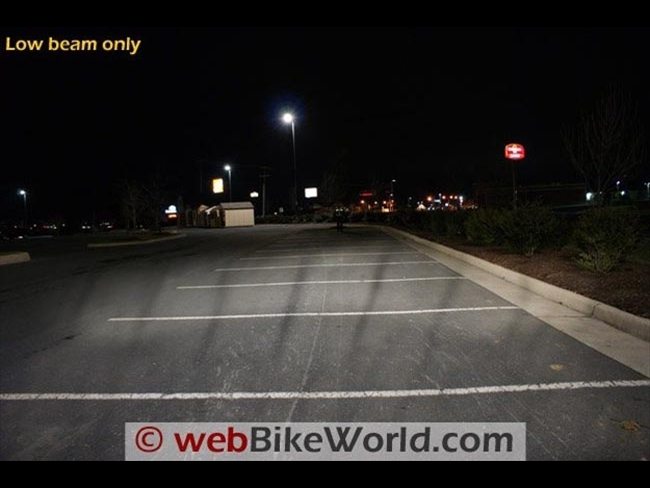
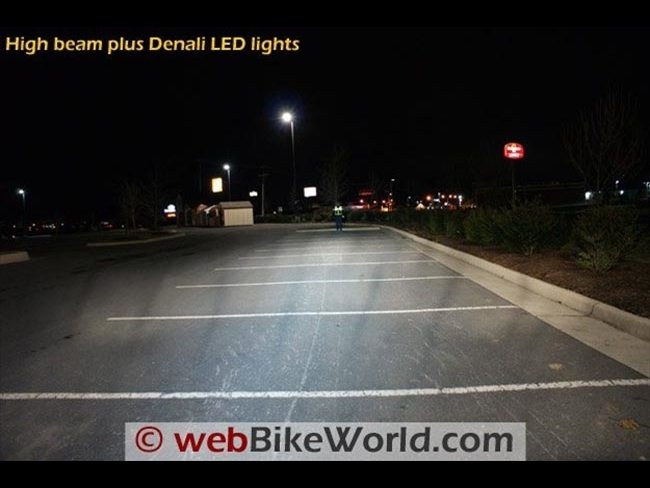
As currently adjusted I can leave the LED units on and the light thrown out in two distinct beams does a great job of extending and filling in the Low beam coverage area.
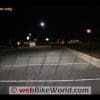
When using high beam, light from the LED units is still very visible and they do a superb job of filling in or augmenting the far-reaching wide angle high beam on the F800GS.
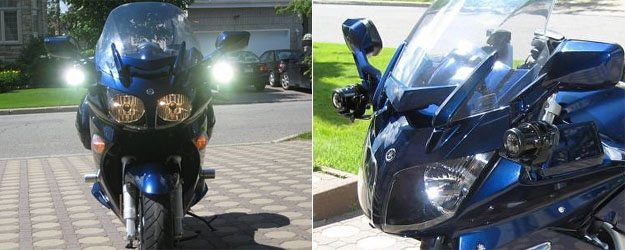
In looking straight on at the motorcycle with the LED units activated, it is hard to see the main headlight on low although it does become slightly visible when set to high beam.
Regarding the installation, I plan on using the two pigtail assemblies provided in the kit to do some rewiring so that the module power leads can connect directly to the four-pin main connector on the main harness.
This will let me remove the expansion yoke harness from the installation completely, freeing up precious real estate space.

Conclusion
An excellent proven product thoughtfully adapted and packaged for motorcycle use. Outside of the machinations required to change lenses and some fragility of the lens edge, there isn’t anything else to really complain about.
The installation instructions are pretty basic, but then so is the kit and it would be hard to go wrong.
Speaking of fragility, I actually broke one of the small seating tangs off the Euro-beam lens while removing it from the front of the module face.
Two lessons learned here: the lens is well seated and its tangs are weak.
I will need to get a replacement; the injured lens no longer sits well in its cavity, something that may be an issue in use.
From design and certification perspectives, I can see why the lenses were mounted in that position and behind the sealing front plate.
But from a user perspective, a secondary faceplate or detachable bracket that holds the lens and/or a guard lens would work as well without compromising main module integrity.
Back to the plus side, the enhancements made by the vendor to the Vision-X automobile version provide a lot of flexibility in mounting the modules.
The second set of lenses is an appreciated bonus, and the optional custom mounting kits ensure that the installation looks neat and tidy — no duct tape required.
I can see (pardon the pun) a second set of Denali LED D1 modules on the horizon so that both lenses can be installed and available for use. Besides, I have a spare BMW switch on the left handlebar control module waiting to be used!
wBW Review: Denali LED D1 Light Kit
Owner Comments and Feedback
See details on submitting comments.
From “S.F.” (04/11): “The single headlamp on my 1980 Honda CB750C has always left me wanting (especially the night it burned out miles from home).
Upgrading from the original incandescent to halogen was a big improvement. I still wanted more but didn’t want to overtax my electrical system. LED lights seemed to offer the perfect solution.
After reading this page, I bought and installed the Denali kit.
I was amazed by: significantly improved daytime visibility of my bike; significantly improved nighttime visibility; the top quality of the product; and completeness of the kit.
It has everything except the mounting bracket (by the way, for about 3 bucks, galvanized pipe hangers fit a crash bar perfectly). The lights have been on my bike for a year – they remain in perfect condition. I’d buy them again without hesitation.”
From “B.F.” (11/10): “Nice review, and I do like like the idea of being able to gang up these lights into clusters (4 would seem to be the right number to me, then again I am spoiled by the 6400 lumens of auxiliary lights I have mounted on my ride).
For the purpose of accuracy, please note: Halogen 55 Watt bulbs generate 1100 lumens of light at about 3200 K (yellowish). 10 Watt LEDs generate about 900 lumens of light, typically at about 5000K, pushing the envelope of white.
HID 35 Watt bulbs generate 3200 lumens of light, ideally at 4200K, quite white.
Note that many Chinese HID conversions START at 6000K, which is starting to get pretty blue, reducing the light’s effectiveness.
As such, there is no way that these Denali lights deliver anything close to what an HID fixture generates as claimed in the article.
Many LED fixtures (from the photos, I suspect the Denalis are among them) have virtually no practical reflector (even if the manufacturer sticks a piece of shiny metal behind the emitter).
Because the light from these devices is unidirectional, essentially shooting photons straight forward, rendering any reflector to be of minor benefit.
The ideal way to build an effective fixture would be to have the emitter facing toward the rear, located at the focal point of a scientifically designed reflector. As such I have yet to see a proper LED design in the aftermarket.
These and the Clearwater fixtures work quite well, especially as daytime conspicuity devices, with the Clearwater product having an adjustable dimmer, to boot.
But they tend to dazzle the heck out of oncoming traffic.
My personal solution was to use the stock H4 bulbs in the OEM reflector of my bike (with a headlight modulator) and a set of HID (D2S-based, 4200K) projector driving lights from a major German manufacturer slung below the mirrors of my FJR1300. They get the job done.
The photo (below) is taken on-axis and you’ll note that the OEM H4 bulbs have covers (the black dots in the center of the reflectors) blocking direct view of the filaments, where the auxiliary projectors are deep-set, with two focusing lenses behind thick glass covers to avoid direct view of the plasma ball.”
HBC’s Reply: The comparison information and comments included in the Denali LED article was based on information found in the Twisted Throttle comparison chart (validated).
It is also based on my own research, user forum comments, discussions with local HID system users and physically comparing HID and the LED outputs at two rallies.
To me, performance (and value) is made up of many factors, some of which are light output, power draw/consumption, intensity of the display, longevity, robustness, etc.
Appreciating these factors, the hardened LED units stack up well against standard Halogen and HID units.
The comparison chart used on the Twisted Throttle website might seem simplistic, but it seems to well validated and as such, I believe represents a realistic comparison of basic systems.
The table clearly shows respective values for common categories. From a pure (light) output perspective, which does depend on the lens used, typical HID units will outperform a single set of the Denali LEDs.
But this comes at greater cost, increased power draw and consumption (very important for motorcycles like the G650 and F650/800GS motorcycles), higher risk of failure (switching) and far (far) less operating life.
These are all important factors when considering sustained performance and return on investment (value).
First hand, based on a light-to-light perspective, most HID (and Halogen) users were simply amazed at the output provided by the two sets mounted on my F800GS using either the dual Euro lens or Euro/Fog lens combination, and overall efficiencies of the LED units.
Running two sets of the Denali LEDs, with the same lens and adjusted for differing ranges to both augment and extend the stock lighting has convinced me that they are very close or equal to most standard HID units.
For my eyes, they provide a nice, bright light.”
From “P.D.” (11/01): “If these lights only draw 0.75 Amps (10 Watts), why does it need a relay? I’m all for relays; I installed one for my air horn. But 0.75A is nothing!
And you used a 20A fuse on your installation? A 5A would have been overkill.”
Response From Twisted Throttle: “The reason the harness appears so over-built is because it is designed to support multiple sets of lights.
The unique interlocking design of the Denali lights allows for easy installation of multiple sets of lights on a bike, so by designing the harness to support this users only need buy a simple Y adapter to join sets together.
As for the use of the relay in the harness it is to allow the light harness to be shut off when the ignition is not engaged so they can not be accidentally left on and drain the bike’s battery, it is a safety feature.
The use of a relay can also allow the rider to use the hi-beam or running light as a switched source for the Denali lights, allowing them to be turned on and off in tandem the bikes stock lighting.
Also, the current draw is per light unit. Although it does not add up to a whole lot more of a draw it does double the needs of the fuse and the relay.”