The Laminar Lip redirects air flow over top of windscreen to reduce buffeting and noise.
Now maybe it’s just me, but as I get older I seem to be less tolerant of the noise and turbulence that’s created by the air blasting onto my motorcycle helmet.
It is both annoying and tiresome.
I’ve been on a quest for the ultimate windshield for my ’99 BMW K1200LT, but I’m also open to solutions that might be easier on my wallet than a complete windshield replacement.
Apparently, there are drawbacks to some of the aftermarket windshields for my LT so I’m a bit hesitant (aka cheap) to shell out the bucks for one only to be less than pleased with the results.
I was scanning the web a while ago when I came across a post about a product called the Laminar LIP.
Several LT owners had installed the product on their windscreen and they seemed to be very pleased with the results.
A visit to the Laminar LIP website revealed the LIP to be a moderately priced “add on” item that is attached to the front side of the windscreen to help smooth the air flow.
Was this the answer to my dreams? I was willing to give it a try, and I figured that if it didn’t pan out I wouldn’t be out a lot of money.
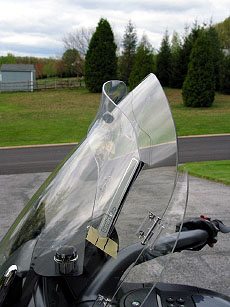
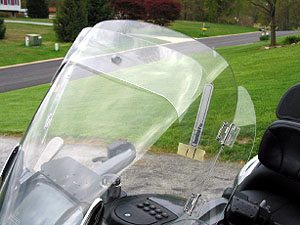
The Laminar Lip Windscreen
So how is this piece of DOT-standard acrylic that is attached to the outside of the windscreen supposed to work?
The word “laminar” is defined by Webster’s as “composed of, arranged in, or like laminae”, and a “laminar flow” is “the regular, continuous, non-turbulent movement, in a specific direction, of the individual particles of a fluid.”
Laminar, LLC, the company that makes the Laminar LIP, describes the LIP as “an inverted airfoil above the rear edge of the windshield.”
They claim “As the air flows between the windshield and the LIP, it follows the underside of the airfoil of the LIP and is redirected vertically. This air eddy then defuses the oncoming air, in effect, to raise the blast of this oncoming airflow.”
They also say that the air flowing through the LIP is pushed up approximately 6-8” above the normal height of the windshield.
The results are very little air pressure behind the windshield, greatly reduced pressure behind the 6-8” above the top edge, and normal wind blast above this point.
I can attest to this claim since installing one on my bike.
The LIP allows me to lower the edge of my BMW’s windscreen to below eye level and it gives me the same protection as a fully raised windscreen without the LIP installed.
Laminar, LLC also claims that “even riders that look through the windshields and their passengers can have a more pleasant ride with a LIP”.
Never mind the mangled grammar, my wife has told me that there is a noticeable improvement in wind protection and a reduction in the buffeting when she’s riding shotgun. And we all know how important it is to keep the VIP passengers happy!
Installing the Laminar Lip
Installing the LIP on the LT was relatively straightforward.
I was a bit unsure exactly of where the LIP should be vertically mounted on the windshield, so I made a quick phone call to the manufacturer and found them to be very friendly, helpful and interested in any feedback on the product.
They informed me that it didn’t really matter where it was vertically mounted as long as it was near the top. I didn’t want it any higher than the stock windscreen so that the LIP would not be in my line of sight when the BMW’s windscreen was lowered.
The LT installation calls for the LIP to be attached with 3M Dual Lock re-closable fasteners on either side (every motorcycle owner needs to have some of this stuff in their tool box!).
Dual Lock is a “hook and loop” concept on steroids, with stiff plastic-like bristles with bulbous tips designed to interlock with one another (instead of fabric hooks and loops).
The installation instructions indicate that instead of using the Dual Lock fastener, some motorcycle models require the use of screws in the existing windscreen mounting points.
The 3M Dual Lock fastener makes it possible to remove and re-attach the LIP after installation for cleaning or replacement.
They claim the 3M Dual Lock loses its holding ability after 20 or more removal cycles, but I’ve had it apart more times than that and it still snaps back together tightly after many months and about 35,000 miles.
Positioning the LIP level with the top of the windscreen is probably the hardest part of the installation.
But it can be easily accomplished with two people, one to hold the LIP against the windshield and the other to sit on the bike and sight along the top to make sure it’s level. It is helpful to have the bike on the center stand or held vertically.
I then lightly placed another strip of tape directly onto the windshield marking the lower edge of the 3M Dual Lock fastener on each side.
With these in place I could make any last changes so as to center the LIP side to side without losing my height position.
I then made a pencil mark in line with the edges of the Dual Lock. It was then simply a matter of cleaning the windshield surface with alcohol wipes, allowing it to dry, peeling off the backing on the Dual Lock while still attached to the LIP and pressing into place.
The manufacturer claims that it takes 24 hours for the adhesive to set up, so I suggest that you refrain from trying it out immediately.
The air and surface temps also need to be greater than 70 degrees Fahrenheit during installation.
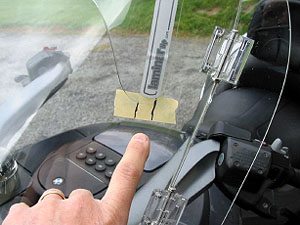
On the LT, the LIP is rather long ( 24”), so it’s necessary to support it in the center to keep it from flattening out with the air pressure at higher road speeds.
Included with the LIP was a spacer that was shaped like a pyramid with a flattened top which was ¾”x ¾“x 5/8” tall. This is designed to be placed in the center of the windshield to support the LIP.
This spacer is a hot topic on the LT website since it is grey in color. Some owners didn’t install it and others used a clear one, similar to those used on an automobile wind deflector.
The color doesn’t bother me, since after installing the LIP I rarely ride with the screen fully raised anyway. Whether or not you need a spacer will depend on your application.
Overall, I’m pleased with the performance of the Laminar LIP. The product appears to be well made, the optics are crystal clear and have remained so over time.
I have noticed a bit more pressure on the back of my head when I “open” the fairing wings and I no longer can use the airflow over the top of the windshield to clear the rain off of my helmet’s face shield, since the rain mostly just splatters onto it while moving at any real speeds.
The swirling patterns that develop on the backside of the LIP in the rain are entertaining though.
Conclusion
If you’re looking for some relief from wind blast and turbulence caused by, ironically, your bike’s windscreen, then you may want to take a close look at the Laminar LIP for an inexpensive solution.
LIPs are available to fit over 130 different types of motorcycle windscreens, so the chances are that there’s one for you.
Master Listing of All wBW Motorcycle Product Reviews
Owner Comments and Feedback
See details on submitting comments.
From “F.G.” (May 2013): “First off I want to claim that I am in no way connected to the Laminar Lip company. This is an unsolicited testimonial.
As a 6′ 2″, 170 lb., 34″ in-seamed skinny/thin Majesty 400 rider, I too was assaulted by the common buffeting we taller folk experience on this scooter no matter the type or quality of helmet.
After spending time searching and reading various online sites about taller windshields, or other solutions, on my Quest For Quiet, I finally ran across a mention of the Laminar Lip.
Upon further online investigative reading they work for some and not so much for others- depending on the bike and the opinion of the user.
Seeing that Laminar made a Lip for the Majesty, I thought I’d give one a try.
It was reasonable in price and a seemingly simple solution to the buffeting noise/roar. Delivery time in receiving the Lip was a week, in my experience.
My experimentation to find the correct height placement was this:
I clamped the Lip on and test rode. Let me explain: with a cleaned windshield. I protected all plastic involved with what is known in sign shops as Application Tape.
App Tape is way easier to apply and remove than masking tape. It’s what I had laying around to use, as I’m a retired sign painter by occupation.
Masking tape will work fine too, but it’s very sticky and leaves a residue in comparison to app tape.
I used those orange handled spring clamps to position the Lip at various heights and went for a ride at each position.
Seems to me, that for my height on the scoot, having the Lip mounted about half way up it’s 5″ height, at 2.5”, worked well for me.
So, following Laminar’s directions, I mounted it using “C” clamps to get a good squeeze on the Dual Lock disks.
Laminar Lips recommend a 24 hour clamp at at least 70 degrees. That coincides with what 3M says.
In fact, 3M says Dual Locks get to 90% gripping strength in 24 hours and 100% in 72 hours.
Also, Laminar will provide you with a set of nylon bolts, nuts and washers if you decide to drill and mount the Lip in that manner. I asked them to provide the set when I ordered, just in case.
Finally, in subjective practice, the Lip has reduced the buffeting noise/roar dramatically, not completely, blowing air over my SCHUBERTH modular helmeted head. Good enough for me.
The Dual Locks, so far, have proven to be a good non intrusive method of installation.
As one element of protected riding, I always wear ear plugs just the soft foamy kind to help with noise abatement.
At my height I look over the lip, no problem there.
By the way, for you Majesty owners, my stock windshield with the Lip measures out to a 27.75″ total height. Instead of a taller after market windshield, (which are acrylic and not the way tougher OEM polycarbonate ones), consider trying a Lip, taller Majesty owner.
You might be surprised with the less noisy buffeting results. My Quest For Quiet on the Majesty is pretty well resolved.”
From “A.M.” (8/09): “I added a Laminar Lip to my Suzuki GS500F and consider it the best $90 I have spent on the bike (possibly fuel included!). It stopped freeways being an endurance exercise and riding them is actually enjoyable now.
I sometimes tuck my head lower for a while to remove almost all the airflow on my helmet.
However there is no situation where I feel unpleasantly buffeted. There is still a reasonable amount of air moving so I don’t feel cut off from the riding experience.
Quality and adhesion are good – I can’t actually get the attachments to pull apart but haven’t needed to so no problem. Laminar Lip staff provided very good customer service for me, too.”