Need a front wheel chock but not looking forward to muscling your big touring rig in and out of it?
With its flat-loading, strut-based, system, the unique construction of the Wheeldock may be a better solution for heavy bikes than your average motorcycle front wheel chock.
The Wheeldock is an extremely solid motorcycle front wheel chock, suitable for stand-alone garage work as well for mounting on a trailer.
There are many reasons why you might want to support your motorcycle using a wheel chock, especially if it doesn’t have a center stand.
These include ease of performing certain maintenance tasks or farkle additions; trailering; and reducing the motorcycle’s storage footprint, particularly when it’s just sitting in the garage all winter.
Appropriately, then, webBikeWorld has reviewed many such devices; see the wBW Motorcycle Lift, Stand and Wheel Chock Reviews and Information page for starters.
But all of these chocks suffer, in varying degrees, from one common shortcoming.
Rolling the bike into a standard chock usually means that the front wheel must be pushed up and over the bar that holds the rotating “V” shaped wheel holder.
Backing out is the reverse procedure and usually requires even more muscle to get the bike over the hump.
On the Wheeldock website they refer to those types of wheel chocks as “Teeter Totter” mechanisms.
Rolling a relatively lightweight bike looks easy in the video included in the Baxley Sport Chock review, which uses the Ducati Multistrada 620 (blog) as the example.
Keep in mind, however, that I’m older than Rick, who wrote that review, and I have already had one of those classic lifting-related surgeries.
And, most importantly, that Ducati Multistrada 620 is less than half the weight of my Victory Cross Country Tour (review).
Putting aside the heavy full-boat touring and cruising rigs for the moment, even your typical sport-tourer will be several hundred pounds heavier than that Duc.
On top of that, for those who feel more comfortable straddling their motorcycle while putting it on or taking it off the front wheel chock, a sport-tourer is generally fairly tall, which can mean less traction for your feet during the process, especially if you’re of average inseam length.
So it made sense to me, when I decided that it was time to buy a wheel chock, to go with one that doesn’t have a hump I’d have to conquer.
Let’s see how it worked out.
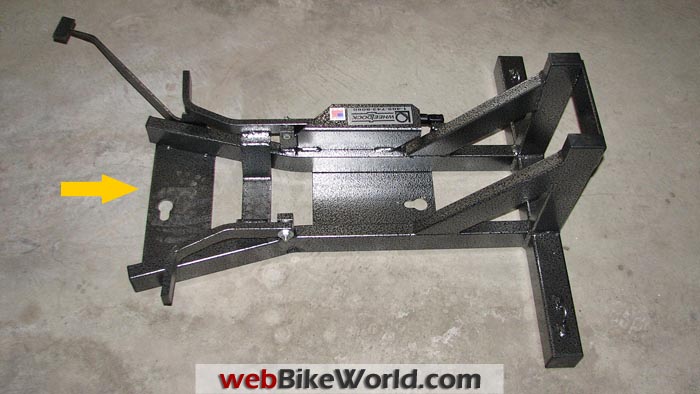
The welded construction means that the Wheeldock requires no assembly on arrival.Build Quality and Stand Assembly
The Wheeldock is available in eight different widths, for motorcycle tires ranging from 3-1/2 inches to 5-7/8 inches wide. They will also make your Wheeldock in a no-extra-cost “custom” size, if you’d like.
Additionally, spacer packs are available for $9.99 each.
These range from 1/8″ to 2-3/8″ wide and they serve as shims, to allow your particular Wheeldock model to be used with a motorcycle that has a narrower front tire.
Some motorcycle types are excluded, as the Wheeldock website has this important note: “Wheeldock does not offer a wheel chock for wheel diameters larger than 21 inches or wrap around style fenders.”
They do, however, now offer a special model for the new Polaris-made Indian motorcycles, for a $50.00 premium over the standard model.
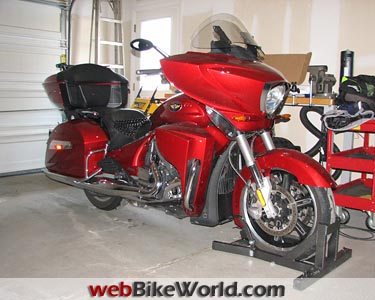
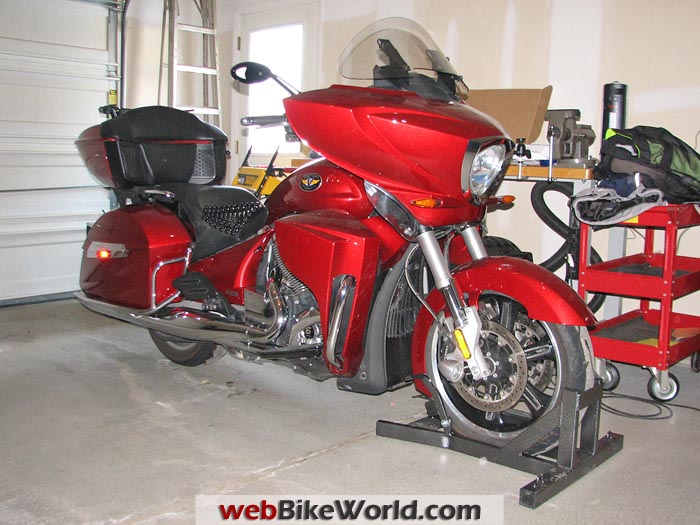
For my Victory Cross Country Tour, the Wheeldock Fitment Guide correctly specified (I double-checked, actually measuring the tire) that I needed “Chock 4,” for tires up to 5-1/8″ wide.
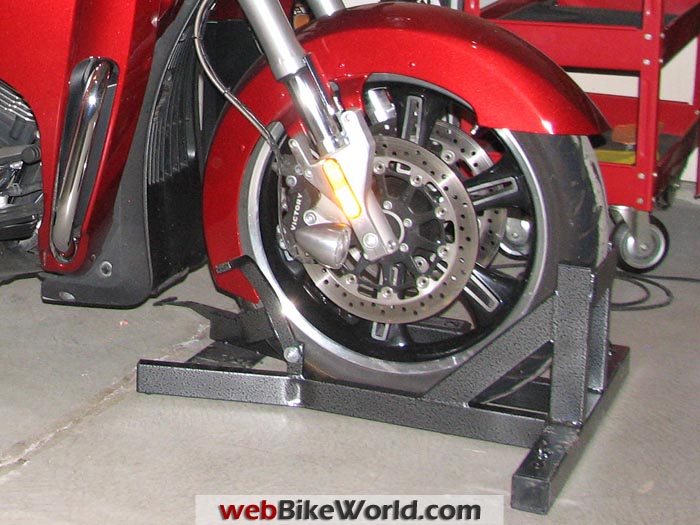
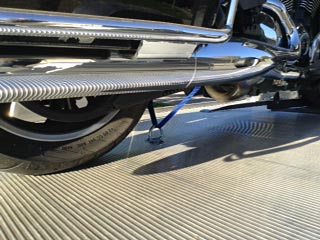
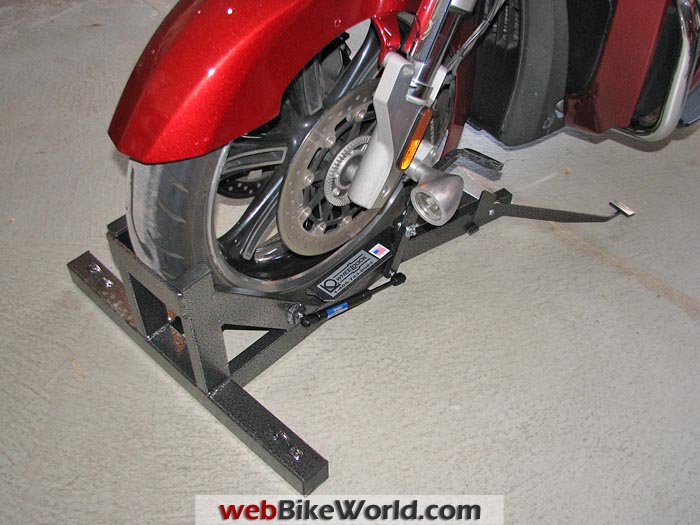
Note the flat “no hump” entry into the chock, which makes it much easier to roll a heavy motorcycle into the stand.In the Wheeldock Box
It took five days for my Wheeldock to make its way from the factory in Oklahoma to my home in upstate New York, which is not bad, considering that two of those days were a weekend.
The shipping charge was a reasonable $33.00.
For some reason, the otherwise-accurate tracking email from UPS listed the shipping weight as a whopping 57 pounds; in reality, the carton weighed 31.3 lbs., most of which was the weight of the Wheeldock itself at 26.5 lbs.
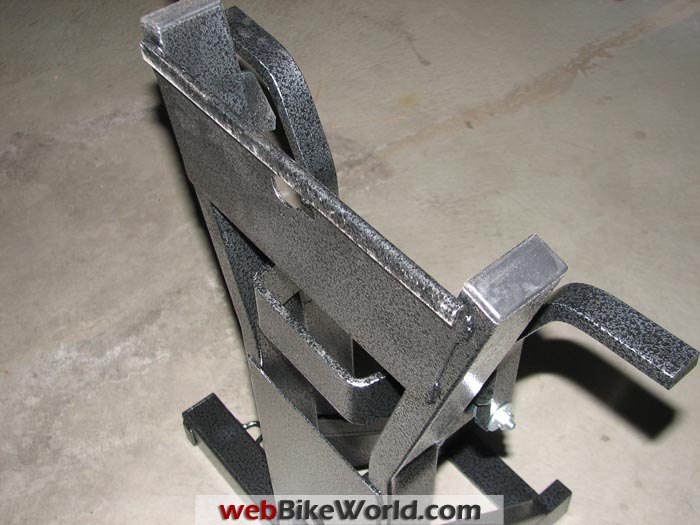
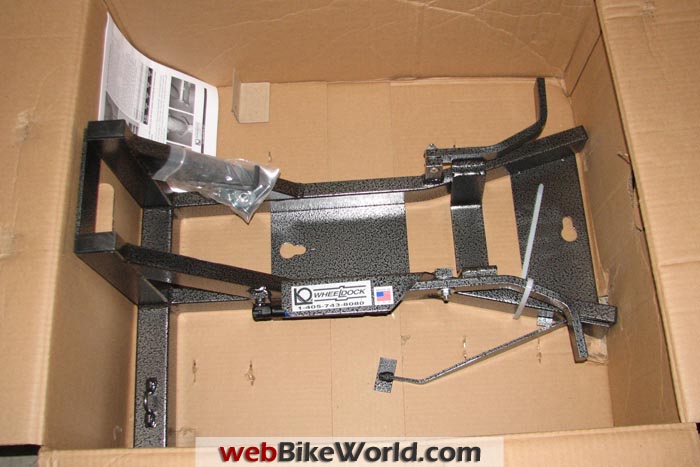
The Wheeldock features welded construction for the main support structure, so the only parts that are not fixed are the locking shoe, the trip lever, and the gas strut.
All of these came delivered in place, i.e., no assembly required. Perhaps as a demonstration of the chock’s robustness, only two tiny pieces of cardboard were present as packing materials in the 12″ x 25″ x 28″ box.
Also included in the box is a clear and concise eight-page manual.
This covers stand-alone usage, trailer mounting, the use of tie-down straps, optional straps and a “Quick-Detach Transport Bar,” optional spacers, a parts list, and a statement of the Wheeldock “Limited Lifetime Warranty.”
Last, also included is a trailer-mounting package: two hefty 1/2″ x 2″ button-head bolts, two corresponding T-nuts, and a 5/16″ Allen key.
Close-up of the welded construction.Construction and Quality
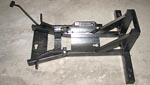
The Wheeldock chock design is essentially a welded “T” with a flat track on the bottom.
The width of the T is about 24″; this narrows down in the middle (based on the model you buy for your particular front tire) and then flares out at the entry point to about 13″.
In the vertical plane, there are triangle-like braces that start about two-thirds of the way up the trunk of the T, running up to the back supports. Across those supports is a horizontal brace, referred to in the manual as a “stop strip.”
All of that alone will support the bike.
To keep it in place is a “locking shoe.” When the motorcycle is not in the Wheeldock, that 2″ piece of metal lies flat on the floor, along with the rest of the bottom bracing.
Actually, because of the thickness of the metal, along with extra flanges at the front opening and on the very ends of the T (presumably there to prevent scratching the main super-structure), the top of the tire track is about 3/8″ higher than the floor.
The Wheeldock also features a gas strut and a lever to activate it.
According to the manufacturer, the strut exerts 250 lbs. of pressure. I can’t measure that, but I can tell you that it is sufficient to move my roughly 900 lb. Victory if I haven’t positioned the bike fully against the front brace before activating the trip lever.
The strut is “cocked” for the next use as part of the process of releasing the motorcycle from the Wheeldock; there are extensions on both sides of the locking shoe that you use with foot pressure to do this.
Note clearance at front and rear of tire.Using the Wheeldock
Using the Wheeldock may be a tad more complex than using other types of motorcycle front wheel stands, but not by very much.
And it certainly involves less effort.
Here’s the drill: Roll or ride the bike into the Wheeldock until the front wheel touches the horizontal cross brace.
If you’re on the bike, reach forward with your left foot and press on the trip lever; if you’re walking the bike into place, press on the trip lever with either foot.
The locking shoe will raise itself into place, snugging the wheel tightly against the cross brace in the process.
To remove the motorcycle from the Wheeldock, press on the cocking lever on the right or left side of the locking shoe; the shoe will then click into place, flat on the floor.
Grab the handlebars or get on the bike, and roll it out of the chock.
Appropriately enough, the trip lever requires almost no force to trigger, while the cocking lever requires a healthy stomp.
Thus, if you want to complete the entire entry process while on the bike, if you can reach the trip lever, you can activate it.
And, again appropriately, once your bike is being secured by the chock, no mere brushing against the locking shoe will get those cocking levers down to the floor.
And once in place, your bike is certainly held securely. I’ve rocked the motorcycle and the Wheeldock absolutely does not flex under load.
The thing is rock solid.
Minor Criticisms
I think the Wheeldock should have rubber feet or pads of some sort, and I may add them.
Because of the flat entry for the wheel when entering the chock, there is less of a tendency to push the chock across the floor as the wheel first enters the chock.
However, even though the entry to the Wheeldock is flat, there is a small 3/8″ front lip on the metal, which means that the Wheeldock can move a little bit if the floor doesn’t have enough friction to hold the stand as the bike enters the chock.
Also, if the motorcycle is slightly offset as it enters the chock, you may also bump against one of the lower walls of the Wheeldock as the front wheel enters.
I have managed to slide the Wheeldock a bit on occasion, so I think some rubber feet would give the Wheeldock better grip on the garage floor.
One other niggling complaint is that the fixed-width system of the Wheeldock, with or without the spacers installed, may not completely center the bike in the chock.
Once the front tire of my Victory motorcycle is in place in the Wheeldock, the total space remaining – not on each side, but in total — is about 0.1″ (which is less than the smallest spacer size of 1/8″, or 0.125″).
This small amount of space on either side means that the bike can swing through an arc of about 3° from perpendicular, depending on how I tug on the handlebar.
I don’t know whether other motorcycle front wheel chocks, which typically use a “V” channel up front, do any better, but for the OCD types among us (myself included, or I wouldn’t have measured this arc) I thought I’d mention it.
(Editor’s Note: If you push on the handlebars of a motorcycle when it’s in a “cup” type front wheel stand, the bike will rock back and forth side-to-side, but usually the stand will hold the bike steady.
You’d have to deliberately push very hard to knock a motorcycle over when it’s in any of the front wheel stands we’ve reviewed.)
Trailering With the Wheeldock
I don’t own a motorcycle trailer so I haven’t used the Wheeldock on one.
But several of my friends own a trailer and I’ve helped them load and unload bikes, so am aware of the issues and I can also relate what I’ve read in the Wheeldock owner’s manual.
I think that loading a bike may be easier with a standard wheel chock.
If you’re loading a very heavy motorcycle and you’re doing it by yourself, using the bike’s power and feathering the clutch may be the easiest way to get it into the chock.
With the Wheeldock, you have to also use your foot to lock the bike in place, which is one more thing to worry about.
On the other hand, Wheeldock recommends — even when using it in the stand-alone garage-floor environment — that you leave the bike in first gear after entering the chock.
That helps to keep the bike upright, even if the brace isn’t engaged right away. If the trailer is not at a very steep angle, you could ride the motorcycle into the Wheeldock and turn off the ignition, at which point the bike will be supported.
Then tap your foot on the Wheeldock trip lever, either while you’re still sitting on the bike or after you dismount.
For unloading a motorcycle from a trailer, I would definitely prefer the Wheeldock.
If you’re on a heavy bike without a reverse gear, tugging mightily on the handlebars (often with limited traction for your feet) to pull the bike back over the hump of a standard wheel chock is not something I would want to do.
And to make matters worse, just as you’re cresting that hump, the bike rises, which may mean that there’s even less traction for your feet.
No, I’d much rather make sure the motorcycle is in gear, push down on the cocking lever, get on the bike, and gently roll it out and over the flat entry plate of the Wheeldock.
Of course, unloading a motorcycle from a trailer is much easier if you have a helper.
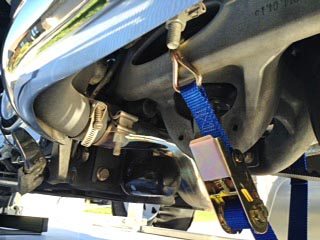
For securing the motorcycle on the trailer, Wheeldock recommends using a specific tie-down method: a safety strap around the front wheel, and two side straps.
There are two welded-on loops on the Wheeldock, one on either side of the front T, to secure the safety strap. The manual notes the following: “Compressing the front suspension by strapping down is not necessary or advised.”
The other two straps on the bike are for “strapping it down and slightly forward from two mid points using “only enough compression to remove all the side-to-side movement.”
As I doubt the manufacturer wants to invite lawsuits, I’m impressed by the confidence it places in the security of the Wheeldock, as well as the recommendation to not compress the forks.
Wheeldock Options
I mentioned the spacer (shim) packs earlier. If you have a front tire that is in-between the recommended Wheeldock sizes, these seem like a reasonable and effective solution.
And as I noted with regard to the owner’s manual, you can also buy a “Quick-Detach Transport Bar” ($50.00). This is simply a solid bar that remains mounted to your trailer when you remove the Wheeldock.
The T portion of the Wheeldock sits atop that, and is held in place by two clevis fasteners.
Also, the Wheeldock company sells ratchet straps itself, along with some extra hardware and tie-down brackets for trailer mounting.
|
webBikeWorld Overall Opinionator: Wheeldock
|
|
|---|---|
| Picks… | …and Pans |
|
|
Conclusion
If you need a front wheel chock for a large, heavy motorcycle or if you’re smaller in stature, I can’t imagine buying a “normal” uphill-and-downhill chock instead of the Wheeldock.
For lighter bikes, I still think the Wheeldock is a good idea, although it may lose some of its appeal; in any case, it’s priced about the same as the competition, so why not?
I won’t say that for me, using the Wheeldock is a pleasure, because I’d just as soon not push nearly half-a-ton of anything anywhere — up, down, or flat.
Pushing a big, heavy touring bike into a front wheel chock is never fun, but at least the Wheeldock makes it tolerable.
More webBikeWorld:
| wBW Review: Wheeldock Front Wheel Chock | |
|---|---|
| Manufacturer: Wheeldock, LLC | List Price: $199.95 + S/H |
| Colors: Mottled gray. | Made In: U.S.A. |
| Review Date: March 2014 | |
Owner Comments and Feedback
See details on submitting comments.
From “R.F.” (October 2015): “This year I purchased the Wheeldock with the trailer adapter. I also own a Victory Cross Country Tour like the reviewer.
I found the Wheeldock to be a great product and easy to use. I use it in my garage for servicing the bike. Make oil changes much easier than on the side stand.
For Bill P.’s information and others with the same bike, I do not use two ratchet straps across the bike as Wheeldock says you can.
As per Victory manual I use 2 tie downs on the triple tree and I use the tie down for the front wheel, through a D-ring, bolted to the trailer under the bike and hook it to either side of the swing arm.
Though the Victory manual says use 2 tie downs. I don’t see the difference.
I then put another tie down through the front wheel. I’ve attached two photos showing the swing arm tie down. Hope someone finds this useful.”
From “J.P.” (March 2014): “I own three of them. I LOVE them! I have a small shed that I park my 1997 Ducati Monster, 2004 Honda RC51, and 2011 Suzuki GSX1250FA in.
The Wheeldock allows me to park all three and easily maneuver them in and out in the limited space.
It also worked on my 2004 Suzuki DL650 V-Strom that I used to own. It’s a great product. Being able to pull the bike out without having to lift it UP is a big deal for me.”