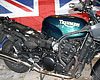
Hinckley Triumph motorcycle owners have been complaining about ignition coil failures.
In Triumph Ignition Coil Replacement Part 1 of this two-part series, we described a coil replacement on a Triumph Thunderbird Sport.
Note that these tips can apply to most modern Triumphs and other brands of motorcycles.
After riding for roughly thirty minutes to an hour, the engine of my ’99 Trophy 1200 would develop a miss at a constant throttle.
The miss would clear up with acceleration or brief cool downs.
The previous owner had replaced one of the OEM Gill coils in 2005, and considering the symptoms of poor performance.
I suspected the remaining original coil was failing.
The Trophy 1200 has numerous areas of potential fuel starvation issues that yield similar symptoms, so I addressed the potential starvation issues first, and then decided to replace the coil.
As you need only one or two wrenches to replace the coils on the Triumph Thunderbird Sport (blog), the Trophy replacement requires more tools and patience.
Unlike the Sport, where the fuel tank can be easily removed to verify the condition of the ignition coils, the Trophy takes a bit more work just to remove the fuel tank.
Through photos and explanations, I will show you how to replace a coil.
Triumph Trophy 1200 Ignition Coil Replacement
First, the seat, bags and trunk must be removed from the bike. After removing the trunk you can remove the luggage rack, or the grab bar, if so equipped.
I discovered that removing the long 6MM screws from the rear of the rack, then the 12MM front mounting bolts worked best.
The luggage rack is heavy and if the 12MM bolts are removed first, the rack puts unnecessary strain on the rear mounting bolts and rear panel assembly.
Disconnect the white connectors to the rear signal wiring, marking left and right connectors.
Do not disconnect the red, black or blue connectors.
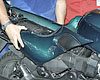
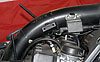
Next, the rear and side panel assembly can be removed (Photo 1).
The side panels are held in place with two 6MM bolts opposite each other along the panel top edge, located at either side of the coolant tank.
Three bayonets secured in grommets hold the front of each side panel to the motorcycle. If the bottom bayonet is pulled free first, the two top bayonets come free easier.
With all three bayonets free on both sides, carefully spread the side panels to clear the bayonets and pull the side panel toward the rear of the motorcycle, avoiding contact with the rear of the fuel tank.
As a precaution, you may wish to disconnect and remove the battery, although I didn’t remove or disconnect mine. In hindsight and for safety regards, I recommend removing the battery before removing the fuel tank.
By the way, the photos show the front bodywork removed, but this isn’t necessary to access the coils. You can remove just the fuel tank and gain access to the ignition coils by removing the side panels only.
I am glad I did remove the front bodywork, but in hindsight, it really wasn’t necessary.
wBWLightbox
Click to open.
Removing the Fuel Tank
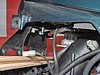
Before removing the fuel tank, the low fuel sensor wiring and the fuel venting hose should be located, under the right rear of the fuel tank (Photo 2). The fuel valve has two fuel line connections and one vacuum connection.
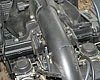
The fuel tank is held in place with two 10 mm bolts.
The third bolt in the center of the tank mount is not removed. I used a small piece of lumber to support the rear of the tank while I disconnected the two fuel lines and vacuum line (Photo 3).
After the fuel and vacuum lines are disconnected from the fuel valve, the fuel tank is

ready for removal. Carefully lift the rear of the tank and pull rearward to clear the tank mountings.
At this point you may discover that you simply have a poor connection on the primary wiring to one of the coils (Photo 4). When you unplug the coil wiring, check and ensure none of the connectors or primary terminals have any corrosion.
Typically, the connectors and the primary terminal spades have terminal grease applied
to prevent corrosion (Photo 5). If you discover faulty wiring, reconnect the wires and remount the fuel tank.
There is some debate about whether the coils can be tested with an ohmmeter.
I cannot confirm or deny this; I can say the ’98 coil that was not consistently firing the No. 1 and No. 4 spark plugs, yielded different ohmmeter readings than the new replacement
and the ’05 coil with an ohmmeter.
If you are still unsure which coil is faulty or whether both coils are faulty, the spark plugs can be pulled to verify the firing conditions.
On the Triumph Trophy, the left side coil fires cylinders No 1. and No. 4, while the right
side coil fires cylinders No. 2 and No. 3.

As a final test, the coil positions can be swapped to verify whether poor plug firing conditions follow a specific coil.
If no wiring issues were discovered, coil replacements are straightforward. The primary wires and spark plug wires are disconnected; then remove the two T-25 Torx screws
holding the coil to the motorcycle spine and remove the coil.
Replace the faulty coil and secure with the Torx screws. Reconnect the primary wires and spark plug wires to the coil.
Mount the front of the fuel tank and support the rear of the tank while fastening the fuel lines, vacuum lines and low fuel sensor wiring. After all connections are complete, remove
the rear support and lower the rear of the fuel tank on the mounts, securing with the two10MM bolts on each side.
With the fuel tank in place, gently and carefully spread the side panel assembly and slide up to the tank from the rear, guiding the bayonets into their associated grommets. Remember to reconnect the rear turn signal wiring.
Finally, install the grab bar or luggage rack, seat, bags and trunk.
As mentioned earlier, the coil replacements on the Triumph Trophy are relatively simple. If you follow these simple instructions, you should be able to replace your ignition coils without a problem.
The majority of the time is spent removing and reinstalling the body work (Photos 6, 7, 8).
Although Nology now makes a direct replacement for the original equipment Gill and PVL coils, both single and dual tower models, I installed a replacement PVL coil purchased from Triumph.
Actually, I noticed the PVL replacement looks similar in size to the Nology unit when compared against the Gill.
The Nology “T” suffix is a “plug and play” replacement coil that uses the existing Triumph spark plug wires.
The correct coil for the Thunderbird Trophy 900 is the Nology PFC-06S “T” or PFC-06D “T” for the Trophy 1200.
If you do not have a Gill or PVL coil replacement in hand, you may consider the Nology replacements because both coils cost about the same as one Gill or PVL coil from Triumph.
A Nology representative explained that any concerns or issues with tachometers were corrected with a diode installation.
Resources
- Part 1: Ignition Coil Replacement on a Triumph Thunderbird Sport
- Nology Engineering, Inc.
- Gill Instruments, Ltd.
- Born Again Bikes
Part 1: Replacing Ignition Coil – Triumph Thunderbird Sport | TBS Page
Owner Comments and Feedback
See details on submitting comments.
From “M.N.” (July 2016): “Very useful — I used the instructions to guide me through a coil change for Daytona 1200. One extra fuel tank connector and no indicator connector or luggage rack, but otherwise almost identical. All done within 30 minutes. Many thanks.”