Triumph TBS Air Filter Change
I’ve done a lot of motorcycle maintenance in my time.
But replacing the air filter on my 1999 Triumph Thunderbird Sport probably ranks as one of the most frustrating mechanical experiences ever.
It even beats the wacko oil filter change on the oil-cooler equipped BMW R100RS, which involves radical contortions and special tools and took me 4 hours after I finally removed the right hand exhaust.
Something as simple and routine as an air filter change should not take more than, say, 1/2 hour? I can change the air filter on both my BMW Airheads in less than half that time.
So unless someone clues me in to the secret of the TBS air filter change, I’m going to rank it as one of the most bonehead engineering decisions that Hinckley-flavored Triumph has made on an otherwise very nicely designed motorcycle.
If anyone has any tips on making this job easier or can point out any mistakes I made, please feel free to send them to me at editor@webbikeworld.com and I’ll add them to this article for the benefit of others.
Changing the Air Filter on the Thunderbird Sport
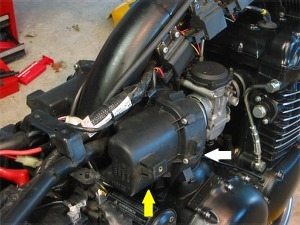
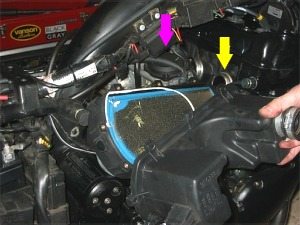
The problem is indicated by the yellow arrow in the photo above: the front airbox on the TBS is a one-piece, U-shaped design that wraps around the chassis backbone.
After scratching my head and trying everything I could think of, I could not figure out a way to get the airbox out from around the backbone without first removing the carburetors.
I guess Triumph had its reasons for this design, but it sure seems to this armchair engineer that there could have been several other ways to locate the air filter which would have made this job much easier.
For example, the right-hand side of the air filter chamber, indicated by the white arrow above, could have been designed as a separate piece with a couple of clips to unfasten a section of plastic and access the filter.
Pop the clips, slide out the air filter, slide in a new one and you’re done.
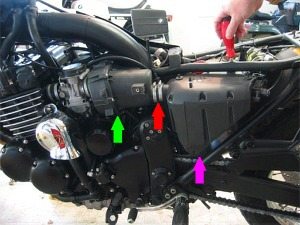
Alternatively, the air filter could have been located in the rear airbox (pink arrow, photo left).
This area has the snout for the air intake (the air intake snout is located on the right side of the bike, in back of the battery and not visible in this photo).
This airbox is located under the seat and is easy to access.
Air flows in through the snout and into the primary airbox (pink arrow), then through the tube and gasket (red arrow) connecting the two airboxes.
It then flow into the front airbox (green arrow), and finally through the air filter, which lives at the intersection of the front airbox and the air filter chamber that attaches to the carbs.
The tip of the green arrow indicates the location of the air filter.
To make things more confusing, the routine maintenance section of the Haynes manual refers the reader to chapter 4 for airbox removal.
Chapter 4, section 16 of the Haynes manual details removing the airbox but never says that the carbs have to be removed first.
I suppose an argument could be made that Haynes steps you through removing the carbs in the beginning of chapter 4, so by time you get to section 16 the carbs should already be out.
I sure missed this the first time around.
I’m probably ranting here, but I would think that since you may have arrived at section 16 in chapter 4 from the routine maintenance section with only a desire to replace the air filter and not remove the carbs, that at least Haynes should have mentioned that you’ll need to remove the carbs before you can remove the airbox.
I spent a lot of time and effort wondering why I couldn’t get the airbox out by following the Haynes instructions, until I realized that the carbs have to come out first. Maybe I’m a bit slow on the pick-up, but hopefully this will save someone else a headache.
By the way, besides a set of long hex wrenches or hex bits, a long screwdriver and a 10mm socket or wrench (to remove the fuel tank bolts), you’ll need size T25 and T30 Torx bits to do this job.
You’ll need to really reach in there to loosen the carb hose clamps, so it definitely helps if you have the screwdriver bits, the hex bits and the Torx bits all ready to use on a long-handled bit driver.
See our Wiha bit driver review, which is an excellent tool for this job (no connection with Wiha other than a satisfied user).
Removing the Fuel Tank
Anyway, you’ll first have to remove the fuel tank (see the wBW article on Thunderbird Sport coolant changes for instructions on how to do this).
Make sure the carbs are drained before you start this job; you can do this by closing the fuel tap and running the engine until it’s out of gas before you remove the fuel tank.
Be really careful during this project, as you’re likely to spill some fuel here or there.
You’ll need to remove the chrome “air filter” trim on each side of the TBS and also the black plastic fluted covers.
Follow the Haynes manual for how-to’s (Chapter 4) on this and you should be ok.
The primary (rear) airbox under the seat has to come out. To do this, you’ll have to first remove the left side “battery” cover. This rear airbox is attached at the bottom by the same 5mm hex screw that holds the side cover.
The airbox is held on top by a Torx screw that threads directly into the soft plastic of the airbox (another strange piece of engineering).
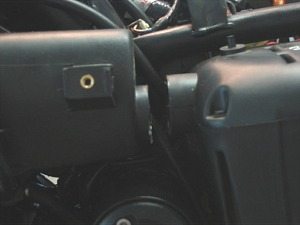
The airbox hangs on a frame-mounted pin that I’m pointing to in the photo. You have to pull the airbox towards you to get it off this pin. I had a lot of trouble with this pin when I was putting things back together, as we’ll see below.
By the way, Haynes suggests removing the seat lock, which is attached to this rear airbox, but I didn’t find this to be necessary. The Triumph shop manual advises removing the horn and the cables from the carburetors.
I didn’t do either of these and don’t think it’s necessary.
Also — there are two vent hoses that come out of the carbs; make sure you remember how these are routed over the top of the airbox and chassis spine.
I believe these hoses allow the chambers on top of the carb diaphragms to equalize with external air pressure. I don’t think it’s that important where the vent hoses hang, as long as they’re not pinched.
Getting Deeper…
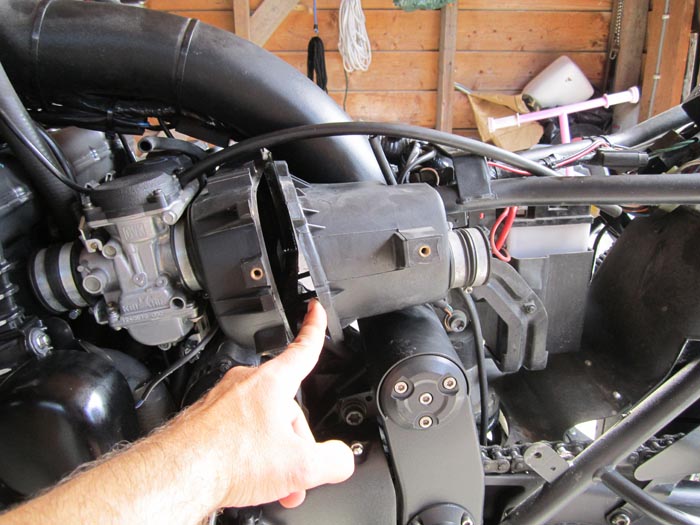
Once you get the rear airbox off (a relatively easy task), you’ll have to loosen all the hose clamps that attach:
- The secondary airbox to the carbs (3mm hex);
- The hose clamps that attach the rubber hose to the front of the carbs (screwdriver) and
- The hose clamps that attach the hose to the engine (screwdriver) intake tubes.
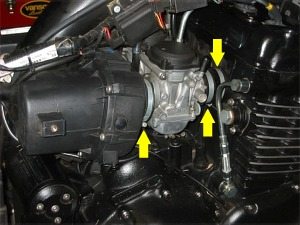
All of these hose clamps are indicated by the yellow arrows in the photo left.
Hopefully whomever did this the last time located the screws for the clamps on the middle carb in a place that allows you to reach them!
Once you get all the hose clamps loosened, it’s fairly easy (or was, at least on my bike) to pull the U-shaped airbox back and separate it from the air filter chamber.
This provides a tiny bit of wiggle room to rock the carburetor rack back and forth to loosen the carbs from the short lengths of hose that run between the air filter chamber and the intake tubes.
It’s a real pain to get the three short hose sections out from in between the carbs and the engine’s intake. It’s a matter of pulling, pushing, cursing, resting and trying it again until they come out.
Note that the hoses that fit between the carbs and the engine intake tubes are a one-way fit. The end that attaches to the airbox and the end that attaches to the intake tube is different.
The hoses are wider at the top than at the bottom to locate the carbs correctly. Make note of how the hoses are located before you rip them out.
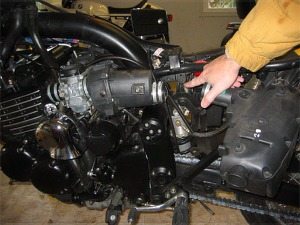
Once you have the carb rack loose, you can then remove the entire rack out the left side of the bike.
I asked my wife to help out by holding the carbs off to the side while I then removed the breather hose from the bottom of the air filter chamber and finally slipped the air filter chamber and the U-shaped airbox out from the chassis.
Once you have the airboxes out you can lay the carb rack roughly back where it came from. Be careful not to bend or kink the choke or accelerator cables.
Again, the Haynes manual does a decent job of explaining everything in chapter 4.
I suppose it would be a good practice to balance the carbs after they’re put back in; I didn’t do it this time and the bike seems to run fine, but I will balance them during the winter and I’ll write it up.
Airbox and Air Filter
Here’s a photo of the U-shaped airbox (upside-down) and the air filter. The yellow arrow points to the barely visible engine intake tubes where the hose attaches, and the pink arrow shows the carb rack laying in the chassis.
There are 10 Torx screws that hold the air filter chamber on to this U-shaped airbox.
Triumph claims that the air filter is not available separately and that the entire airbox assembly must be purchased.
This is strange, and I bet it’s because they don’t want you to know that you can probably get away with cleaning the existing foam filter, thus depriving them of some revenue.
Obviously, I was able to remove the Torx screws and access the filter without having to purchase the entire airbox assembly.
The previous owner told me he installed a K&N air filter, but this air filter isn’t a K&N, so I don’t know what he meant. TBS riders tell me this is the Triumph stock filter.
It’s a foam filter, not paper, and although Triumph recommends replacing it and the entire airbox chamber (not sure why), by time I got this far the Triumph dealer wouldn’t be open for a couple of days, so I washed the filter with dishwashing liquid and gave it a light coat of oil and put it back in.
Other than some grass and dust, it was in pretty good shape, so I figured I’d be ok.
You probably think I’m nuts to go through all this and then put the old filter back in.
But I honestly thought this would be a 1/2 hour job and that I could see how everything came apart and then put it back together and ride over to the dealer to get a new filter, then come back and do it again and record it for posterity.
I’m not sure what the white stuff is — it appeared to be some silicone sealant that was only placed on the bottom lip of the box. I don’t know why it’s there or who put it there. I didn’t replace it, and the box seemed to seal up fine.
After I got everything back together (reverse order), I started up the bike and gave it the old “contact cleaner” test.
I sprayed some contact cleaner around all the potential cracks in the box and the around where the hoses meet the airbox and engine to see if the idle changed or if there was any smoke from the exhaust.
If so, it’s a good indication that there’s a leak. This is a dangerous test, so be careful and do it in a well-vented area.
There’s a chance of fire, so do it at your own risk. Don’t use any flammable sprays or anything that could harm plastic, paint or rubber. I didn’t notice any leakage.
Reassembling the Airbox
Putting everything back together was just as much of a pain (or more) as getting it apart. I struggled for a considerable amount of time to get the hoses and clamps and carburetors located in the correct orientation and to get everything buttoned back up.
Again, it’s a matter of brute force and patience.
I strongly recommend taking several long breaks during this job, as your patience will be severely tested, and it pays to come at it with a fresh approach now and then.
Why it should be so difficult just to replace an air filter is beyond me.
Make sure the hoses and clamps are located correctly; that the hoses aren’t pinched; and that the hose clamps will do their job of sealing everything up.
After I got the carbs back in and the U-shaped airbox buttoned up, I had a lot of trouble getting the rear airbox correctly lined up in the frame. It had obviously been brute-forced in place at the factory, and now I couldn’t (wouldn’t) use the same force to get everything back together.
There’s a tab that’s welded on to the TBS’s frame up top that locates the Torx screw mentioned earlier that screws directly into the top of the plastic airbox.
That tab apparently was welded out of location on my bike, because it was impossible to line up the screw that goes through that tab, the pin that holds the airbox (mentioned earlier), the hex screw on the bottom of the airbox that also holds the left side “battery” cover and the two snouts (shown in the out-of-focus photo above, sorry!).
These two snouts were too long and interfered with each other and were causing the misalignment problem. I ended up trimming them back with a Dremel to get everything to fit correctly.
Before I put the hose and clamps back on I took this photo to show that they are still out of alignment, but they are now much better than before.
I bet there’s a potential for a loss of horsepower on my bike because the air can’t get cleanly through from one airbox to another.
If I didn’t know any better, I’d bet that Triumph found out late in the design of the TBS that the airboxes had to be re-engineered, possibly to meet noise regulations.
The entire design of the airbox assemblies and the air filter seems to be not very well thought out.
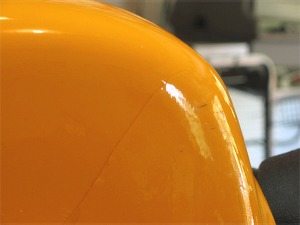
Addendum: Right Side Cover Interference Solution
When I took off the right side cover at the beginning of this project, I noticed that it rubbed against the black plastic fluted trim section (photo left).
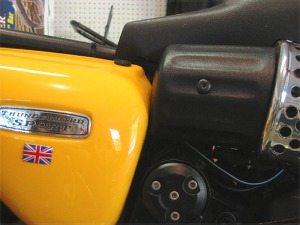
It was starting to scratch the paint, and this cover comes off much more frequently than the left side cover, so I was afraid that it would eventually rub off all the beautiful yellow paint.
The photo below shows the scratches in the paint (left photo). I had a few pieces of 3M Scotchcal around, so I installed a piece at the rub point to help protect the cover from any more damage.
Scotchcal is great stuff to have around. It’s a clear plastic sheet that is used to protect paint from chips. It’s used a lot in the automotive industry.
Scotchcal is very easy to install once you get the hang of it — just spray on a mixture of water and a touch of dishwashing liquid and slide the Scotchcal on like a decal.
Locate it in the correct spot and squeegee out the water and let it dry.
The photo on the right below shows the side cover now protected by the Scotchcal sheet. Scotchcal dries clear and you usually don’t know it’s there unless you look for it.
It peels right off if necessary and doesn’t harm the paint, but it protects it from scratches.
I use it on all my bikes in areas where there may be stone chips or frequent rubbing from pants, jackets, zippers, etc. Here is a webBikeWorld search for “Scotchcal” with reviews that describe this material.
Publication Date: 2005
▪ Motorcycle Product Reviews
▪ Maintenance and Repair Articles
More: The wBW Triumph Thunderbird Sport Blog
Owner Comments and Feedback
See details on submitting comments.
From “P.H.” (May 2017): “Read your article regards the air box and having just purchased my ’95 Thunderbird, which was much loved and well-kept by the previous owner.
I did all the usually checks one does and found that the original air filter was still in the bike — or what was left of it anyway.
The coolant was probably still original, oil filter looked same although they probably changed oil before I looked at it, new plugs that weren’t and a slight miss on 1 cylinder when you are about 3K RPM.
I decided to check timing chain as was a bit noisy, turns out roller bearing on balance shaft will need replacing at some stage.
I pulled off the cam cover, the right hand side cover and lined everything up and timing was out by 1 tooth, but the chain looked good though.
What a job for the first time getting that one tooth — 6 attempts but I nailed it. I almost got to the point thinking “What’s 1 tooth, did it really matter? I’ll find out when I get it going.”
OK so the tank is off, I remove first section of the air box, loosen the clamps holding the air box to the carbs, then, I stopped and had a look.
Why, I undid the air box screws, the screw driver for the centre screw works a treat, pulled out what was left of the filter and the enclosure.
Then with some struggle and patience I removed the airbox without pulling the carbs or horn or anything else off.
So how to get it back? I cut the RHS end section off flat, then removed the remaining 15 mm of the box to the side cover screw fixing, then I fitted the end back on using black gasket silicone sealed inside and out.
It slides easily back in, then the filter housing, screwed them together, done.
I could have just undid the screws and pulled out the filter but I wanted to check for any signs of crap from the old one.
I’ve ordered the Haynes manual and downloaded the original manual online, so I look forward to getting to know the her intimately over the next few years.”
From “J.D.” (July 2015): “Re-your very detailed tutorial on “how to” change the air filter on a Triumph Thunderbird Sport. It seems you’re making it unnecessarily complicated.
K&N sells a replacement air filter for this model and it quite easy to open the air box, pull out the (crappy) OEM one with a pair of long pliers and replace it with the K&N.
It still requires to remove the gas tank (not that difficult), the side covers, the air box on the left side (all this takes a little bit of time but is really easy) and as to the center screw, as one of the comments mentions, gentle pressure applied with a long flat screwdriver is plenty enough to dislodge it.
It will get back into place when replacing the air filter rear cover and I believe there’s no need to tighten it as there are six other screws to hold it in place.
It took me about an hour to perfom the whole task and I used the extra time allotted to change the air filter after reading your tutorial to change the engine oil…
Hope that helps and thank you for being so efficient at keeping the motorcycle community spannin’ and wrenchin’ !”
From “J.M.N.” (July 2014): “I have a Triumph Legend TT which has needed an air filter change for some time. I did some internet research prior to this job, which included reading this article.
Did the job today and I must report that I don’t necessarily think the approach shown here is the best one.
First remove tank etc. Then remove the rear air box.
Then remove all the small Torx screws around the air filter box. As the picture (below) proves, the air filter box can now be opened enough to pull the air filter out and to put the new one in without any damage.
The only difficult part is getting the lower, middle Torx screw in the air filter box out. For this I used a bit-ratchet. Mine is a Bahco 2058-BR. It is also nice to have a rather long flat screwdriver to help steer and brake the ratchet.
I think maybe you could omit putting this screw back in to make the filter change easier in the future but I put it back just to do the job really properly.
Mine also had the white silicone string, it came out just by pulling it, and everything seemed fine with the new filter in place so I made no effort to replace it either.
As most of the readers here will probably know, the Legend TT, Adventurer, Thunderbird and Thunderbird Sport are basically the same bikes, so I would think that this would work on all these bikes. However there may be different carburetor sizes for all I know.”
From “A.B.” (July 2014): “Thank you for the post on how to change the air filter on the T-bird!!!
I have studied hard and worked on my Adventurer, took photos and made a guide too where I have quoted a link to your guide which is really kickass.
I have modified the air filter to make life easy and the bike even more retro and simple. Have a look here (on my blog). Ciao and long live the triples!!!”
From “D.Q.” (July 2013): “I’ve only today discovered webBikeWorld — where have I been? Rick K’s article on the TB Sport air filter is spot on (I assume the 1999 Sport is the same as my 1998 TB standard in this regard).
I didn’t have access to a Haynes manual so had to use the old noodle. It was a finicky task and on my machine the air filter had clearly never been changed as the foam element had all but disintegrated (I bought it with 32,000 km on the clock in 2006 and now know why it had never been changed).
The new air filter assembly was also A$120.
To be fair, the only really fiddly bit was getting at the middle carb clamp screw to drop the three carbs off and replacing them. Changing the middle spark plug is also a conundrum- there’s a darn motor bike frame in the way! Anybody have tips on that?”
Rick’s Reply: The spark plug wrench in the Triumph tool kit worked best for me, described in the Triumph valve adjustment article.
From “M.P.” (August 2012): “I just bought a 1999 TT and I was about to venture down this road, until I decided to have my carbs rebuilt, to which I do not have the tools and special equipment to balance the carbs when done.
Needless to say the bike ended up at a local Metric shop for a tune-up. To my dismay I was notified the air box (filter) needed replaced because it was pretty much non-existent. Just shards of the original foam remained.
The shop ordered a new box, no problem with that, though I like the rest of you found that to be absurd! Only to find out the d**n thing has been discontinued! I shopped several places for a new box with zero luck.
I then thought well let’s just check K&N and sure enough they have what is touted to be a direct replacement for approximately the same price. I ordered it. The jury is still out on whether I will have to rejet or not.
Has anyone else question the infinite wisdom of Triumph pressing knurled brass nuts into the little plastic ears of the airbox, which break after the plastic becomes brittle?
Aaaah yes, another way to ensure you buy a new airbox that is conveniently discontinued or perhaps to force you to trade up for a new scoot.
One of those things that make you go “hummmmm”, again! I love my Triumphs, but it does bring new meaning to the word triumph, when you finally finish a filter change.
Editor’s Reply: I’d guess now that Triumph has more experience, they wouldn’t design it like that again.
Back in the early ’90’s when the Thunderbird series was designed, Triumph was still learning as a new motorcycle manufacturer. To be honest, that slight design error is pretty minor and forgivable, especially considering the ’90’s bikes were generally built like tanks…
From “P.G.” (August 2012): “I found that if you remove all the screws from the air box and replace them with plastic tie straps, you can split the air box and remove the air filter for maintenance.”
From “A.H.” (6/10): “Great pics and walk-through. Please … start writing manuals!
I found this article in attempts to disprove I had to remove the carbs (or loosen) in order to get to the filter. I have an 02 Trophy 1200 and admit I cried a little when I saw what I was up against.
I found through the Hinckley Triumph Trophy group (Yahoo) that someone had sliced the lid in half and was able to replace/renew the filter.
They had put some sort of washer to help keep things snug when put back together and so you didn’t need to get to the impossibly-placed screws again.
Obviously it’s not as air tight once you slice it, but looking at it… I can’t imagine there would be noticeable issues considering where the slice would be after installation.
So I didn’t disprove carb removal as a necessity. Sadly, it has to be done at least once. Again, nice work on the post.”
From “K-U O” (4/10): “By pure luck I found you article about the air filter box removal on the Triumph bikes.
The story is, that a friend of mine bought a very well used (and rebuild) Legend TT last fall. Yesterday we tried to get it going and wanted to do some maintenance work. So while he replaced the dead (= partially dry) battery, I tried to locate the air filter.
We didn’t have any workshop manual or similar, so my guess was it should be inside the “easy to reach” plastic box under the seat. Removed it and surprise: it is empty, I can look righty through it!
Where is the d….n air filter? Ok, one of the previous eight (8!!!) owners must have removed it! I also took a look at this other strangely shaped plastic box connected to the carburetors, but never got the idea that this is the home to the filter!
It looked simply impossible to remove – at least when we are talking about a routine maintenance job.
This is actually THE WORST piece of engineering I have seen for a long time, and believe me, I am a lot into technology, technical service and things like that. Not only motorcycles!
My F800GS has such a clever and simple solution: just remove the top cover of the “virtual tank”, remove the air box cover (6 screws, if I remember right) and there is the air filter. Replacement takes 10 minutes!
I had been considering a Triumph Tiger 1050 for some time, but now I am glad I wanted a more off-road oriented bike. Shame on you, Triumph! 🙁
But thanks for the enlightenment – you article was very instructive. We will just hope the filter is still ok and leave it where it is….!”
From “K.H.”: “Just read your article on the Trumpet airbox. I have had two Trophy 1200cc fours (still got one) and they are just the same. I tried to cut out the end of the box and slide the old filter out- no chance.
What I did learn was that when you put the carbs back on make sure that the jubilee clip screwdriver slots face up.
This makes removal a lot quicker next time. I also removed the rubber sleeves to the carbs prior to sliding the carbs out of the way. You can do it with them on but it is a real pain.
Got to say the Trophy is a real comfy bike. We have just done a fund raising run for UNICEF from the UK to Kiev, 4,000 miles in twelve days. The wife and I never got saddle sore even when riding 12 hours a day.”
From “B.K.”: “I have a 2000 T-Bird (not the sport). Your article took the mystery out of this job. I was actually done in about 2 hours, but that was because I knew exactly what to do.
My filter looks exactly the same as yours, so I just sprayed it out with brake cleaner and the filter looks brand new. My air cleaner housing had the same silicone sealant on the bottom half only of the box.
I know this assembly has not been touched, so these must be factory installed. Re-installing was a snap (thanks for the tip on the carb to engine couplings, I carefully marked them so I would not put them in backwards).
I did find a really weird thing. There is a hose at the bottom of the air filter housing on the backside, and it actually tore off as I was removing the housing. I inspected it, and found it to be extremely soft and squishy.
Then, I discovered a part of the hose that felt rock solid. As I pinched on it, I felt something move, so I kept squeezing until a rubber nipple came out the end of the hose! I’m guessing the nipple blocked the drain and so the hose soaked up the oil, or something. Ever hear of anything like that?”
Airbox Hose Question Solved?: This from “K.G.” – “I have just read your how to guide on removal of a Triumph airbox. I am sorry to say, that I can not improve on your description. Though I can gleam some light on the squidgy tube which is attached to the bottom of the air box.
There is a larger diameter engine breather tube, which connects the top of the crank case to the bottom side of the air box. Over time small amounts of fluids from the engine build up in the base of the airbox.
The small tube is there to drain this fluid. Triumph recommend draining the fliud every 3,000miles. The hard lump is just a bung. I hope this explains the squidgy tube.
I am not a mechanic and this information was gained when I was diagnosing a problem on my Legend. If the seal on the breather tube fails, you will find small amounts of oil from the engine sucked up the breather tube.
After about 500 miles, the oil will build up in the air box. In my case, the oil started to seep out of seam of the air box.”
From “B.P.”: “Hi Rick, I have a 1996 Triumph Sprint that I recently purchased. I had to replace the cracked air box. My neighbor, who owns a Triumph Tiger, thought that I would have to remove the carbs to access the box and offered to help me.
I am definitely not a mechanic, but nor am I mechanically insane.
On Sat. morning at 6:00, I logged on to the internet and searched “Triumph Motorcycle Air Filter Replacement” and to my amazement, your article was the very first that I encountered.
Though it was for a different year and model of Triumph, it took me exactly through the step by step process to correctly replace the air box. It did take me about five hours to complete the task.
I do agree that this was a stupid design by Hinckley and the armchair engineers. When my neighbor called me on Sat afternoon and offered to come and help, I told him that I had the job done thanks to your article. I just thought I would send you a quick email thanking you for the great information.”