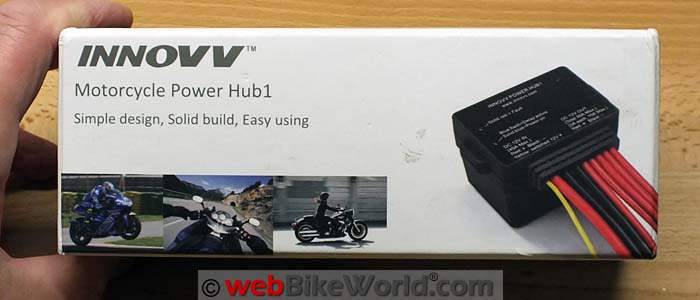


The INNOVV Power Hub1 is a power distribution system for motorcycle accessories.
Up to 5 different accessories can be connected to the fused power wires.
Connect a wire from the Hub1 to the battery and one to the ground.
Then connect the yellow wire from the Hub1 to a switched power source.
The Hub1 will turn on with the bike’s ignition and it then powers your accessories.
This makes it easier to manage the wiring and connections for accessories like auxiliary lights, horns, radios and more.
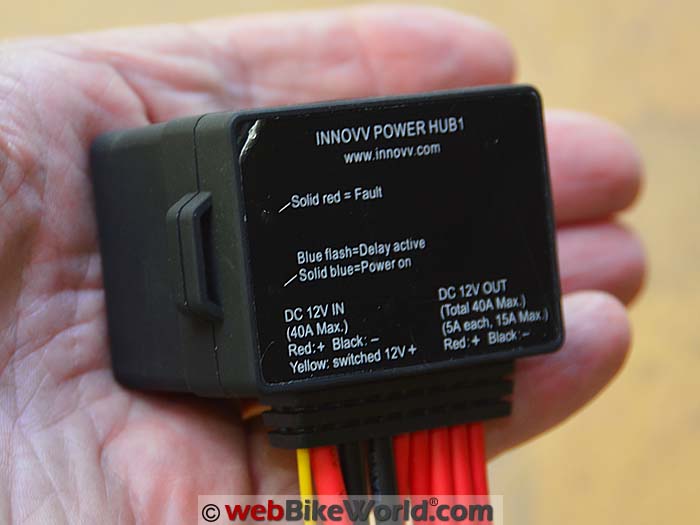
The Power Hub1 consists of a sturdy sealed module with an integrated well-sealed input/output distribution harness.
With only two small indicator LEDs on its face, the whole system looks and should be tough enough to resist all sorts of wear and tear, bumps and jumps.
Total capacity is rated at 40A.
Background
Fused and solid-state power distribution systems for motorcycle accessories have been around for a long time.
And many motorcyclists have taken advantage of their features, which can be either simple or complex.
Fused systems range from the basic Powerlet Termin-8 to the more sophisticated Centech AP2 fuse panel to various types of fuse blocks.
“Mid-range” power distribution systems include examples like the Dispatch 1 (review), the Rowe Electronics PDM60, the Denali Powerhub 2 (from Twisted Throttle) or the Blue Sea ST Blade Fuse Block.
Then there are the more sophisticated CPU-based systems.
Those include the Motobrain (review) or the Neutrino BB V2 (review), which allows settings and control via a smartphone app.
So there are many choices in power distribution systems, with small ruggedized weatherproof forms and distributed leads, modular connectors or direct connection strips.
This can make installing and managing your motorcycle accessories a simpler and more reliable thing — good objectives, right?
What’s a Power Distribution System?
The more sophisticated power distribution systems have switched options for individual or ganged circuits along with fused and/or solid-state electronic circuitry.
These options provide flexibility of use for and protection of electronic accessories.
Many newer products include a wired, wireless (or both) programming capability.
This can be done with a desktop or mobile app, with connectivity provided by a USB cable or wirelessly using Bluetooth or even WiFi.
Wired or wireless management of the power distribution management system provides flexibility and versatility.
It allows any or all system features to be exploited fully for effective utilization and best return on the investment.
The bottom line here?
No matter how simple or sophisticated our requirements, there’s a wide and interesting variety of power distribution and management products available to motorcyclists.
Ranging from $69.00 (Power Hub1) and up, they can pretty much meet any requirement and budget.
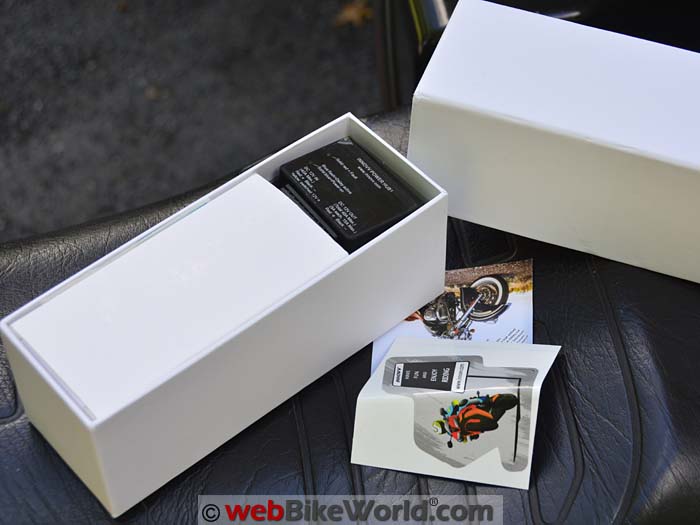
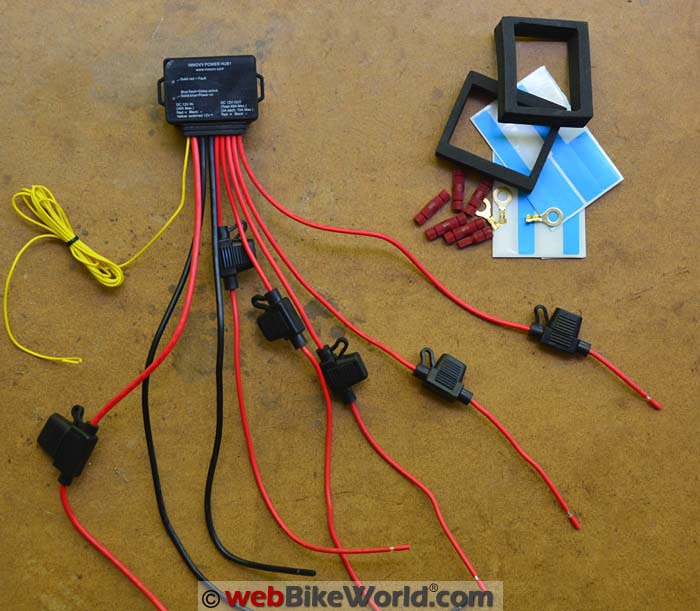
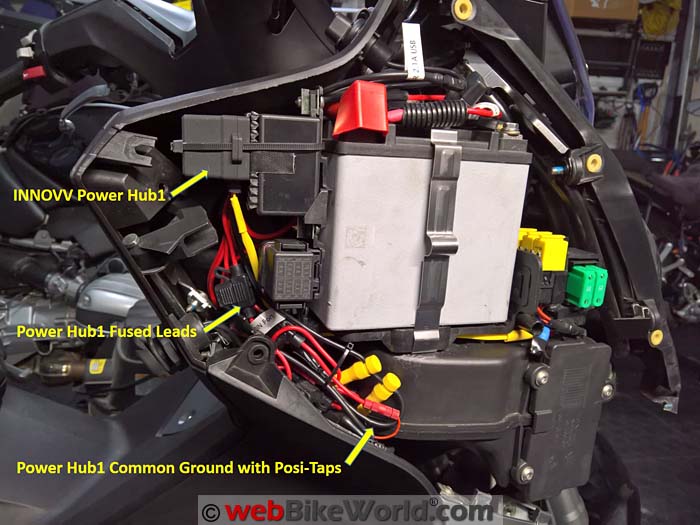
The INNOVV Power Hub1 included wiring and kit contents.The INNOVV Power Hub1
INNOVV is familiar to webBikeWorld readers for the on-board camera systems, such as the K1S front-and-rear dual camera system we reviewed.
The Power Hub1 was developed in response to queries from customers who were looking for a good basic power distribution system.
And since webBikeWorld has been a leader in reviewing motorcycle power distribution systems of all types, INNOVV asked us to participate in the development of the Power Hub1, for which we provided feedback.
The Power Hub1 is simple to install and simple to use.
Just turn on the ignition, wait for the Hub1’s ten second power-up delay after which the Blue LED goes steady and accessory circuits are activated, supplying power to connected accessories.
The shutdown procedure is pretty much the reverse; a ten second delay indicated by the flashing Blue LED, then shutdown of the system, with power cut off connected accessories.
INNOVV Power Hub Overview
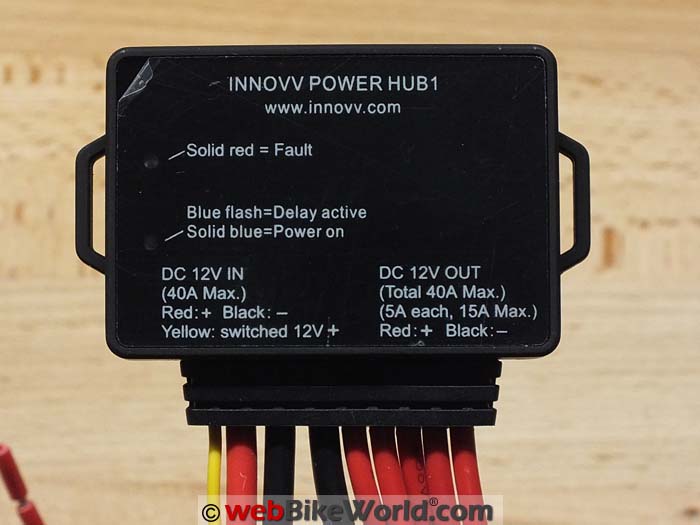
The most noticeable feature of the Power Hub1 is the black sealed box or module that houses and (definitely) protects the electronics.
IINNOVV states that the housing is “rain and dust proof” but no IP rating is identified.
Measuring 64.2 x 39 x 40 mm (2.5 x 1.5 x 1.6 inches), the Hub 1 has a smaller base footprint than most of its competitors.
But it sits taller, depending on its orientation when installed of course.
With a power rating capacity of 40A, the Power Hub 1 has a sealed main harness that includes five mini-fused power output leads for connecting your accessories.
Those can include items like auxiliary lights, horns, GPS, radios, heated gear and more.
Each connection is rated for 5A to 15A (observing the 40A overall system maximum) and electronic protection is provided by the solid state electronics inside the Hub1 module.
Also, the Hub1 is weatherproof, as are the inline fuse modules.
The Hub1 also features a ten-second power-up and power-off delay that kicks in when the ignition is turned on or off.
Power Hub1 Wiring
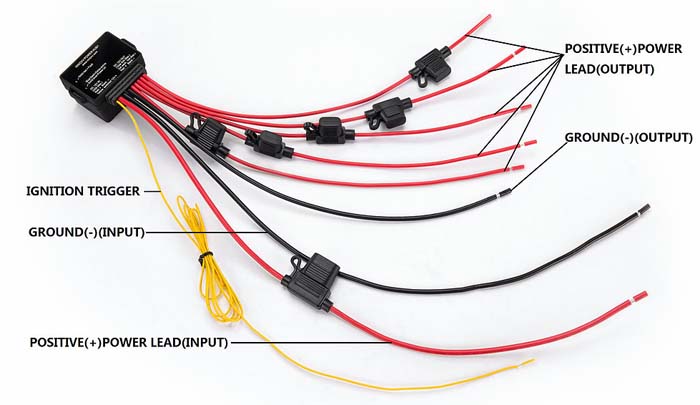
Reference the photo above, with the Hub1 oriented with the printed side facing up.
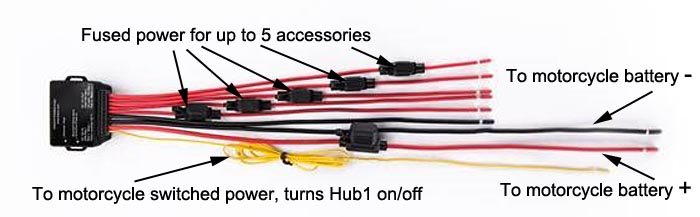
The sturdy sealed nine-wire harness grouping exits the Hub1 with the wires ordered, in the photo from bottom to top, by input and output functions.
This is a logical and effective grouping.
Looking at the photo above, from bottom to top:
Power Hub1 Inputs to Power the Hub1 and Attached Accessories:
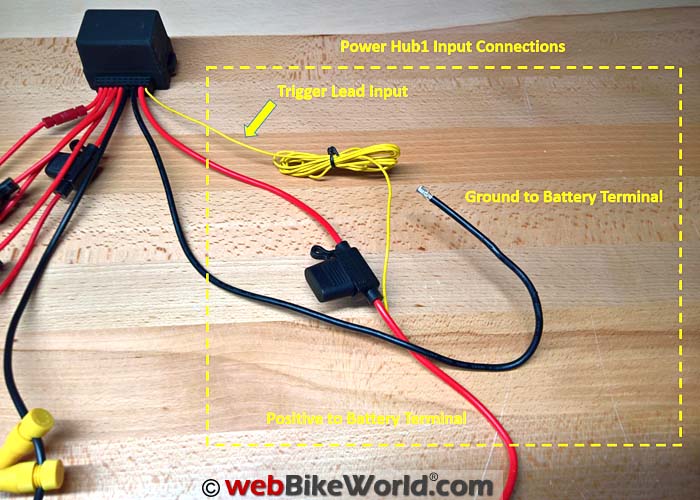
- Yellow 22AWG wire, 145 cm (57″) long, connects to a switched power source on the motorcycle, providing the trigger or sense lead to activate the relay in the Power Hub1.
- Red (+) 12AWG wire, 47 cm (18.5″) long, with 40A in-line fuse, connect to positive terminal of the motorcycle battery for overall power to the Hub1, which then feeds power to the up to 5 connected accessories.
- Black (-) 12AWG wire, 47 cm (18.5″) long, connect to negative terminal of the motorcycle battery or to a frame ground.
Power Hub1 Outputs to Accessories:
- Black (-) 12AWG wire, 33 cm (13″) long, this is the common ground for wired accessories. Add Posi-Tap 10-12 taps to connect a ground for each accessory if desired.
- Five Red (+), 16AWG wires, 33 cm (13″) long, with in-line mini-fuse housings. These are the power leads for up to 5 accessories.
Included Accessories
Included with the Power Hub1 kit are five red 18-24 Posi-Locks.
These can be used on the output circuits.
One red 20-22 Posi-Tap is also included to connect for the yellow wire to a switched power circuit on the bike. This starts the Hub1 when the ignition is turned on.
Also included in the kit are three light-duty spade connectors.
Power Hub1 input connections.More Power Hub1 Details
The printed side of the Power Hub1 module includes product identification markings and two small round LEDs on the left side.
The printing is covered with a removable clear plastic protective sticky.
Once the Hub1 is installed, when the power is turned on the upper red LED flashes once, then goes out, unless there is a fault, in which case it remains lit.
The lower blue LED has two conditions: flashing (for ten seconds) on start-up or shutdown; and, solid blue when the system has been activated.
Two other sets of markings on the lower left and right of the face on the Hub1 identify the DC 12V IN and DC 12V OUT assignments correlating to the wiring harness segments.
Everything about the Power Hub1 projects an image of simplicity, strength and ease of use.
Power Hub1 output connections.Power Hub1 Installation Considerations
The Power Hub1 has more of a square shape and this profile might just take a little more planning regarding installation.
The Hub1 can be mounted in any orientation, as long as you can find a suitable mounting location somewhere on the bike.
Many under-seat areas will be good candidate spots for installation.
Also, locations in the fairing or even in a storage pocket can be used, which I considered as one of the options for the BMW C 600 Sport installation detailed below.
Where space or clearances are very limited, using a system with a direct connection strip of some sort can be an advantage.
But for other applications, an integrated distribution harness as used on the Hub1 works just fine.
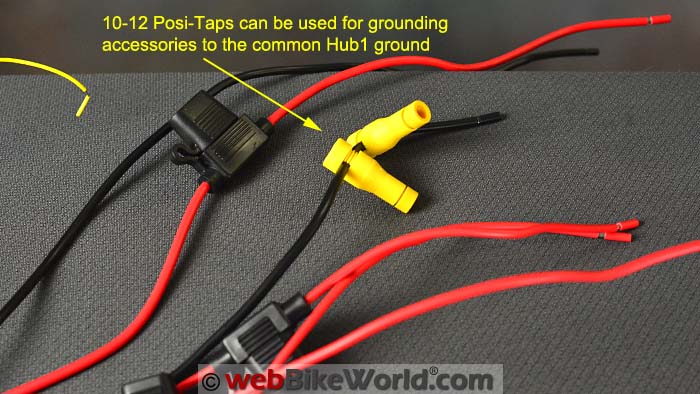 10-12 Posi-Taps can be used to connect the accessory ground wires to the Power Hub1 common ground wire.
Notes on Connecting Power Wires
The first step is to mount the Power Hub1 and connect the power and ground leads.
Then the five output leads off the distribution harness can be kept together or routed on separate paths depending on requirements.
Note also that Posi-Lock connectors are ideal for expediting the connections to your various accessories (and Posi-Locks and Posi-Taps can be purchased through webBikeWorld).
Notes on Connecting Ground Wires
Ground wires for your various connected accessories can be made to an appropriate frame point on the motorcycle.
But for lots of reasons I prefer using a common ground lead or buss, which is provided for on the Hub1.
Again, you can add multiple 10-12 Posi-Taps (not included in the kit) to the Hub1 black ground wire or use various frame mounting points as a ground for your accessories.
There are pros and cons to each.
If you use a local frame ground connection for the accessory, it avoids having to run a separate ground wire from the accessory back to the Hub1.
But with multiple accessories each using their own ground, tracing electrical faults can be more difficult whereas a common ground point can simplify troubleshooting.
Update on Wiring
INNOVV said that additional one meter long red and black input wires will be added to the Power Hub1 kit.
This will provide the option of adding more length to the red and black input wires using a Posi-Lock if a longer connection is necessary.
Also, 5 short black wires will also be added to the kit to be used for adding to the common ground wire if needed.
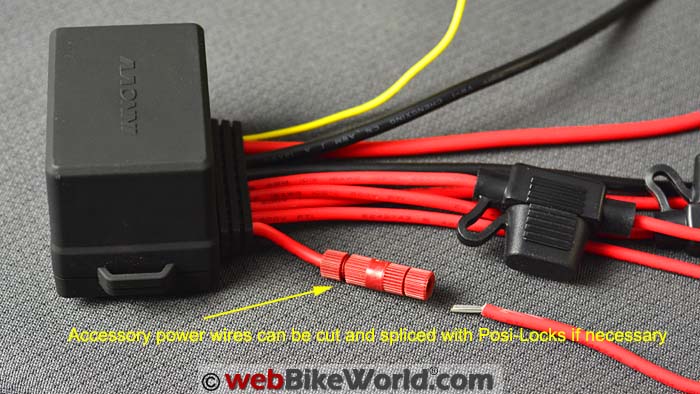 The accessory power wires can be cut and spliced with Posi-Locks if necessary.
Other Hub1 Mounting Considerations
You don’t actually need to see the LEDs on the Hub1 and it has a built in relay, so it can be mounted either in view or out of view on the bike.
This can be an advantage over one of the more modular power distribution systems that may require ongoing access for configuration or fuse replacement purposes.
While the integrated distribution harness found on the Hub1 might seem to limit wiring options, it doesn’t have to.
The in-line fuse modules are located close to the module itself, again for all the right electrical reasons.
But if accessing the fuses will be problematic, a safe workaround can be implemented.
An accessory power lead can be extended by cutting it above the fuse holder, then extending the wire using a Posi-Lock connector.
The portion of the wire that was cut and which has the inline fuse can then be spliced on to the wire extension.
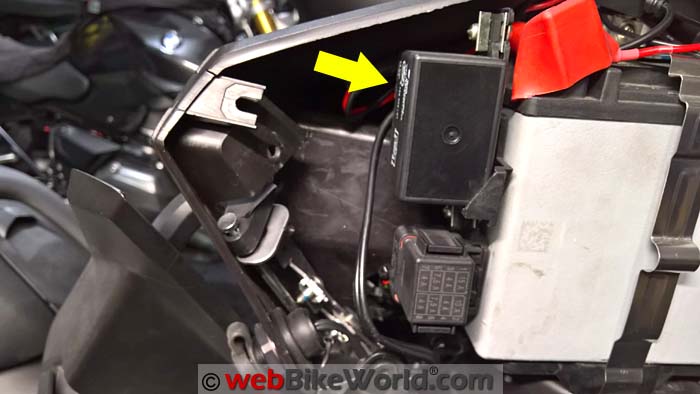
A suitable location for the INNOVV Power Hub on the BMW scooter.Example Power Hub1 Installation
I used my BMW C 600 Sport scooter to install an INNOVV Power Hub1 unit.
There’s usually a lot of space to mount electrical accessories and components under the right-side fairing panel on scooters and touring bikes.
On the scooter, the right side fairing panel can be quickly removed to reveal the battery, related electrical components, the air cleaner and other things.
I first disconnected and removed the battery to facilitate access.
I then found a suitable spot to mount the Hub1 on the left side of the High Current Relay, which is attached to the left side of the battery box.
Optional: Ventilation Considerations
While 3M Dual-Lock or 3M double-sided adhesive would be more than enough to secure the Hub1 to the relay housing, I wanted to provide a bit of separation and air flow.
This is important, given the heat that may be generated by the Hub1 and its built-in relay.
Accordingly, I used a small square of plastic radiator grill from my original BMW F 800 GS (review)as sort of a standoff.
It provides a 5 mm air gap space between the Hub1 and the relay housing wall.
The Hub1 has small mounting slots on each side to help simplify mounting.
A zip tie can be used to loop through the slots around the Hub1 to attach it.
For initial testing and photos, I located the Hub1 so the two LEDs were exposed.
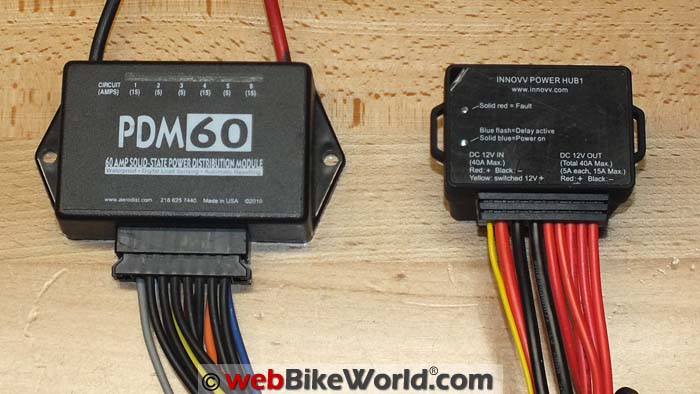
(L) Rowe Electronics PDM60 vs. Power Hub1 size comparison.Final Checks
After installation, I made a final check of all work, followed by turning on the ignition and waiting ten seconds for the Hub1 to activate, which revealed that all circuits were up and running.
And with the right-side fairing panel reinstalled, the work is done, for now.
Another tip is to label each of the five power wires from the Hub1, along with their fuse type.
On the scooter, I have Circuit 1 with a 15A fuse to connect a Powerlet DIN 4165 port installed into the left upper dash.
Circuits 2 and 3 use 5A fuses to provide power for a pair of 3BR weatherproof USB outlets (review), both flush mounted.
I’m using Circuit 4 in an ongoing experiment, to supply power to a lower-dash mounted ADVmonster digital rotary switch.
The switch will manage a small set of generic round LED modules mounted on the lower front fender mounts.
Finally, I’m also going to install a Power Hub1 under the seat of a 1998 BMW R 1100 R.
Final installation location on the BMW scooter.Function & Performance
Life with the INNOVV Power Hub1 is innocuous and that’s a good thing.
Once it’s correctly installed, you only need to access it when you’re adding an accessory or perhaps if you need to replace a fuse.
After the Hub1 is installed (with the circuits properly fused, of course), it is just a matter of turning on the ignition and waiting the ten seconds for the Hub1 to turn itself on and power up the circuits.
Recommendations
Starting the bike with the Power Hub1 installed raises an observation that is a recommendation for the product.
The ten second delay from ignition on/off to Power Hub1 power up/off is a good feature.
It prevents the system from powering up before on-board routines are finished and ensuring a power-good environment before accessories are powered.
However, with some motorcycles, the fixed ten second default may not be enough to allow CAN bus or other controller-based boot-up routines to finish.
A longer time-out would be good or perhaps a small switch of some sort allowing the user two or three choices (10/15/30 seconds).
Also, if the engine is not physically started within another fixed or selectable period (like 30-60 seconds), the Hub1 could be programmed to shut itself down.
This would prevent unintended battery discharge.
But in the end, the INNOVV Power Hub1 does what it is intended to do.
It provides stable switched 12VDC power via five mini-fused circuits with a total capacity of 40A for installed electrical accessories.
Conclusion
The INNOVV Power Hub1 is an excellent product that takes some of the sweat and headache out of installing accessories on your motorcycle.
With all of the accessories now typically installed on a modern motorcycle, the market has provided several choices for power distribution systems.
These range from simple, like the INNOVV Power Hub1 to mid-range systems like the Dispatch 1 (review).
There are also sophisticated computer-controlled power distribution systems like the Motobrain PDU (review) or the Neutrino Black Box Review.
Within that range of choices, you should be able to find the just right product to satisfy your needs.
The INNOVV Power Hub1 is also cost-effective, with a list price of $69.00.
It’s a near-perfect solution for adding multiple accessories to a power distribution system, especially where in a rugged hands-off operating environment is key.
See Also: Motobrain PDU Review | Dispatch 1 Review
Owner Comments and Feedback
See details on submitting comments.
From “B.P.” (December 2016): “Looks like a well-made and thoughtfully designed product.
I personally don’t have a need for the programmable power-distribution systems, such as the Neutrino Black Box and similarly complicated systems.
For the basic needs of typical motorcycle electrical farkling, the Power Hub 1 looks like it fits the bill very nicely.
As it happens, I was in the market for such a simple system a couple of months ago, having acquired a used bike that didn’t have a power panel and was ripe for electrical work.
I settled on the Eastern Beaver Power Center 8 (PC-8), along with one of the corresponding pre-built relay and battery-cable harnesses.
I’ve always found Eastern Beaver products — wires, crimp work, shrink tubing, etc. — to be of exceptional quality.
One of the things I like about the PC-8, the Centech AP-2, et al., is that they provide both switched and unswitched circuits.
The always-on circuits are useful for alarm systems, for DIN ports that you may also use for hooking up a smart charger (something I do), as well as some other purposes.
The Power Hub 1 doesn’t seem to support unswitched circuits.
Of course, for those kind of circuits you could always just bypass any power hub, going directly to the battery (with an in-line fuse); actually, on my Victory Cross Country Tour (review), I use a Termin-8 to do just that.
So, it’s a pretty minor nit regarding the Power Hub 1, but it’s something your readers might want to keep in mind.
In any case, nice review — clear and helpful — of what looks like a nice product. Thanks.