
EZE Bleeder Brake Bleeder Review
The EZE Bleeder lives up to its name. It’s an easy way to bleed motorcycle brakes or a hydraulic clutch with a minimum of fuss.
Reference: Bleeding Motorcycle Brakes With the Actron Vacuum Pump Review
Flushing the old and dirty brake fluid from your motorcycle’s brake system may seem like a mysterious task best left to experienced mechanics, but it’s actually pretty easy.
It’s also an important maintenance task that should be performed on a routine basis, usually at least once per year.
For some reason I have never been able to figure out, motorcycle brake fluid gets really dirty, really quick.
The clear fresh fluid quickly turns a sort of yellowish/hazel color, then tan, and if left too long in the still, it will turn brown as a nut.
You don’t want that to happen; it usually means a lot of moisture has been absorbed by the very hygroscopic brake fluid.
This stuff is more like a sponge than a sponge; in fact, the container should be (properly) disposed of after it’s opened, even if you only used half of it.
It has been reported that BMW ABS modulators may be damaged when bleeding the brakes with a reverse bleeding system.
Apparently this type of bleeding method can destroy internal seals in the modulators by forcing fluid in a direction it normally doesn’t go, and those parts are not available to repair the modulators.
This may also be the case for other types of ABS brakes.
Where to Buy EZE Bleeder Motorcycle Brake Bleeder
Check Reviews & Prices on AmazonSee More: Motorcycle Accessories, Motorcycle Tire, Motorcycle Helmets
Actron vs. EZE Bleeder Methods
Motorcycle brake bleeding was covered on webBikeWorld several years ago in a review of the Actron Vacuum Pump Review and that tool does work well.
It definitely makes the job easier and better I think than the old manual “squeeze, release, close the nipple” or whatever method, which I have never been able to get working correctly.
This is one job where a tool really helps, and now that I’ve been using the EZE Bleeder, I can say that it really lives up to its name — it makes the job as easy as can be.
I help out with some of the mechanic work for some of the guys and I’ve used the Actron system many times to bleed brakes on motorcycles and cars. I had never tried another type of brake bleeder and the Actron works well most of the time.
But connecting the Actron hose to the brake bleeding nipple on the disk brake caliper has always been a frustrating experience.
It’s possible that I don’t have the correct hoses and adapters, but it seems to take too much messing around to get the hose to stay on the nipple without letting in air, and then more fooling with the nipple itself to make sure air doesn’t get sucked in to the system through the threads.
There is a major difference between the Actron and the EZE Bleeder design. The Actron sucks the fluid from the brake fluid reservoir through the brake lines and out the nipple. The EZE Bleeder is a reverse bleeding system; the fluid is pumped from the bleed nipple back up through the line to the reservoir.
You would think that since the nipple is at the end of the line when using the Actron pump that it would be less likely to get air into the line, but it seems like I’ve ended up with air bubbles using that system more than a few times, so who knows.
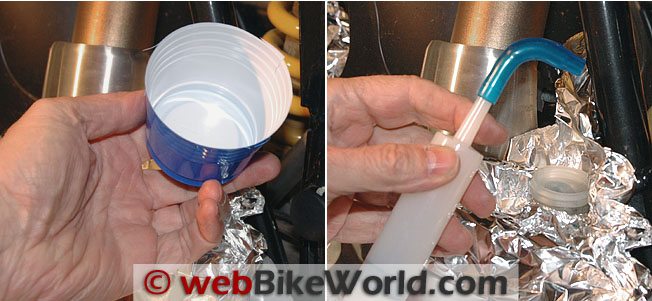 A container is required to hold the fresh brake fluid (L). L-shaped tube adapter fits over the brake bleed nipple (R).
The EZE Bleeder Brake Bleeder Kit
The EZE Bleeder kit comes with two plastic syringes, two clear vinyl L-shaped adapters that fit the bleed nipple and a container with a snap top that I have no idea what to do with. [UPDATE (December 2010): EZE Bleeder said the container is designed to store the bleeder kit. The large needle syringe was included in the original kit, but it wasn’t needed and it added to the cost so they discontinued it.]
The instructions are written in a tiny 4 or 6 point font and appear to be directed more towards an automobile brake system than a motorcycle. I’m not sure if they’re trying to save money or something, but surely the instructions could be printed on a regular 8×10 piece of paper? [UPDATE (December 2010): Instructions are now printed on 8×10 paper.]
But I picked up on the idea pretty quickly, perhaps because I have some experience bleeding brake systems. But I had never used the EZE Bleeder or a brake bleeding system like this before, although I was familiar with the reverse bleeding concept and heard about these type of bleeders for many years.
The bottom line is that I’m impressed; I’d say it is easier by about 30% to use the EZE Bleeder than the Actron system, and with just a couple of tricks to learn when using it, a motorcycle brake system (single caliper) can be flushed and refilled in about 25% of the time of using the Actron system.
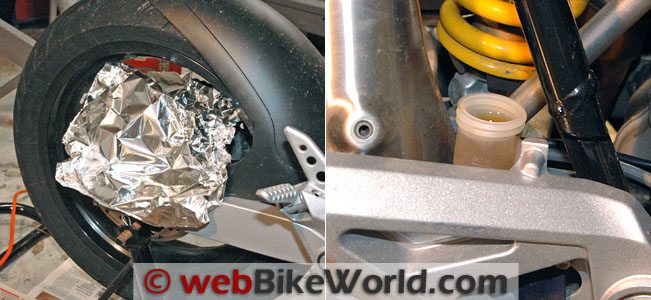 Use aluminum foil to protect painted parts (L). Old brake fluid is tan in color (R).
Where to Buy EZE Bleeder Motorcycle Brake Bleeder
Check Reviews & Prices on AmazonSee More: Motorcycle Accessories, Motorcycle Tire, Motorcycle Helmets
Preparing the Bike
There are a few tricks to using the EZE Bleeder, but overall I’d say that anyone with basic mechanical skills should be able to manage it without a problem.
First, remember to cover the ground under the bike with newspaper or something to catch any drips. Also, Rick showed me the trick of using aluminum foil to cover anything around the bleed nipple and the brake fluid reservoir to catch any drips. The photo above shows the foil around the rear wheel but we removed it when taking the photo of the reservoir to show you the color of the old brake fluid.
Remember also that brake fluid can eat through paint, but it’s not an immediate reaction. Keep a roll of paper towels handy and a spray bottle of Glass Plus (we have a case of the bulk bottles in the garage) to clean up and you should be fine.
It’s important to wear safety glasses or goggles and rubber gloves; I was wearing safety glasses but I have to admit I didn’t wear disposable gloves for the photos.
After you arrange the protective newspaper and aluminum foil, first loosen the bleed nipple on the caliper. We’re showing the rear brake of the Multistrada here because this was the easiest bike to photograph; the bleed nipple points up on the rear caliper so it’s easy to access and photograph.
The nipple on this bike required an 11 mm open-end wrench. Loosen the nipple just enough that you’ll be able to turn it by hand later to open it slightly when you’re ready to inject the fresh brake fluid with the EZE Bleeder.
 Pulling the old brake fluid from the reservoir.
Where to Buy EZE Bleeder Motorcycle Brake Bleeder
Check Reviews & Prices on AmazonSee More: Motorcycle Accessories, Motorcycle Tire, Motorcycle Helmets
Using the EZE Bleeder Brake Bleeding System
Next, use the EZE Bleeder syringe with the large tip to suck out as much of the old brake fluid as possible from the reservoir, as shown in the photo above. Be careful, because the fluid will drip out of the tip of the syringe when you pull it away from the reservoir, so you have to sort of tip the syringe back quickly as you pull it out of the reservoir.
I placed a large and wide oil drain pan under the bike to use as a basin to pour the old fluid. This is where the rubber gloves and paper towels come in handy — you have to be careful with the EZE Bleeder syringe to make sure it doesn’t drip, so if you hold a folded paper towel under the syringe as you lower it down to the drain pan to squirt out the old fluid, the towel should help catch any drips.
Don’t tip it back too far though, or some of the fluid may leak out the back, especially after the plunger has been pumped in and out a couple of times and the rubber O-ring gasket leaves fluid residue on the inside walls of the syringe.
Once the reservoir is drained of the old fluid, which takes the equivalent of about 2-3 full syringes, you’re ready for the next step.
Here’s another one of the main differences between using the Actron and the EZE Bleeder: When using the Actron system, the new brake fluid container only has to be opened just before you or your helper are ready to pour it into the reservoir.
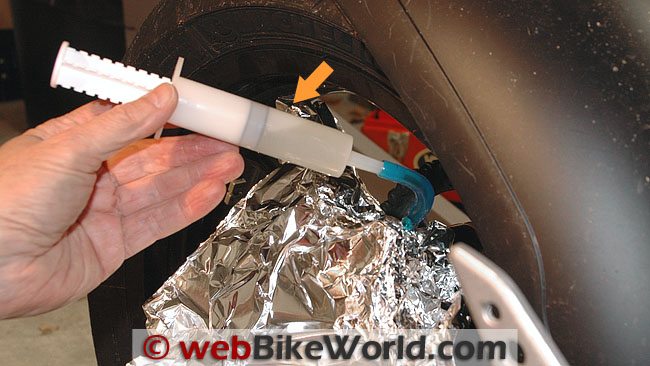 Injecting the fresh brake fluid into the bleed nipple. Note air bubbles rise to top.
You’ll need an intermediate container to hold the fresh brake fluid to fill the syringe when using the EZE Bleeder system. I cut the bottom half of a plastic disposable cup to use for this and it worked fine. The tube container with the attached lid shown in the first photo at the top of the page comes with the EZE Bleeder kit and it may be designed to act as the intermediate container, but I’m not sure. It’s not reference at all in the instructions.
Put the L-shaped adapter on the syringe with the smaller tip and fill the syringe with clean, fresh fluid from the intermediate container. Pull back slowly on the plunger and the vacuum will suck in the fluid. Keep the tip down in the fresh fluid and it shouldn’t suck in any air bubbles, but it’s not that big of a problem anyway because as soon as the syringe is tipped back, the air bubbles will rise to the top.
The biggest trick is fitting the L-shaped adapter over the nipple without any of the brake fluid leaking out of the full syringe. You should try attaching it a few times to the nipple without any fluid in the syringe first to get the hang of it.
Once the adapter is on the nipple, carefully turn the nipple counter-clockwise to open it up slightly and slowly press on the plunger. The fresh brake fluid should start to go down through the nipple and back up to the reservoir.
Keep a careful eye on the reservoir because it can fill up fast, especially the smaller rear brake reservoir. This is where it comes in handy to have a helper.
It usually requires 2-3 full fills of the reservoir to flush the old brake fluid out of the lines, so repeat the process.
You’ll have to pause to snug up the bleed nipple and refill the syringe each time. When the reservoir becomes full, use the other syringe to suck the old fluid out. This is where a helper comes in handy, because you’ll be busy at the bleed nipple, opening and closing it
Once you see clear fluid in the reservoir, you’re all done. It only took 3 fills of the reservoir to flush the rear brake system on the Multistrada and that was it. After the last fill, tighten up the nipple and you’re done.
Be sure not to overfill the reservoir; it needs room for expansion when the fluid is hot (and the fluid gets hot) and space for the rubber gasket and membrane that is designed to compress as the fluid heats up. You really don’t need a full reservoir — it can do more harm than good. Don’t forget, the fluid heats up as you use the brakes, so it expands, so the reservoir will almost always become more, rather than less full.
| The wBW Opinionator: EZE Bleeder | |
|---|---|
| Picks… | …and Pans. |
|
|
Conclusion
The EZE Bleeder lives up to its name. It’s not the perfect brake bleeding tool and there are a few tricks to using it, but overall I think it’s easier and more efficient than the Actron system and definitely faster.
It seems like it has the potential to introduce more air into the brake lines because it pumps the fluid in from the nipple, but the L-shaped adapter fits very tightly (but easily) over the nipple and so far that hasn’t been a problem on the three sets of front and rear brakes I’ve flushed and refilled for winter layover.
The price is right also, so I’m giving this one my recommendation.
|
wBW Product Review: EZE Bleeder Motorcycle Brake Bleeder
|
|
|---|---|
| Manufacturer: EZE Bleeder | List Price: $20.00 to $25.00 |
| Colors: N/A | Made In: U.S.A. |
| Sizes: N/A | Star Rating (1-5): |
| Review Date: December 2010 | |
|
Note: Item was provided by a retailer, distributor or manufacturer with these Terms and Conditions.
|
|
Where to Buy EZE Bleeder Motorcycle Brake Bleeder
Check Reviews & Prices on AmazonSee More: Motorcycle Accessories, Motorcycle Tire, Motorcycle Helmets
Owner Comments and Feedback
See details on submitting comments.
From “B.L.” (02/11) (Not related to B.L. below): “I read all of your information on brake bleeding and bleeders. From this I bought the EZE Bleeder unit and my ridding buddy and I installed new brake pads, on our Triumphs, and used the EZE Bleeder to bleed – flush the system of old fluid.
I found the EZE Bleeder simple to use and effective. I did have a bit of a problem with the overly loose bleed valve leaking air back into the system as I injected the new fluid. I ended up leaving the box end wrench on the bleeder nipple so that I could control how far I opened the valve while pressing on the syringe plunger, which worked out ok.
The end result was firm brakes but not as firm as I had expected. Your tip to “..always zip tie the brake lever squeezed tight overnight..” made all the difference in the world. Thanks for the great information that webBikeWorld.com provides and your work to make it so.”
From “B.L.” (12/10): “I’m not convinced this method is better than pulling the brake fluid through at the bleeder valve end. I think a reverse bleeder like this one has more of a chance of putting bubbles into the brake line. You’re opening up the bleed valve and pushing fluid up into the line so any bubbles that enter from the threads will be pushed in also.
I think the MityVac or Actron systems, which pull fluid down from the reservoir and out the bleed valve, are less likely to introduce air into the system because even if the threads at the bleeder valve are opened too far, they are at the end of the line and the air goes right out and not staying in the brake line.”
From “J.C.” (12/10): “Thanks for the thorough description of brake bleeding with this product. I’m going to buy one and your tips will save me time and a mess. Is is possible that the mysterious container with a snap top is supposed to be the intermediate container for holding the fresh fluid?”
Editor’s Reply: Good question, we haven’t figured out what the container is used for. I’ll ask EZE Bleeder. UPDATE: They said it’s for storage.
From “S.S.” (12/10): “You can get an inexpensive syringe at a Tractor Supply or similar store, where they are sold for premixing fuel. I use one for bleeding the brakes, but I do it slightly different than your description, and there is no mess at all.
If you simply hook the syringe up by a clear plastic hose to the bleeder valve with the syringe plunger fully depressed, you can then open the valve and start pumping the old fluid out. Since the syringe is a closed system, no air can get in, and it is easy to see when the brake fluid changes color from dark to clear, verifying that clean fluid is in the system.
I don’t try to suck any out of the reservoir, as this is where it gets messy. (To remove the old fluid), simply let the syringe fill, and if you still aren’t passing clear fluid, close the valve, carefully remove the syringe and empty it, and then repeat.
One additional tip – remove the bleeder valves and wrap with Teflon plumber’s tape, being careful to keep it on the threads so that it can’t plug the opening in the valve. This prevents the sucking of air into the system around the threads, which is very common and the source of most air infiltration back into the lines.
PS – I also looked at the speed bleeders, but my complaint was they stuck out so far I was afraid of hitting them and knocking them loose. Using the syringe as I described has always worked well for me, and I have never had any spillage or other issues.”
Editor’s Note: The EZE Bleeder kit comes with better adapters for the bleed valve, we haven’t had very good luck using plastic tubing; one of the problems with the Actron kit.
Also, I think it’s important to remove the old fluid from the reservoir first; I’m not sure from your description how you’re doing that?
Not sure the Teflon tape is necessary, as we have never experienced a leaking problem without using it. Also, remember that using Teflon tape means the torque values will probably change and also there is a chance of the tape getting into the brake lines. Not sure how Teflon holds up to brake fluid. So I’m not sure this step is necessary unless you’re experiencing leaking problems, and if you are, that’s another issue.
From “B.L.” (12/10): “After reading both brake bleeding systems reviews, I can’t help but wonder why you have not tried Speed Bleeders. You have complained about the complexity, and messiness, of both brake bleeding systems used thus far. Speed Bleeders are phenomenally simple to use, and as clean a brake bleeding system as you will ever find.
Speed Bleeders require you to remove the existing bleed nipple from the caliper, and simply replace it with the Speed Bleeder nipple — permanently. I have had them on two of my bikes now for 3+ years, without issue. I will be installing them on my newest bike in the Spring, both front and rear brakes, and the hydraulic clutch, as well.
I just unscrewed the original bleeder nipples, on the two bikes, and screwed the Speed Bleeders into place. After they were tightened, I unscrewed them 1/2-turn, to open them for bleeding. I then attached a drain hose, which ended in a zip-lock baggie on the garage floor, to catch the old fluid as I pumped it out.
I then opened the reservoir, removed the old fluid in it with a syringe, filled it with fresh fluid, and then I began pumping the lever, to push the new fluid down into the system. The old fluid was pushed out the Speed Bleeder’s one-way valve, every time I squeezed the handle.
The valve closes when the fluid pressure drops at the end of the squeezing of the lever, preventing any air from entering the system. When the reservoir level gets low, I add more fresh fluid, continuing this process until the fluid coming out of the Speed Bleeder nipple is clear. At that point, I put the reservoir cap on and secure it. I then close the Speed Bleeder valve the 1/2-turn, remove the tube and baggie full of old fluid, and I am done until the next flush and fill is needed.
Speed Bleeders are less than $20 each (typically they run $12-$15 each). They are available at local automotive parts stores — you will need to look up the part number for your particular application/bike model online, but once you have that information, you can just pick them up locally, skipping the shipping and handling charges of Internet mail order.
The hardest thing about using Speed Bleeders, is the number of times you may have to squeeze the brake/clutch lever, to flush the system. After a couple of bleeds, you will need to re-coat the threads of the Speed Bleeder valves with their special sealant (some users report that PTFE/Teflon Tape will seal them as well), to prevent fluid from seeping out, but that typically won’t happen until 3+ bleeds are performed.
In my opinion, Speed Bleeders are the greatest thing for brakes, kind of like sliced bread.”
Editor’s Reply: Actually, we have tried them. Didn’t like them, couldn’t get them to work properly and they leaked. I thought that was written up somewhere in webBikeWorld but maybe not.