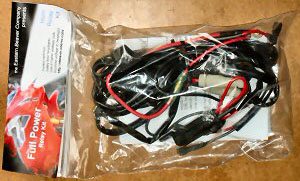

Ready-made wiring harness and relay kit makes it easy to add a horn relay to power a set of motorcycle horns.
Uses high-quality components. Adding a relay can improve the horn’s output and reduce load on switches.
We covered the installation of the Eastern Beaver headlight relay kit in a previous webBikeWorld tech article; that installation proved to be very easy and provides an optimal flow of electrical power to the motorcycle’s headlight.
Eastern Beaver now also makes a horn relay wiring harness kit which can be used to power a motorcycle horn upgrade.
The typical factory installed motorcycle horn is a tiny vibrating disk that usually provides a weak and flatulent sound that’s more of an embarrassment than a wake-up call.
The Fiamm “Freeway Blaster” horns have proven to be a very popular upgrade for motorcycles in search of more horn power.
These suckers are loud, they’re in your face and they’re positively rude!
At a claimed 130 decibels each (measured at 4″ from the horn), a pair of these will wake the dead, and maybe even the aberrant SUV driver cutting you off while chatting on the cell phone.
A single Freeway Blaster can be used, but to get the maximum effect, it’s best to install a pair. A pair of Freeway Blasters uses two tones; a high tone in the key of “E” at a frequency of 485 Hz, and a low tone in the key of F at 405 Hz.
Put ’em together and you’ve got one of the most powerful sounds on the road. Most people won’t believe that sound is coming from a motorcycle!
The only problem is that a large amount of current is needed to fire these babies off. Each Freeway Blaster draws 5 amps. The weak original equipment horns need much less.
Stock horns also usually have equally wimpy switchgear, using only a thin copper connector on the end of a spring to complete the electrical circuit. And the wiring for the original equipment horn is typically about the thinnest gauge found on a motorcycle.
So if you’re planning on improving your bike’s horn output, it’s essential to use at least a relay to do the switching, and it’s also a great idea to add a separate wiring harness to feed the new horns with all the juice they need to pump up the volume.
With this in mind, I had purchased a set of Freeway Blasters a while back, intending to mount them on one of my motorcycles using a relay.
But wiring a relay has always baffled me and I was too afraid of messing things up to try it until the Eastern Beaver kit came along.
Wiring the Relay Kit
I’m not much of an electrician, but I know that a motorcycle horn only works when its electrical circuit is completed. A horn has two connections, one for power and one for ground. If these were connected to the bike’s battery without a switch, the horn would run continuously.
Thus, the wiring for the horn runs through a horn switch, connected to a button, which is usually located in the left-hand handgrip’s switchgear.
There are two ways that the horn button can work: the most common method is for the horn button to have a power feed and a ground feed. When the button is pushed, the electrical circuit is completed, and the horn is engaged.
Another wiring method is when the horn itself is connected directly to ground, and the horn button completes a power circuit. This is apparently a less common approach; on most bikes, the horn grounds the horn.
With a horn relay, the horn button is used only to send a small amount of power to the relay, which then does the switching.
Relays are built to take the more powerful electrical surge needed by items like horns or lights. A relay is a safer approach to electrical switching and it enables the maximum amount of power to be fed to the device.
A wiring harness is used to separate the entire horn power and switching system from the rest of the bike’s wiring harness. The separate wiring harness usually includes thicker gauge wire with higher quality connectors and its own fuse.
The most common method of connecting the horn relay wiring harness to the bike’s power is directly through the battery, completely bypassing the bike’s wiring harness.
For a much better and more detailed explanation of how an electrical relay works, see All About Relays by “Mike”.
The Eastern Beaver horn relay wiring harness includes all the necessary ingredients to give those Freeway Blasters all the juice they need without frying your bike’s switchgear.
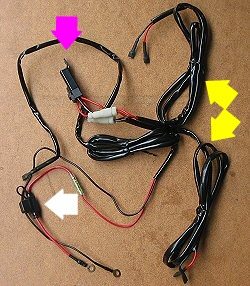
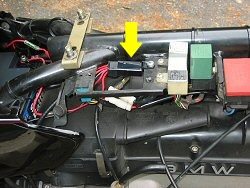
It includes two pairs of wires ready to connect to the horns (yellow arrows, photo left) and a high-quality sealed relay with its own mounting tab (pink arrow, photo left), which is made by NAiS, a division of Matsushita Electronics in Japan.
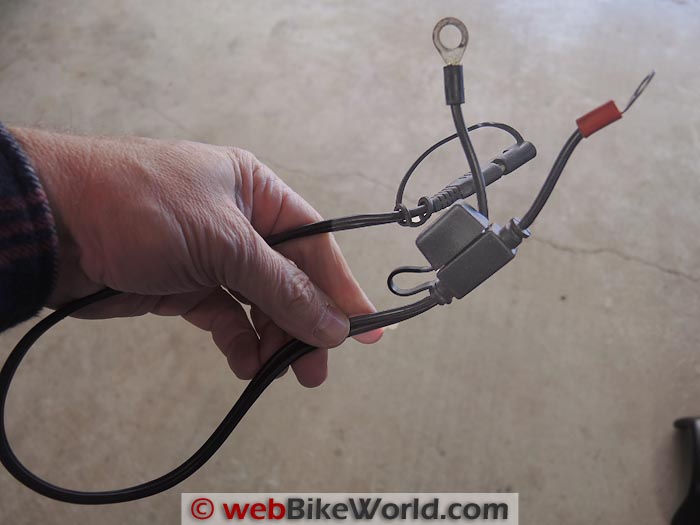
The harness also includes Posi-Lock connectors, a sealed fuse (white arrow, photo left) and brass barrel-type crimped connectors. The wires are encased in vinyl sheathing for protection.
The installation of the Eastern Beaver horn relay wiring harness is relatively straightforward.
The trickiest part is determining which type of horn switch is currently installed on the bike, and then digging through the bike’s wiring harness to locate the two wires leading to the horn switch.
The horn relay harness can be installed on any motorcycle, but I decided to try it on my 1986 BMW R65 because its little Bosch horn disk was barely audible and definitely needed upgrading.
This bike has the common BMW “Euro” style switch gear on the left side of the handlebar, with one switch for lights on, lights off and parking lights, and also a low/high beam switch with a “flash to pass” function.
The switchgear was installed a couple of years ago as a replacement for the original BMW unit.
The 1986 R65’s horn button completes a power circuit, not a ground circuit. The Bosch horn had its own dedicated ground wire, and when the bike’s horn button was pushed, it completed the power circuit, engaging the horn.
Eastern Beaver provides instructions for determining what type of horn you have and for locating the bike’s horn wires within the wiring harness.
A single Phillip’s head screw is used to hold the switchgear on my bike, and looking inside I could see a pair of wires at the horn button, one green and one green/black.
There is a single sheathed wiring harness leading out of the switchgear and down into a connector located on the heavy spine of the bike, underneath the fuel tank on the right hand side towards the front.
I had some difficulty with this particular bike because somewhere in the harness, another green wire had been spliced to the horn wire. So there is one green wire going into the harness, and two coming out!
This made for a more complex job of finding the correct green wire to the horn, but following the instructions and with the use of a volt-ohm meter, I was eventually able to identify the correct pair.
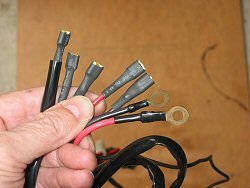
The Eastern Beaver harness has 7 wires that must be connected to the appropriate locations on the bike. Starting from right to left in the photo (left), are the power (red) and ground (black) wires that are attached directly to the battery.
The red power wire shown here has a fuse, which isn’t visible in this photo.
The next four wires are the two pair for each horn; one ground and one power for each. The last wire on the left is the wire that is attached to one of the existing horn wires. Note that each connector has a strain relief and is shrink-wrapped for protection.
The instructions that come with the kit (the instructions are also posted on the Eastern Beaver website) are comprehensive, and I won’t repeat them here. It is, however, slightly less complicated to install the kit for a horn that completes the ground circuit rather than the power circuit.
If the horn button is already grounded by one of its wires (as it is on most bikes), it’s only necessary to connect the single relay feed wire (far left in the photo above) to the horn’s other wire.
Since the ’86 BMW horn button completed the power circuit instead, I had to connect one of the bike’s horn wires to a ground and then connect the other to the horn relay single wire.
This, in effect, completely separates the horn from any direct connection with the bike’s wiring harness and runs it completely through the horn relay wiring harness instead.
BMW uses several relays for switching, and BMW, in their infinite wisdom, usually anticipates that their customers will be adding accessories to their motorcycles.
Thus, BMW usually provides a neat mounting location for additional relays.
On the ’86 R65 and R80, this location is under the fuel tank towards the rear of the bike on the right-hand side, where BMW has left a couple of open spots on a relay mounting frame.
I used a stubby sheet metal screw to attach the Easter Beaver relay to the BMW’s mounting location, which keeps it secure and out of the way. It should be easy to find a hidden location to attach the relay on any motorcycle.
The wires in the Eastern Beaver kit are long enough fit just about any motorcycle made. I secured the extra wire up under the bike’s frame with a cable tie. Since the wiring harness must be connected to the motorcycle battery, you may want to make sure the battery terminals are clean.
Check out the wBW review of the Permatex Battery Cleaner and Battery Protector and Sealerproducts, which make this job a snap and can help prevent corrosion.
Once everything is laid out, it’s very easy to make all the connections. The final step is to double-check all the connections and make sure any loose wiring is secured, preferably with cable ties. I scared myself the first time I touched off the Freeway Blasters in the garage — these babies are LOUD!
Eastern Beaver’s horn relay kit works on all bikes, and the horn switch can be powered by the ignition or it can be powered directly through the bike’s electrical system.
I chose the latter so that I can blast the horn without having to start the bike (works great for demos!). The difference is in a slightly different installation and is explained in the instructions.
I rarely find myself in a position where I have to use the horns, either in a car or on a motorcycle. In fact, I can’t think of a single instance where I ever relied on the motorcycle’s horn to get me out of danger. But it’s very nice indeed to know that if I do need them, they’re definitely going to do the job!
Conclusion
You can roll your own horn relay wiring harness, but if you’re an electrical tyro like me, the Eastern Beaver headlight relay wiring harness saves a lot of time and effort.
It uses high-quality components and it’s relatively easy to install. It will last basically for the life of the bike, so it’s a worthwhile investment. And you can scare the hell out of your friends every time you touch off the horns!
UPDATE (December 2012): Unfortunately, Easter Beaver no longer manufacturers the horn relay.
Next: Eastern Beaver Headlight Relay Wiring Harness
Owner Comments and Feedback
See details on submitting comments.