

I installed an Electrical Connection LED brake and running light bar on the rear of the 2015 Kawasaki Versys 650 LT (Blog) Project Bike.
While I was at it, I also installed the pair of Radiantz “Puckz” (pronounced “pucks”) LEDs that Rick had listed in the webBikeWorld Garage Sale.
The Puckz have been sitting around here since 2005 for the Radiantz “Dogeye” LED turn signal review and since no one jumped on them in the wBW Garage Sale, your loss is our gain!
I’ll review the Electrical Connection product here first and then the Puckz will be reviewed in Part 2, coming next.
I can say this for sure: the combination of the Electrical Connection LED brake light bar and the big Radiantz Puckz LEDs give a new meaning to the word “bright” when it comes to rear-facing lighting.
And although Rick wasn’t too keen at first on the fact that I wired these up as running lights also, he quickly warmed to the idea.
This will be a two-parter: first up is the Electrical Connection LED license plate brake light bar, configured as a running light and brake light system.
In Part 2, we review the Radiantz “Puckz” LED running/brake lights.
They were also added to the Versys for even more rear brake light power.
Introduction
A common accessory for motorcycles is the LED brake and/or running light that fits on or around the license plate.
But the frame type LED, with the brake light incorporated into a full license plate plastic or metal surround, doesn’t always fit correctly.
Sometimes there’s not enough space to fit the frame on the bike’s license plate mounting parts.
And I’ve found that too often that either the license plate size and/or bolt holes don’t match the corresponding holes in the frame or the license plate doesn’t the non-existent “standard” size.
(As an aside, there’s a reason for that and we explored U.S. license plate bolt hole dimensions in this article from 2009.)
And if that’s not enough, the actual frame or surround part of the license plate frame LED types is usually pretty thick, which you may not like. And it can block portions of the text on the license plate itself.
So what’s the alternative?
You’ve probably seen something like the relatively generic Electrical Connection High Output LED brake light bar.
It attaches horizontally to the license plate by using the top or bottom pairs of holes.
There are (or have been) many of these types of horizontal bar format add-on brake/running lights I’ve seen over the years and they have one thing in common: the manufacturers seem to come and go like the wind.
An example is the LED brake light bar that is the subject of the review you are now reading.
Electrical Connection had two different versions of a light bar but one of them has disappeared recently from their website.
Various internet searches haven’t turned up much either, although that also changes rapidly over time.
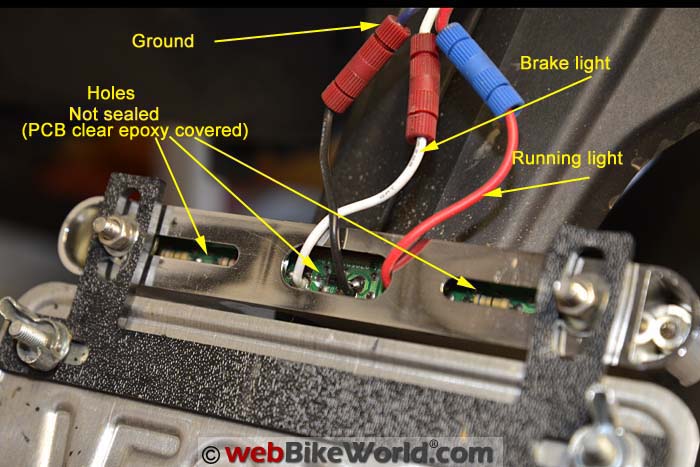
Rear holes aren’t sealed but the PC board is coated in clear epoxy.The License Plate LED Brake Light
The idea is that you bolt on an LED light bar to the top or bottom holes on the rear license plate, connect the light to the brake light and/or rear running light on the motorcycle and you’ll get some additional brake light visibility.
But as it happens with LEDs, the cheap eBay types usually have weak light output and the LEDs typically don’t last long, although as LEDs have become mainstream, the era of junk LEDs seems to be mostly over.
On the other hand, more money doesn’t necessarily buy more quality either…
Most of these products are made in some anonymous factory somewhere on the planet and without much product support or warranty. This means that it’s pretty much a case of “buyer beware” and hope for the best.
Now it’s relevant to note that at the very high end, there are products like the programmableOhmics LED brake light (review) or the Skene P3 brake lights (review) or the Clearwater CANopener programmable brake/tail light for BMW motorcycles (review).
You’ll pay dearly for those however…and do you really need to program a brake light? The Electrical Connection product shown here lists for just $34.95 — a bargain.
 The Electrical Connection LED license plate brake light kit.
Kit Contents
This brake light bar has been retailed for many years, as far as I know. It’s made from chrome-plated plastic and it’s a running light and brake light only.
It does not incorporate turn signals and it isn’t one of those flexible LED types. But it’s bigger than it looks in the photos; this is actually a pretty big unit as far as these brake light bars go.
The LEDs are enclosed behind a red lens, but strangely enough, the back of the unit isn’t sealed, as you can see in the photo above.
The circuit board is exposed, although Electrical Connection states that it is “epoxy sealed for weather resistance”.
Let’s hope it holds up in the rain…
This brake light bar is 167 mm wide (6-9/16″), with a height of 25 mm (1″) and the height of the front (with the red lens) is 20 mm (3/4″).
It has 10 LEDs mounted to the printed circuit board and the LEDs glow through the red lens. I’m not sure if the LEDs are white or red; I can’t tell.
There are three wires out the back, black, red and white:
- Black: The black wire is the ground.
- Red: This is to the brake lights to power the LED brake light bar when the brakes are applied.
- White: This is for the running light feature. If you don’t want to use it as a running light also, just don’t connect the white wire and the running light feature is disabled.
The manufacturer lists no specifications for the light, so there’s not much more I can tell you. It’s pretty bright though, subjectively speaking.
But, Electrical Connection claims this light bar is “DOT/SAE approved”, which is bonus, because many of these types of auxiliary lights are not actually approved for use.
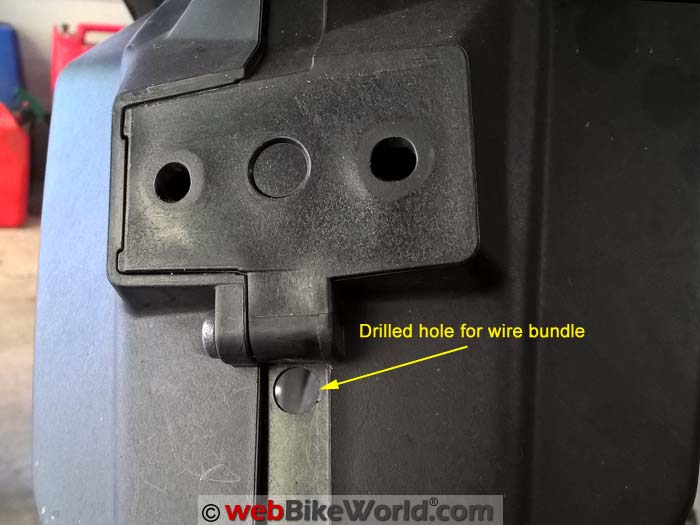
 The back of the license plate bracket of the Versys, which was removed from the bike.
Mounting and Hardware
This is where it always gets tricky…
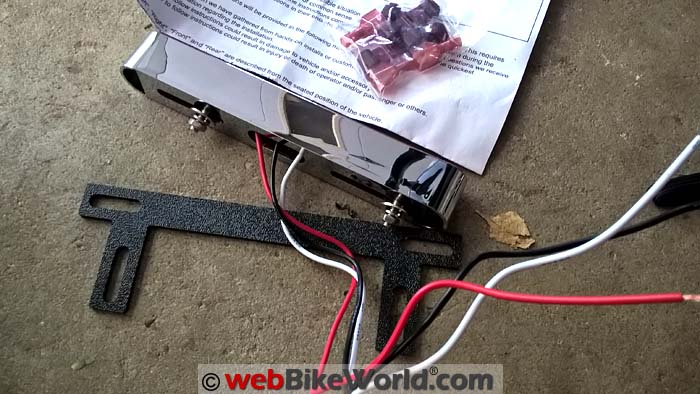
The kit comes with a plastic mounting bracket with a couple of slotted bolt holes. It’s designed to fit under or over the license plate.
The idea is that you fasten the bracket to the license plate using the existing license plate mounting bolts on your bike, then fasten the LED brake light bar to the mount.
The brake light bar has screws, washers and nuts on the back (photo second above) that slide back and forth in the plastic slot you can see in the photo.
What’s strange is that they didn’t use a carriage-type bolt, so the bolt/screw turns as you tighten the nut. You have to sort of finesse this as you tighten the nut on to the back of the black plastic license plate mount, but it works.
Use some blue thread locker for sure!
I opted to mount the light bar on the bottom of the license plate, as you can see in the photo below. Note that the light bar is not fastened directly to the license plate, although I suppose you could do that.
Instead, the plastic bracket fastens to the license plate, then the light bar is attached to the second set of holes on the bracket.
The plastic bracket doesn’t really bend, so if you need to change the angle of the light bar, you may want to make a couple of aluminum or metal tabs with drilled holes top and bottom.
Fasten one end of the tabs to the bottom or top license plate holes, then attach the light bar to the other pair of holes. Then, you can bend the metal tabs to the optimal angle for the best light bar visibility on your particular motorcycle.
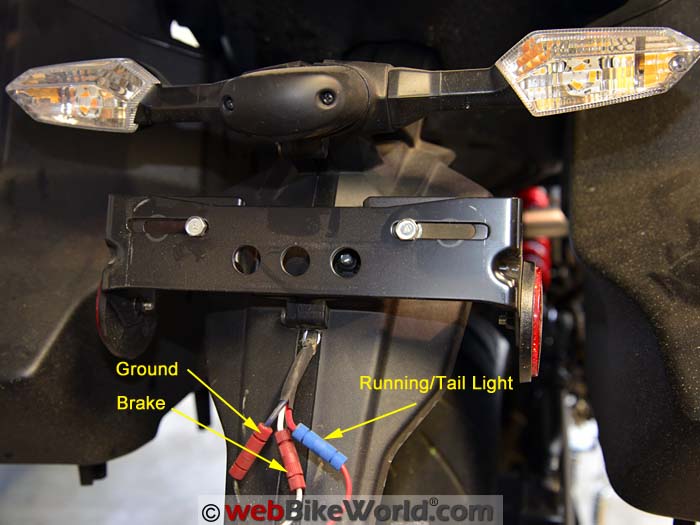
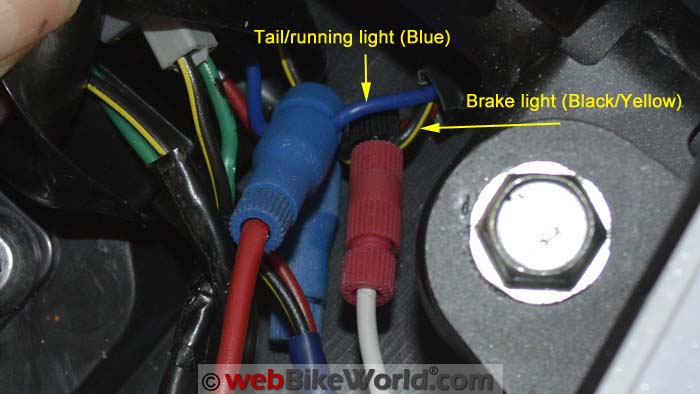
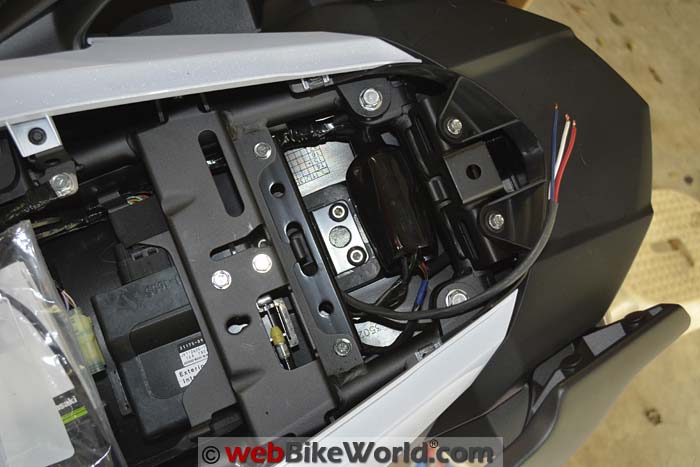
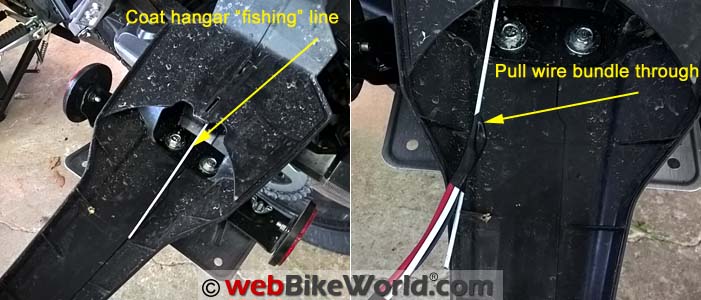
The fender of the Versys after the license plate bracket was removed. Hole was drilled for the LED brake light bar custom wiring harness. I taped the wiring harness to a straightened coat hangar to pull the harness through the fender. Wiring harness under the seat of the Versys before splicing to the rear brake lights and license plate light. Under the rear seat, the blue wire in the Versys is the running light in the tail light and the black/yellow wire is the brake light.Wiring Notes
Wiring the brake light bar is relatively simple.
Basically, you connect the red wire coming out of the brake light bar to the motorcycle’s brake light wires to power the LED brake light on the light bar.
If you want to use the running light feature (you don’t have to if you don’t want to), connect to a switched power wire that is on when the bike’s ignition is turned on.
The ground wire can either be connected to a good ground on the frame of the bike or tapped into a black or brown ground wire (or whatever color they use on your bike) using, of course, a Posi-Tap purchased from webBikeWorld!
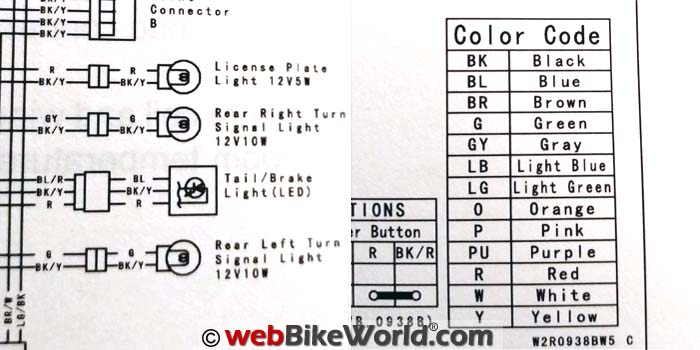
Here’s a portion of the wiring diagram for the 2015 Versys 650, showing the rear light wiring on the left and the color codes on the right. Here’s the wiring harness I made coming out of the rear fender. Posi-Locks were used to connect the LED brake light bar.Additional Extra Wiring?
The wires coming out of the Electrical Connection brake light bar aren’t very long — maybe about 30 cm (1 foot) or so in length.
So you’ll probably also have to add to the wires by using some Posi-Locks to connect another length of wire to each of the three LED light bar wires and thus have a long enough wiring harness to reach under the seat.
Once you have enough wire to reach under the seat, you can tap into the bike’s existing brake light and running light (the license plate light or the always-on running light in the tail light, if your bike has one) wiring.
The ground wire can be secured under a frame bolt or tapped into an existing ground wire, usually black or brown.
I went the distance and made up a red, white and blue (didn’t have any black) wiring harness and wrapped it in heat shrink tubing.
Using blue was a mistake, because it confused the heck out of me when I discovered that the Versys uses a blue wire for what they call the “tail light” (i.e., the always-on running light in the tail light/brake light assembly).
I spliced the wires at one end under the seat (see the photos above) and then drilled a hole through the fender of the Versys right behind the license plate to feed into the LED brake light bar and the set of Radiantz Puckz lights (see below).
This was fairly easy to do on the Versys; I first unbolted the rear fender and then fished the wires through by taping them to an unfolded coat hangar (see photos above).
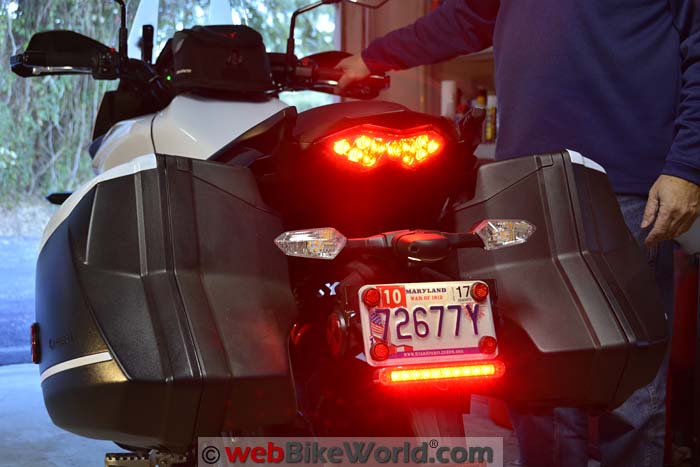
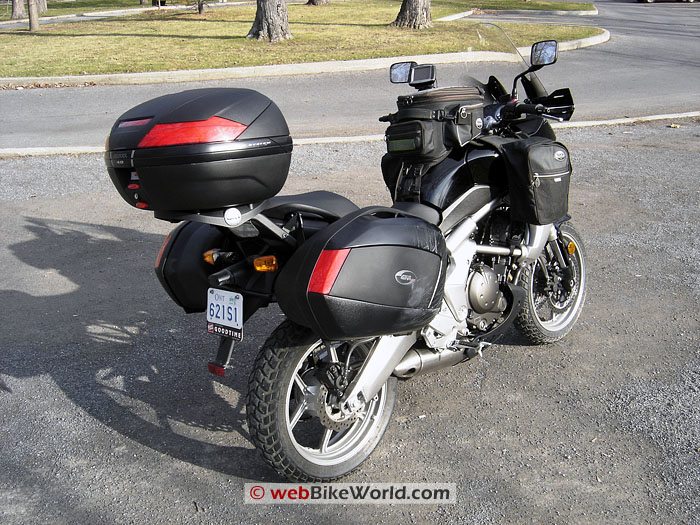
Electrical Connection LED brake light bar only on the Versys. Electrical Connection LED brake light bar with the Radiantz Puckz lights also installed on the Versys.Conclusion
The addition of the Electrical Connection license plate LED brake and running light adds good visibility for the brake lights on the Versys.
The Versys has a standard LED brake light, but it’s not very big and I wouldn’t say it’s overly bright when the brakes are applied.
Also, with the addition of the universal mounting plate for the SHAD SH39 top box (review), the high rear brake light on the Versys is somewhat hidden from view, especially when the top box is on the bike.
In fact, that was the Editor’s motivation to add some additional running lights and brake lights to this bike.
The Electrical Connection LED brake light bar isn’t too difficult to install, but you will need an understanding of how to locate the correct ground, running light and brake light wires for your specific motorcycle.
And at $34.95, it’s fairly well made and a pretty good deal.
A wiring diagram really helps to do this, so if you don’t have a shop manual, one of your friendly bike forum members may be able to help.
Next up in this series, I’ll describe how I installed the Radiantz Puckz 2.25″ round LED running lights with brake lights.
They are very, very bright and when combined with the Electrical Connection brake light bar and the standard Versys rear LED brake light, the back of the Versys really stands out during the day and at night.
Part 2: Radiantz “Puckz” LED Brake Light Review
Owner Comments and Feedback
See details on submitting comments.
From “B.P.” (August 2016): “I enjoyed the Electrical Connection License Plate LED Light review by “Mad Dog,” and I have a couple of follow-up questions for him:
1) Does the light output decrease significantly, as a following motorist would see it, if the light bar is tilted? I ask, because I have a “lay-down” license-plate holder on my bike that is tilted about 30 degrees from vertical.
2) You don’t mention the current draw of the lights in either mode; I couldn’t find this information on Electrical Connection’s site, either, but I thought maybe the product’s packaging might include a data sheet.
I have a friend with a brand new Versys, and so have been following wBW’s Versys farkling. And in particular we are both aware of the very limited output of the Versys’ charging system.”
Editor’s Reply: Good questions, the light bar we used has a slight amount of directionality, as do most LEDs, but the lens seems to diffuse the light pretty nicely.
We did check by following the bike and the “cone” of light widens out enough to make it visible, although depending on sun angles, it can get washed out a bit, as happens with any light in certain sun angles.
Mounted on the license plate of the Versys, the light bar is tilted just a few degrees.
The Versys license plate mounting is more straight up-and-down vertical than many other bikes, like the BMW F800S Project Bike (Blog), which tilts the plate at a much greater angle upwards.
30 degrees from vertical on your bike seems kind of extreme.
But since you actually mount the light bar on a bracket, not directly on the plate (although I guess you could mount it that way), you could also make an aluminum bracket or simply a couple of aluminum tabs, with two holes.
The top holes would attach to the bottom holes on the license plate and the bottom holes to hold the light bar. Then you could bend the tabs to angle the light bar to whatever angle that works best.
Regarding the current draw, that’s a good question, there’s no info anywhere on it. I sent an email to Electrical Connection and haven’t heard anything after a few days.
But I’d assume that a light like this draws very little power, I’d guess maybe 5-10 Watts, certainly not as much as the Kawell amber light bar (review), which is 18W total.