
This set of instructions is reposted with permission from Beenay25 on Instructables
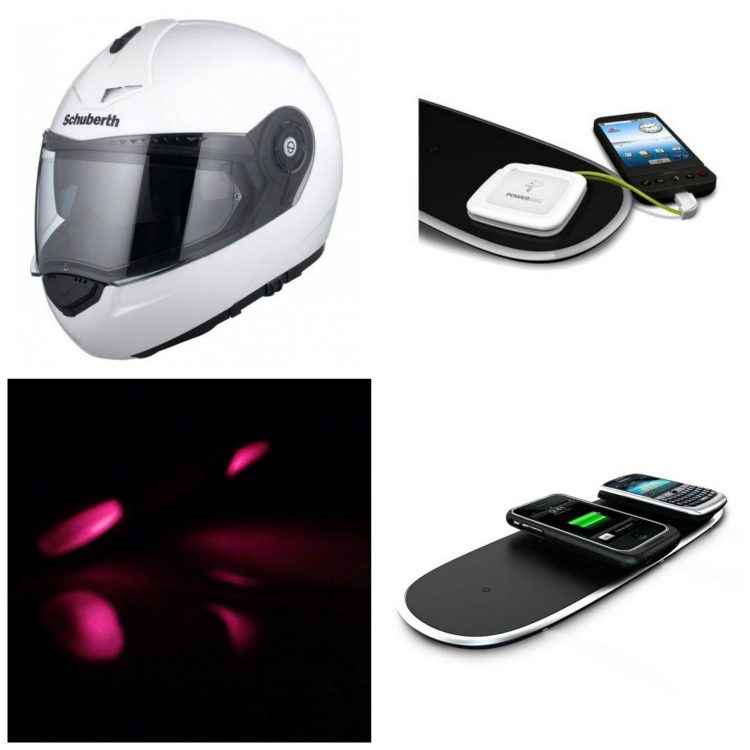
I thought it was time to buy an SRC Bluetooth collar for my Schuberth crash helmet. Now, the latest Bluetooth communication systems are the most amazing pieces of kit. For starters, you can listen to your favourite MP3s as you ride, it will pick-up PMR or GPS radio and it is easily connected to my mobile phone. The collar is fitted with an inbuilt FM radio, but, in my opinion, it doesn’t offer good sound quality.
Naturally, we must consider the pros and cons of the SRC Bluetooth collar and in my view, the charging socket is inferior. I feel they must have used a different type of Micro USB connector or a really cheap connector. The cowling used means the device fails to fit many standard Micro USB plugs and the connector itself is very difficult to charge. So, I started to look for a solution to my problem. In fact, I went one better, I decided to create my own bluetooth helmet charging device.
Now, PowerMat chargers are expensive bits of kit, but I managed to get one for £5 on the Amazon website. These costly devices are generally used to charge handheld gaming systems and mobile phones. I also decided to invest in a power cube at the same time. All in all, the cube and the mat cost just under £10 or around the $15 mark.
A List of all the Bits and Pieces Used to Make My Bluetooth Helmet Charging Device:
- Schuhberth helmet with SRC Bluetooth – The device I intended to make wireless
- Powercube
- Powermat
- Wire
- A Micro USB cable
- A needle and some thread
- Heat shrink tube (1.5 inches or 40mm wide)
I’ve taken some photographs, but some of them are a little blurry. I would also like to remind you that I cannot be held responsible if you damage your helmet, fry your USB devices or burn yourself with the soldering iron!
This is my idea and I have written these instructions. This information is not backed by Schuberth helmets.
Stage One – Make Your Own Bluetooth Helmet Charging Device
Dismantle the Powercube
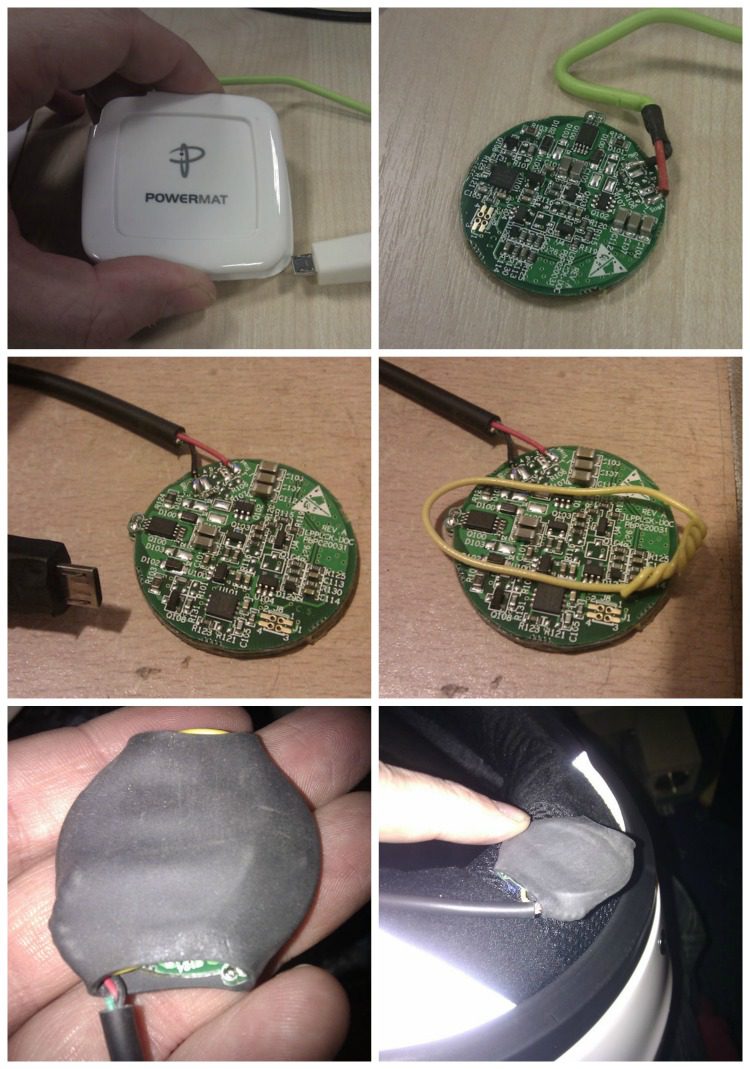
- Look inside the cube and locate the circuit board
- The circuit board is normally held in place with a dab of glue
- Use a small pair of scissors to cut the glue away
- Carefully pry the circuit board out of the cube
- Remember, too much movement could damage the circuit board!
- Place the circuit board to one side and dispose of the casing.
Stage Two –Assembling your Bluetooth Helmet Charging Device
- Kill your USB cable and fasten it to the circuit board
- You are looking at two wires. One red and one black
- You need to desolder both wires and remove them from the circuit board
- Make a note of the way they are fixed
- Now shorten the Micro USB cable
- Use sharp scissors to cut the USB cable to about 15cm or six inches from the plug
- Strip the casing back an inch and cut it off – this will expose the red and black wires
- Place the Powercube circuit board in front of you and look for the connectors where the red and black wires were once soldered
- Resolder the black and red wires into the Powercube circuit board
At this point, you can test the charger
Look at the above picture and you see the coil is on the bottom and the circuit is on the top. You must remember which side the coil is on.
Stage Three – Pack your Bluetooth helmet charging device
- Make a loop from a small length of wire (look at the image)
- Lay the wire loop over the circuit board ensuring a little spare wire sticks out from each side
- Cover the circuit board with the length of heat shrink tube
Stage Four – Attach the Bluetooth Helmet Charging Device
- Thread a needle (use strong thread, preferably button thread)
- Look at the images and locate the yellow wire loops
- Sew the device to the back of the helmet using the wire loops as your anchor points
The Bluetooth helmet charging device must be sewn to the helmet coil side down. This ensures the coil makes contact with the Powermat.
The device should not be sewed tightly to the helmet. The circuit should be able to float to make contact with the Powermat magnet.
Examine the back of the helmet to determine how it fastens. You will notice the fabric inside of the collar falls into folds. I slid the connectors up inside of the back of the helmet, hid the cable in the folds and found it easy to plug the USB charger into the socket.
Stage Five – Give the Bluetooth Helmet Charger a Trial Run
Look at the pictures and note the helmet rests on the Powermat. This allows room for the charger to be drawn into place by the magnets.
View the darker photograph. Note the red lights are shining to indicate the helmet is charging
Stage Six – Is My Bluetooth Helmet Charging Device Safe and Comfortable to Wear?
My Thoughts on the Helmet Charger
I feel this gadget could be used to charge other 5 volt devices. For instance, rechargeable torches or other gizmos with a USB supply.
I decided against wiring the charger directly into my helmet because I didn’t want to cut the fabric or damage the inner zipper. If I had wired the charger into the SRC helmet I am sure it would have invalidated the guarantee.
As it stands, the charger is safely and securely connected to the charging plate.
Was I concerned that the charging device lay near base of my neck? At first I was a little worried, but my concerns were unfounded. I managed to position the charger safely and comfortably. The disc was well out of the way, so all’s well that ends well.
Quick Video Demonstration – you can hear it charging.