
The HeliBars Horizon series of replacement handlebars are adjustable for various combinations of reach, height, and wrist angle.
They are also available for many different motorcycles.
Unlike stock handlebars and most other aftermarket handlebars, the Horizon series provide an ergonomically tailored fit and that fit can be continually refined whenever the rider feels the need.
I’ve read some on-line comments that assert that the stock handlebars on my Victory Cross Country Tour (review) were built for gorillas. I think that’s unfair… to gorillas; I think Victory had orangutans in mind.
In any case, like many Victory riders, I wanted handlebars with more pullback, i.e., less of a reach.
But I had another problem: with or without adequate pullback, many stock handlebars have a less-than-optimum wrist angle.
My standard is that the forearm and hand form a straight line at the wrist, i.e., with minimal or no creases in the skin on the back or the inside of that wrist intersection.
Further, the fingers should slope downward, going from the index finger toward the pinky. This is akin to the natural position your hands form if you just let your arms drape in a relaxed manner down by your sides.
Along with many other riders (judging by posts on assorted Internet forums), I found that the stock Victory handlebar grip angle was far from optimum for me.
What To Do? Some motorcycles have a clamp as part of the design that holds the handlebars, so it’s simply a matter of adding aftermarket risers or spacers of some sort.
But many bikes — like my Victory, some Harley dressers and baggers and others – can’t use handlebar risers because the handlebar clamps are difficult to access and/or obscured by bodywork. This means that a new set of handlebars may be required to resolve this issue.
HeliBars Horizon adjustable handlebar kit.The Handlebar Solution
Victory offers 2″ pullback handlebars as an option, with a list price of $300. Other companies sell handlebars for the Victory, as well as for other cruisers and tourers, starting with some slightly below $300 and going all the way on up past $500, with additional costs for optional chrome or other coatings and finishes.
At least one company asserts that the wrist position of its handlebars is superior to that of the stock or pullback Victory bars.
Unfortunately, there is some dispute regarding whether third-party handlebars offer enough pullback; there seems to be some discrepancy in how measurements are made (and I’ll discuss measurements more fully in a minute).
There are several problems with all of these handlebars, even the custom-made ones. How do you know what dimensions (pullback and wrist angle) are right for you? How do you specify those dimensions when ordering custom handlebars or evaluate the dimensions listed for various pre-made bars?
And even if you manage to buy handlebars that seem right at the time of purchase, what happens if you decide later that maybe those fixed positions are not optimal?
The HeliBars Horizon Series
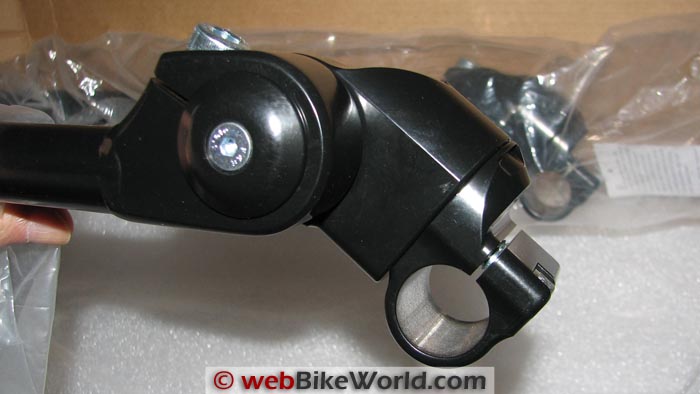
HeliBars seeks to overcome these problems by offering adjustable handlebars in its Horizon series. The set I bought, the Horizon CCR Multi Adjustable Handlebars for Victory, consists of five pieces: A large U-shaped bar, which, like regular handlebars, gets clamped to the bike; two multi-pivot mechanisms, each one welded to the open (rider’s side) end of the U-bar.
Also included are two straight handlebars for the grips and controls, each with a circumferentially machined channel at one end, for insertion into the pivot mechanisms. The kit also contains some wire ties, four decorative bolt caps, and two plastic end caps.
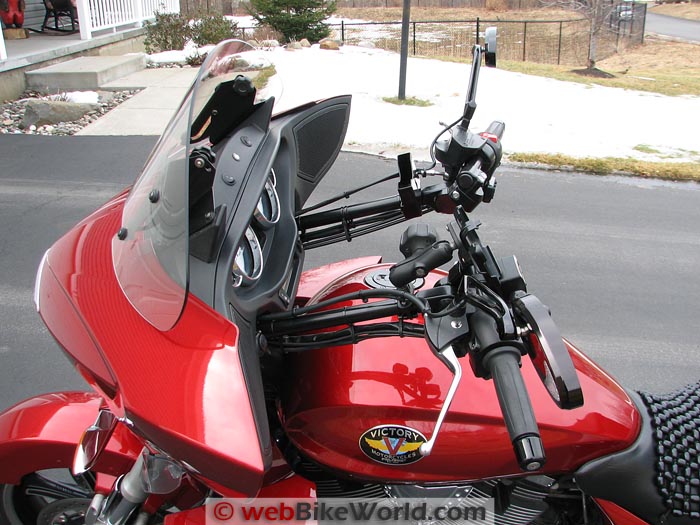
HeliBars Horizon adjustable handlebar close-up.HeliBars Adjustable Handlebar Details
The angle of the HeliBars as they attach to the triple-tree clamps is adjustable (what you might think of as the difference between pullback and “ape hangers”). This is true of nearly all tubular handlebars, so there’s nothing new here.
Compared to the stock Victory handlebars, there is a minor improvement in this aspect with the HeliBars because the latter use a cross-hatch pattern by the clamps, while the stock handlebars use a series of raised ridges. This allows a slightly more fine-grained adjustment of the clamp angle, sort of the difference between a digital and an analog system.
But the big difference comes at the rider-end of that U-bar: those pivot mechanisms. One pivot swings through an arc, in the plane of the bike’s length. This determines the amount of pullback, and the straight-line fore/aft sweep of the arc (its diameter) encompasses a little over two inches.
The second pivot controls the angle of the grip bars. Those handlebars can swing through about a 33° arc. The movement of this grip-bar pivot is somewhat dependent on the positioning of the pullback pivot and the angle of the clamped U-bar.
As the pullback pivot goes through its fore/aft sweep, at some point near the middle the rotational plane of the grip pivot will be horizontal. When that occurs, sweeping through the grip pivot will result in those bars moving from about a right-angle to the length of the bike, and then swinging straight back another 30° or so.
However, if the fore/aft pivot is set in its most rearward position, the plane of the grip pivot will be angled somewhat, i.e., no longer parallel to the ground.
What this means is that as you swing the grip-bars back toward you, you will also be swinging them downward a bit. And that’s actually a good thing, I’d say, for nearly all riders who want a lot of pullback; if you want the grips close to you, it’s also likely that you’ll want them angled down.
And finally, most aftermarket handlebars don’t include holes for the locating pins on the stock control housings, so owners either drill new holes or cut off the pins. This work is unnecessary with the HeliBars, as the Horizon grip handlebars have those holes pre-drilled.
Further (and I neglected to mention this in my short video demonstration), those grip handlebars can also rotate circularly 360° within the grip-pivot mechanism. The grips handlebars are held in place by two bolts, one of which is primarily a safety bolt, i.e., it ends within a “V” channel machined into the end of the bars.
Thus, retaining the locating pins provides the control-housing security of the stock bars, while still allowing you to rotate the entire housing, as desired (and more on that in a minute).
The bottom line here is that the HeliBars give you both pullback and wrist-angle adjustment capabilities. Incidentally, the stock handlebars are about 31½” wide, tip to tip, at their trailing edge. The HeliBars are about ½” narrower in a fairly swept-back position (what I wound up with) and an inch or more wider when adjusted such that the grip handlebars are angled out more.
HeliBars vs. stock Victory handlebars.Installing the HeliBars on the Victory Cross Country Tour
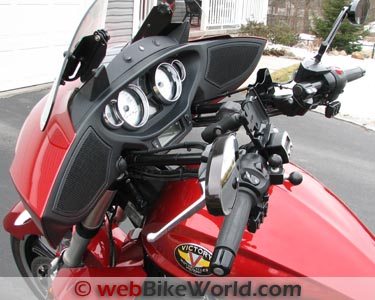
Just so you know what we’re dealing with, a Victory Cross Country has a fork-mounted “bat-wing” fairing up front and a dash panel on the rider’s side. This combination conspires to block unhindered access to the handlebar clamp bolts and to the cables, hoses, and wiring that attach to the switchgear, some of which may need minor re-routing. This is also the case for some other full dressers from other manufacturers.
For the Victory Cross Country, HeliBars provides a 13-page installation manual (.pdf), with two pages of installation text and 22 pictures. While those instructions were welcome, I went a little farther than the company said was necessary and removed even more of the Victory’s outer coverings.
Here’s what I would recommend:
Get a front wheel chock. Here’s a list of the webBikeWorld Lifts, Stands and Wheel Chock reviews. It’s much easier to do all this work, including what may be near-final bar positioning, with the bike standing straight up.
If, like the Victory Cross Country, your bike doesn’t have a center stand, you should get a front wheel chock. I took this opportunity to purchase the Wheeldock front wheel chock (review).
Protect the fuel tank. You must cover the tank, because even if you never drop the handlebars you’ll probably at least drop a bolt on the tank. I used a lot of old beach towels, but it was suggested to me (later on) that a very large, very thick, bath mat — the kind with a non-slip backing — would be ideal for this, and I agree.
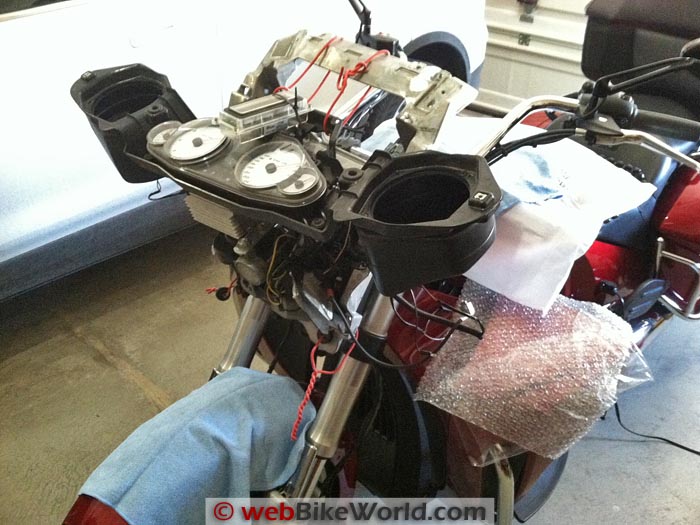
Remove the fairing. Check your shop manual or the HeliBar instructions. On the Victory, this is about a ten-minute job.
Remove the dash. Heli doesn’t bother with this step, but I recommend it. Heli says to take out two bolts and loosen two more. This will allow you to tilt the frame part that held on the fairing, so you can get at the top bolts that hold the handlebar clamp. (There are two more bolts on the bottom, which you can get to by turning the handlebars full lock).
However, removing the dash (the piece with the gauges) allows you to see what’s going on better, i.e., not just have access to the top bolts. I wanted to see how the cables, hoses, wires, etc., were currently routed, and how I could best re-route them (which turned out to be necessary, for some of them).
It also allows you to place the old or new handlebars directly on top of the new or old bars. This should eliminate any doubt you may have in terms of how much pullback you’re getting for your money.
The downside is that dash removal is tedious, and re-installation is even more tedious. On the Victory, there are four screws in front of the fork tubes and two more underneath the dash that are difficult to get to, along with half a dozen electrical connectors and many additional screws.
Remove the Master Cylinder. You have to support the master cylinder if you don’t want to bleed the brakes, and you don’t want fluid to slop out. So, you have to keep the master cylinder level, and out of the way. I taped it to part of the fairing frame.
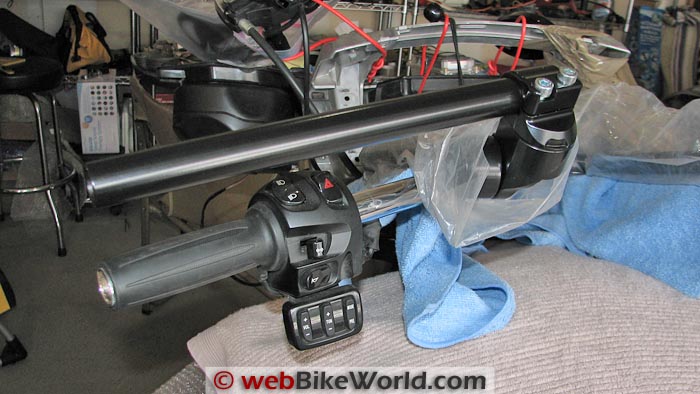
Remove the Switchgear and Mirrors. On the Victory, the bar ends are plastic “chrome” and may be removed with a strap wrench (or very strong hands). You might want to buy new ones ahead of time, or buy real bar ends. I bought Vibranators, because I needed black ends to go with my black bars, anyway.
If you have cruise control, you have to move some cables out of the way to get at two screws that hold its mounting plate in place. This is not detailed very well in the shop manual, and not at all in HeliBars instructions, so you have to peek and poke around.
If you have heated grips, the left grip is held in place by two little screws. These are visible if you peel back the grip edge, the one that’s nearer the center of the bike. If you don’t have heated grips, the left-grip removal process on the Victory and most other bikes involves a thin screwdriver blade underneath, aided by some WD-40 or compressed air blasts.
Remove the handlebars. When you take off the clamps, leave the top bolts resting in the clamps as you set them aside somewhere. Those top clamps are directional on the Victory, so you’ll want to remember which way is the front and which the back.
Because of the increased pullback of the HeliBars, you’ll need more slack. On my 2012 Cross Country Tour, I didn’t have to buy any extensions of any sort, but the instructions note that 2010 and 2011 models need to have a longer brake line (which they state is included in the kit for those models). You’ll certainly want to discuss this issue with HeliBars if the documentation on their website is not clear enough regarding the need (or not) for extended cables and hoses for your particular make, model, and year.
I had to move some of the hoses, cables, and wires from below the handlebars (where they all used to be) to on top of the bars.
On any bike, you’ll want to make sure that the handlebars and all their associated cables are high enough to clear the tank. I clamped the handlebars such that the long ends of the “U” were about the same angle (relative to the ground) as the stock bars. This means that you’ll want to measure that angle before you begin (and is another reason to do this work with the bike vertical).
Pick a tentative pullback rotation for the main (fore/aft) pivot, the one closer to the U bars, and lightly tighten the bolt that prevents it from rotating. In my case, this was easy, as I wanted maximum pullback.
Re-install the master cylinder and switchgear. For my Victory with heated grips, the HeliBars grip bar for the clutch side (which was mislabeled as the right side) has those pre-tapped holes for that grip. Like most bikes, the Victory’s switchgear has a locating pin on each side. The HeliBars have holes drilled for these.
Unlike the stock bars, this pin does not prevent you from positioning the switchgear at any circular position you like, because the grip handlebars can be rotated a full 360° before being tightened in place in their respective pivots.
On the Victory, this is a nice benefit because, in the stock condition, if you rotate the clutch lever just a little bit up, it will bump into the dash-menu-choice button (where a flash-to-pass button is located on some bikes) every time you fully squeeze the lever. With the HeliBars, it’s simply a matter of rotating the entire grip bar to achieve the desired clutch position.
Guide the cables and hoses. In the stock configuration, the cables, etc., are held in place along the handlebars by barbed cable ties, i.e., the cable ties that have ribs that stick in a hole drilled in the bars. That kind of cable tie is generally not re-usable, so one option is to buy new ones, and then drill new holes. I don’t recommend that, because you may make changes later and wind up with holes all over your new bars.
HeliBars supplies some ordinary (wimpy) cable ties, but I opted to get double-loop cable ties. These allow you to make one loop tight, so it stays in place where you put it on the handlebars (the way a barbed cable tie does). The other loop can be tight (like a regular cable tie) or loose, like the “guide” loop on a barbed cable tie.
While we’re on the subject of cables, hoses, and cable ties, in case you haven’t figured this out: no, you can’t route cables inside of the HeliBars. If you desire that kind of custom look, you’ll have to shop elsewhere.
Adjust the bar-grip pivots. Having selected – at least tentatively – a fore/aft (i.e., pullback) pivot position, you now have to select a “swing-back” position for the bar-grip tubes.
To reiterate: 1) these pivot from about straight-out-sideways to about 30° swept back from there and; 2) depending on how far back you adjusted the pullback pivot, swinging the grip handlebars back may also bring them downward.
Tighten the pivot bolts. There’s a single socket-head cap screw for each pullback pivot to lock them in place. These get torqued to a hefty 28 lb. ft., using an 8 mm Allen key. If you don’t have socketed hex keys, it’s time you got some. The grip-bar pivots also have a bolt each. These get torqued to 12 lb. ft., using a 6 mm key.
Last, the circular rotation of the grip bars – the kind of movement that used to be controlled solely by the locating pins on the switchgear – is held in check by two bolts on each side. Again, 12 lb. ft., 6 mm key.
Check Your Work!
At some point, make sure that all hoses and cables aren’t pinched by the triple tree or fork tubes when you turn the handlebars full lock in either direction. Make sure that engine idle doesn’t change when the handlebars are moved lock-to-lock. If the idle changes, you’re probably stretching a throttle cable. Make sure the front brake works.
Riding With the HeliBars
How does it all work out, you ask? It works splendidly!
Let’s start with pullback. With the fore/aft pivot in its most rearward position, and the grip-bar pivots adjusted to my liking, I gained about 3″ of much-needed pullback. The HeliBars website asserts “4” Rear adjustable offset (closer to the Rider)” but I think that’s a case of creative marketing.
If you measure from some point on the front of the bike to the very ends of your grips, that may be the case (depending on how much you’ve swept back the grip bars). However, I think a more meaningful measurement would involve the center of the grips, say, about where your middle finger rests. And that, of course, would be a lesser figure.
Regardless, the pullback is much improved. Sitting normally, I am now able to have my forearms parallel to the ground, the way I want them, with a comfortable reach to the bars. Equally important, the wrist angle is perfect. When in touring mode, there are no skin creases, no bends in my wrist.
And the downward sweep of the bar ends does an excellent job of mimicking that natural wrist angle you have when your arms are down at your sides or when walking, for instance. HeliBars claims “Vastly improved wrist angles!” and I have no beef with that statement.
For the first month or so of using the HeliBars, I kept a ratchet, a 6 mm hex socket and a torque wrench in a saddlebag. After riding for a few hours, as part of a lunch break, say, I’d change the sweep-back angle of the grip-bar pivots a bit, and check that out on the way home.
That’s why you won’t see the provided decorative bolt caps installed in any of the pictures. There are little hash marks and an indent by each pivot, by the way. These give you an indication of how much you’re moving each pivot, and also facilitate your setting the pivots on each side to the same angles (although there’s nothing that says you can’t have different angles for each hand, if that’s what you want).
What I wound up doing, up to my settled-upon point, was moving the sweep to a sharper angle, i.e., more rearward (and down). What I think caused some discrepancy regarding my initial “guesstimate” is that when sitting on the bike in the garage I would tend to keep my arms farther out to the sides than I do when actually riding. Relaxing and letting my arms rest essentially straight down while touring resulted in my changing that grip-bar angle.
 HeliBars installed, before final adjustments.
Steering Differences?
In case you’re wondering, the change in pullback and wrist angle has not affected my steering. I may ride a touring cruiser, but I’m a big fan of the twisties, too (check out all the pictures in that Victory Cross Country Tour review).
The closer handlebars (HeliBars) haven’t impeded that sort of riding at all. I haven’t noticed a thing. Same thing with the occasional U-turn: the new handlebars haven’t gotten my attention.
Vibration Differences?
Like the stock Victory handlebars, the HeliBars are 1″ diameter steel tubes. While my dial caliper isn’t the best device for measuring curved surfaces, both the stock handlebars and the Heli grip-bars are about 0.083″ (2.1 mm) thick. My guess is that the main U-bar is made of the same material or maybe even thicker (given the larger bolts and higher torque specification at those pivots), but as the pivot mechanisms are welded onto the ends I have no way of measuring it.
I usually tour in the 2300-2800 RPM range. At those RPMs, my mirrors are crystal clear. At 3000 RPM, which is about 78 MPH in sixth gear on the Cross Country, until about 3500 RPM, there is a slight lack of clarity in my mirrors. I mention the mirrors because I really can’t tell that there’s an increase in vibration otherwise.
I remember that with the stock handlebars and mirrors, each mirror used to go in and out of absolute clarity at different RPM ranges, i.e., the left mirror in one range, and the right in another.
I haven’t had stock mirrors on the Victory in over a year, though, and unfortunately I didn’t make a study of RPM vs. the clarity of my aftermarket mirrors on the stock handlebars. The Vibranators I added for bar ends didn’t have much effect, by the way. In that 3000 RPM range, with the Vibranators left off, the buzziness was at a slightly higher frequency (which was marginally less desirable). They do look nice though and cost about the same as ordinary bar ends and are held in place by hex-head bolts.
The bottom line here is that you’ll never get vibration-free riding across the entire RPM range on a big V-twin, but the HeliBars seem as up to the task of dealing with it as the stock bars. Being constructed differently, they have their own set of resonant frequencies, is all.
Nits and Picks
It wasn’t necessary to tap any holes, deburr anything, chase any threads, and so forth. The HeliBars are a quality item, well-designed and well-made.
I do have some criticisms, though, but they are all very minor. First, the black coating (which is available upon request instead of chrome) can be scratched, so be careful when re-installing lever clamps, for instance.
Also, if you’re ordering the black version, you may be disappointed that the bolts and pivot-mechanism covers are not black as well. Personally, I think these silver-colored bits make a nice contrast.
Next, I think the hand grip portion of the HeliBars for the Victory Cross Country should be about ¼” longer. If for some reason you’d want the grip handlebars set at nearly a right angle to the tank (i.e., no sweep-back at all), the mounting plate for the Victory’s cruise control will hit the right-side pullback-pivot cover.
Last, the instructions should be made more specific regarding what to leave alone. HeliBars tells you the torque values of the bolts you’ll be adjusting, but there are also a couple of smaller bolts lurking in the vicinity. These are part of the construction of the pivot mechanisms, and I had to check with the company to make sure that I shouldn’t attempt to play with them.
|
webBikeWorld Overall Opinionator: HeliBars Horizon Handlebars
|
|
|---|---|
|
Picks…
|
…and Pans
|
|
|
Conclusion
The HeliBars are an investment in long-haul comfort. Just as you might have a custom seat made to suit the lower part of your body, the HeliBars can be adjusted to suit your upper part.
If all you do is canyon carving, the HeliBars are probably not for you. On the other hand, if you do a lot of touring and if you dislike the reach to or angle of your stock handlebars, it doesn’t get any better than this.
▪ Motorcycle Product Reviews
▪ Maintenance and Repair Articles
| wBW Review: HeliBars Horizon CCR Multi Adjustable Handlebars for Victory | |
|---|---|
| Manufacturer: HeliBars | List Price: $279.00 to $750.00 |
| Color: Chrome or Black | Made In: U.S.A. (Maine) |
| Review Date: August 2014 | |
Owner Comments and Feedback
See details on submitting comments.