Part 2: The Physical Tour
The Garmin zūmo 660 is rectangular and a bit thicker than many other 16:9 style wide-screen GPS units.
Smooth hard plastic and rounded edges visually streamline the device.
But these same features also make it somewhat slippery…tactile material strips have been applied to the outer surfaces for handling and protection purposes.
The 4.3 inch wide screen dominates the front. The power pressure switch sits flush on the top right edge.
There is a small hole on the right side face of the unit for the microphone and the battery compartment release is on the lower right edge.
The headphone/audio-out jack and external antenna connector are located under a soft weather cap flush mounted on the left side of the unit.
Turning the unit over reveals a vertical multi-pin cradle interface connector positioned in the centre recess and the speaker grill.
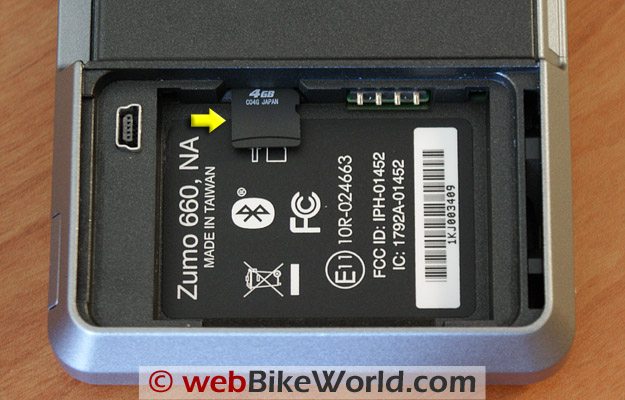
Garmin zūmo 660 battery and microSD memory card (yellow arrow).Battery Comparment and microSD Memory
Everything else is hidden under the battery compartment cover.
This is removed by sliding the bottom edge latch release towards the outer edge, while pulling up gently on an edge of the cover. On my unit however this is easier said than done.
The manual states that the battery cover should ‘pop up’ when the latch is released but the cover on my unit is well sealed (as it should be) and being slightly pressurized it does not want to move unless some force is applied to the inside or upper edge of the cover.
With the cover finally popped off, the push-in lithium-ion battery is revealed.
A mini-USB port provides data and charging connectivity while a micro-SD media slot is nestled cave-like on the right side wall of the compartment just above the battery contact strip.
The GPS antenna is hidden inside the upper right corner of the casing.
Heavy duty describes the integral main harness. It houses four connection leads: the standard two-wire power lead with an in-line fuse module on the positive wire; a 3.5mm audio output jack, a 2.5mm input microphone input jack; and, a mini-USB connector to hook up an optional traffic receiver.
Getting Started
The zūmo 660 does not come with an AC/DC charger like the zūmo 550.
Charging is meant to be done via the trickle charge it gets from a USB 2.0 standard port on a computer or while mounted in either the motorcycle or automotive 12V cradles supplied with the kit.
Wanting to reduce the initial charging time, I used the AC-DC charger from a zūmo 550 kit. This component facilitates an industry standard 5V charge through the mini-USB connector.
After three hours, the battery icon was showing a full charge.
Holding the power button for two seconds brings the wide-screen display to life: holding it down again for the same period of time shuts it off.
One useful feature I found quite accidentally is a documented shortcut to adjust display brightness and audio volume by way of a “Quick Settings” menu. With the system powered up this menu is invoked by a quick press of the power switch.
This menu also has a separate “Mute” icon as well.
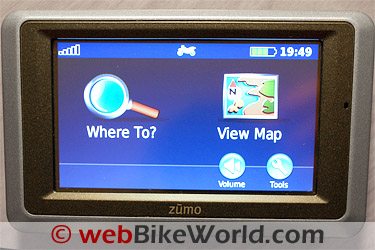
Powered up and once past the standard liability “Agree” screen, a now-familiar opening screen is presented featuring two large “Where To?” and “View Map” icons. The upper strip features the satellite status display in the left corner, the use mode in the center and battery life and time in the right corner. The lower strip has the Volume and Tools touch icons.
With four usage modes — motorcycle, scooter, automobile and pedestrian, the user specifies a specific mode for any particular use and depending on the mode selected routing and navigation data is presented differently.
If power or cradle changes occur, the zūmo 660 typically senses the change and subsequently asks via the display if the usage mode needs to be changed.
Sitting in my main floor work chair I was pleasantly surprised when all five bars on the GPS satellite strength indicator lit up indicating that the optimum number of satellite signals had been acquired.
The zūmo 550 and BMW Navigator like to be near a window or actually outside to receive the minimal number of signals resulting in the indoors’ mode being selected.
Like the zūmo 550, file storage for images and music is provided by available internal memory or removable microSD storage media.
A direct connection via a USB cable results in both the internal and optional removable storage volumes showing up as removable drives under Windows and mounted volumes on Mac computers.
Supported file types are MP3 with M3U and M3U8 music playlist files, AA audio book files, JPEG and JPG image files, GPX route files, GPI custom Point of Interest (POI) files from the POI Loader application, and maps, routes, trip logs and waypoints from MapSource.
The Toolbox
Any tool, or toy, needs to have the goods, right? The zūmo 660, like most new navigation devices has a pretty impressive list of goodies, features and tools, many not found on older models.
While not all of them will be of interest to all users, they are there ready for use as desired or needed.
Given publishing constraints, only some of the main features are covered in this section: a more detailed look at the tools, installation, etc, is planned for the remaining parts of the review.
Initial System Setup
Back to the main screen. For initialization purposes, one selects “Tools”, which provides access to the next level.
This screen reveals:

- Settings.
- Where Am I.
- Help.
- Media Player.
- Picture Viewer.
- Custom Routes.
- And (using the Drop-Down arrow in the lower right) the additional selections of: My Data, World Clock, Language Guide, Calculator and Unit Converter.
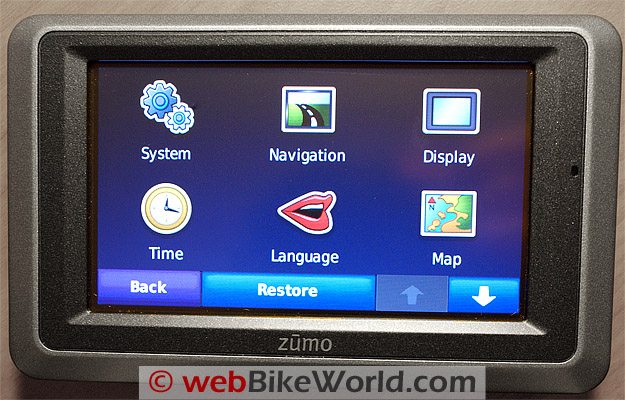
Selecting Settings takes you to its sub-menu comprised of: System, Navigation, Display, Time, Language and Map. Using the drop-down arrow takes you to the final choices: Security, Bluetooth and Fuel Gauge.
Choosing “System” brings up four options: GPS Simulator, Usage Mode, Units and Keyboard Layout. For my purposes, the Simulator Mode = Off, Usage Mode = Motorcycle, Units = Kilometres and, Keyboard = QWERTY.
Selecting “Usage Mode” allows you to choose one of the four modes.
Selecting “Motorcycle” and pressing the “OK” icon will activate the configuration menu.
Selecting “Yes” will let you choose the user (display) icon you want from an animated list (many more are available from the Garmin website).
Once an icon is selected, pressing “Next” will bring up the Riding Map View.
The options here are:
- Track Up.
- North Up.
- 3-D.
Selecting Track Up will put the map tracking in the direction of travel, with the North-Arrow icon displayed on the screen for reference purposes.
Hitting “Next” brings up the Riding Route Preference: Faster Time, Shorter Distance or Off-Road. This ends the basic usage mode setup process.
| Garmin zūmo 660 Review: | |
| ▪ 1: Introduction to the the zūmo 660 | |
| ▪ 2: Physical Tour | |
| ▪ 3: Where To? | |
| ▪ 4: Using the zūmo 660 | |
| ▪ 5: zūmo 660 Specifications | |
| ▪ 6: zūmo 550 vs. 660 Comparison | |
| ▪ 7: Installation | |
| ▪ Owner Comments (On Page 1) | |