Ducati GT 1000 Throttle Cable Adjustment
I’ve been noodling on the possible reasons for the GT1000’s super-sensitive throttle. It could be anything from a too-light flywheel to fuel injection and probably is amplified by the abundance of torque from the 1000DS engine at low RPMs.
But something Chris told me about similar problems with the FJR1300 got me thinking. The FJR folks say that the hot setup is to remove all of the throttle freeplay on that bike and apparently this helps solve the problem.
So I whipped out the GT1000 owner’s manual and discovered that Ducati recommends 1.5mm – 2.0mm throttle freeplay. I checked the owner’s manuals for the 1000DS Multistrada and Monster and they call for the same.
Since the Oberon bar end mirrors prevent me from measuring the freeplay at the end of the throttle grip, I drew a line on a piece of paper and taped it to the throttle. I measured the freeplay at about 4.5mm, which is way too much.
Ducati recommends balancing the throttle bodies after a throttle cable adjustment, and I plan on bringing my GT to the local dealer to do this soon. But in the meantime, I adjusted the throttle cables down to about 1.0mm of freeplay, which is slightly less than the minimum recommendations. But I figure the cable will stretch some more and it’s very hard to get exact measurements when adjusting the throttle cable anyway.
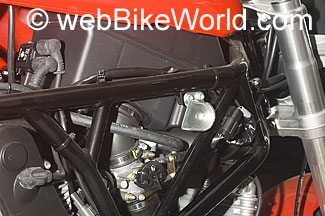
All you’ll need for this job is one 10mm and one 8mm open end wrench. The throttle cable adjusters are located on the right side of the bike, in the “V” of the engine. Here’s a photo:
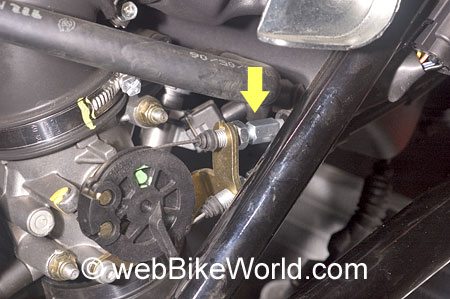
The yellow arrow indicates the upper throttle cable adjuster. The upper adjuster controls the throttle closing and the lower adjuster controls the throttle opening.
Each adjuster has a rubber cover that must be peeled back to access the nuts. They’re slightly sticky but they peeled back relatively easily on my bike. Next, the 10mm nuts must be loosened; they’re the nuts closest to the bracket. Note that they’re only tightened with what feels like a couple of foot pounds of torque.
It’s kind of hard to get the 10mm open end wrench on these nuts; I found that I could reach in from the outside for the top nut but had to go in from in back of the frame on the engine side to get the bottom nut.
Once they’re loose, back them off a few turns. Use the 8mm open end wrench to adjust the cable. I had to back mine off quite a bit to tighten up the freeplay. I’m not sure if they’re supposed to be turned the same amount — I tried to do this but it’s nearly impossible to calculate. Try to count the number of flats that you’re turning each one; you may want to mark one of the flats with a permanent marker first.
I adjusted them to take out all of the slack but then re-adjusted to get about 1mm slack, which is slightly less than required but it seems fine.
I then road-tested the bike and it does seem to make a difference. Before the adjustment, I felt like I would roll on the throttle quite a bit before anything happened and then the engine would kick in. It seems much smoother after the adjustment, more of a linear response replacing the “on/off” jerkiness. I’ll have to ride in a variety of weather conditions to really understand the differences and I’ll report back on my findings.
Here are two animated photos showing the before (top) and after (bottom) adjustments. The lines are slightly out of parallax because I couldn’t get the camera exactly lined up over the throttle, but I think you’ll get the idea:
 Before
 After
AfterI’m now curious to see if the throttle bodies are out of adjustment and I’ll report back after I get this checked at the dealer.
UPDATE: Now that I’ve put a couple of hundred miles on the bike after the throttle cable adjustment in a variety of weather conditions (it went from 74 degrees two days ago to 47 today), I can report that tightening up the throttle cable has proven to be the single best improvement I’ve made to the GT1000 so far. It really does take out about 95% of the “on/off” abruptness in the throttle.
Maybe the throttle on my GT was out of adjustment right from the factory, but taking out nearly all of the slack provides much better throttle control, especially in the corners. Unfortunately, the last 5% is probably an artifact of the fuel injection, which is a problem with many fuel injection systems, no matter the brand.
This is especially noticeable at very slow speeds, when a slight throttle movement causes the fuel injectors to blast the gas into the cylinders. It’s probably amplified by the bike having only two cylinders, tuned for an abundance of torque at low RPMs.
Nevertheless, the throttle is now completely different and much better than it was before. I still plan on bringing the bike to a local dealer to check the throttle body balance and will report back on that project.
I’m sure I’m not the first one to do this maintenance task, so if anyone can provide more intelligence on this project, feel free to send me an email at
GT1000 Background Info: Ducati GT1000 initial press release and Technical Specifications | Ducati GT 1000 Review | Sportclassic Parts & Accessories | Information on the Sportclassics fuel line problem | GT1000 Owner Comments (bottom of GT review page) | Sportclassic Parts & Accessories page
More Ducati Blogs: Our Multistrada 620 Blog! | Adam’s Ducati GT1000 (UK) Blog with info on fitting a Scottoiler and Givi windscreen
Completed Projects: CRG Hindsight LS Mirrors | GT 1000 Throttle Cable Adjustment | GT 1000 Chain Adjustment | Cool GT1000 – Sport 1000 Fly Screen | GT1000 Oil and Filter Change | Billet Oil Filler Cap | Pit Bull Sportclassics Rear Stand | Oberon Bar End Mirrors and Soft Grips Installation | GT1000 Brake Light Bulb Replacement | Remove evaporative emissions canister for maintenance, inspection or repair | Page 2 Projects: Install 40 mil Scotchcal headlight protection film | Ducati GT1000 Secret Battery Charger Harness! | Replace headlight bulb with yellow version | How to remove fuel tank | Remove U.S.A.-only rear reflectors | Remove U.S.A.-only front reflectors
If you have comments, further information, tips or guidance on this project, please send it to me at
Owner Comments
Note: For informational use only. All material and photographs are Copyright © webWorld International, LLC – 2000-2011. All rights reserved. See the webBikeWorld® Site Info page. NOTE: Product specifications, features and details may change or differ from our descriptions. Always check before purchasing. Read the Terms and Conditions!