The Denali DM1 Micro LED lights are a smaller version of the popular Denali LED auxiliary lights (review).
The DM1 Micro lights put out a fairly amazing amount of light, considering their size.
Rugged and waterproof with high-quality connectors and several available mounting kits, the Denali DM1 Micro LED lights are also convertible from spot to wide beam via the included lens.
A wiring harness with relay is provided in the kit, along with basic mounting brackets. Motorcycle-specific mounting kits are also available as an option.
Mounting the DM1 lights on the BMW scooter was relatively easy, although the mounting location options for the scooter are limited due to its design.
The Denali DM1 “Micro” LED auxiliary lights are “right sized” for many applications where larger auxiliary lights just won’t fit.
A good example of that is the new BMW C 650 GT scooter (blog), with its tight-fitting, all-encompassing bodywork that makes it very difficult to find a spare corner to hang a light (or other accessories).
But a BMW motorcycle — or in this case, a scooter — wouldn’t be a BMW without 80 bajillion accessories available, just begging for owners to spend even more money.
And, as luck would have it, as I was putting together the farkleup list for the scooter, along comes Twisted Throttle with the Denali DM1 Micro light kit suggestion. Count me in!
I had no idea what I was getting into on this, because BMW has yet to release a shop manual, much less a wiring diagram or even anything other than the most basic information on maintenance and upkeep.
So diving into the scooter to install accessories is roughly comparable to Shackleton stepping foot on Antarctic shores for the first time. But without the cold. Or the smelly sailors.
Introduction
The Denali DM1 “Micro” light kit arrived, along with an optional Denali light M5 Fender Mounting hardware (part TT.D1.020.M5). So Chris and I peeled away the panels on both sides of the scooter (described in the BMW Scooter Horns article) and had at it.
Actually, like everything so far on this scooter, it took more time to study the situation and get everything laid out than it did to actually wrench it all together.
But that’s what this article is all about — we do the hard cipherin’ work for you and once I show you how it all goes, you’re left with a veritable piece o’ cake.
In fact, on the BMW scooter, this is an easy job and all you have to do is remove the upper right panel for this project. We had both front panels on both sides removed because I installed the dual horns at the same time.
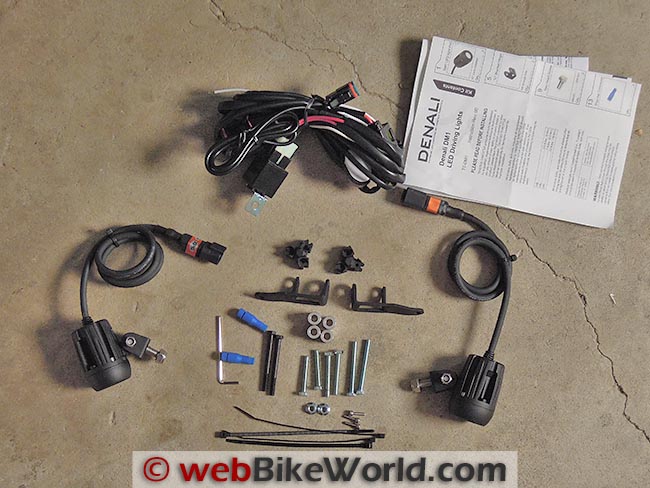
Denali DM1 Micro lights with included waterproof wiring and connectors.Denali DM1 Micro LED Auxiliary Light Kit
The Denali DM1 lights are not just for the BMW scooter by any means; in fact, Twisted Throttle has 11 different hardware mounting kits available with the hardware and brackets to mount the lights on several different motorcycle types.
However, I believe this was the first BMW scooter mounting application for the lights and I provided some feedback to Twisted Throttle.
In fact, we discovered that the optional M5 mounting kit has all of the parts needed to mount the DM1 lights on the BMW scooter.
The M5 is more or less the generic mounting kit that should work on a variety of motorcycles if there isn’t a bike-specific kit available for your ride.
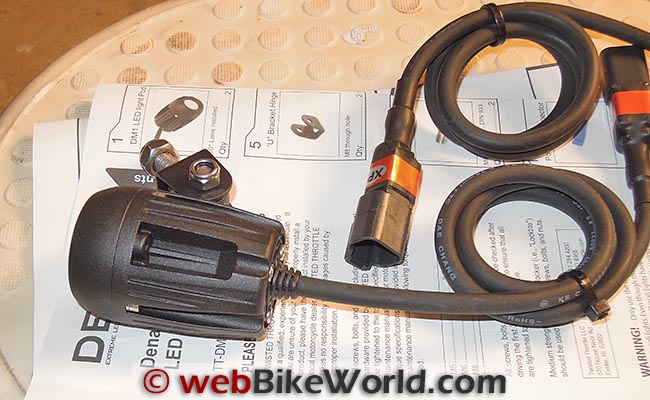
The Denali DM1 Micro lights are slightly smaller than the Denali LED lights (review), but the most noticeable difference between these light types is the round “bullet” shape of the DM1 lights instead of the square shape of the original Denali lights.
The DM1 lights measure roughly 43 mm in diameter and they’re about 60 mm long and 65 mm tall, including the mounting bracket. The build quality is excellent and they seem a bit more modern or updated than the original Denali lights we reviewed.
The dark black crinkle-coated aluminum machined housing on the DM1 lights looks the business and it’s IP68 rated (dust and waterproof according to the International Protection Rating) to beyond 1 meter submersible.
That means you can take your F 800 GS through that stream without worry…at least until the water pours into the air intake!
I’m impressed with the build quality of the DM1 lights and the wiring and wiring harness. It’s as good or better than I’ve seen on any other brand of motorcycle auxiliary lighting.
The price also seems reasonable at around $210.00 for the light pair, although adding one of the fender mounting hardware kits can add anything from $25 to $70 to that price.
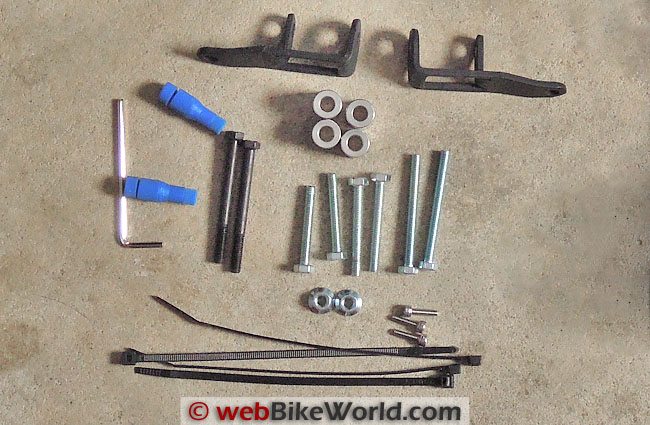
The generic M5 hardware kit (so named because it fits M5 fender bolts) lists for $44.99, so the total bill would be $255.00 for the dual light kit (which includes relays and wiring harness) and mounting hardware for the BMW scooter (the M5 kit contents are shown in the second photo below).
The mounting brackets and hardware are also first-rate and are made from high-quality stainless steel. An illustrated parts list and basic instructions come with the kit.
It would be nice for the owner to have installed something like this before, but it’s pretty straightforward for anyone with basic mechanical skills who knows a bit about motorcycle electrics.
Denali DM1 Micro lights with included mounts. The contents of the optional M5 hardware mounting kit.Included in the Denali LED Lighting and Hardware Kits
The Denali DM1 light kit comes with the lights with a basic mounting brackets shown in the photo above with bolts and nuts, the waterproof wiring and connectors.
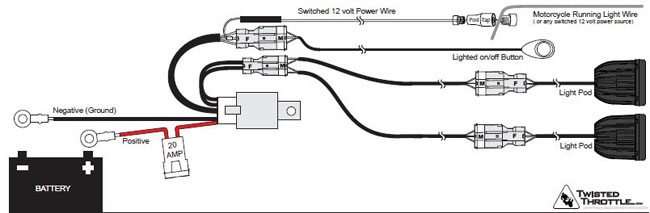
It also includes the wiring harness with relay and fuse — all ready to connect to the battery, plug in the lights and fire ’em up. A lighted on/off switch is also included as part of the harness, which can be mounted on the dash or another location.
If required, hardware mounting kits are available as an option.
As I mentioned, the generic M5 kit includes the hardware shown in the photo directly above. Other kits are available with brackets for BMW, Kawasaki, Suzuki, Triumph and Yamaha motorcycle models.
Some of the basic hardware in the kit could probably be gathered up by the owner without buying the kit, but not the “L” shaped brackets and spacers. The bike-specific mounting kits definitely make the job much easier and cleaner-looking.
Mounting the DM1 Lights on the BMW Scooter
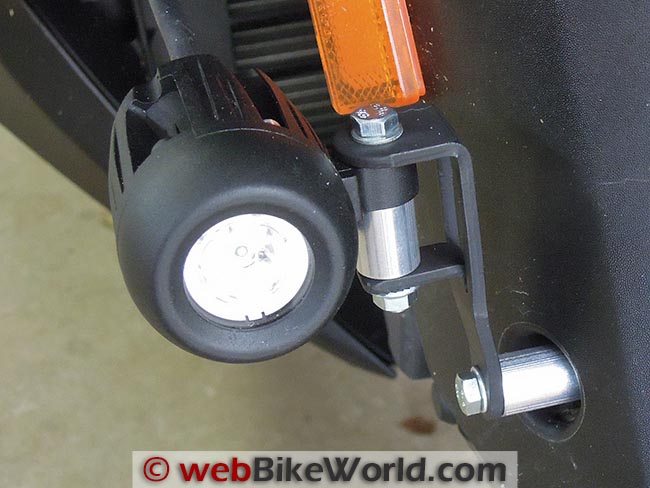
As it turned out, the M5 screws in the M5 hardware kit are a perfect replacement for the 5 mm screws that hold the fork fairings in place on the scooter.
BMW conveniently added a threaded boss on the front of the fork, and all you have to do is remove the 5 mm bolt holding the fairing and replace it with the 5 mm bolt in the hardware kit, along with the spacer.
The only issue on the BMW scooter is that 5 mm is a pretty small diameter for a bolt that will hold an auxiliary light and bracket.
It’s fine for securing the lightweight plastic fairing in place, but the larger and heavier DM1 light is probably a touch beyond what a 5 mm bolt and the narrow threaded boss are designed to hold.
I didn’t want to strip the threads on the aluminum fork boss, so I used one of the longer 5 mm bolts in the hardware kit and then put a washer and Nylock nut on the back side.
This helps to firm up the bracket but it’s still not as tight as I’d like — I can move the light bracket in the mount by hand. I used some blue Loctite also just for good measure.
But, this is a quirk of the BMW scooter, not the Denali DM1 light kit. There just aren’t many locations on the scooter to mount any type of accessory unfortunately, so scooter owners will have to make do with what they have and the fork fairing boss is it.
Denali DM1 lights wiring diagram.Wiring the Lights
Once I decided where and how to mount the lights, I prototyped the setup by hand-mounting everything without tightening the bolts just to see how it looked and to make sure everything fits — always a good practice.
Next, it was time for the wiring. The waterproof wires connected to the back of the lights are about one meter long, so I threaded them up around the outside of the forks and over the top of the metal tubing under the scooter’s fairing.
This tubing serves as the framework to hold the fairing and headlights on the front of the scooter.
Routing the wires over the top of the framework keeps the wires out of the way from interfering with the fork tubes as the front wheel moves — very important to make sure you get this right on your motorcycle or scooter installation.
Next, I connected the relay wiring harness to the waterproof connectors at the end of the light wires (Here’s the .pdf for the Denali DM1 wiring diagram from which the image above was taken).
The rest of the layout is simple, and will depend on your application.
I used quite a few cable ties to keep everything nice and tidy, doubling over the excess wire to make a cable-tie bundles I could pack into the nose of the scooter.
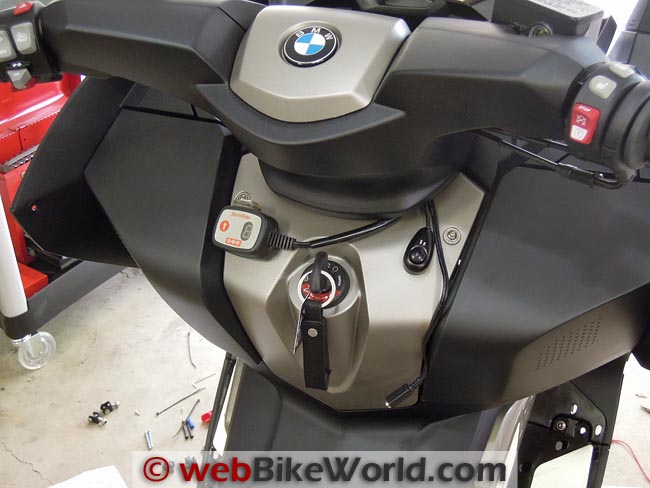
After connecting the harness to the battery, I ran the on/off switch up under the nice space BMW left under the handlebars on the scooter and located the switch on the plastic inside part of the fairing, as shown in the photo below:
Denali DM1 lights on/off switch on the right. Controller for the EXO2 StormRider heated vest (review) on the left.Low Beam, High Beam, Fog or Spot?
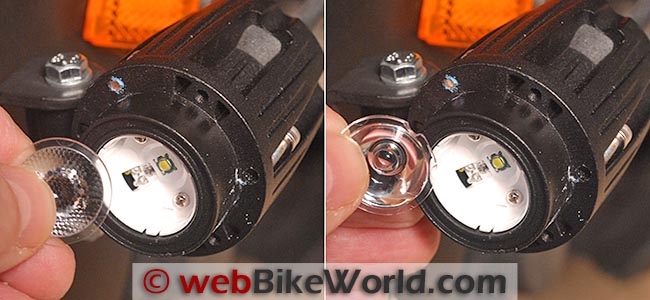
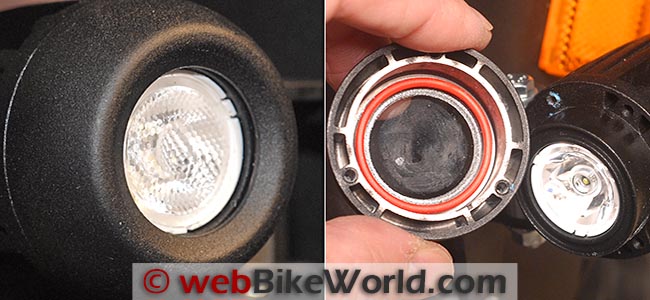
One interesting feature of the DM1 lights is that they come with a replaceable lens, which converts the lights from a spot focus (10 degree spread) to a wide focus (25 degree spread). The lights come with the spot lens installed.
The lens is replaceable by removing the cover ring on the front of the light housing, which is held by three 3 mm Allen screws. The clear lens cover has a thick O-ring and the lens fits underneath, into a groove over the LED.
I tried both lenses and decided to use the wider beam, but it’s a tough decision. I don’t use high beams that often and I don’t really ride much at night. But I wanted to use the DM1 lights as auxiliary visibility lights during the day, so I figured a wider beam would be better.
The light mounting brackets weren’t tightened yet, so I aimed the wider beam to illuminate in front of the scooter and augment the scooter’s low beam headlight, which is a single bulb on (curiously) the right-hand side of the dual headlight array on the BMW scooter.
I wired the Denali DM1 lights to turn on directly with the on/off switch, whether the low beam or high beam is on.
Twisted Throttle also has a CAN-Bus adapter that can be connected to a BMW headlight, which in effect provides a tap into the headlight system, allowing the Denali lights to automatically turn on or off with the high (or low) beam.
I did not use the CAN-Bus adapter however, opting instead to wire the lights directly to the battery with the harness.
I didn’t use the adapter because the front of the scooter is so packed that I can’t even see where the wiring is that feeds into the lights; it’s not really accessible, so I don’t even know if I could get the CAN-Bus adapter in there.
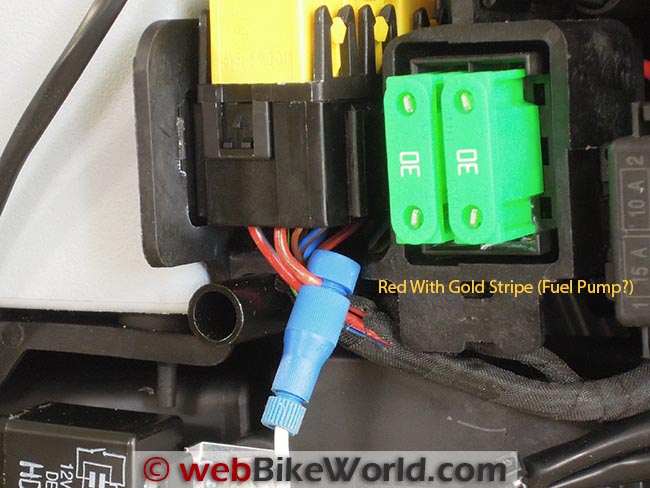
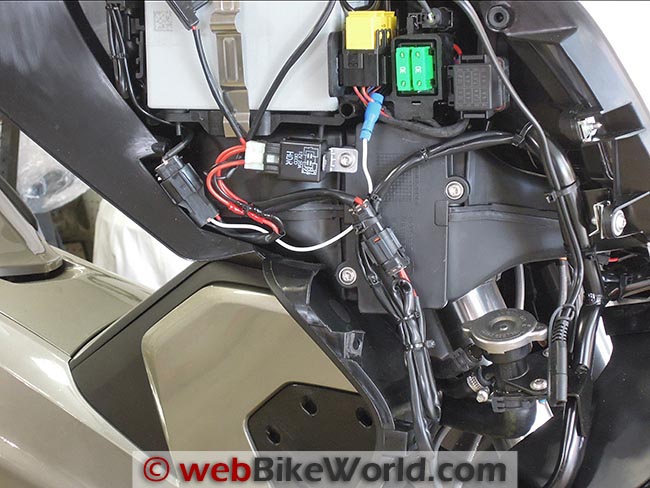
Chris helped me find a powered wire that turns on with the ignition. We had to do some experimenting to find it, because as of now there is no BMW scooter wiring diagram.

We think it’s the wire that powers the fuel pump — it’s the red wire with gold stripe shown in the following photo:
Red/orange wire with gold stripe used for powering the relay of the Denali DM1 lights.Using the On/Off Switch
This brings up an interesting issue: Do I turn the Denali lights on or off using the provided switch on the wiring harness, or should I have the lights turn on and off automatically with the high beam?
Since I’m using the wide beam for the Denali DM1 lights, I can leave them on all the time, although I have to reach down and separately press the switch to turn them off, which is an extra step when riding.
For example, if I switch to high beam at night and I don’t want to use the Denali lights, I have to reach down separately to press the auxiliary on/off light button. It’s not really a big deal because I leave the Denali lights on all the time.
If I was using the spot beam lens in the DM1 lights, I could wire them to turn on automatically with the high beam, or wire them to turn on or off with the switch on the harness (although that would mean an extra step every time you turned the bike’s high beams on or off).
Note that the Denali lights do not have a rheostat like the Clearwater Krista lights (review) that allows the light output to be dimmed. So the Denali lights are either on or off.
For daytime running light use, it would be nice if I could lower the output of the Denali lights to about half or less, just enough to make them work as visibility lights but not dazzle the oncoming traffic.
In any case, I opted to run the wide beam lens and power the lights via the included on/off switch on the DM1 light wiring harness. I leave the DM1 lights on all the time during the day and at night, whether I’m using the low beam or high beam.
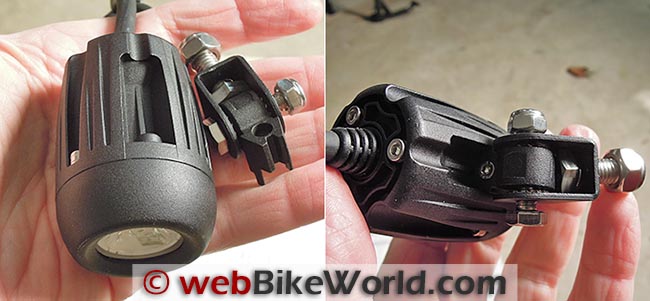
Wide beam lens on the left and the spot beam lens on the right. This is a close-up of the mounting bracket and hardware that comes with the optional M5 mounting kit.Aiming the DM1 Lights
Once mounted, the mounting brackets that come in the hardware kit allow the lights to be aimed horizontally, while adjusting the bracket at the bolt that attaches to the fork allows the lights to be aimed vertically.
By the way, the Denali DM1 lights require very little power at 5 Watts each (0.41 Amps at 12 volts DC). This means they could theoretically be used on smaller motorcycles with limited alternator output.
I have to say, for that tiny 5 Watt output, these lights are pretty powerful and they really reach out there.
To be honest, I wasn’t expecting much but I’m very surprised at the output, which shows both the design of the lights is good and the fact that LED technology has improved dramatically since we first started reviewing LED lights for motorcycles about 10 years ago!
Of course, the output of the DM1 lights doesn’t match that of the monster Clearwater Krista lights (review), but it’s all relative because the DM1 lights are only about 1/3 the cost.
Bottom line is that the amount of light put out by the DM1 Micro lights for their size is pretty amazing.
Wide beam lens installed (L). Inside the clear lens protector ring showing the lens and thick O-ring (R). Denali DM1 light wiring harness bundled up and tied down with cable ties on the BMW scooter. Note location of relay, which was secured under the upper left-hand screw that holds the air filter cover.The Results
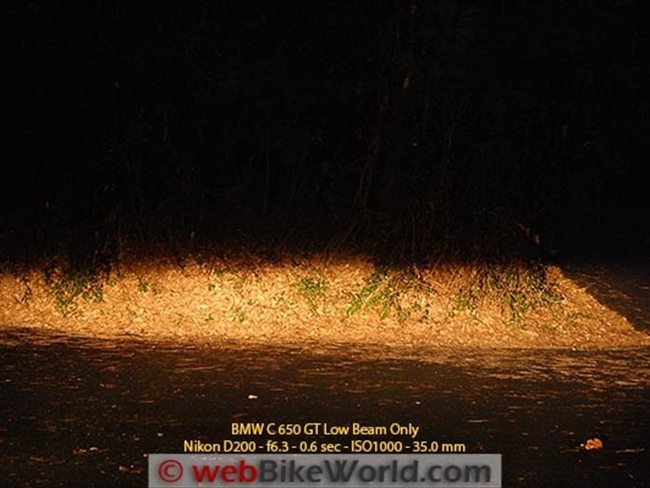
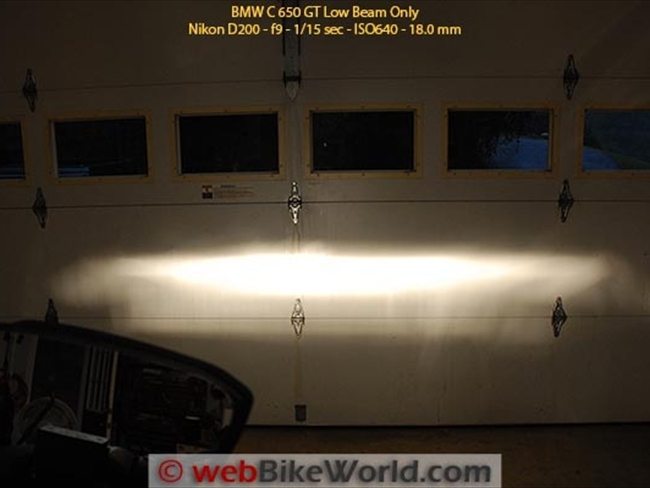
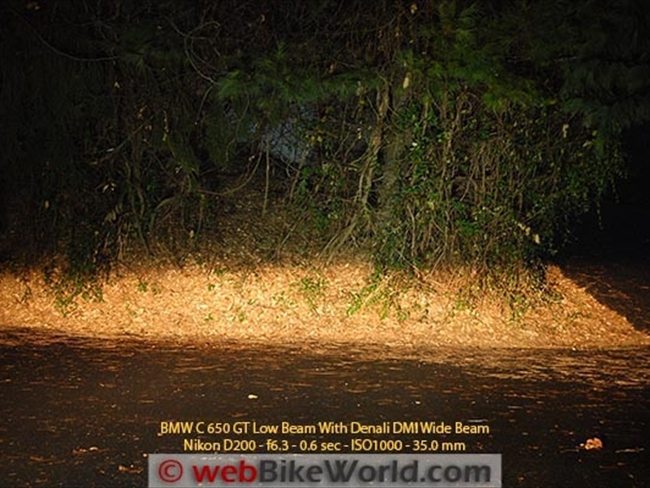
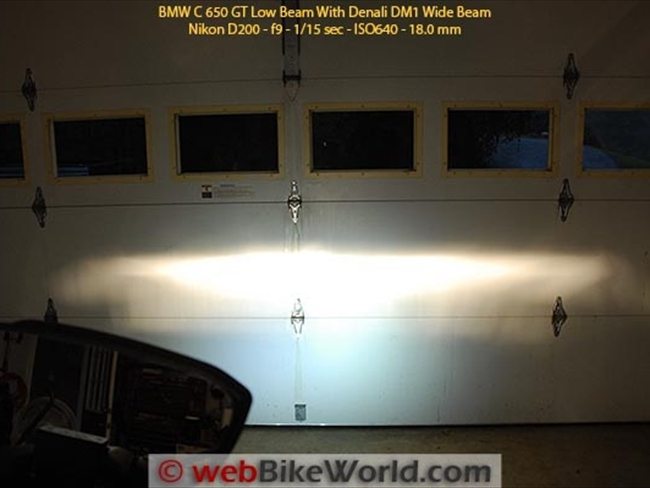
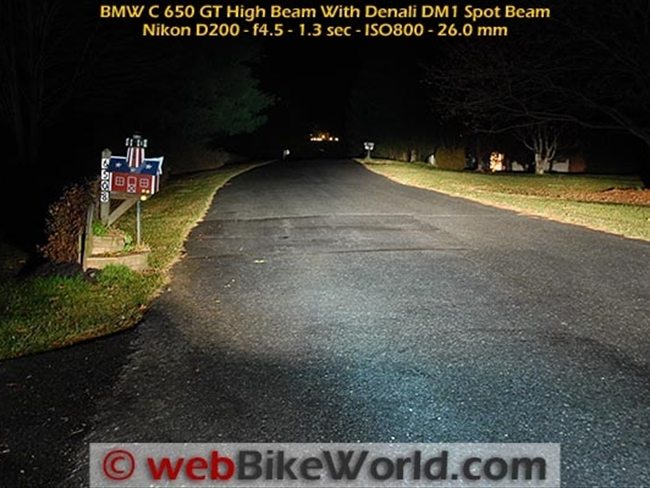
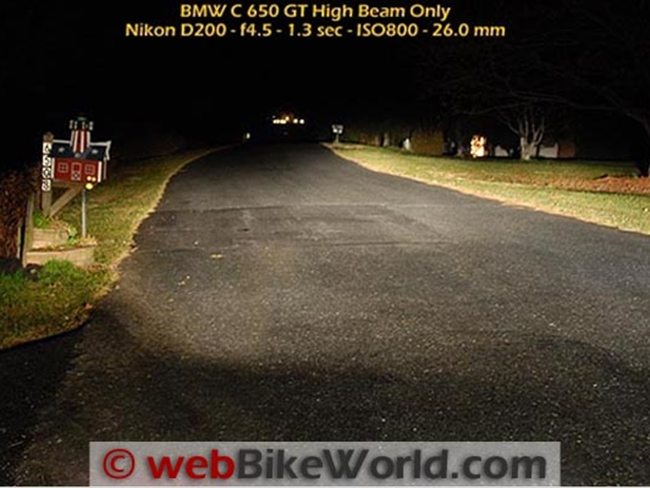
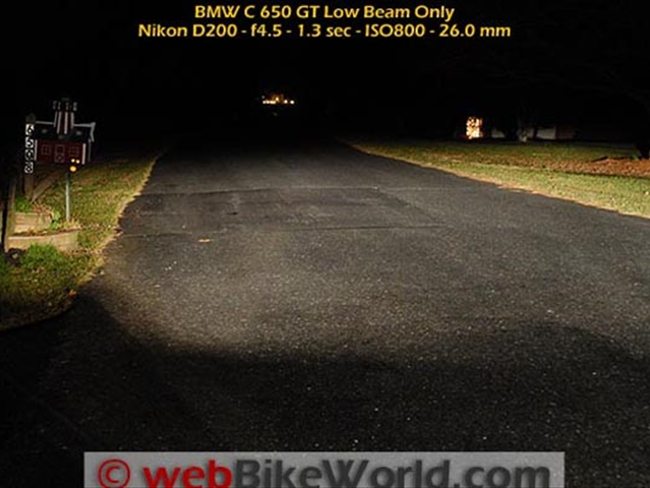
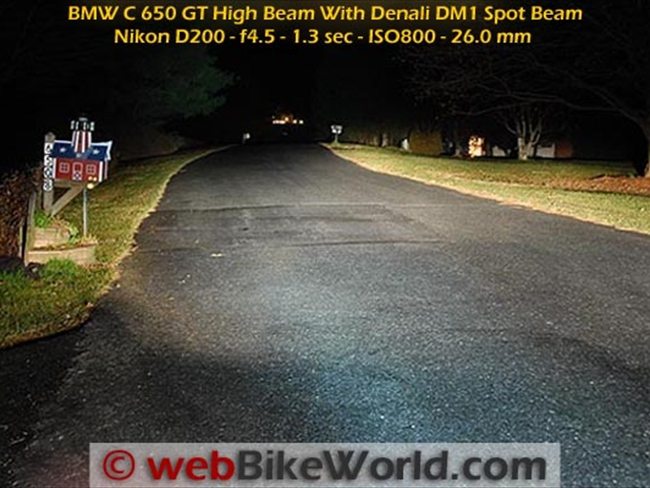
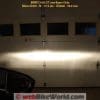
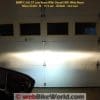
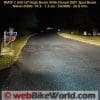
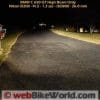
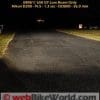
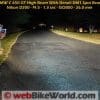
It’s always very difficult to photograph motorcycle light output in a way that truly illustrates the final result. The Denali DM1 Micro lights have a noticeable additional effect and we selected a few photos to hopefully illustrate the difference.
Of course, it’s most noticeable at night but one thing’s for sure: the DM1 lights definitely, positively put out a lot of light when used as daytime running lights for added visibility.
In fact, I’m a bit concerned that it might be too much light for oncoming vehicles, which is one of the main factors that helped me decide to use the wide beam instead of the spot.
Also, I aimed the lights a bit low, both to illuminate the road directly in front at night and to help eliminate some of the dazzle to oncoming traffic during the day. Using the spot lens aimed farther up I think might be too much for daytime use and could direct the light into the eyes of oncoming traffic.
While this might make you more noticeable, it could diminish the oncoming vehicle’s ability to make out your turn signals, or they may be so focused on the dazzling lights that they miss your motorcycle and/or intentions.
So it’s the wide beam for me which, by the way, has another interesting effect that I noticed at night. Since the lights are mounted on the forks, they turn with the handlebars.
At low speeds, such as turning a corner or turning into a driveway, the wide beam lens does a nice job at illuminating where you’re going.
At higher speeds, once the effects of countersteering come into play, the front wheel doesn’t turn enough for the lights to illuminate a curve. The light output points more or less directly in front of the bike.
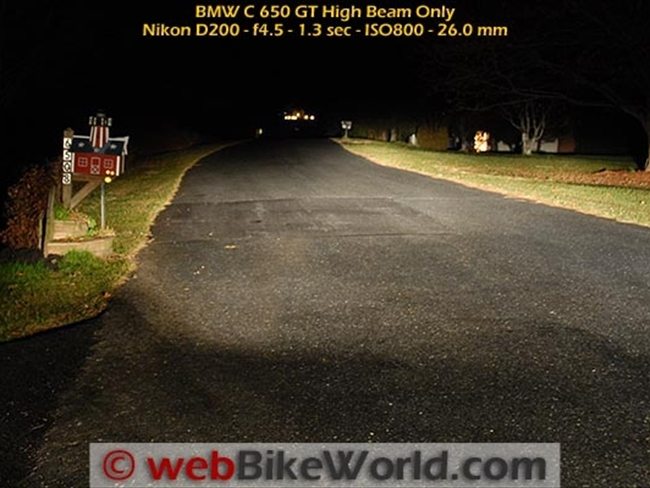
Here is a slide show with some examples of low beam and high beam with and without the DM1 lights.
Once the show starts, each slide will stay on screen for 2 seconds, then will transition to the next, which hopefully illustrates the additional light contributed by the Denali DM1 Micro lights:


Conclusion
The Denali DM1 Micro lights are easy to install (at least on the BMW scooter) and they provide quite a bit of extra light for their size, which is small enough to look good on any motorcycle or scooter.
The price is reasonable and the lights are very well made. The optional mounting hardware kits should have everything you need for a clean installation.
Owner Comments and Feedback
See details on submitting comments.