My Classic Motorcycle Restoration Project:
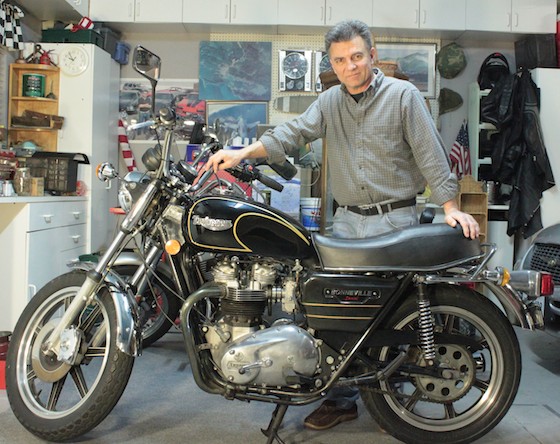
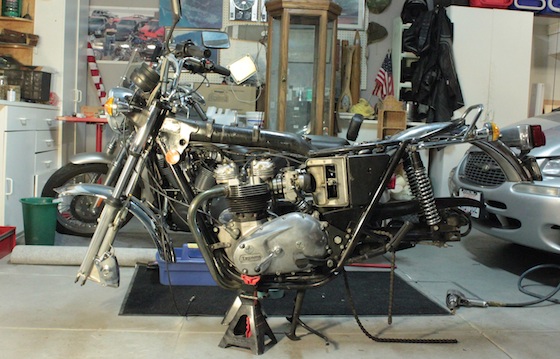
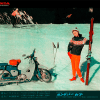
My next cheap Classic Motorcycle Restoration Project: This sweet 1979 Triumph T140D Bonneville Special, pictured here in our state-of-the-art Research & Development Center (my garage).
CLASSIC MOTORCYCLE RESTORATION PROJECT:
THESE BIKES ARE CHEAP!
Obviously, ‘cheap’ is a relative thing. But, when you think of what it costs to get into most hobbies today, nothing is cheap. If you’re looking to get into Classic British Motorcycles as a hobby and/or a passion, fear not. It doesn’t have to be expensive. Especially now that the economy is in the tank. Bikes that used to sell for crazy money now languish in showrooms. And in tough times, people often need to liquidate some things to get some cash. The time has never been better to get into a Classic Motorcycle Restoration Project.
CLASSIC MOTORCYCLE RESTORATION PROJECT:
UNDERVALUED CLASSICS
I’ve been saying all along that I believe Classic British Motorcycles are underpriced & undervalued. Especially compared with Harleys & Indians. Considering not only the rich history that Brit bikes have, but the blistering performance & excellent handling that allow them to be ridden in the modern world, and also what it costs to restore one, they should cost more…but they don’t. Some don’t. A Brough Superior recently broke records & sold for 286,000 pounds ($457,857 US). Vincents have seen six figures. But that’s the upper crust of a market that is teeming with incredible machines that range from $4,000 to $40,000…or more…or less…
FINDING MY NEXT CLASSIC MOTORCYCLE RESTORATION PROJECT
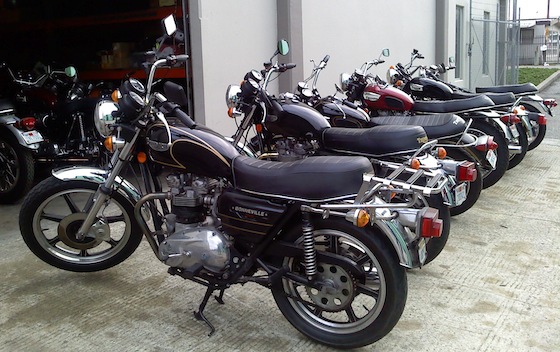
Here it is, just like I found it, tucked in the back at Rabers. I’d seen it for sale before, when it was $5,000. I got it for $3,000!
A TRIUMPH BONNEVILLE FOR $3,000? DOES IT RUN?
I’ve been looking for a proper Classic British Motorcycle Project ever since I sold my Yellow Bike a couple of years ago. I was thinking of a ’69 or ’70 Triumph Bonneville or TR6, or maybe a Trident. I really like Tridents. But the right one at the right price hadn’t presented itself yet. I had seen this scruffy 1979 Triumph T140D Bonneville Special at Rabers a few times, & I saw it slowly slip down in price from $6,000 to $5,000. Now it was priced at $4,000 & it still hadn’t sold & Raber needed the space, so the seller was picking it up the next day to take it home. After looking it over (it needed lots of stuff, mostly minor) & riding it, I made the guy an AS IS offer of $3,000. This was just before Christmas & Raber’s was closing for 10 days & wouldn’t be back until Tuesday, Jan 4th, the same day I was driving down to the big MidAmerica Auction in Las Vegas. It would be Tuesday, the 11th before we could meet again. While in Vegas though, I got a call from Bob Raber that the seller had reluctantly accepted my offer. Happy Days!
The big question on my mind now moved to whether that was good news or bad news. Was $3,000 for a classic Triumph Bonneville a good deal, or a pig in a poke? I would soon find out.
CLASSIC MOTORCYCLE RESTORATION PROJECT:
THE 1979 TRIUMPH T140D BONNEVILLE SPECIAL
In 1978 Triumph introduced the T140E, the “E” standing for “Ecology” or “Environment”, which meant it was in compliance with the latest round of smog legislation in the US & Europe at the time. They accomplished this in a number of ways: a new cylinder head with parallel intake tracts, new Amal Mk2 carbs, sealed airbox, mild exhaust cam, restrictive exhaust & more. “Smog Dogs” is what I call them. Because they give up lots of power in exchange for dubious results, environmentally. I mean, it you have to thrash them to make them go, then how clean will they be running, in reality? Triumph lowered the gearing to compensate for the gutlessness, but that ate into fuel mileage. It was a crappy deal. And running like they did, they couldn’t hope to compete with the 750s in performance.
But, in 1979 they tarted it up real pretty & turned it into the T140D Bonneville Special. Black & gold paint scheme, gorgeous 7-spoke mag wheels & unique 2-into-1 exhaust made this Bonneville “Special”. It continued through 1980, then was dropped, which was appropriate for a ‘limited edition’ motorcycle.
CLASSIC MOTORCYCLE RESTORATION PROJECT:
HISTORY OF THE BIKE
This T140D was owned by a gentleman in his late 80’s. His best friend had ridden bikes into his 90’s & this fellow vowed to do the same. He owned this Triumph for many years & it served him well. But, as he got older, it became more & more difficult for him to kickstart it. So, the clever people at Rabers put a kickstart quadrant from a T150 Trident in, which geared the whole mechanism down, allowing him better leverage & making it easier to kick…in theory. While it was easier to kick through, there are no free lunches in nature. To get that advantage you have to give something up. In this case, it was the number of turns the engine would spin when kicked. It wasn’t much & while easy to kick, it still wasn’t easy to start. Some spark plugs got cross-threaded along the way enough times that a brand new head was installed. Other than a dog-ugly parcel rack on the back, the bike stayed pretty stock & original, thank goodness. And overall, it aged well. But, it got to where he couldn’t ride it anymore because he couldn’t always get it started. And the fear of stalling it at a light & having to kick it in busy traffic was holding him back. He finally put the bike up for sale at Rabers & there it sat until I bought it.
CLASSIC MOTORCYCLE RESTORATION PROJECT:
IT’S CONDITION
The bike was dusty from sitting. Both tires are hard & cracked. The chain is stretched. The clutch cable is gone. The pillion (buddy peg) rubbers are shot. The whole fuel system is gunked up with old gas. The paint scheme is wrong (a cheap repaint with pinstriping tape instead of hand-painted stripes. The funky kickstart mechanism has other problems too, slipping sometimes (see photo). My deal with Rabers was that I would remove all the T150 stuff & trade it straight across for the correct T140 kickstart hardware. And, perhaps most significantly, the front brake hardly works & the rear brake doesn’t work at all, both are hydraulic disks, of course. The Seller was smart to sell it to me for $3,000. What else could he do? He couldn’t ride it. He probably didn’t want to haul it home then store it in the garage. And he didn’t want to put anymore money in it. It was the best move for all concerned. And I got a screaming deal on a great new-old Cheap Classic Motorcycle Restoration Project…I hope.
CLASSIC MOTORCYCLE RESTORATION PROJECT:
THE MISSION OF THIS PROJECT
Of course I want to end up with a cool old Brit bike to ride around on, that is old enough to be interesting, but new enough to hold its own in modern traffic. But I also want to prove something with this project. I want to show the world just how cheap it is to get into Classic British Motorcycles. You don’t have to be rich to do this. Especially if you have some basic mechanical skills. I bought this bike for $3,000 & now, it is my goal to fix it up & make it right for a total of another $500, for a total investment of just $3,500. $3,500 for a running, riding, limited edition, collectible, beautiful, fast, fun-to-ride Classic British Motorcycle? That’s amazing! Like I said, these bikes are underappreciated & undervalued. Can I do it? Just how far will $3500 take me?
CLASSIC MOTORCYCLE RESTORATION PROJECT:
HANG OUT WITH ME IN MY GARAGE
Ride with me as I tear this baby down just far enough, but not too far. Discover the problems that hide beneath the surface. Lend a hand as I clean, polish, strip, prime & paint my way to motorcycle Nirvana. Along the way, we’re bound to learn a thing or two.
CLASSIC MOTORCYCLE RESTORATION PROJECT:
LET’S TAKE HER OUT FOR A RIDE
It’s my goal that when she’s all done, she’ll be reliable enough to ride anywhere, just like my old Yellow Bike , because I plan to ride it to San Luis Obispo next October for the big Classic British Motorcycle show they have down there. I’ll ride there with the nice people from Raber’s.
CLASSIC MOTORCYCLE RESTORATION PROJECT:
BUT, WE’VE GOT TO GET IT RUNNING FIRST…
Journey with us now as we take this, our Project Bike, step-by-step through the entire process of restoring it to a good ‘rider-quality’ machine. I paid $3,000 for the bike. It is my goal & intention to finish it, at least to what we will call “Stage 1” for $500 ideally, but no more than another $1,000. Can we end up with a finished, running, riding classic British motorcycle, a Triumph Bonneville Special no less, for only $4,000? Let’s see…
THE RESTORATION PROCESS
CLASSIC MOTORCYCLE RESTORATION PROJECT: THE CHALLENGE
Our mission is simple: Can we end up with a clean, good-running, good-riding Classic British Motorcycle for under $4,000, lock-stock-and-barrel? That’s what we’re here to find out. And in the process, have some fun, maybe learn a thing or two, take some great photos & share them with the world…oh, and let’s not forget: at the end, we’ll have a cool Brit Bike to ride around. Let’s get started.
CLASSIC MOTORCYCLE RESTORATION PROJECT: FRIDAY, JANUARY 14, 2011
I BUY THE BIKE
I got word from Rabers that the Seller has accepted my offer for the dog-eared 1979 Triumph T140D Bonneville of $3,000 as is. It seemed like a low price, especially to the seller, but would it be a bargain after all? I arranged for my brother-in-law to meet me there, as I didn’t think the bike would fit in the back of my Prius.
MY FIRST LOAD OF PARTS
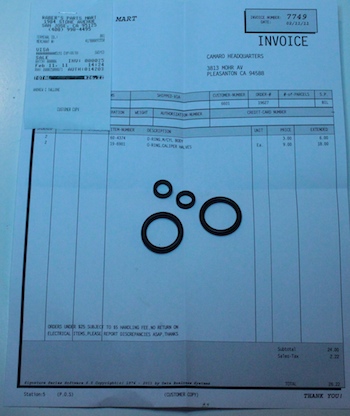
We did the paperwork (I even got the original Owners Manual) & I bought my first load of parts. $245.32 bought me 2 carburetor kits, oil for engine & gearbox, a gearbox cover gasket, a new clutch cable, assorted clamps, hoses & bits, enough to get me off to a good start. We got the bike home, placed it next to my Harley in the garage & called it a day.
CLASSIC MOTORCYCLE RESTORATION PROJECT FRIDAY, JANUARY 17, 2011
TIME IS OF THE ESSENCE
It’s time to strip parts off the bike & see what we’ve got. I just joined the Northern California Chapter of the BSA Owners Club (I know, I know…but BSA owned Triumph, right?), & their first big ride of the season is on March 5th, barely 5 weeks from now. I need to check everything, decide what needs to be addressed, complete the work, then have the time to sort out the bike on the road. Not that big a deal, but there is some pressure.
STRIP IT DOWN
I begin by pulling the “skin” off (ie: tank, seat & side covers). Overall, the bike isn’t in too bad of shape, although the paint on the frame is badly chipped & the bare metal showing through is rusting. Typical. This bike has a lot of miles on it (35,000) & has been sitting a long time. All the soft parts (tires, hoses, grips, foot rubbers) are dried & need replacing. The tank & seat are in good shape (the seat especially). The tank was repainted & improperly striped using tape. It looks OK from 20 feet away, but it’s not right. We’ll have to do some thinking on this. I’m not prepared to spend $600 to have a professional do it.
AND SO IT BEGINS…
I already know that the kickstart mechanism will need to be changed out & both tires are dried & cracked so I plan to remove both wheels. My big concern is with the rear brake. There is no fluid in the underseat reservoir & when I test-rode it, the brake pedal seemed dead. When I try to remove the rear wheel I see that the caliper is frozen & dragging badly on the rotor. No wonder it seemed so gutless, I can hardly turn the wheel! Further investigation shows that the rear master cylinder is also frozen up & had apparently leaked over several years, because the entire underside of the bike on that side is stripped of paint. So now we know what we have to do.
CLASSIC MOTORCYCLE RESTORATION PROJECT SUNDAY, JANUARY 23, 2011
ITCHING TO RIDE
The BSAOC Annual Meeting was last night & I’m all fired up to get my bike running & go riding with those guys. So, with fresh cup of coffee in hand, I set myself to the task, planning on enjoying every moment.
REROUTE THE CLUTCH CABLE
First was the kickstart mechanism & that new clutch cable. I undid the cable, found that it routed between the instrument console & the handlebars so I had to loosen the console to get the old cable out. I don’t like this routing, it makes the cable bend too much right off the bars & this is where it failed last time. So, I rerouted it, giving it a longer arc before diving down, just right of the headlight shell.
INTO THE GEARBOX
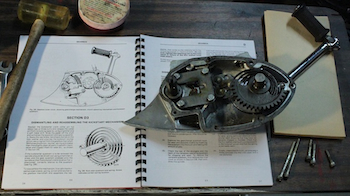
I drain the gearbox oil via the drainplug/selector plunger. It looks like it might have had traces of water in it. The gearbox cover is no problem to remove, but the oil in there definitely seems contaminated with water. Was it getting in through the clutch cable? I remove all the T150 kickstart components, which Rabers has agreed to swap straight across for the correct T140 pieces.
DON’T TRY THIS AT HOME!
The real problem is with the back brake system. The rear wheel will barely turn & it makes it difficult to remove the wheel, but I manage. With the bike on its centerstand, I use automotive jackstands to brace it so that I can remove both wheels. I do not recommend this method for safety reasons, don’t try this at home. Especially if you have kids or pets running around who could bump the bike.
BACK BRAKE WOES
Wheels off, I got my first good look at that rear master cylinder. What a mess!! I’ve never worked on one before & was amazed at how complex, heavy & hard-to-reach it is. They stuffed a spring-loaded, adjustable linkage into one of the tightest places on the bike. It’s almost impossible to get to, even with the rear wheel off. I finally figure out that the master cylinder must be removed with its linkage, which includes the brake pedal shaft. This ultimately required a trip to Sears to pick up a 1-1/8″ deep socket for the large nut/bushing that supports the brake pedal shaft. It passes through the right-rear engine mounting plate & is threaded deeply into the linkage bracket behind it. And when I say ‘deeply’, let’s just say I was glad I was using air tools. It probably took 30 turns to get it out!
IT’S ‘ALL OUT’ NOW
Both wheels are now off & in the car. The outer gearbox case has been removed, along with the kickstart ratchet & pinion gears, all boxed up & ready for Rabers. I add my rear caliper and rear master cylinder (along with its greasy linkage which I haven’t figured out yet how to remove). It’s been a good day. Too bad Raber’s is closed on Mondays.
CLASSIC MOTORCYCLE RESTORATION PROJECTTUESDAY, JANUARY 25, 2011
BACK TO RABERS
I drop off my wheels at Rabers with instructions to install the best Avon tires (3.25 X 19″ front; 4.00 X 18″ rear) & their best inner tubes. They will mount & balance them & I can pick them up on Friday. We swap out the kickstart bits & Bill, one of the many helpful, knowledgeable people at Rabers, spent as much time with me as it took to bring me up to speed with all the ins-and-outs of the job I was about to take on. Turns out, they had just finished another ’79 T140D & I was able to look it over closely for pointers. It pays to work with pros.
PARTS, PARTS & MORE PARTS
As these projects have a way of doing, things got deeper & pricier fairly quickly. My original cost estimates of completing the bike for under $1,000 (not including the $3,000 purchase price), would seem to be low. But, hey…it’s still going to be a bargain! So, let’s go.
BRAKE STUFF AIN’T CHEAP!
I ended up getting 2 new brake disks (rotors), as mine were the older chrome-plated type with about half of the chrome eaten off. They were obviously not flat anymore as the wear was uneven. I could have had them turned, & perhaps I should have, in the interest of cost. But, I opted for new at $113.02 apiece. And they are gorgeous pieces, with a very fine bare metal finish. I will paint the centers & they should look & work fantastic. I also got new master cylinders front & rear. The rear needed it for sure, but with 35,000 miles on it, I thought it wise & prudent to do the front also. Hey, we’re talking about brakes here! Rather than attempt to rebuild my old ones, which are usually too pitted to save anyway, I went with new stainless units, thereby mitigating any future problems. They were $139.00 each. I decided to rebuild both calipers as well, and those kits were $22.34 apiece & new pads were $19.96 per set.
MISCELLANEOUS OTHER BITS
On Bob Raber’s advice, while I had the gearbox cover opened up, I installed new shifter & plunger springs to my shift mechanism, in an effort to improve the shifting. It didn’t feel quite right when I test-rode it & it seemed that the shift lever was too short with too little leverage. Maybe that’s a left-shift thing, I don’t know as I haven’t ridden many left-shift Brit bikes.
IT HURTS SO GOOD
A few odd bits & pieces, & an official Triumph shop manual ($37.50) later, I was out the door, with tax included, at $742.15. OUCH! And that didn’t include the 2 tires mounted & balanced, which I will pick up on Friday. I’d estimate that at somewhere around $350-400 (2 tires at approximately $110.00 apiece, plus tubes, plus tax, plus $40 each for mounting & balancing). So much for my plans of doing the whole job for $500.00. We just blew right by $500 & didn’t even slow down!
CLASSIC MOTORCYCLE RESTORATION PROJECT – WHAT NOW?
I’ve already installed the shift springs & kickstart quadrant. I plan to put the gearbox cover back on tonight. The swing arm has been so bathed in brake fluid over the years that most of the powdercoating is stripped off the right leg (1979 was the first year that Triumph Motorcycles powdercoated their frames from the factory). I have been pondering removing the swingarm to properly strip & repaint it. And now that the rear wheel, caliper & master cylinder have been removed, this would be the best time to do so.
CLASSIC MOTORCYCLE RESTORATION PROJECT WEDNESDAY, JAN 26, 2011
BABY STEPS
Tonight I spent the evening scraping petrified gasket material off of the gearbox cover surfaces. Big pain, nothing fancy, but it had to be done. I also pulled the rear shocks (the original 30-year-old upside-down gas shocks, which are shot) & the swing arm. I think it was the smart thing to do. The bottom right of the swing arm & the brake anchor link are pretty rusty. This will not only allow me to better strip & paint them, but will also make it much easier to get to the nasty (& rusty) nether reaches of the frame where the rear master cylinder lives, otherwise almost completely inaccessible.
CLASSIC MOTORCYCLE RESTORATION PROJECT SATURDAY, JAN 29, 2011
BACK TO RABER’S
The last couple of nights I’ve put in some time cleaning parts. Bob Raber called to tell me my tires were now mounted & balanced. I’ve decided it’s time to buy some new rear shocks, so I bring the old ones with me & drive to San Jose. My wheels look terrific with the new Avon tires. I get a set of Hagon shocks & a few other tidbits. I also picked up a special spanner (wrench) for the exhaust nuts. The bill comes to $668.94.

CLASSIC MOTORCYCLE RESTORATION PROJECT SUNDAY, JAN 30, 2011
PREP & PAINT
I spent the day stripping & sanding the nether regions of the frame where the brake fluid from the rear master cylinder had taken all the powdercoating off. It was rusty & peeling & coated in the vile stuff. I’d already removed the swing arm to prime & paint it, the rear master cylinder & linkage, opening up some space to work. I wiped it all down with paint thinner first, let it dry, then sanded by hand. After wiping it down again with thinner I ran a space heater directed toward it to warm all the surfaces & the shaker cans, as my garage is cold. I used black primer & fogged in gloss black in several final coats. It looks OK for a quickie job. I’ve also painted some of the other hardware that came off.
HYDRAULIC BLUES
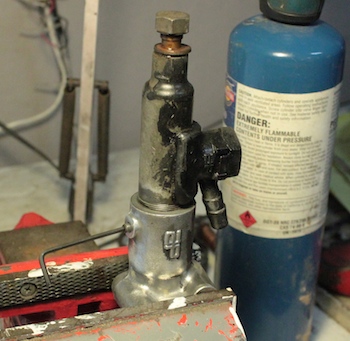
I bought 2 new stainless steel master cylinders, (they’re the same front & rear) but they are just the cylinders & need to be installed in their respective housings. I’m starting with the rear unit. It needs to be heated with a torch to soften the old Locktite, then a tiny Allen set screw is removed from the housing & the old cylinder can be threaded out. I counted the threads showing (4) & need to get the new unit in about the same place. I also took both brake calipers apart. The rear is frozen solid on both sides. I plan to rebuild both.
CAUSE FOR CONCERN?
I’ve discovered a potential problem. The drain plug on the crankcase is so tight that even an air impact won’t loosen it. Upon close examination, it looks like it may have Locktite or some other substance bonding the threads. I thought about heating it up like I did on the master cylinder. But both the crankcase & the plug are soft aluminum, where the master cylinder & set screw were steel. I’m afraid to put too much heat on it. Hoping to take advantage of the wisdom that is supposed to come with age, I have decided to wait until Tuesday when Rabers opens & call them for advice. There’s plenty to do until then…
CLASSIC MOTORCYCLE RESTORATION PROJECT – STAY TUNED
Follow our progress as we tear this sucker down & put it back together again. Bruise your knuckles & freeze with me in my garage (virtually of course, please don’t show up at my house) as we rush against the deadline of the BSA Owners Club’s first ride of the season on March 5, 2011, leaving from Rio Vista CA & riding through the Delta. That’s barely a month & I still have to do the carburetors! Can I make it? Will I make it? Keep checking on me to see how I’m doing & how much I will have spent at the end of all this to get a good-running 1979 Triumph T140D Bonneville Special.
CLASSIC MOTORCYCLE RESTORATION PROJECT TUESDAY, FEB 8, 2011
THE WORK CONTINUES
I manage to squeeze out some time to work on the Triumph. I clean up some parts, then assemble both the front & rear master cylinders. It’s about all I have time for today. But I’m beginning to see that I can get this bike done fairly quickly now. It’s nothing I can’t handle, nothing I haven’t done before. I just have to make sure I don’t go too far with the bike. That’s always my problem, not knowing when to stop. Besides, this is just a stop-gap measure, to get me through for this riding season, after which I will go through it completely.
RIO VISTA RIDE COMING UP
As you know, I just joined the BSA Owners Club and plan to participate in as many of their Northern California rides as I can, on this Triumph Bonneville Special, our Restoration Project. But, now I’ve gone & volunteered to be on BSAOC’s Ride Committee, so I will be very much involved with the planning & execution of the club’s rides & events. I’m very pleased with this development & look forward to not only serving the membership of BSAOC, but also to improving this website through my involvement. And of course, this is just one more reason why I need to get this bike done in time for the Delta Ride leaving Rio Rista CA, on March 5th, and today is February 8th. I’ve got barely 4 weeks left & I need some time on the bike just to get to know it & make sure everything else is sorted out. The pressure is on.

CLASSIC MOTORCYCLE RESTORATION PROJECT SATURDAY, FEB 19, 2011
REASSEMBLY BEGINS
Finally, I think I’m done taking things apart & cleaning them, now it’s time to start putting it all back together again. First comes the gearbox cover, with correct kickstart quadrant installed, cleaned & lubed. Meticulous cleaning of the surfaces & a new gasket are a must.
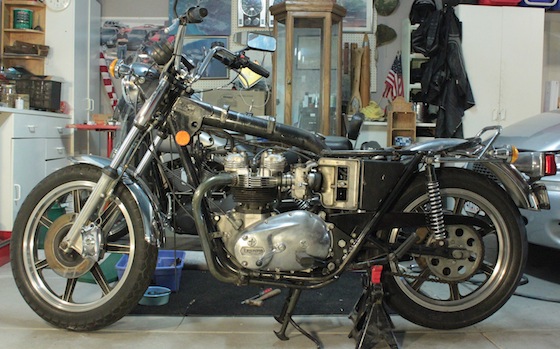
FRESH PAINT
I had stripped & painted the swingarm & brake anchor, along with the right rear frame rail, as they had been marred badly by leaking brake fluid from the rear master cylinder. Those are new Hagon shocks, with light-duty springs (I ride solo & I’m not too heavy). You can see the rear master cylinder hiding under the front-right of the swingarm. There is very little space to work with & almost no clearance between the master cylinder & the rear tire. Careful rear wheel adjustment & alignment is needed. Its almost impossible to get to, for adjustment, etc. unless the rear wheel is removed, and there is a very tricky linkage that must be adjusted. There is very little travel in the pedal, so proper adjustment is critical.
SAVE THOSE OLD PARTS
Valuable lesson learned. I was sloppy in disassembly & lost a couple of O-rings for the master cylinders. “No big thing”, I thought, “I’ll just buy new ones. How much can a few O-rings costs?” Well, here’s the bill: $26.22 for 2 tiny O-rings. WOW!! Special rubber to cope with the corrosive brake fluid, I guess. If you want to save money on your project, clean, inspect & re-use as many parts as you can. This was supposed to be a low-budget project, but I’m already seeing the error of my ways. I should have made a better effort to keep those old parts & I should have had my brake disks resurfaced rather than buying new ones. Ah…hindsight.
REBUILDING THE CALIPERS
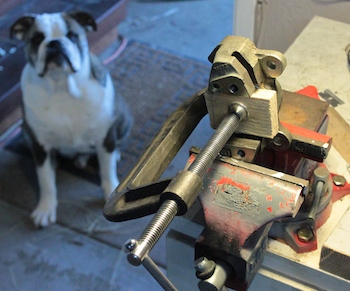
Rebuilding the brake calipers is really quite simple. Not necessarily easy, but simple. A rebuild kit comes with 2 sets of seals (big O-rings), one for each piston (each caliper has 2 pistons). Simply pop out the old ones, clean thoroughly, then refit the new ones. Simple, right? The inner seal goes in no problem. The outer seal has a steel retainer ring around it that must be gently pressed into the caliper & it if doesn’t go in perfectly strait, you’ll bend it & its ruined. The best way I found was to use a C-clamp & a block of wood to apply uniform pressure to the entire seal. Note my faithful dog Otis in the background.
MONDAY, FEB 22, 2011
BRAKE BLEEDING WOES
I have been trying to bleed the back brake for two days now & can’t seem to get good pedal feel out of it. There is so little in the pedal to begin with that everything has to be absolutely perfect for it to work. After trying for several hours, I called my buddies at Rabers for advice & they said to make sure the bleeder valve is at the absolute highest point so that the air bubbles travel to it. The only way to do this is to remove the rear caliper. The only way to do that is to pull the axle part way out allowing the brake anchor plate to be swung upward enough to pull the caliper off. Then, to bleed it, one must place something between the brake pads that is the same thickness as the brake disk. I fabricated a piece out of plywood of the correct thickness. I then used a bungee cord to elevate the whole thing to free up any bubbles caught in the line & hopefully in the guts of the caliper itself. However, I have spent all day on it, bled what seems like gallons of brake fluid through it, seen lots of bubbles, done everything right, numerous times & I still don’t have it right! It’s driving me nuts!! The front brake doesn’t feel much better either. I have to spend the day away. I’m hoping that when I come back fresh, I’ll be able to get it right, like magic.
CLASSIC MOTORCYCLE RESTORATION PROJECT SUNDAY, FEBRUARY 26, 2011
I FINALLY GET THE BRAKES RIGHT!
After endless frustration trying to bleed the back brake, I decided to try something completely different. I had a new theory: that the master cylinder wasn’t threaded into the actuator body far enough. I was told to count the threads on the original unit, then thread the new one to the same point & not beyond. If it threads in too far, it won’t allow the master cylinder to fully return & pick up more fluid. The old one had 4 thread showing, so I assembled the new one with 4 threads showing. I was beginning to think that it wasn’t threaded in far enough (considering the possibility that manufacturing tolerances vary considerably, especially in aftermarket parts), meaning that the actuator rod couldn’t travel far enough to work the master cylinder through its entire stroke. So no matter how much I bled it, I still couldn’t get enough action out of it. That was my theory anyway.
To reinforce this, I decided to test my theory on the front master cylinder, which was much easier to get to. While it had bled nicely, there was too much travel in the lever for my liking. When I replaced it, it had 7 thread showing & I reassembled it the same way. So now, I unscrewed the front brake lever assembly (the tiny set screw must be removed first) & threaded in it several more turns, carefully monitoring the play in the lever until I had it far enough in, but not too far. I put it back together, checked it & it worked perfectly!! This was all the proof that I needed.
I immediately took to removing the rear wheel to gain access to the rear master cylinder. It wasn’t going to be nearly as easy as it was on the front, because there simply isn’t any room to move down there & the only way to turn it was to remove the entire assembly, which involved draining the brake fluid I had just spent a week getting all the air bubbles out…agghh! But, if I’m right about this, then the bleeding was never the problem anyway. I pull it all out, thread it in all the way before I feel the master cylinder make contact with the actuator rod. I check & re-check, then reassemble the whole mess. It bleeds like magic & the brakes work. THEY FINALLY WORK!!
Note the differences between the stock US-emissions carburetor slide (LEFT) & the European-spec, non-smog slide (RIGHT). Note how the US slide is longer & how the Euro slide has a greater cutaway.
CLASSIC MOTORCYCLE RESTORATION PROJECT TUESDAY, MARCH 1, 2011
REBUILDING THE AMAL MKII CARBS
I’m really up against it now. The Rio Vista Ride is this Saturday, it’s now Tuesday evening & I haven’t gotten my bike back together yet, let alone running. I have been focusing on the carburetors. I stripped them down completely & thoroughly cleaned them inside & out with a strong automotive aluminum wheel cleaner, wiped them down, blew them dry & blew out all the holes really well. I then proceeded to install all the new parts I picked up at Rabers.
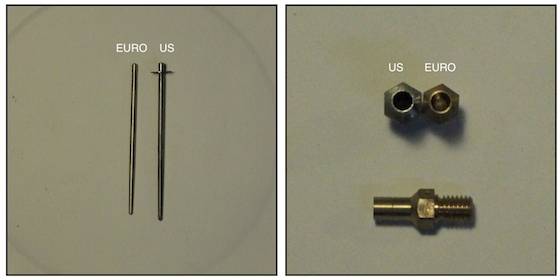
Although difficult to see the subtle differences in tiny parts, the difference in performance is huge! The Needles (LEFT) show the Euro-spec unit on left & the US-smog unit on right (with clip on it). Note that the US version is longer & slightly fatter, restricting fuel flow. The Needle Jets (RIGHT) show the US-smog jet on left is slightly smaller internally than the Euro-spec unit on right.
CLASSIC MOTORCYCLE RESTORATION PROJECT:
SMOG VS. NON-SMOG
In the late 1970’s Triumph was hit with increasingly stringent US emissions regulations. To cope, among other things, they fiddled with the carbs & leaned out the mixture. This makes them run weak (compensated for with lower gearing). The Amal Concentric MkII (Mark 2) carburetors are actually very good units as designed, before the US smog-related changes. The British & export Triumph motorcycles didn’t get the smog changes & all those parts (known as Euro-spec) are available & can easily be swapped out.
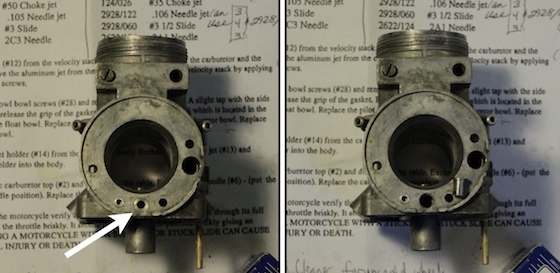
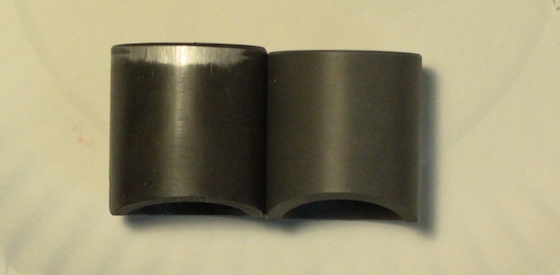
After removing the bellmouth from the carb, locate the bushing sizing down the hole in the very bottom of the intake. Use a hook to pull it out & discard it. This allows better breathing.
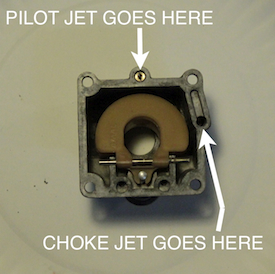
These parts consist of the following:
ORIGINAL US MODELS (SMOG)
Pilot Jets #25
Choke Jets #50
Needle Jets .105
Slide #3
Needle 2C3
EUROPEAN-SPEC MODELS (NON-SMOG)
Pilot Jets #15
Choke Jets #35
Needle Jets .106
Slide #3-1/2
Needle 2A1
All these parts are easy to change & I am told will make a major difference in the way the bike runs. All these parts are available through Rabers along with incomparable knowledge & experience, which the Raber’s Crew is always happy to share with you. I get an education every time I go there.
CLASSIC MOTORCYCLE RESTORATION PROJECT SATURDAY, MARCH 5, 2011
THE RIO VISTA DELTA RIDE
Well, I’d love to tell you I got my T140D Classic Motorcycle Restoration Project done, I rode it on the Rio Vista-Delta Ride in 2011 & that it ran flawlessly. But alas, that didn’t happen. By Friday (the Ride is on Saturday, the next day), I got it running, & the brakes work so I take it out for a teat ride. It starts in one kick (yeah!), it’s very cold blooded & must be warmed patiently. The brakes work fine, but the clutch is worn out, not slipping, thank goodness, but at the very end of its travel. It runs well enough, but has no power. I don’t feel good enough about it to take it on this ride tomorrow.
So, I take the Harley. The Rio Vista-Delta Ride leaves the quaint little burg of Rio Vista, about 60 miles from my home. If I would have taken the T140D, I would have trucked it there & back. But, I went ahead & rode the Harley there & back & on the ride. It was a wonderful day, including perfect weather, excellent company & an 88-mile loop through California’s Sacramento River Delta including countless bridges & 2 ferries. I’ll worry about the Triumph when I get back.
CLASSIC MOTORCYCLE RESTORATION PROJECT SUNDAY, APRIL 17, 2011
I GET IT RUNNING RIGHT…OR BETTER, ANYWAY
I’ve been incredibly busy lately, what with the phenomenal growth of this humble website & life and all…you know how it goes. So, I’ve just now gotten the time to get back to my T140D Classic Motorcycle Restoration Project.
CLASSIC MOTORCYCLE RESTORATION PROJECT – A NEW DEADLINE
While we blew right past the Rio Vista ride-deadline of March 5th, there’s always another ride & hence another deadline. This one is the Quail Ride, which is part of the annual Quail Motorcycle Gathering held at the Quail Lodge in Carmel Valley CA on Saturday, May 14, 2011. The Gathering on Saturday consists of a concourse classic motorcycle show & a Bonhams & Butterfields Auction. Classic-British-Motorcycles.com will be there covering both events & taking lots of eye-popping photos. The show is preceded by the Quail Ride on Friday, May 13, 2011 (which happens to be my birthday), and includes a 100-mile loop through the Monterey Penninsula ending at Laguna Seca Raceway for touring laps, followed by picnic lunch on the top of the Corkscrew. I plan to ride it on this T140D. It’s running, it’s just not running well. I’ve gotten some advice from Raber’s, nothing new, same old thing: “New plugs, adjust the valves, check the timing, then dial in the carbs”.
TUNE-UP
I have found that the Champion N5C spark plugs that the manual specifiies for a ’79 T140D with Lucas Rita electronic ignition, are not correct for a bike equipped with Boyer electronic ignition. Champion N3C’s are called for, which are hotter. I gap them to .025, apply anti-seize compound & torque them to 18 ft/lbs (manufacturer’s spec). I check the valves, one exhaust is tight, & I adjust the valves to .008 intake & .006 exhaust. I check the timing & find it to be retarded. I time it spot-on. I’ll leave the carbs for later.
TEST DRIVE…ER, RIDE
With full choke, it starts with one kick. As always, it’s cold blooded as all get-out, & I warm it up for several minutes with the choke on before it will even run without it. Finally, it’s ready to go. I take it down the block, check everything out, return for a quick few adjustments, the it’s back out on the road for a quick ride. I take it for some fresh gas, then drive it around town, run it up to around 50mph & take it through it’s paces for maybe 10 miles.
WELL, HOW DOES IT RUN?
My analysis after my test ride:
1.) It’s a gutless wonder, & I’m pretty sure it’s tuned pretty well. It’s just naturally fairly gutless, and what’s more, it’s geared low & it’s still gutless! No wonder they Brits lost the war to the Japanese. This thing runs about as well as a Honda 350. I’m sure some of it has to do with the fact that it has 35,000 miles on it & it’s worn out. But, I don’t believe these bikes were very fast when new. And this one now has the European tuning.
2.) It’s pretty well worn out. The engine is pretty noisy, with the pistons so loose they’re ringing like bells (typical of short-rod 750s). And of course, the clutch is worn out. I think after this riding season, it will be time to tear it down & rebuild it. I’ll split the cases & do the bottom end as well, including better cams (the T140E & T140D ‘Smog Dogs’ have awful exhaust cams in the them from the factory).
3.) I hate the seat. I looks great on the bike & it’s in perfect condition. But it’s very hard, it’s too tall & it’s shaped all wrong. It’s angled forward & the hump doesn’t allow you to slide back far enough in the seat. It forces me forward into the tank, & this creates riding position which puts the pegs too close & also in the way when at stops. I also find myself on my tiptoes at lights. I’ve got to find another seat.
4.) While I may not be over impressed with it’s performance, the bike seems totally reliable, it starts in one kick, everything works, it runs well enough, and I think it’s ready for this ride.
CLASSIC MOTORCYCLE RESTORATION PROJECT:
MY CONCLUSIONS, IN CONCLUSION
While there is still some fine-tuning to be done & it will be, the first phase of this Classic Motorcycle Restoration Project is essentially over. Mission accomplished. I plan to take it on the Quail Ride on May 13th & have no doubt that it will be up to the task. As I said earlier, I think I’ll put in plenty of ride time this season then tear it all the way down next winter & do it all: top end, bottom end, clutch, powdercoat the frame, the whole nine yards.
As the result of my experience in this process I have come to the few conclusions:
1.) It costs more than you’d expect to fix up one of these bikes. And as always (and a lesson I learned many time with classic cars), it’s never cheaper to get a fixer-upper & do it yourself. Even if you don’t factor in any value for the hundreds of hours of your own time you’re going to put into it, it would be far cheaper to simply spend a little more up front & buy a finished bike. Let the seller be the one to lose the money & spend all those hours in the cold garage.
2.) These late-model ‘Smog Dog’ Bonnevilles are really dogs. I’m not going to be able to live with it like this for long. My Yellow Bike, itself a ’73 Bonneville 750, was really quite fast. I don’t see any reason why this one can’t be just as fast. I hope I can do it with those Amal Mk2’s, since I just sunk a ton of money into them.
3.) While I don’t like the riding position & the seat, and it doesn’t run worth a crap right now, I actually really like the look of the bike. Once I get the right seat on it & rebuild the engine with all the right stuff, I think I may really like this bike.