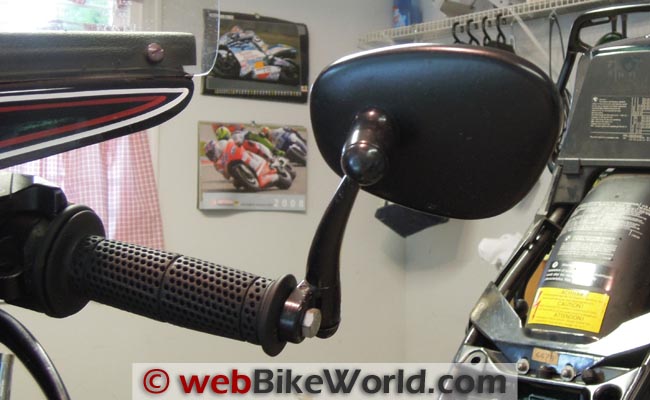


The classic bar end mirror for motorcycles!
I wanted to install a set of Napoleon bar end mirrors on my Triumph Thunderbird Sport (blog), but I just couldn’t figure out how to do it until I found Gary’s instructions.
The problem? Triumph, in their infinite wisdom, placed a threaded insert inside of the stock handlebar ends to hold the decorative handlebar end cap.
They then proceeded to weld the insert in not one, but two places!
There’s one weld on top, and one weld on the bottom of the handlebar on each end.
The end cap is then held on by a 5Mx.08 metric flat head hex machine screw that uses a 3mm hex wrench.
This welded-in insert comes to within 7mm of the handlebar end. This interferes with the mounting mechanism on the Napoleon mirrors.
The Napoleon mounting mechanism is meant to be inserted into a 7/8″ handlebar end.
When you tighten the Napoloen mirror’s 8M x 1.5 socket head cap screw, it expands a rubber insert, which keeps the bar end mirror mounted via friction.
The Napoleon mounting mechanism is way longer than the puny 7 mm of space offered by the stock Thunderbird Sport bars, so it’s a “no can do”. Gary came up with an ingenious method of working through this issue.
I’m not sure how he figured it out — it would have taken me about 323.4 years to come up with his solution.
It involves finding some rubber bicycle bar end caps, cutting them to the 7mm length, and using a 5Mx.08 metric screw to tighten the mirror against the bar end plug.
 Velox plugs and parts from a bicycle shop.
This makes it necessary to ditch the Napoleons’ stock 8Mx1.5 socket head cap screw and the rubber expander.
I followed Gary’s instructions, but made some modifications.
I cut the Velox bicycle end plug so that there was only 7mm left, using a Sears Craftsman “Handi-Cut” scissor-type tool, which made a nice, even, straight cut off the end of the rubber bar end plug.
I didn’t file the inside to fit the Napoleon rib that locates the mirror within the original Napoleon rubber expander.
All I did was insert the shortened rubber plug into the bike’s handlebars, then screwed in the mirror.
The friction seems to be holding them with no problems, and I haven’t experienced any vibration — in fact, they are much steadier than the Napoleons on my BMW R65.
Mounting the Bar End Mirrors
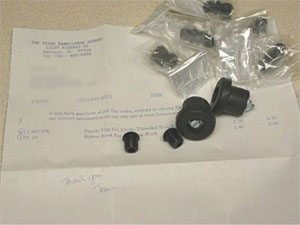
A local bicycle shop may have the Velox rubber end plugs and the plastic plugs (photo above) that will cover the ugly threaded holes used with the original Thunderbird Sport mirrors.
The only problem is that the minimum order is $10, so I ordered some extra plugs and an extra set of Velox end plugs.
The part numbers are: Plastic Plug for 10mm Threaded Hole, part number LS-4877FK, $1.50 per pair. Rubber Road Bar End Plug, Black, part number VL-23; $1.40 each.
See more on inserting these plugs below. A new bolt that will replace the 8Mx1.5 that comes with the Napoleons is also required.
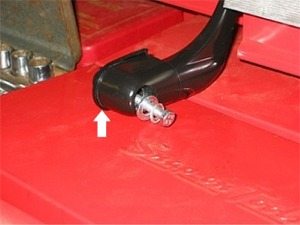
I found a 50mm long 5Mx.08 hex head bolt at the local Ace Hardware store (See Photo 1, left).
While I was there, I also picked up a flat washer of about 14 mm outside diameter, which fits perfectly in the end of the Napoleon, and a 10 mm “wavy” washer to back it up, which I’m hoping will help keep things from loosening up.
The parts at the top of photo 1 are from the Napoleon, and are not used for this modification, only to illustrate the original Napoleon mounting system that you’ll need to work around.
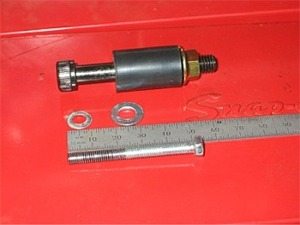
Photo 2 is a look at the 5Mx.08 hex screw with the flat washer and the wavy washer over it.
Note that the only part I’m using from the Napoleon is the black plastic/metal backup plate opposite the screw (See white arrow, Photo 2 right).
After I cut the end plug, I pushed/screwed it into the bike’s bar end. I did not cut a slot in it for the rib on the Napoleon that you can just see on the top of the boss that sticks out of the mirror.
All I did was insert the plug and screw in the mirror.
The plug (white arrow, Photo 3, left) then expands inside the handlebar, and the tension of the rubber plug pushing outward on the mirror puts enough tension on the screw to keep things in place.
You need to give it a good tightening, but don’t overdo it — this is only a 5mm screw, and can’t take the torque that an 8mm could.
Once you feel it getting tight and the mirror doesn’t feel like it’s loose, you’ve probably tightened it enough. I think the rule of thumb here is to tighten it only as much as you need to keep the mirrors from moving.
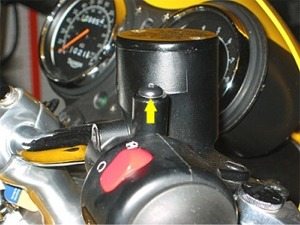
Here’s the finished product in photo 4. You can see the hex head of the screw from this angle, but it’s pretty well hidden inside the recess of the Napoleon and sort of disappears when you’re looking at the bike from a normal standing position.
Maybe one of these days I’ll come across a plastic cap for this screw, otherwise I may paint it flat black.
I don’t know how Gary ever thought of these caps (yellow arrow, photo on the left) to finish off the job — he must be a bicyclist. I had no idea they existed!
You have to be careful when screwing these in. They are made of soft plastic and use a 5mm Allen wrench, but they can strip very easily.
I liberally coated the threads with “Never Seize” before I screwed them in, which helped a lot.
You can sort of see some of the left-over Never Seize around the head of the cap.
These mirrors work really, really great! Zillion percent better than the originals, and it gives the bike a much neater, “low down” cafe racer look!
Master Listing of All wBW Motorcycle Product Reviews
Owner Comments and Feedback
See details on submitting comments.