We’re big fans of 3M Scotchcal paint protection film, which is very useful in motorcycle applications.
We’ve covered this subject previously in thereview/technical article on the SheerMask paint protection system.
SheerMask is available pre-cut for a few different motorcycle models, and to be honest, if you can find a pre-cut paint protection kit for your bike, my advice is to go for it.
Making your own templates and cutting the Scotchcal isn’t really that difficult, but I’ve come to realize that it’s hard enough to get it right on anything other than a flat surface that a pre-cut kit is probably the way to go.
You may find “paint protection film” sold under a variety of trade names, but apparently most of it is the real thing: 3M Scotchcal.
I’ve always had very good luck with 3M products and I think their quality is superb, so I wouldn’t suggest trying other brands just to try and save a few pennies.
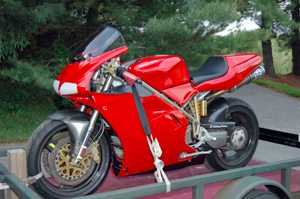
I was looking for an excuse to mess around with Scotchcal once again, and it just so happened that a local Mid-Atlantic Ducati Club member was inquiring about a way to protect the beautiful new paint job on his Ducati 916SPA track bike.
This application turned out to be quite a challenge as you’ll see, due to the compound curves on Massimo Tamburini’s exquisitely designed fuel tank.
Just to make things interesting, we also installed a section of Scotchcal 40 mil (0.040″) thick headlight protection film on my Triumph Thunderbird Sport (see the wBW article). The 40 mil piece was relatively easy to install and it disappears on the headlight (virtually) and hopefully it will prevent any rock damage to what is probably an expensive part.
What is it?
3M Scotchcal is a clear adhesive-backed urethane covering that is applied over clean and smooth surfaces to protect the paint or finish from scratches, nicks and dings.
It works very well in protecting a motorcycle’s paint from scratches caused by things like errant zippers; motorcycle seats rubbing against painted parts; chafing caused by motorcycle clothing and of course, stone and bug dings.
Motorcyclists in the southern U.S. say that it works great to protect against the infamous Love Bug! If you don’t know what Love Bugs are, you’re lucky, because they can severely damage paint due to their very high acid content.
Paint protection film works great on the front of a motorcycle’s fairing, on an air dam, or on any bodywork located in back of the front tire.
It also works great on the sides and the back of the fuel tank; on the sides of the battery covers to protect against scratches from motorcycle pants; on top of the fuel tank to protect against tank bag scratching; and basically anywhere else where the paint needs protecting.
Heck, you could cover your whole bike in the stuff if you wanted to — it’s easy enough to peel off when/if you don’t want it any more, and (so far for me anyway), removing it hasn’t damaged the paint. It’s semi-permanent, and usually peels off about as easy as it goes on.
Scotchcal is available in several thicknesses; 8 mil (0.008″) is most commonly used as paint protection, the 12 mil (0.012″) can be used for flat surfaces like the front of an airdam or fairing on a motorcycle, and the 40 mil (0.040″) thickness is used to protect headlights from stone damage.
Where to buy it?
X-Pel and other online retailers sell bulk Scotchcal paint protection film here![]()
(wBW affiliate link) and there are some (not many) pre-cut kits available for the most popular motorcycle models, e.g., BMW R1150RT and K1200LT, Honda Gold Wing, and a few others.
Several acquaintances have purchased from X-Pel with good success. X-pel also offers a guarantee for their paint protection film against cracking, peeling or yellowing for 5 years after the initial installation, including a five year, $1,000.00 guarantee “against damage to your vehicle’s finish”. I’ve never taken them up on their guarantee, so I’m not sure what the terms or conditions really are or how they might apply to a motorcycle.
How Much Does It Cost?
Scotchcal and paint protection film is sold by the foot in 8 mil (0.008″), 12 mil (0.012″) and 40 mil (0.040″) thicknesses. A 12″ wide by 8 mil thick piece costs $6.50 per foot; the 12″ wide by 12 mil costs $12.00 per foot. The 40 mil headlight protection film costs $15.00 per foot. Thicker isn’t necessarily better; in fact, the thin 8 mil type is commonly used to protect paint because it does the job and the thinner film is much easier to install.
Installation
The basic idea is simple: Measure twice, cut once, wet it and squeegee it on! On flat or near-flat surfaces, it really is about that simple. A bit of practice does help, and there are full-time shops that do nothing but install paint protection film on cars, motorcycles and boats, so if help is really needed, it can probably be found at a local installation shop by looking in the Yellow Pages.
The complex parts are a bit more difficult. X-Pel has instructions on their website, and they include a squeegee and a set of printed instructions with every order. I don’t know how the pros do it, and they would probably laugh at my apprentice methods, but I’ve installed several yards’ worth of the stuff, and in the end, it doesn’t look half bad.
The problem is that unless it’s a perfectly regular or geometric shape, the shape will have to be drawn free-hand, and for poor artists like me, that’s a bit of a problem. The pros use computer-aided-design software and then cut the film with lasers, water jet cutters or a knife on a plotter-type machine, but rookies will have to use X-Acto knives and scissors.
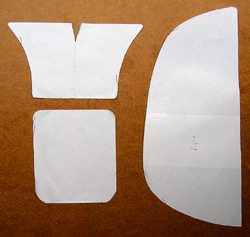
Patterns for the rear and top of the fuel tank (L). Pattern for the sides of the fuel tank (R).I use use plain white printer paper to create the patterns. I usually lay a sheet (or two taped together) on the bike and very roughly sketch in the basic shape or design that I want with a pencil.
For example, on the side of a fuel tank, the shape may be oval on top and straight across the bottom (see photo left).
Scotchcal pretty much disappears when it’s properly installed, so I’ve learned that it really doesn’t matter all that much if the shapes aren’t exactly symmetrical or if the edges aren’t perfectly straight.
Study the photos of the finished product at the bottom of this page, and it becomes apparent that you really have to look to see where the film is installed; the owner will probably know that it’s there because he or she installed it, but a casual observer probably wouldn’t notice it.
After sketching the rough shape, I smooth out the lines with my pencil and then cut the pattern slightly bigger than necessary. Then it’s a matter of back and forth, trial and error, cutting until it fits correctly or until the pattern looks like it’s going to work.
Lay it over the film side of the Scotchcal and trace the pattern with a roller ball pen — this is important — not a ball point. The roller ball ink for some reason disappears, while ball point ink seems to permanently mark the Scotchcal.
On the Ducati, we cut the pattern shown on the right in the photo above to fit the fuel tank sides. Since the sides are relatively flat, these two pieces were easy to install.
One thing to remember when using the same pattern for both sides of the bike, (e.g., battery covers, sides of the fuel tank, etc.) is that the pattern must be flipped over when the tracing is laid on the Scotchcal, or the pattern will end up with the adhesive on the wrong side of the film.
This type of paint protection film is usually installed wet – very wet. X-Pel’s directions include the recipe for the mixture; it’s mostly water, a touch of rubbing alcohol, and a couple of drops only of dishwashing liquid. I used to follow the recipe religiously, but now I just throw together a bit of this and that and it seems to work.
Before the film is installed, the surface must be cleaned with something like Glass Plus. Don’t use an ammonia-based cleaner, because it can discolor some plastics and possibly the Scotchcal over time. I then usually take some rubbing alcohol and give the surface a final cleaning to remove any wax or grease residue.
X-Pel’s directions say to spray the mixture over the desired area and also spray the outside and inside of the film as it’s peeled away from the backing. I try to get everything as wet as possible, because this makes it easier to slide the film around, similar to laying on a decal on a model car or plane. Keep spraying and keep everything wet!
“It’s all in the wrist”, as they say — start from the middle and squeegee out to the edges. There are all sorts of tricks and tips to be learned with
practice, but try flat surfaces first, it’s really rather easy.
The idea is to work any of the air bubbles out towards the edges. The edges can be picked up and peeled back to work out any bubbles if necessary. Don’t press too hard on a bubble, or you’ll risk folding and creasing the film.
Water, tiny bubbles and foam may appear under the film,
Failed attempt #1, rough edges and creased film.but as long as there are no large bubbles, it’s usually not a problem.
If a bubble does appear and it’s too late to pick up the edge, a small pin can be used to puncture it, and the water can be squeegeed out. I’ve done this many times and I usually can’t locate the pinprick the next day.
After about 24 hours, the film will dry and set and clear up. But while you’re squeegeeing (is that a word?), try to look at the surface from different angles to make sure that any of the bubbles are identified and removed.
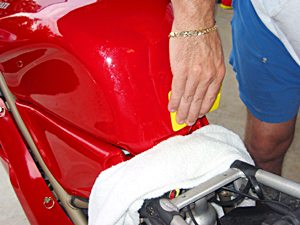
Sometimes the edges are tricky, and they can be dealt with by pressing with the fingers or even a terry cloth towel. The technique is to keep stoking the surface with the squeegee until all the water is removed and the adhesive starts to stick.
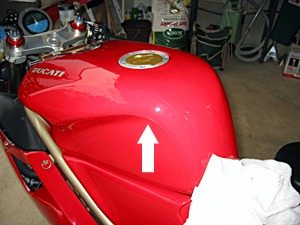
Although the sides of the Ducati’s fuel tank were easy, we had some problems with the rear of the tank, and ended up having to do the job over again. The problem is that there are several very compound curves, and the film will only stretch so far before it starts to crease.
Protecting the rear and top rear edge of the tank on this bike is important, because it’s used only as a track bike and the rider is moving back and forth when hanging off and also crouching down behind the fairing, rubbing on the top of the tank.
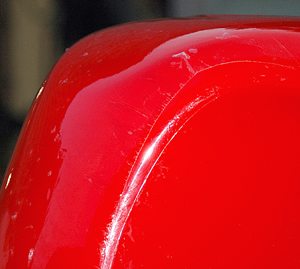
The first time around, we laid a single piece of film from the base of the tank all the way up over the top curve. You can see the result from the photo on the left — the film buckled and looked pretty ratty around the edges.
We were running out of time, it was getting dark and it was Barber track day weekend, so we left it on there to at least protect the paint, even if I was embarrassed that my name would be attached to that quality of work!
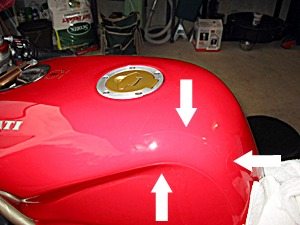
We decided to try again, and this time we cut two patterns for the back of the tank, shown in the photo (with the patterns) above. The bottom half in the rear of the tank was relatively easy to cut and install.
We cut several pieces for the top section, and pondered the best solution, and finally came up with a piece that has a slit cut in the top, which helps the upper edges of the film to bend enough to wrap around the radii.
The result is illustrated below — I had to put some arrows on the photos so you could see the edges of the film. This time, the installation turned out well, although I’m still a bit worried that the round corners at the rear of the tank won’t be protected. But the bike’s going back to the track this weekend and the owner will report back to see how everything worked out.
Conclusion
Paint protection film can help protect a bike’s paint from the abuse that a motorcycle often gets from stone damage, scratches and rubbing of parts. It’s a good idea to install the paint protection film on brand-new motorcycles as soon as possible, to help prevent any damage. I use it on all the parts of the bike where there might be wear or rubbing from my clothing or other parts.
I’ve been very pleased with the results; it keeps the bike looking new and it can be polished just like any other painted surface (although it probably won’t take the same shine as the paint). Polish or wax can build up a bit on the edges, but it’s usually easy to remove by running a rag along the edge with a fingernail.
Even with limited mechanical skills, an owner should be able to easily install paint protection film on many parts of the bike. It’s relatively inexpensive, especially considering how much a new paint job would cost. Measure up a couple of sections and order some today!
More wBW Paint Protection Film Reviews
Review Date: June 2004
Owner Comments and Feedback
See details on submitting comments.