Replacing a Motorcycle Chain and Sprockets
Motorcycle ownership means belonging to a taxonomy of tribe and sub-culture that parallels those found in nature. Remember Biology 101?
If I recall correctly, it goes something like: Phylum, Class, Order, Family, Genus and Species.
As motorcyclists, we end up on a branch of a tree that can be classified street or dirt, cruiser or Sportbike, V-twin or multi-cylinder, chain drive or shaft drive.
That’s a generality, of course, and there seem to be about as many different flavors of motorcycles as there are motorcyclists.
I’m not forgetting belt drive either, which is really a variant of chain and sprockets when you think about it.
Harley Davidson has pretty much perfected belt drive, but I wonder if that’s why the rest of the motorcycling world doesn’t use it also?
It’s light, quiet, efficient, long lasting and doesn’t need lubrication.
Sounds perfect…
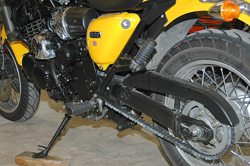
Members of the Triumph Thunderbird Sport tribe use the tried-and-true chain and sprocket system.
This type of system must be lubricated and adjusted, and the chain stretches and the sprockets wear, requiring periodic replacements.
I’ve read reports of chains lasting 20,000 miles or more, and I don’t doubt it, considering the capabilities of modern O-ring chain design and with proper attention paid to lubrication and adjustments.

That ol’ Devil Chain…
Most of my bikes over the last decade or so have been shaft drive, and although I didn’t have to worry about chain and sprocket maintenance, there were another whole set of issues to address.
Shaft drive devotees would like you to believe that their method of propulsion is maintenance-free, but that’s a pipe dream.
Splines need to be lubricated, gear oils changed and sometimes very expensive parts like universal joints need replacing. If you’re ever been involved in a spline lube on a BMW “K” bike, you know what I mean. Never again for me!
I’d just as soon spray some lube on a chain every few hundred miles, and I have this weird compulsion to take things apart and put them back together to see how everything is getting on.
I actually like doing routine maintenance tasks, because it gives me “touch time” with my bike.
Touch time is polishing, maintaining and accessorizing — “hands on” tasks that allow me to get up close and personal with my motorcycles. The end result is that I understand my machines and I feel that I have more knowledge about how they’re functioning and maturing over time.
This gives me a more secure and safe feeling when I ride them
Where to Buy Motorcycle Chain
Check Reviews & Prices on AmazonSee More: Motorcycle Accessories, Motorcycle Tire, Motorcycle Helmets
Cautions
NOTE: You may not want to try this project yourself, but the material presented here is very good background information to have if you’re planning on talking to your dealer about replacing the chain and sprocket for you.
As you will see, there are some definite quirks to changing the chain and sprocket on a 3-cylinder Triumph.
My local Triumph dealer did not have any of the necessary parts in stock; the parts can take up to two weeks to arrive from Triumph.
So read on and make sure your dealer orders the parts before you bring the bike in.
My dealer’s repair department has not yet changed a chain and sprocket on a Triumph, so my advice is to read this article and become knowledgeable about the process so that you can converse intelligently with your dealer to ensure that the work is done correctly.
The chain and sprockets on my Thunderbird Sport probably could have gone another 5k miles or so, but I was itching to get in there and see what kind of job the lads at Triumph did when they designed and built this beauty.
I also figured it would make a great webBikeWorld tech article, hopefully with information that others can use.
So whether you’re planning on doing your own chain and sprocket replacement, or you just want to know more about the procedure so that you’re a smarter consumer, we hope you enjoy this article.
Kudos
Note: This article was written with assistance from some of the wonderful folks at the Mid-Atlantic Ducati Owners Club, who bailed me out on a couple of problems.
MAD is one of the most active and knowledgeable groups of motorcyclists I’ve ever encountered.
They have a nice tech section on their website with more info on chain replacement — too bad I didn’t refer to it before we started this article! And of course, the Triumph Thunderbird Sport Riders over at Yahoo!
Groups also provided the inspiration and support for this project, and corrected me with my egregious gear ratio errors!
More Cautions and Safety
Before we start, remember that the information contained here is not complete by any means, and is not designed
to replace the information in your owner’s manual or shop manual or an expert technician.
This is the first time I’ve tackled a chain and sprocket replacement, so I’m by no means an expert, nor were any of my colleagues who helped with this project.
Working on motorcycles can be a dangerous occupation, and mistakes made during something as critical as replacing the chain and sprocket could literally cost you your life.
Read your owner’s manual and shop manual several times, make sure you have the right tools and equipment, and consult experts whenever you have a question.
This article was developed for informational purposes only and may not be accurate for your motorcycle or situation.
Parts and Part Quality
Something we learned during this project is what we might call:
Tip #1: buy the best quality chain and sprocket you can afford. There are a couple of reasons for this.
Since this job is so critical to the proper operation of the motorcycle, it doesn’t make sense to try and save a few bucks on a cheap chain or sprockets. And believe me, there are some really flimsy examples out there.
Also, since this is a job that’s only performed about once every 15,000 to 20,000 miles or so, and is a relatively difficult task, it pays in the long run to purchase the good stuff an avoid worries about having to do the job over again in 5,000 miles.
This isn’t to say that expensive is always better, but name-brand, quality parts are usually the only way to go with projects like this.
Tip #2 is to think about sticking with OEM parts on this one.
We discovered that although the Triumph branded parts were more expensive, they seem to be much more robust and they have some differences that might have an effect on the safety and performance of the bike.
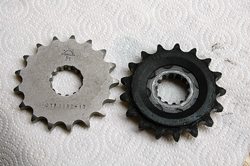
For example, the Triumph front sprocket has a rubber spacer on either side that probably helps reduce the sound and possibly the vibration emanating from under the sprocket cover.
The part looks, feels and is very different than aftermarket sprockets.
Does is perform differently? Who knows, but we didn’t want to take the change. We noticed that the Triumph parts just seemed more robust than their aftermarket replacements.
We learned this lesson a little too late, because some of the parts that we purchased for the job were not returnable.
Tip #3 is make sure the correct parts were ordered. I had to make several visits to the local Triumph dealer to make everything right.
They were very helpful and friendly, and parts from Triumph are usually delivered within 3 – 4 days after they’re ordered, but the parts will be useless if they’re not the correct.
Spend the time necessary to make sure everything is exactly what is expected.
The parts counter people, in their quest to be helpful, always seemed to try and find the most inexpensive parts, rather than understanding the cost vs. value equation and the pros and cons.
Gearing, Sprockets and Gear Ratios
One of the nice things about chain and sprocket drive on a motorcycle is that it’s easy to mess with the ratios and find different levels of performance.
But another big lesson that we learned is that everything is a compromise, and changing a sprocket size can have implications that might not be readily apparent.
Gear ratios can be changed by using sprockets with different numbers of teeth, but it’s important to be careful and to understand the implications.
We didn’t think about changing the ratios when this project started, and we planned on staying with the standard front and rear sprocket sizes.
But after learning that Triumph apparently switched back and forth between 17-tooth and 18-tooth front sprocket sizes on the Thunderbird Sport over the years, we decided to try our hand at changing the stock ratios in an attempt to get higher rpm at any given road speed.
As far as we can tell, the rear sprocket on all Thunderbird Sports has 43 teeth.
The Thunderbird Sport seems a bit “over geared” to me — I’ve noticed that both fifth and sixth gears on the bike seem very tall, dropping the revs down below the power band on the type of low speed rural roads where I ride. This means that I almost never get it into sixth gear.
Since the Thunderbird Sport has a nice torque spread, even at low rpm, the tall gearing isn’t that much of a problem.
But I thought that it would be nice to try and keep the engine in a more useful power band for my style of driving. So we figured we’d experiment with the ratios a bit to see what happened and report back.
Physics for Gearheads
It’s easy to get very deep into the physics of gear ratios, power curves and the like, and there have been many, many pixels devoted to explaining all of it on zillions of web sites and in many technical manuals and books.
If you’re interested, a good place to start learning about this stuff might be with checking out the webBikeWorld reviews of Gaetano Cocco’s “Motorcycle Design and Technology: How and Why“.
Also check out Kevin Cameron’s excellent “Sportbike Performance Handbook” (one of my all-time favorites); or Professor Vitore Cossalter’s “Motorcycle Dynamics“.
These books don’t necessarily cover gear ratios per se, but they provide some idea of the very, very complex physics that come into play when riding a motorcycle.
There are a many decent web articles out there also on chain and sprocket replacement, gear ratios and more.
Sport Rider has a concise and excellent article on the pros and cons of changing gear ratios, and “Mal’s” free download of a motorcycle gearing calculator (Microsoft Excel spreadsheet) is a nice tool for playing “what if” with gear ratios.
It also calculates various engine speeds, miles per hour, kilometers per hour and more.
It’s interesting to note that the gear ratios can be changed by either the front sprocket or the rear sprocket. It’s also possible to go ether way and end up with something better or worse than the original settings.
Sprockets and Ratios
For example, this chart illustrates the various gear ratios that might be obtained by using different combinations of front (top row) and rear (left column) sprocket teeth:
| Gear Ratios – Motorcycle Front/Rear Sprocket Combinations | ||||||
|---|---|---|---|---|---|---|
| 14 | 15 | 16 | 17 | 18 | 19 | |
| 49 | 3.50 | 3.27 | 3.06 | 2.88 | 2.72 | 2.58 |
| 48 | 3.43 | 3.20 | 3.00 | 2.82 | 2.67 | 2.53 |
| 47 | 3.36 | 3.13 | 2.94 | 2.76 | 2.61 | 2.47 |
| 46 | 3.29 | 3.07 | 2.88 | 2.71 | 2.56 | 2.42 |
| 45 | 3.21 | 3.00 | 2.81 | 2.65 | 2.50 | 2.37 |
| 44 | 3.14 | 2.93 | 2.75 | 2.59 | 2.44 | 2.32 |
| 43 | 3.07 | 2.87 | 2.69 | 2.53 | 2.39 | 2.26 |
| 42 | 3.00 | 2.80 | 2.63 | 2.47 | 2.33 | 2.21 |
| 41 | 2.93 | 2.73 | 2.56 | 2.41 | 2.28 | 2.16 |
| 40 | 2.86 | 2.67 | 2.50 | 2.35 | 2.22 | 2.11 |
| Matrix complied by webBikeWorld.com | ||||||
This matrix uses a simple calculation: rear sprocket teeth/front sprocket teeth = gear ratio.
What About the Thunderbird Sport?
Our Triumph Thunderbird Sport sample motorcycle came with a 17-tooth front sprocket and a 43-tooth rear, for a 2.53:1 ratio (43/17 = 2.53), shown in red in the matrix above.
This means that the front sprocket turns 2.53 times to turn the rear wheel once.
Changing the ratio so that the front sprocket makes more turns for each single turn of the rear wheel can mean that the bike will be revving higher for any given speed, which was my goal.
At first, after discussions with the parts counter person, we both made the common mistake of going the wrong way with our ratios. We ordered a 44-tooth rear and an 18-tooth front sprocket.
A glance at the chart shows that this yields a 2.44:1 ratio, not what I wanted. This combination would give me less rpm at any given road speed, rather than more.
I didn’t realize the mistake until some correspondence with the Triumph Thunderbird Sport Owner’s Group pointed out the errors of my calculations. So it was back to the shop to order a 17-tooth front and 44-tooth rear.
As it happened, they couldn’t locate a 44-tooth rear so I went wild and bought a 45-tooth rear, for a ratio of 2:65:1.
Just how wild is this? Using a calculator, we see that 2.53 is 95.47% of 2.65. So in theory, going to a two-tooth-larger rear sprocket should increase the rpm’s by about 4.5% at any given speed.
And the Choice Is…
After filling in the Triumph Thunderbird Sport ratios and tire sizes in Mal’s Gear Ratio Spreadsheet, we also find that this is essentially (and theoretically) correct.
Mal’s spreadsheet shows that at the Triumph’s maximum power rpm of 8,500 rpm, the difference in speed should be (again theoretical) 132 mph vs.138 mph, or just about 4.5%.
So, in theory, I should end up with about 4.5% more revs at any given speed, and hopefully this will be enough to keep me in a better power range and not bog down when I’m puttering along on my back roads.
I also hope that the engine doesn’t seem too “busy” at normal (for me) cruising speeds. But since the rear sprocket is very easy to change out, I could always go back to the standard 43-tooth if necessary.
With the original gearing, when my Thunderbird Sport ran at 3,500 rpm in sixth gear the speedometer indicated 52 miles per hour.
At 3,500 rpm in fifth gear, the clock indicated 49 miles per hour.
I’m assuming that the new ratio will yield something like 3,675 rpm at 52 mph (3,500 x 1.045 = 3,675), which will leave the bike slightly closer to the power range. This should be just about what I’m looking for, and I’ll report back after the job is complete.
It isn’t always as simple as all that, unfortunately.
Other Gearing Factors to Consider
There are other factors to take into consideration when changing ratios. For example, using a smaller front sprocket means that the chain would have a smaller diameter to turn through, which could cause more strain, friction and wear.
So I wouldn’t recommend using a replacement sprocket smaller than the 17-tooth original on the Triumph Thunderbird Sport, especially since the Triumph’s chain already rubs on the chain guide (more on that later), causing the guide to wear out long before the chain or sprockets.
Perhaps this is why Triumph used an 18-tooth front at one point on the bike?
A larger front sprocket would physically move the chain away from the chain guide, quite possibly avoiding all the wear on that part.
I’m not sure if the 45-tooth rear that I used might do the same; only time will tell.
The chain guide issue brings up another potential problem — will there be enough clearance if different size sprockets are used? As we discovered, and as you’ll see below, this can be a problem.
Other factors to consider are how the bike will be used (track or street), what type of roads the bike is being optimized for (slow commutes or long-distance, high-speed runs) and more.
The bottom line is this: when changing gear ratios, it’s important to do some research and think carefully about the goals.
The old adage “if it ain’t broke, don’t fix it” should certainly be the watchword.
If the bike is currently running great, then why mess with success? In the end, it may not be wise to try and second-guess the Triumph engineering staff and their collective wisdom and probably exhaustive testing.
Parts Required for Chain and Sprocket Renewal
Here’s a list of the parts that used for this project:
- Triumph Front Sprocket, 17 tooth
- JT 45 Tooth Rear Sprocket
- DID 530V Chain (*See note)
- Locknut for Front Spline
- Clutch Pushrod Seal for engine case (TR3600012-T0301)
- Shifter rod seal for sprocket cover (TR3600008-T0301)
- Side Cover Gasket (TRT1260801)
- Rubber chain guide
- Clutch Pushrod (optional but recommended) (TR1170270-T0301)
Weird Triumph Quirks
The chain adjuster nuts on a Thunderbird Sport (at least on mine) are 27 mm on the right and 24 mm on the left.
I’m not sure why Triumph used two different sizes, but both of these are pretty big and the average home mechanic does not have access to sockets in these sizes.
I purchased 1/2″ drive impact sockets at Sears (27mm deep is Item #00919473000 and 24 mm deep is Item # 00919472000.
Triumph calls for 85 Nm of torque. You’ll need a 1/2″ drive flex handle (Item #00944202000) or ratchet also, to hold one nut while the other side is torqued.
*Number of chain links will vary depending upon the number of teeth in the replacement sprockets.
The Triumph front sprocket was almost exactly twice the cost of a JT brand front sprocket, but the Triumph part includes the rubber spacer on either side that help keep things quiet.
The DID chain is the “Professional” model, which is one of their top-of-the-line units, and it uses O-rings, not the X-rings that have less friction but tend to wear quicker. The other miscellaneous parts were a few bucks each.
A 36mm 1/2″ drive socket and a big breaker bar are required for removing the front sprocket nut, and if you’re as weak as me, it wouldn’t hurt to have a length of pipe to slip over the breaker bar as a “cheater” to add some leverage.
This nut takes 132Nm of torque, which is probably the highest amount of torque of any nut on the bike.
This means that it’s important to have high quality and correct tools and a torque wrench that can apply the correct amount of torque when the parts are reassembled. If this equipment isn’t available or you don’t feel confident using it, don’t try to replace the front sprocket.
We needed a Dremel tool with a small cutoff wheel to remove the rubber chain guide bolts (see below).
The Dremel was also necessary to use with an attached grinding wheel to grind off one of the pins on a chain link to remove the endless chain that’s installed at the factory (also see below).
The best tools are the combination chain breaker, side plate installer and riveter, like this Motion Pro kit, purchased through J.C Whitney for about $75.00 (although this tool broke during its first use, see below).
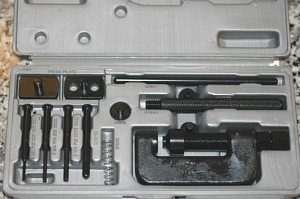 A chain breaker is also required to remove the chain and a chain press is needed to install the master link on the new chain. A chain riveting tool is also needed to “stake” the master link ends when the new chain is installed.
Disassembly
The big news about this project is that we did not have to remove the swingarm to replace either the chain or the chain guide, which I’ll describe later as Tip #7.
So the rear brake stretch bolts that secure the rear brake torque arm (the old ones can’t be reused), weren’t necessary.
We followed the Haynes Service and Repair Manual for Triumph Triples and Fours to guide us through this task, although not necessarily in the same order that the manual suggests.
I also have a copy of the official Triumph service manual also, and usually take a look-see to make sure the Haynes manual is consistent, and we found no discrepancies.
A paddock stand or rear swingarm stand is also a necessary piece of equipment for this project.
I use a Steel Horse swingarm stand (see the wBW review), which is a very robust and beautifully built unit, and which fits the Thunderbird Sport perfectly and gives me a lot of confidence that the bike won’t come crashing down on me.
After the bike is up on the stand, here’s how we proceeded:
Tip #4: After the bike is up on the paddock stand, and before the shifting assembly is removed, put the bike in first gear. This is necessary for removing the big front sprocket nut, and it’s much easier to do it now than after the shift mechanism is removed!
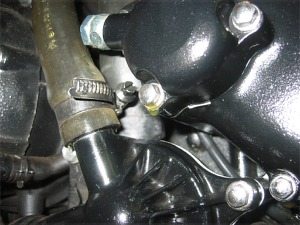
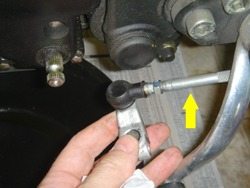 After placing the bike in first gear, remove shifter assembly. It’s not necessary to remove the shift rod (yellow arrow).
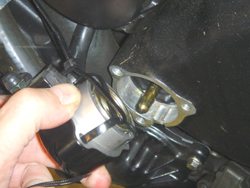 Hydraulic clutch assembly cover (above), showing the cable ties used to prevent the piston from falling out.
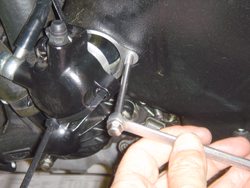 Slide one of the hydraulic clutch assembly cover bolts through an 8mm box wrench. Then screw the bolt into the cover and pull to remove the sprocket cover.
 A 36mm, 1/2″ drive socket is necessary to remove the front sprocket nut.
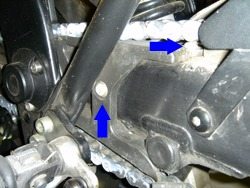 Blue arrows showing the location of the Torx bolts that hold the chain guide.
 To remove the bolt without having to remove the swingarm, carefully grind a notch with a Dremel tool and cutoff wheel…
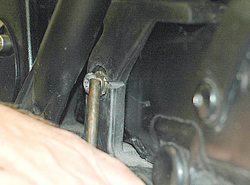 …then tap the bolt using a drift and hammer; grind another notch, tap it again, etc
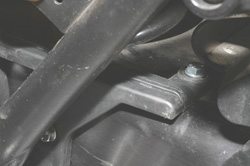 The new chain guide replacement, using M6 stainless steel hex head cap screws to replace the original Torx screws
Get a Shop Manual!
Following the Haynes manual, remove the shifter mechanism from the left-hand side.
Haynes says that it’s necessary to unscrew the shift rod from the clevis, but we found that this isn’t necessary
(Tip #5). See the first photo on the left.
Removing the shift assembly is a straightforward task; the clevis slides on to a spline and is secured by a pinch bolt.
Haynes suggests marking the spine and the clevis so that it can be reassembled back to the same position, but in our enthusiasm, we forgot to do this.
Since the shifter can be adjusted up and down and back and forth (to remove slack), we’ll have to fuss with it a bit when we reassemble everything to get it back to a comfortable position for riding.
The Haynes manual suggests draining the oil from the bike’s crankcase prior to starting this job. This is to prevent the oil from draining out when the sprocket cover is removed.
Since we’re always looking for the easy way out, we did not drain the oil from the crankcase first, so that we could see if this step could be avoided.
Tip #6: Only about 1/3 of a quart of oil drained out after the sprocket cover was removed, and this can easily be replaced after the job is complete (saving the precious $8-$10 per quart synthetic), so our opinion is that draining the oil from the bike is an unnecessary step.
Note that this only works if the bike is upright and on the swingarm stand; as soon as the bike is leaned over towards the left (i.e., on the side stand), the oil will continue to pour out of the crankcase.
Next, we removed the hydraulic clutch assembly cover. This is easy — the cover is only held on with 3 bolts. Note that two of the bolts are the same length, and on this bike, the bolt towards the rear is shorter.
Haynes suggests using two cable ties to keep the piston inside the hydraulic clutch assembly housing, just in case someone squeezes the clutch lever while the hydraulic clutch cover is unattached.
Next, remove the sprocket cover.
Whenever a thin metal cover like this with a machined edge is fastened or unfastened, it’s good practice to unscrew the bolts in a cross pattern. This helps prevent the cover from warping as it comes loose.
The bolts for this cover are not the same length, so make sure to keep tract of which bolt goes where, because it’s not obvious once the cover is off. Pull the clutch pushrod out of its hole.
The cover has a gasket between it and the engine casing, and this gasket has enough stiction to hold the cover to the engine block, making it difficult to remove. If necessary, lightly tap the cover with a rubber mallet to loosen it up.
But the best way to remove it is:
Tip #7: slide one of the cover bolts through an 8mm box end wrench and screw the bolt back into one of the threaded holes for the hydraulic clutch cover. This makes a nice little improvised handle to remove the sprocket cover with an easy tug.
The sprocket cover was packed with lots of road gunk, tar, bugs, dirt and all sorts of other assorted road debris stuck inside. It’s amazing that a fire wasn’t started in there with all the heat and friction from the chain whipping around through all this gunk!
So the first thing to do once the cover is off is to clean everything out. We stuffed a paper towel down around the shifter spline to prevent any dirt from getting back into the crankcase.
At this point, we were anxious to see if we could get the 36 mm front sprocket nut removed, because if we couldn’t, we didn’t want to proceed any farther with the job, and it would have been time to take the bike over to the dealer.
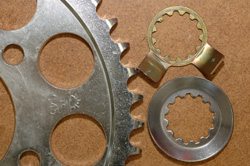
First, bend back the tabs on the lock washer. The tabs are a safety item that prevent the nut from coming loose.
The nut that holds the front sprocket is a huge 36 mm.
I have no idea how I ended up owning a 36 mm socket, but deep in the back of a drawer in my tool chest there are a few really big metric Craftsman brand (Sears) 1/2″ drive sockets, and one of them just happened to be 36mm, so we were in luck.
The front sprocket nut is secured using a tremendous 132 NM of torque; I couldn’t budge it with a 1/2″ drive, 14″ long breaker bar, and had to go down to the local hardware store to get a piece of pipe to use as a cheater to slip over the end of the breaker bar.
One person sat on the bike and held the rear brake pedal down, and with some effort I managed to break the nut loose.
Thunderbird Sport owners have been baffled by Triumph’s chain guide design flaw.
The hard rubber/plastic chain guide seems to last only about 10,000 miles or less, which is long before a new chain and sprockets are needed.
Triumph uses two Torx screws to attach the chain guide to the swingarm, and the screws are placed in a location that makes them nearly impossible to remove without also removing the swingarm.
Why they used Torx screws, and why the guide was designed this way remains a mystery.
With just a tiny bit of thought, the rubber chain guide could have been designed to be about 25 mm longer towards the rear, and the bolt that’s now hidden behind the frame member could have then been located in a position that would make it easy to remove without interference.
We scratched our heads trying to figure out how to remove these screws without removing the swingarm.
We tried tried using a cut off Torx (#30) bit to see if we could slide it in between the frame and the screw head on the side of the swingarm.
There wasn’t enough clearance for this to work, so we decided to take the somewhat radical approach of using a Dremel tool with a small cutoff wheel to grind a series of notches in the head of the Torx screw.
This allowed us to use a drift and a hammer to tap the screw, slowly loosening it.
Be careful when removing the chain guide, because there are metal ferrules used in both the top and bottom holes to help support the bolts, and it’s easy to lose these very small but critical pieces.
Removing the second Torx-headed bolt from the top of the chain guide is relatively simple, especially if the rear wheel is off the bike (which is necessary to replace the rear sprocket).
We used a Torx bit and a small adjustable wrench to remove this screw.
Thank goodness that at least Triumph used the commonly available M6 metric thread size for these screws.
We used an M6x20 stainless steel hex head cap screw to replace the side Torx screw and an M6x25 to replace the top Torx screw when we reinstalled the chain guide.
Our hope is that the next time the chain guide needs to be replaced we can slide an open-end wrench.
The unique Alden ratcheting open-end wrench works great for jobs like this, see the webBikeWorld review) between the frame and the swingarm and remove the troublesome side screw.
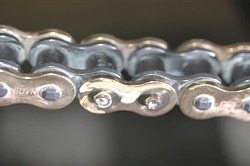
Next up was removing the endless chain that Triumph uses as original equipment.
We wanted to avoid having to remove the swingarm at all costs, and the only way to remove the endless chain is to grind off the end of one of the pins and push it out using the chain breaker tool.
This was an easy job with the Dremel; just be careful about wearing eye protection and keep the sparks and grit from flying all over the bike by using a piece of cardboard as a guide.
Once the pin end was ground off, it was easy to push it out of the chain link using the chain breaker.
We had some trouble with our chain breaker — we couldn’t get it off the chain because the design of the tool wouldn’t allow the pin to fall out.
It ended up taking more time to get the chain breaker off of the loose chain than it did to get the chain off the bike.
Where to Buy Motorcycle Chain
Check Reviews & Prices on AmazonSee More: Motorcycle Accessories, Motorcycle Tire, Motorcycle Helmets
Rear Wheel and Sprocket
Removing the rear wheel on a Thunderbird Sport is a breeze — if a paddock stand is available.
Following the directions in the Haynes manual, we removed the left-hand axle nut and slid the axle out from the right-hand side. Be careful to note where the spacers are located on the right and left hand side of the hub.
Unbolting the rear sprocket is also very easy, and it only took a few minutes to remove the old 43-tooth sprocket, replace it with the 45-tooth sprocket (recessed side out) and to torque the nuts to specifications.
Replacing the wheel on the bike is slightly more difficult.
The brake rotor must be lined up in between the brake pads at the same time that the spacers on either side of the wheel hub are perfectly aligned with the tight-fitting swingarm as the wheel is lifted back into place.
It definitely pays to have at least one extra set of helping hands for this procedure.
Everything went smoothly up to this point. We re-torqued the front sprocket to 132Nm, and threaded the new chain over both new sprockets.
But wait! We forgot something — a 110-link chain is fine for the 43-tooth sprocket, but a 45-tooth sprocket has 2 more teeth!
This means that the new chain must be at least 2 links longer, and it wasn’t!
Even with the chain adjusting bolts screwed all the way forward, the brand-new chain was still too short.
So it was back to the Triumph dealer, who thankfully took the 110-link chain in exchange for a custom ordered DID Professional O-ring chain with 114 links.
UPDATES
Note: See comments from visitors below.
UPDATE #1: Unfortunately, the 114-link chain was still about 1/2 link too short!
So the lesson here is to purchase a chain that’s several links longer than you think is necessary. A longer chain doesn’t cost much more, if anything.
In fact, the 110, 114 and 122 link chains were all the same price. I’m not sure why we didn’t just get the longer chain to begin with, but that’s the value of this type of tech article — we make the mistakes so hopefully you don’t!
By the way, chains are sold in links, e.g., “120 link chain”, but the links are twice the number of side plates. So when counting the plates as the pass by as the rear wheel is rotated, you’ll find that the number of plates equals half the chain length.
A 120 link chain will have 60 side plates on one side of the chain.
Our third chain finally arrived — this time it’s a 122-link D.I.D. “X-Ring” chain.
We noticed something interesting right away: the chain adjusters on our Thunderbird Sport only have about 25mm of travel. We wanted to have the adjusters backed in to the swingarm to make the chain length as short as possible.
But the 530 chain link length is about 17mm.
This means that it’s theoretically possible to end up with a chain length and sprocket combination where the adjusters won’t have enough travel to account for chain stretch.
For example, with our 45-tooth rear and 116-link chain, we could not find a short enough adjuster dimension, and had to back the adjusters out almost all the way to the end of their travel to tighten the chain to specifications.
I’m afraid that if the chain stretches a little bit that we will run out of adjuster travel. As it stands, we seem to be alright and hopefully the nice D.I.D. X-Ring chain won’t stretch anywhere near the amount of the stock chain.
In any case, to complete the project, we first measured about a dozen times to make sure that when we cut down the 122-link chain that we’d end up with the correct number of links.
Don’t forget that the master link only fits between two half-links. A 115-link chain was too short by a hair, so we ended up with the 116-link chain length and ran into the problem described in the paragraph above.
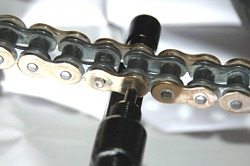
We then used the Dremel tool to grind off the end of a pin, then used the chain breaker to pop out the pin. The master link is then installed with all 4 extra O-rings (or in this case, X-rings).
Don’t forget to grease up the new master link with the little package of special chain grease that’s supplied with the chain.
Next, the side plate must be installed correctly on the master link. A specialized motorcycle chain press works great for this job, but it can also be done with a Vice Grip or C-clamp.
Make sure the plate is installed correctly, that the O or X rings are installed, and that the plate is not cocked to one side or the other.
Staking the pins on the master link is the most critical part of this whole project.
This must be done correctly to avoid having the chain come apart when riding. A specialized motorcycle chain rivet tool must be used for this job.
Our Motion Pro kit had just the right attachments, but it’s design is a bit clumsy, and we had to use what seemed like an enormous amount of pressure to get the pins to stake correctly; in fact, we broke the knurled handle on the tool (see photo).
Road Racing World magazine ran an article with lots of photos in the August 2004 issue; they claim that the pins should be mushroomed over about 0.4mm larger in diameter then the master link pin.
We followed their instructions and we’ll keep our fingers crossed that the chain will never come apart. I’ve been checking it after every ride and so far everything seems fine.
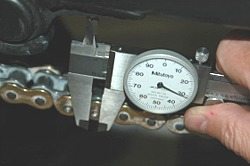
After the chain is installed, we went through the normal procedure to adjust the chain.
We used the Vernier dial calipers to measure the distance from the swingarm to the adjuster bolt head and made sure it was even on both sides. This helps get the rear wheel aligned correctly and seems to work well for this task.
We’re in the process of experimenting with lasers to find an easy way to perform a motorcycle wheel alignment, and we’ll check to see if the Vernier caliper method works.
All that was left was to button up the sprocket cover.
There’s a new seal that must be pressed in around the clutch actuation rod, and the new gasket needs to be installed between the front sprocket cover and the engine block.
We cleaned off the machined area of the engine case where the gasket seals to the engine and used a very small amount of soft gasket sealer to hold the paper gasket on to the engine case while we installed the sprocket cover.
I then topped off the oil and it was ready to go! The new gearing is working exactly as I had hoped — at 3,500 rpm in 5th gear, the bike now runs about 45-46 mph. At 3,500 rpm in 6th gear, the bike is going about 49-50 mph.
This puts the bike in a slightly better part of the power band in all gears.
It’s noticeable right from the start in 1st gear. The bike feels much more lively and is easier to pull away from a stop sign.
It feels eager to go in any gear. I really don’t notice a downside because the slightly higher revs don’t bother me at all.
UPDATE #2: The D.I.D. X-ring chain made lots of noise when the bike was taken for its first ride post installation.
It has a very loud whirring noise that overcomes the nice burble of the Thunderbird Sport’s mufflers, even at speed. It’s annoying, but I think there’s a logical cause.
I noticed a lot of wear occurring very quickly on the brand new Triumph rubber chain guide, and apparently the noise is coming from the chain links rubbing over the guide.
Some Thunderbird Sport owners have reported a noise that sounded like a “snow tire” sound that they thought was coming from their tires. Perhaps that sound is caused by their chain running over the chain guide, and/or the chain/sprocket combination?
My bike had no chain sound that I noticed prior to this project, so I’ve reached the conclusion that the noise came from the wear on the new chain guide.
There were bits of rubber chain guide scrap all over the chain, but now that it’s broken in, the whirring noise has disappeared.
UPDATE #3: I noticed that the bike was leaking a few drops of oil on the ground right above the side stand after a ride.
I looked at it carefully and decided that it’s coming from the seal on the clutch pushrod. This seal installs in the engine case, under the sprocket cover.
I did not replace this seal during the chain replacement because it seemed hard to remove. So it was back to the Triumph shop, where I ordered a new gasket, shifter seal and clutch pushrod seal.
I pulled the cover and replace everything once more, adding just a touch of Permatex non-hardening gasket sealer to hold the cover gasket in place.
Be careful when mounting the new gasket, because it’s fairly easy for it to become crimped when the sprocket cover is installed.
Unfortunately, the bike still leaked oil, just like Triumphs of old, after the second gasket was replaced!
Back to the shop a third time, now for a new clutch pushrod seal.
The Triumph design is not very robust, because the clutch slave cylinder that serves as the pushrod cover has a slot machined into the underside to drain any leaking clutch fluid.
The seal that is supposed to hold in the hydraulic fluid is not a very tight fit over the pushrod. My pushrod showed wear at the point where it rubbed on the seal, so I bought a new pushrod and seal. This has solved the leaking problem.
So my advice is to purchase the sprocket cover gasket, the shifter rod oil seal, the clutch pushrod seal, and a new pushrod (only $3.44) along with the sprockets, locknut, chain guide and any other parts you’ll need.
If you’re bringing the bike to the dealer, make sure he has these parts in stock before you leave the bike off and it ends up becoming a two-week job while he waits for the parts.
UPDATE #4: wBW visitor “J.S.” recently changed the chain and sprockets on his TBS and had this to add: “I have finally finished the chain replacement job, and have a few points to pass on.
1) When removing the shifter rod it was easier to remove whole foot peg assembly, then you can spread the sub-frame to get at the chain guard bolts with an Allen wrench. I did replace these with hex head bolts.
2) The combo of an 18 / 46 sprocket set lifts the chain off the chain guard minimizing any wear and retaining the original gearing. requires a 120 link chain cut to fit, will report later on any extended wear benefit.
3) This combo is only a little longer than stock giving plenty of adjustment.
4) Reused the locknut, saw no problem with it.
5) By grinding the rivets down had no problem with pin sticking to chain breaker tool.
6) Couple of tips, remove brake caliper to aid rear wheel removal and replacement, wedge something between pads to keep from pads from extending too far. Had to remove side stand switch to aid sprocket cover replacement.
Once again thanks for the parts and keep up the fine job on your web site.”
If you have any questions or comments; if you notice an error or omission, or if you would like to add any tips to this article, please feel free to contact me at editor@webbikeworld.com
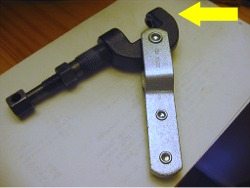
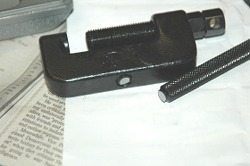
This basic version of the Motion Pro chain breaker can only be used to push out the link pin after grinding, and it does not work well at all for “staking” the tips of the master link, because of the hole at the end of the tool (yellow arrow) that is designed to allow the pin to pass through when breaking a chain. A special chain press is necessary to correctly stake the link pins – see the photo of the Motion Pro chain kit above.
Some parts of the automotive industry, as well as aviation like to use them.
The way to use them to lock the nut/bolt is to insert a flat screwdriver under the edge, facing one of the flat faces of the fastener to be locked, and to then roll the edge up against the fastener.
You can then use pliers, or a small punch and a hammer to drive the edge of the washer flush with the side of the nut or bolt, keeping it from rotating loose.
If so inclined, you can secure it once, twice, or even from three sides, depending on how much work you want to make for yourself upon removing it next time, balanced against how secure you want it to be.
I have usually seen them pushed up from opposite sides of the nut, making for 2 faces locked.”
Where to Buy Motorcycle Chain
Check Reviews & Prices on AmazonSee More: Motorcycle Accessories, Motorcycle Tire, Motorcycle Helmets
Owner Comments and Feedback
See details on submitting comments.
From “S.S.” (05/11): “I just replaced the chain and sprockets on my ’99 Legend, and wanted to make a quick comment for others who find this article when they do their own job.
I used the JT sprockets and an EK x-ring chain, and found these to be reasonably priced and excellent quality.
The EK chain came with a pair of sleeves which insert between the side plates when seating the rivets in the master link, their purpose being to let you know when you had applied the correct amount of force to finish the rivet heads.
Taking just a quarter of a turn at a time and then checking the inserts allowed me to get the rivets perfectly adjusted quickly and easily.
Basically, I kept adding a quarter turn more until the sleeves were snug in the side plates, and then used a pair of pliers to wiggle them out.
The most important point however, is that I purchased an RK chain breaking/riveting tool for just over $100, and it worked flawlessly to both push out the pin on the factory chain I was removing, and then seat the side plate and round over the rivets correctly.
The cost may be more than similar tools, but there is nothing worse than working with inferior tools that break or otherwise impede a job’s progress, so I think the value of a quality tool always trumps the cost of several cheaper ones.”
From “S.P.” (10/10): “Hi, I was reading your article about the chain replacement and came to a certain misinformation. It consists in the fact that you can use the “basic Motion Pro” chain breaker to rivet the new master link.
I work on bikes for living and this is the only tool I use.
The only thing you have to do is to take a 6 mm “button head” bolt, grind the head slightly to make it even lower, stick the treaded part in the hole with the head facing the pin and that’s it. Use it like a press.
You can take this tool in the tool bag with you and to have a universal tool for under $20.”
From “E.G.”: “I have the basic MotionPro chain tool and I was able to stake the rivet link on a size-525 chain without pushing the pins out the back side of the link by placing a 3/16” plate of steel behind the chain, “under” the back of the chain tool.
Disclaimer: I haven’t measured the mushroomed pin yet, so I’m not sure I’m done. And I (obviously) haven’t ridden it yet so I don’t know for sure that it won’t fly apart.
My only concern is that I didn’t use MotionPro’s proper “rivet” tool tip, with the dome top. (I hadn’t seen one up close until afterward.)
I took my existing pin-removal tip, which was showing some bending and tip cracking from hard use, and ground it into a cone, and used that.
But theoretically, the basic MotionPro chain tool could be used to stake rivet links on any chain thin enough to fit inside the tool along with a plate of steel to prevent the pins from being pushed out.
The basic chain tool’s handle should be tough enough to avoid failing like the knurled handle on the more advanced chain tool.”
Other WebBikeWorld Chain Lube Posts