Surprisingly good video when the conditions are right.
Uses two readily available AA batteries and SD memory.
Tiny LCD screen is very useful and displays elapsed time during recording, recording time left and other menu options.
Kit comes with several mounting devices, but you’ll probably have to rig up your own for motorcycle video. Price is relatively low.
I wrestled the Oregon Scientific helmet cam out of its wrapped-for-the-apocalypse blister pack in the living room one cloudy Saturday afternoon about a month ago. After sliding in a couple of AA batteries and an SD card, I was up and running in no time.
A couple of minutes of fooling-around video of the dogs and the cat proved to be a bitter disappointment. The results were awful. I threw the camera back in the box and forgot about it.
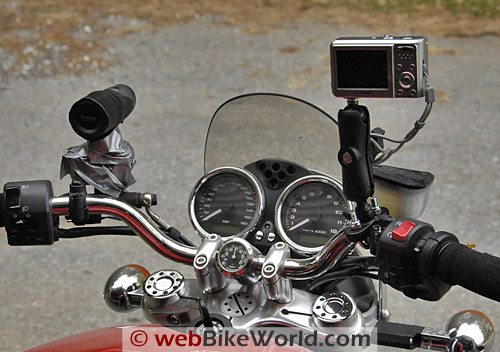
As I was on my way out the door for a ride the other day, just for kicks I grabbed the camera and stuck it on the GT1000’s clutch reservoir with some duct tape in a 20-second mounting job. I figured I better give it at least one ride before I trashed the entire project.
Lo and behold, the results were amazing! Well, comparatively speaking, anyway. The video looked pretty darn good and way better than I expected after the poor results from the living room trial.
So I grabbed my Fuji F31d digicam, which has a pretty decent built-in video capability, and quickly rigged it up on the right side of the Ducati’s handlebars using a RAM 1/4″-20 camera mount.
I stuck the Oregon Scientific camera back on the clutch reservoir cover on the left-hand side of the bike and fired ‘er up again.
The comparison between these two cameras is very interesting, and both videos are posted below.
I notice no difference between the two; in fact, I had to go back a couple of times to make sure I hadn’t mixed up the .avi files.
Caveats
Note that there is a lot of vibration apparent in these videos, only because I didn’t take the time to create a secure mounting, and, let’s face it, the handlebar of a Ducati GT1000 is not, shall we say, the smoothest location in the world and is probably one of the worst places on a motorcycle to mount a camera.
Also, this type of fast movement is the worst-case scenario for just about any digital videocam — especially a cheap unit.
Note also that the videos below have first been processed in Adobe Premier Elements 4.02, then they went through YouTube’s Flash compression. So keep in mind that the quality out of the camera is very, very much better than what you see here.
Also, for some reason, YouTube didn’t like the sound file attached to either video.
We’ve been saving the .avi files directly from Premier Elements 4.02 and then converting them using the DivX converter lately, which seems to do an OK job dealing with YouTube’s brutal compression algorithm.
But DivX did not like these jittery handlebar videos, so I saved them instead as .wmv files out of Premier Elements. YouTube doesn’t seem to like the Premier Elements .wmv sound coder, and it deleted the sound, so who knows.
You’re not missing anything; the sound is pretty bad anyway because of the wind passing over the microphone.
Final caveat: The weather has been overcast for some time, and the smooth light that filters through the high cloud layer yields perfect conditions for photography.
Although I have tried the videocam in low-light conditions as noted above, I did not have the opportunity to try it in high contrast conditions, like bright mid-day sun.
I’d suspect that, like most cameras up to and including some pretty expensive digital photography cameras, the Oregon Scientific camera will not do very well in conditions of high contrast and will probably blow out the highlights, at the very least.
The important things to note: 1) Both of these videos look much, much better when played directly on the computer than they do on YouTube; and 2) Each file was processed exactly the same, so we’re comparing apples to apples.
Take a look and see if you can notice any differences. I can’t.
UPDATE: I created two 10-second clips to illustrate the original quality of the video from the Oregon Scientific camera, because the YouTube compression algorithm seems to degrade the quality of the embedded YouTube video (below) quite drastically and is not a fair illustration of the quality of the video from this camera.
The raw .avi file from the Oregon Scientific camera was processed with Adobe Premiere Elements 4.02, then saved at 100% quality and 100% bit rate in the Apple QuickTime (Apple MPEG-4 codec) and Windows Media (Windows Media 9 Advanced codec) translating processor.
Both of these files are very close to the original .avi quality taken directly from the Oregon Scientific camera, but are much smaller at a total of approximately 10MB (1MB per second), about a 75% reduction in size from the original 10-second .avi file, which was about 40MB.
The Oregon Scientific ATC2K Waterproof Action Cam
The Oregon Scientific camera, or helmet cam, has been available for some time, as far as I can tell. I hadn’t paid much attention to the thing, and even considered it a toy, until we ran our review of the VholdR Helmet Cam.
That review generated enough interest from webBikeWorld visitors to motivate us to do follow-up review of the HERO Helmet Cam, which also doubles as a digital photo camera.
So the Oregon Scientific camera was the next logical step and, as you have probably surmised, I didn’t expect much from it, but I now think that for the money, it’s currently the best solution of the three.
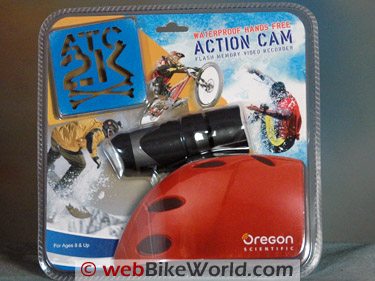
This ATC2K waterproof camera lists for $119.00 directly from Oregon Scientific, and it can be found for 99 bucks or so.
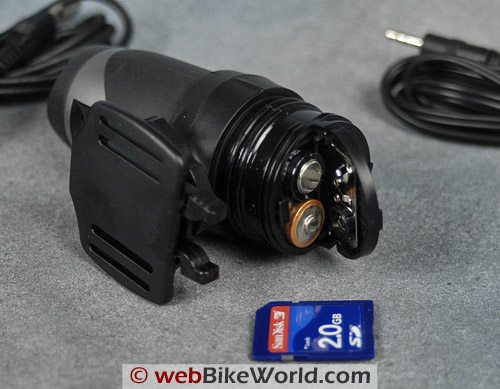
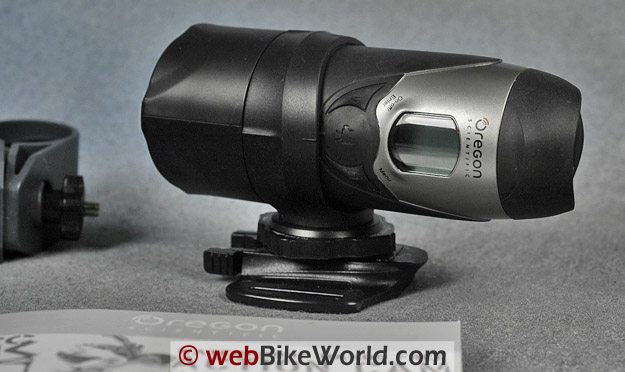
It’s built in a robust plastic housing and the screw-on cover in the back includes two big O-rings to keep out the moisture.
Inside are the two AA batteries (not included) and the SD card, which is much more readily available and commonly used in digital cameras — I didn’t have to buy yet another memory card, like the too-tiny microSD card used in the VholdR.
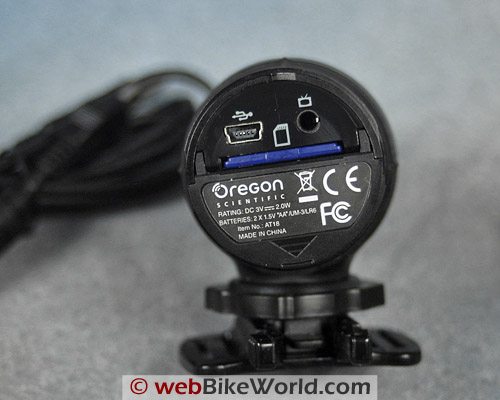
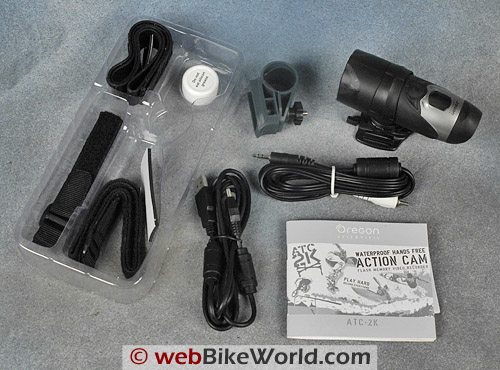
Contents of Oregon Scientific Camera Kit: Clockwise – Camera (top right); RCA cable for TV viewing; owner’s manual; USB 1.1 cable; tray with straps, rubber spacers and silicone grease; bicycle handlebar mount. Rear View: SD card; USB port (upper left) and TV port. Oregon Scientific Camera: Rear view, open, batteries and 2GB SD memory card.In fact, the Oregon Scientific camera isn’t much bigger than the VholdR, so how much room was saved in the VholdR by using its proprietary rechargeable battery and microSD card?
Batteries, Memory and Options
The SD card and AA batteries can be found in the local Big-Box-Mart, and extra AA’s can go along for the ride, unlike the VholdR’s rechargeable, which must be plugged into a computer’s USB port or USB hub or their recharging station when it becomes available.
So on the road or on tour, throw a couple of AA’s in the Oregon Scientific and keep on rolling.
The owner’s manual, which is clear and concise, suggests that alkaline or lithium batteries, NiCads or rechargeable batteries can also be used.
The Oregon Scientific camera comes with some mounting options, like the flat base shown in the photo above, which has slots for either of the two straps supplied with the kit; one rubber and one Velcro.
The flat base slides off and they also throw in a cheesy handlebar clamp that is probably designed for a bicycle.
The problem with all of these portable video cameras, as far as I can tell, is that the mounting options aren’t very good and not really designed for a motorcycle. So, you’ll have to improvise, like my duct taped clutch reservoir solution.
The camera is easy to use. It has three buttons on top: on/off; video on/off; and menu options. Once the batteries and memory are in place, press and hold the on/off button until the camera beeps and the LCD display turns on.
Having the LCD display come to life is actually a better indicator that the camera is “on”, because I can’t hear the beep when I’m wearing a helmet and ear plugs, much less when the bike is running. The VholdR has only a dim light to tell you that it’s ready to go.
Taking Video
Once the Oregon Scientific camera is on, simply press and hold the middle button, which turns the video camera on and off, and you’re ready to go.
The third button changes some of the menu options, like video quality (high at 640×480; medium at 320×240 and low at 160×120); keep it on high.
The sound recording can also be turned on or off, a nice feature not available on the VholdR. You can also use the menu to delete the last video or all video on the SD card, another good feature.
The date and time is set through the menu, which should be done initially so that the video files will have the correct date and the video speed can be set for either 30 frames per second or 15 FPS. Nice.
I left all the menu options as is and set only the date and time. It’s best to record video at the highest possible quality, because it will get degraded every time it’s processed and especially if it’s uploaded to YouTube.
File Sizes
After the camera is turned on, a number is displayed on the LCD screen.
This is an estimate of how many minutes of recording time are left on the SD card. I’m using a 2GB SD card, which is the maximum size recommended by Oregon Scientific, and this gives me approximately 60 minutes of video at the highest VGA, 640×480, 30FPS resolution.
he camera will accept cards as small as 8MB, according to the owner’s manual.
Each on/off button press automatically creates a new video file, and the files are saved in a folder named “100COACH” on the SD card.
Oregon Scientific provides both a USB cable and television input. But I usually pull out the memory cards on my digicams and videocams and pop ’em right into the USB multi-memory card reader.
This way, I can pull them directly off the memory and into Photoshop or Photoshop Elements to process the photos and Premier Elements or Sony Vegas for processing the video.
Oregon Scientific says the ATC2K camera is not shockproof, but it is claimed waterproof to 3 meters.
They even threw a small bucket of silicone grease in the package to grease up the O-rings to help keep them waterproof. I use the grease also on the sliding mounts, because the plastic gets kind of grabby if it’s dry.
And they even offer an optional “blanket” to wrap around the camera for really cold weather use.
Specifications
Some of the details of the camera include:
- Sensor resolution 640×480 VGA
- CMOS sensor
- Built-in 32MB memory
- Focus: fixed range, 1.5 meters to infinity
- Movie images saved in .avi format (Motion JPEG [MJPEG] codec)
- Audio saved as Pulse Code Modulation (PCM) Audio, 16,000Hz 128 kb/s (1 channel)
- USB 1.1 only
- Automatic shut off after 30 minutes
- Dimensions: 40mm diameter, 110mm long
Let’s see: that’s about it. The camera is easy to use — easier, I think, than the VholdR, because the menu choices seem simpler and the LCD screen provides at least some feedback so you know what’s going on.
It’s very hard to tell if the VholdR is recording when you’re on the bike, but the LCD display on the Oregon Scientific camera gives visual feedback by displaying the elapsed time for the recording when the video function is running.
The camera rotates in its base and there are little marks molded in to the plastic on both the camera and the plastic surround at 90-degree intervals.
One of the hardest things about using these cameras on a motorcycle is getting them lined up so the resulting video is level and so the camera is pointed where it should be.
This is why even though they’re called “helmet cams”, I almost never mount one on a helmet.
A helmet is probably the worst place to mount one of these, for both safety reasons and because your head is bouncing up and down, moving around and getting tossed by the turbulence.
Mount it on the bike and at least you’ll end up with a somewhat steady video.
Conclusion
The Oregon Scientific ATC2K camera takes decent quality video in the right conditions.
The price is right and the features make this camera easier to use than others I’ve tried.
It’s size and shape and waterproof housing make it easier to use on a motorcycle, although you’ll probably have to improvise to get any of these inexpensive videocams mounted securely on a motorcycle.
More webBikeWorld:
▪ Video Action Camera Reviews
▪ Intercom and Radio Reviews
| wBW Review: Oregon Scientific ATC2K Waterproof Video Camera | |
|---|---|
| Manufacturer: Oregon Scientific | List Price (2008): $119.99 |
| Colors: Silver/Black | Made In: China |
| Review Date: March 2008 | |
| Comments: Both raw .avi files were processed in Adobe Premier Elements 4.02 and saved as a .wmv file at 100 quality; 2 pass; 640×480; 30FPS; Max bit rate 2,688.96; key frames every 15. | |
Owner Comments and Feedback
See details on submitting comments.
From “M.Z.”: “First of all, I love your work! Thank you.
Recently I happened to run the tests similar to what you did with Fuji and this Oregon Scientific Camera. So far I have covered a couple cameras/camcorders with CMOS sensors and a few with CCD sensors.
Some are even capable of making 720p HDTV quality videos.
My result shows CMOS sensor cannot compete with CCD in the on-motorcycle usage, because of it uses the rolling shutter.
Generally CMOS sensor uses rolling shutter during the data readout (using global shutter like CCD sensors will make it more expensive).
When mount a CMOS sensor camera/camcorder on motorcycle, the fast moving scene and vibration of the bike will create wobble effect due to this rolling shutter.
I don’t have direct access to this Oregon Scientific Camera, but a technician recorded one short video clip using this camera for me, which shows the expected drawbacks of CMOS.
Although your video doesn’t show significant wobble effect, it will be shown when the speed is higher rt vibration is stronger/faster.”
From “P.O.”: “Judging from your review, this looks like it could be an ideal surveillance — “What do you mean you ‘didn’t see me’?” — evidence camera to have running continuously whenever riding, particularly if there would be a way of defeating the 30-minute auto shut-off.
I could imagine that you could get quite a few hours of continuous real-time “potential evidence” for court and insurance situations by setting the camera at low resolution and 15 frames per second.
Perhaps I’m just overly paranoid after riding for 43 years, but I can think back to several situations where I wish to heck I’d had one of these attached to the bike and recording the actions of car drivers.
p.s. This thing would really be great if it could be programmed to run continuously and, when it reached the 2-Gig capacity of the card, quickly erase the contents and then begin again, over and over until needed. Oregon Scientific, are you listening?
I enjoy your site very much and have bought a lot of products you’ve drawn to my attention.”
From “B.R.”: “My son bought this camera for me for Christmas and like you I wasn’t impressed with it and put it in the drawer. Last week I was going for a ride on the twisties and decided to give it a chance on the bike.
I have an Honda 750 Aero with a windshield. I mounted the camera on the handlebars behind the windshield and was amazed at how good the video was.
The mount worked well although I did have to put an additional rubber shim around the handlebar to secure it.
Like you I am having a hard time getting the camera aimed properly. I may glue a bubble level on the side that I can use to aim it.
One other problem I am having with it is the switches are very hard to push.
I have a hard time stopping the video while I am wearing gloves. So far I have had to stop the bike, take off my gloves, and press the stop button.
I have thought that Oregon Scientific may have done this on purpose so you wouldn’t be fooling with the camera when you should be concentrating on your riding. All in all I am happy enough with the camera to recommend it to others.”