Easy to install wireless LED brake light strip attaches to helmet.
Comes on steady when brakes are applied; after 5 seconds the LEDs flash.
Has button for continuous blinking emergency display. Provides potentially greater visibility at night or in inclement weather.
Brake lights and motorcycle visibility continue to be one of the hottest subjects in motorcycling.
We receive a huge amount of email traffic related to motorcycle lighting.
That includes LEDs, brake lights, light bulbs or how to get brighter and better visibility.
So it’s obvious that motorcyclists are both concerned about these issues and want to do something about it.
There are many articles and lots of information on webBikeWorld regarding various types of lighting solutions (see the wBW Technical and Maintenance Articles page or the Motorcycle Lighting page).
But much of the interest involves increasing the light emitted by brake lights. Power, wattage, brightness, surface area, location — you name it, and motorcyclists want it!
There are various theories, too. Some say that there should be a large area of brake light concentrated around a single location on the back of the bike.
Others think that spreading the brake lights around the back of the bike is a better idea. Then there are those who want blinking, twirling or flashing brake lights in one or more locations. And some want all of the above!
One of the problems is that there hasn’t been much research (at least that I’m aware of) that has studied the effectiveness of various brake light schemes on the awareness and reaction times of drivers and other traffic. Maybe someday there will be an effort made in this area, and we’ll find out that certain colors, brightness, surface area or location of brake lights in back of a motorcycle are more effective than others.
Until then, many motorcyclists want as much as brake light power as they can get.
RiderLight LED Wireless Helmet Brake Light
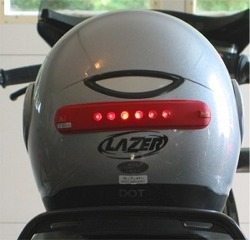
If you’re one of them, then the RiderLight may be for you. The RiderLight is a water repellent brake light LED strip that can be attached to the back of a motorcycle helmet (or saddlebags, top boxes, fenders or anywhere else on a bike).
The 6 LEDs in the RiderLight strip are powered by 4 lithium watch-type batteries that are accessible from the rear of the strip.
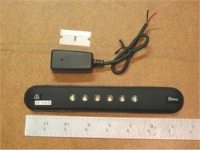
The LED lights on the RiderLight are activated by a tiny radio transmitter that is either attached to an accessory 1157 LED bulb, or in a “black box” (shown in the photo on the left) that can be plumbed in to any motorcycle brake light system.
When the RiderLight is installed and powered up, activating the bike’s brake lights will cause the 6 LEDs to first burn steady for about 5 seconds, then start to flash as long as the brake lights are applied at the rate of about 85-95 flashes per minute.
The RiderLight also has a hazard/warning flash mode. When the unit is powered up, the button with the international hazard triangle logo can be pushed to activate a continuous flashing mode.
This could be useful when riding in fog or poor visibility conditions at night, or for the unfortunate rider stuck on the side of the road doing some nighttime repairs. The hazard flashers could also be engaged and the helmet placed on the seat or by the side of the road to warn other motorists.
A helmet mounted RiderLight places the flashing LEDs at just about eye level with following vehicles. There are no studies to confirm this, but some say that having a brake light at eye level may help increase driver awareness that the motorcycle is stopping, slowing, or at least that something is happening.
Hopefully, the following driver will not become overly fascinated with the blinking helmet and not realize that the rest of the bike’s brake lights are burning bright!
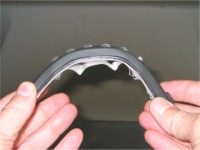
The RiderLight LED strip is very light at 60 grams (2.125 oz.). It’s 19.5cm long (7-11/16″), 30mm wide (1-3/16″) and about 1cm thick (about 3/8″).
The strip is relatively flexible, and it should fit the curvature of pretty much any helmet. The RiderLight is attached via some 3M VHB double-sided tape.
Once the RiderLight is attached to the helmet, the unit must be removed to replace the batteries. But, this apparently is not a problem.
In one test, the RiderLight was continuously left in the hazard blinking mode for 5 weeks and the batteries have not run down.
One of the wonders of LEDs is their low power consumption. Since the RiderLight is only activated when the bike’s brake lights are applied, the batteries will probably not have to be replaced for a very long time, if at all. If the RiderLight strip does need to be removed from the helmet, the job can be made easier by blowing some hot air from a hair dryer on the strip as it is lifted off.
We found that it is important to find the optimal mounting location for the RiderLight on the back of the helmet. One of the drawbacks of LEDs is that they are somewhat directional, and many LEDs will not be as bright as an equivalent incandescent bulb.
The RiderLight uses plastic lenses over each LED to diffuse the light somewhat, but it’s still important to find a location on the helmet that will provide optimum visibility. Don’t just slap the RiderLight on the back of your helmet without first determining an optimal location! I just about guarantee that if you install the strip on your helmet without first confirming a location that you will locate it too high on the back of your helmet.
Mounting the RiderLight
Our advice for mounting the RiderLight is to first temporarily mount the unit on the back of your helmet using a couple of pieces of duct tape doubled over to form a crude version of double-sided tape.
You’ll probably find that you have to mount the RiderLight much lower than you would think; this is because you’re usually in some type of a crouch when you’re on the bike in riding position. The sportier the bike, the lower the RiderLight strip will have to be mounted on the back of the helmet!
You’ll need an assistant to help with the next step. Put on your helmet and your riding gear just as if you were going for a ride. Mount the motorcycle and take it off the side stand or center stand, and sit on the bike just as if you were sitting at a stop light.
Try to assume a normal riding position. Put the RiderLight into the hazard warning mode, and have your assistant stand behind you at various distances, just as if they are a following vehicle.
Your assistant’s job is to try and determine the optimal position for the RiderLight by moving the unit to try various locations.
The optimal position is where the LEDs are most visible at different distances. You can get even more scientific by having your assistant sit in a car behind you to simulate the eye level view that a following vehicle might have.
Once you’ve found a good position, make sure you first clean the helmet with some rubbing alcohol to eliminate any dirt, grease or oil from your hands. Place the RiderLight strip on the helmet and press firmly all around. You may want to cover the RiderLight with a strip of paper and then put a big strip of duct tape over the top of the RiderLight and well past each edge.
Make sure it’s tight against the helmet and let it set for about 24 hours until the double-sided tape glue really sticks. This is especially important if your helmet has a sharp radius and you have to bend the RiderLight to fit.
The edges of the RiderLight may tend to pull away from the helmet before the glue sets, but the 3M VHB tape is pretty good stuff, and if it’s applied correctly, you shouldn’t have any problems.
Activating the RiderLight
The RiderLight is activated either by a special 1157 replacement LED array that contains a tiny radio transmitter, or by a “black box” that contains the transmitter. Although the 1157 LED may not be compatible with the ABS systems on some bikes, the black box will work with all motorcycle brake light circuitry.
The 1157 LED array has 12 LEDs; 6 are aligned to point straight back, and 6 point out towards the outside diameter of the circuit board, to help bounce the light off the bike’s reflector. Three LEDs from each orientation light up as running lights, and the other pair of three lights up when the brakes are applied.
We found that the black box is a bit more work to install, but could be the more logical choice for many RiderLight owners. Not all bikes use an 1157 bulb for the brake light, so make sure you know what type of bulb your bike takes.
Also, although the LEDs on the RiderLight unit are arranged so that some of them will bounce light off the internal reflector, the LED array may end up not being as bright as the bike’s original bulb (although the RiderLight LED array is claimed to pass all requirements for brake light illumination).
If your bike uses two brake light bulbs in the housing, chances are that the LED replacement will have a different light output and pattern than the adjoining bulb, which may look strange.
The black box is small enough at 50x20x25mm to fit in most brake light housings. You can also mount it anywhere under the seat where you can tap into the power and ground for one of the bike’s brake lights.
RiderLight supplies two electrical taps for this purpose, but we’ve had great success using Posi-Lock and Posi-Tap electrical connectors for very secure and vibration-proof electrical connections on motorcycles (see the wBW Review of Posi-Lock connectors and Posi-Tap connectors).

There are only two connections to make — power and ground. Tap into the power and ground for one of the brake lights using Posi-Tap connectors, and you’re ready to go.
The radio transmitter is completely FCC legal. It has an interesting effect — if you’re riding in a group of people who all have RiderLights, one brake light will activate all of the RiderLights on everyone else’s helmet! This is due to the single broadcast frequency of the radio transmitter. This isn’t a bad thing — many blinking brake lights are probably better than only one!
This also means is that only one transmitter is necessary for multiple LED strips on the same bike. The single transmitter will signal, for example, a separate LED strip on your passenger’s helmet and/or the back of your bike, on saddlebags, etc. If you don’t want the LEDs to flash, don’t turn on the strip and you’re all set!
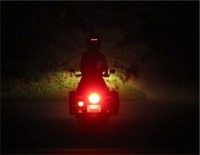
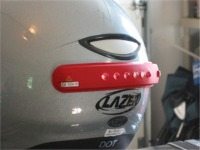
It’s very hard to get good photographs of motorcycle lighting. The brightest light usually overpowers the camera’s range of exposure. And it’s nearly impossible to get good photos of motorcycle lighting at night.
The photo at left is a good example — the bike’s brake light overpowers the exposure of the scene, but the point of this photo is to show that if it wasn’t for the RiderLight, the upper half of the rider would be virtually invisible to oncoming traffic.
I had to set a long exposure time to capture the light from the RiderLight, but remember that it will also be flashing, which makes it more noticeable (I also notice that my right rear 2397 directional/running light is out!).
The RiderLight is not as noticeable during daylight, but many motorcyclists will want to have every type of brake light possible, with the hope that something will attract the attention of sleepy motorists following them.
The RiderLight is currently ready for release and is available for sale with the 1157 LED replacement transmitter. The “black box” will be available for distribution sometime in October of 2003. Replacement or additional strips and transmitters are available for separate purchase.
Great Choice, Inc. has developed the RiderLight and is handling its distribution. Jack Holt, the President & CEO of Great Choice, has mentioned that he’s waiting on an endorsement for the product from the State of Arizona Dept. of Public Safety for use by the Arizona Motorcycle Police.
Jack said that they have tested 6 units in the heat, desert and in traffic and that “it surpassed every test”.
| wBW Review: RiderLight Wireless LED Brake Light | |
|---|---|
| Manufacturer: RiderLight (Apparently no longer in business as of November 2007; see note in Comments section below). | List Price (2007): $49.95 for light; $49.95 for sending unit. |
| Colors: Black, white, red. | Made In: China |
Owner Comments and Feedback
See details on submitting comments.
From Computac: “We at Computac Technologies, Inc. located in Spring Grove, Illinois, are the manufacturer of this wireless helmet brake light which is made in Taiwan, and which Riderlight bought from us at Taiwan in 2003. We are the original and (it is) patented in the United States right now.”
From “SLJ” (10/08): “I was browsing your site, because I need to replace my Riderlight, not because the Riderlight cannot be stuck to my helmet (Vega Summit) but because after about three years of use one (plus only one change of batteries) of the LED’s has burned out.
The comments of “J.Q” (April 2008) are valid in terms of using the supplied adhesive strips or even carpet tape/standard hook and loop fasteners. I was successful though when I used some “industrial strength” hook and loop fastener from 3M. I told the manufacturer at the time, I guess they didn’t take my advice seriously judging from J.Q.’s comments.
I’ve been told that the light is effective, mostly at night or on dark/overcast days. Any product that keeps other road users from running into me is worth the effort.”
From “J.Q.” (April 2008): “A week or so ago, I spotted a reference to American Scientific’s sale of RiderLight LED helmet brake lights. They were selling the units for about $9 apiece. A further search led me to the WebBikeWorld review of this product.
I ordered two of the lights and installed the radio sending unit on my Honda Pacific Coast. The installation was fairly straightforward, and the lights both lighted up, though the four little batteries were so depleted that I decided to buy eight new batteries – for a few dollars more than the lights themselves. I wasn’t complaining, though, after reading your review, which listed the original RiderLight price at about $50 for the lights and another $50 for the sending unit. I felt I had gotten a bargain.
Then I tried to mount one of the units on my helmet, an XL Shoei RF900. I’ll have to report that it did not work. The curve of the helmet shell was too strong for the original adhesive, resulting in the left and right edges pulling away from the helmet. I removed that 3M strip and replaced it with some double-stick foam tape, the kind used to mount posters to walls. To make sure I got the best possible adhesion, I circled the entire helmet, and the light, with clear packing tape and left it in place for a full day.
But no more than an hour after I removed the tape, those edges had once again pulled away from the helmet shell. I suppose that the light could be attached with a really heavy-duty adhesive, but of course it needs to be removed from time to time so the batteries can be changed.
I’m sure that the lights will work well on a flat surface, and I’ll look for some spots to mount them. But as a helmet-mounted device, I’m afraid it’s a bust. The body of the unit is too wide, and too flexible, to adhere well to an actual helmet.
I do like the idea of signals on a helmet, of course, and I’ll keep looking for an alternative (in a perfect world, helmet manufacturers would build such things into their products, along with Bluetooth microphones and speakers and sliding sunshades). But this one isn’t the answer. No wonder the company seems to be out of business, as your review notes.
I thought you might like a user’s report.”