Suzuki V-Strom 1000 ABS Adventure Blog
Welcome to the Suzuki V-Strom 1000 ABS blog!
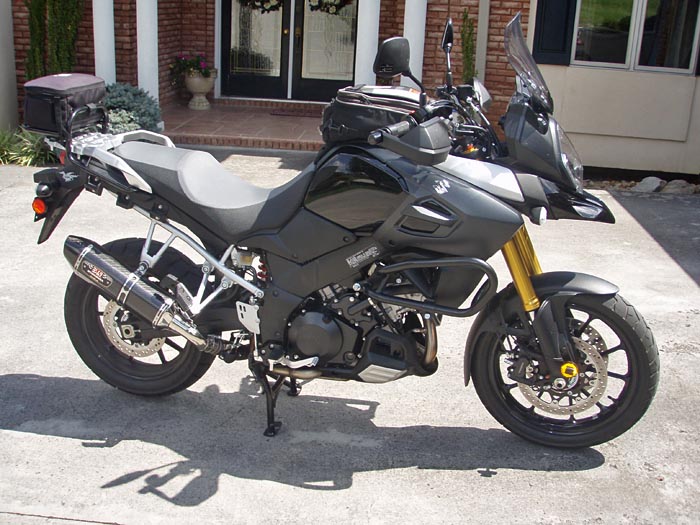
The V-Strom 1000 ABS is a webBikeWorld Project Bike for 2014.
I eagerly anticipated the V-Strom after seeing a European version introduced at the 2013 AIMExpo dealer show (report) in Orlando, Florida in 2013.
I reported on the bike in this 2014 Suzuki V-Strom 1000 ABS preview and I took delivery of an “Adventure” version in May of 2014.
As I mentioned in the Suzuki GW250 Blog (another webBikeWorld Project Bike), despite the preponderance of the Suzuki brand recently as Project Bikes (e.g., the Suzuki DR650SE Blog), it’s pure coincidence, nothing more. I never knew I was a Suzuki guy!
I published a Suzuki V-Strom 1000 ABS First Impressions report after only 100 miles or so.
That was perhaps too early for a “first impression” but I wanted to get something out there and I had some, well, first impressions about the bike.
If you’ve read that report, you may think that I think that it’s a horrible motorcycle. Not true; it’s just that it doesn’t “blow me away” like most new motorcycles do.
I plan on keeping it for the duration and — who knows? — maybe I’ll come to like it. One really never knows…
In the meantime, this Blog page will have links to articles and tips, so check back often.
Also, please subscribe to the webBikeWorld.com RSS feed, Twitter posts, Facebook, Google+, YouTube Channel, Vimeo Pro Channel (info page) and more to get updated every time a new article is posted.
And feel free to send your comments, tips on parts or accessories and your feedback on the new V-Strom 1000 ABS, Standard or Adventure model, to editor@webbikeworld.com
Reviews and Articles
Newest…
- MADSTAD Windshield Review
- SHAD Seat Review
- More V-Strom 1000 ABS Torque Specs
- Barkbusters Storm Hand Guards Review
- LED Dimmer for Auxiliary Lights
- SW-Motech Mirror Wideners
- Denali DR1 vs. D4 LED Lights
- Adding Wide Foot Pegs
- SW-Motech Skid Plate Engine Guard
- Handlebar Riser Review
- SW-Motech Protector Guards
- Metzeler Tourance Next Review
- G2 Throttle Tamer Transforms V-Strom!
- Stebel Magnum Horns
- Givi Bags on the V-Strom (below)
- Cameleon Chain Oiler
- Kaoko Throttle Control
- V-Strom Chain Adjustment
- SHAD SH36 Side Cases for the V-Strom
- Nokya Hyper Yellow Bulb Replacement
- Paint Protection Film for V-Strom (below)
- V-Strom 1000 ABS Tank Bag Review
- Center Stand Installation
- Suzuki Tank Bag Notes (below)
More V-Strom Tips, Tricks and Info
Sargent Saddle and Decals
From “R.D.C.” (January 4, 2015): “Well, been enjoying the Strom and have added some more new mods that you might find interesting and have contributed to my loving this under-appreciated gem.
First, found out that Sargent saddles is now making a lowered saddle for the Strom. Got it (along with a lowered saddle for my wife’s F700GS Lowered).
We both had Sargent saddles on our previous Stroms and loved them. Looks like the love affair will continue as after several thousand miles we love them.
Second, you we so right about the need for tank protection. Did you know that in Europe they offer a series of decals for both looks and tank protection?
Can’t get then in the states (I tried), so had an English friend who was coming to visit get them and together we put them on. I absolutely love the look and the tank is fully protected from my knees.
With all of your connections, thought that if you were interested someone from across the pond could help. I have all the part numbers if you decide to get them. Would be glad to send them to you.
OBTW, we took our bikes to Reg Pridmore’s CLASS at Virginia International Raceway for two days of hard track work. Bike was amazing (hopefully the rider got better). I am looking forward to many years of enjoyment with this under-appreciated gem.”
U.S. vs. Europe Service Intervals for the V-Strom
(November 23, 2015): “I would like to ask you about the different service intervals of our bike the V-Strom 1000.
Here in the States the dealer still wants to see you for a 4,000 mile inspection. In Europe however it seems they got rid of it and jump from the 600 directly to the 7,500 mile or 12 month inspection.
Do you have some information about it? Or can you check your contacts if there was an update or why the US still has a 4,000 mile inspection?
In the British magazine MCN you’ll find from 27 January 2014:
Suzuki’s press release states: ‘Extensive engine development has also led to an increase in service intervals for the V-Strom 1000.
While the first service remains at 600 miles, subsequent service intervals have been confirmed at 12 months or 7,500 miles, making the V-Strom an even more affordable and practical proposition.’
And this German service sheet (.jpg) shows only a 1,000 km and 12,000 km inspection (600 miles / 7,500 miles).”
Rick’s Reply: Good question, anyone have the answer? My guess would be that average trips are much shorter in the U.S and possibly with much more off-road usage, thus the increased service intervals?
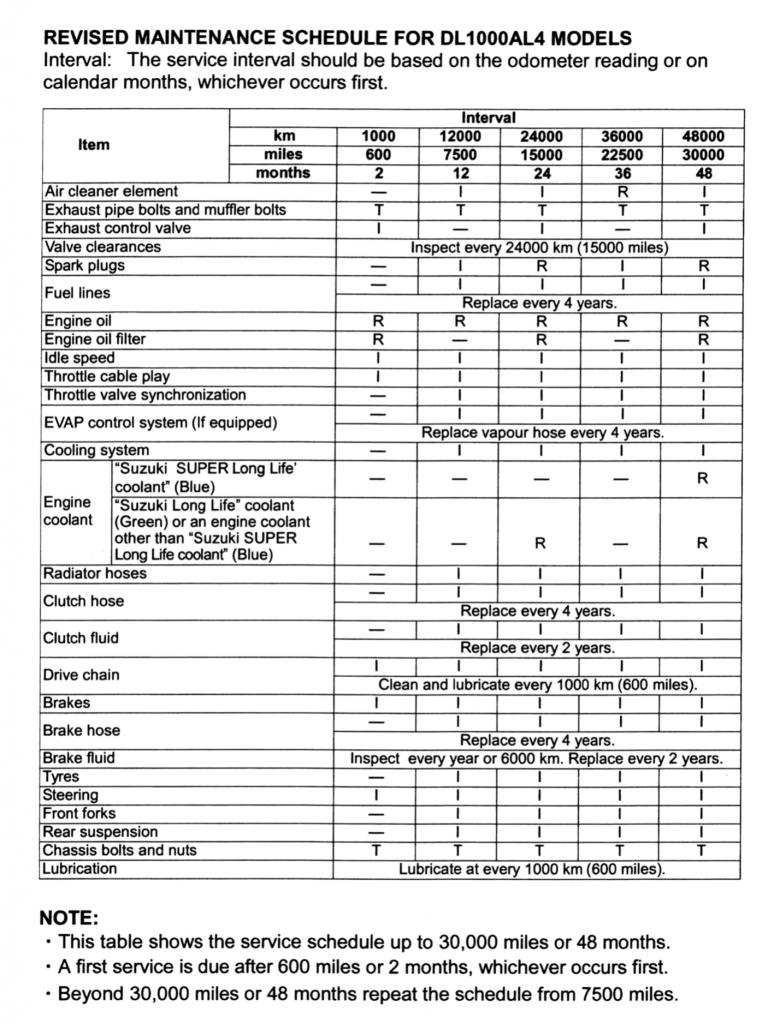
UPDATE From “G.Z.” (May 2017): “Here is the answer to the open question on your 2014 Suzuki V-Strom DL1000A ABS blog regarding different maintenance schedule in the U.S.A. vs in Europe: the original maintenance schedule for Europe was revised (see links below).
Based on the service addendum / revised schedule, the European schedule now includes recommended service at 12,000 km / 7,500 miles / 12 months, just like the U.S. schedule.
V-Strom 1000 UK Manual Downloads
Revised Maintenance Schedule for the DL1000
BTW, I cannot find this bike’s owner’s manual anywhere on the internet!!!”
Rick’s Reply: Thanks for this information! Suzuki USA sells a .pdf version of the owner’s manual for $20.00 (they should give it for free though!).
Fix Those Non-Waterproof Connectors!
(November 23, 2015): A 2014 V-Strom 1000 ABS owner let me know about a problem, Suzuki used non-waterproof connectors on the wires up above the radiator, under the fuel tank.
These connectors can become wet when riding in the rain and short some electrical components.
Here is the forum thread on the UK V-Strom Owner’s Club website on waterproofing 2014 Suzuki V-Strom 1000 electrical connectors with photos and information.
MADSTAD Windshield Review
(September 12, 2015): The MADSTAD Windshield (review) is easy to install and it transforms the V-Strom. Blocks all the wind and noise and it’s nearly infinitely adjustable. Plus, it works with the stock Suzuki windshield brackets.
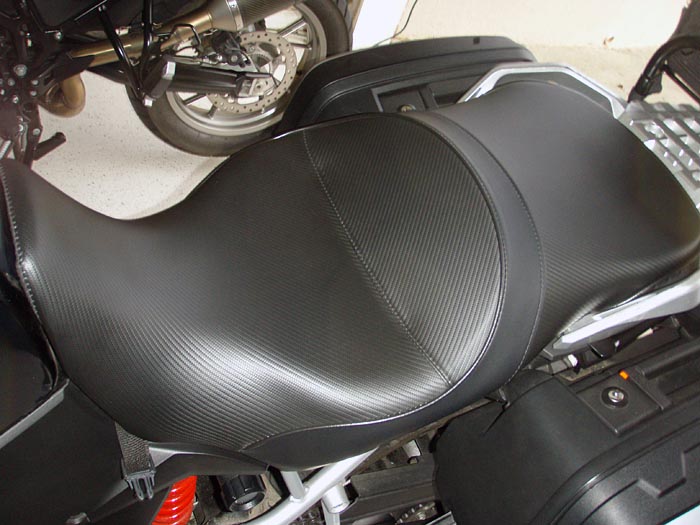
SHAD Suzuki V-Strom Seat Review
(April 24, 2015): SHAD makes seats for a variety of motorcycles and the new SHAD seat for the Suzuki V-Strom was announced in February. They sent us the first one and we now have a review with plenty of photos and information.
Barkbusters Storm Hand Guards Review
(March 29, 2015): The Barkbusters Storm hand guard kit, including the aluminum backbone, is surprisingly easy to install on the V-Strom, even with the handlebar risers in place.
The Storm hand guards provide better wind protection than the Suzuki OE guards and the original guards do not have a metal backbone, so this has added protection.
The Storm hand guard system is very popular and available to fit many different makes and models. Read all about it in the Barkbusters Storm Hand Guards review.
SW-Motech Mirror Wideners
(December 5, 2014): If you’re seeing your shoulders in the mirrors, then a quick fix is a set of these SW-Motech Mirror Wideners for the V-Strom. They fit many other bikes too.
Denali DR1 vs. D4 LED Auxiliary Lights on the V-Strom
(November 16, 2014): Comparison of the Denali DR1 vs. D4 LED Lights with special crash bar mounts adapted to the V-Strom Adventure. UPDATED: LED Dimmer added to the D4 lights!
Adding Wide Foot Pegs to the V-Strom
(October 2, 2014): This SSW-Motech skid plate engine guard (review) is an easy installation on the V-Strom and yet again, it makes a real difference in the comfort and performance of this bike.
SW-Motech Skid Plate Engine Guard and Installation
(October 29, 2014): These SW-Motech wide foot pegs (review) are easy to install and provide up to 1″ more leg room. They’re angled slightly forward and they’re more comfortable and offer a better platform for standing on the bike.
SW-Motech Bar Back Bar Riser Set
(September 22, 2014): This SW-Motech bar back bar riser set (review) is a nice piece that’s way more protective than the plastic valance Suzuki put on the Adventure. It’s a relatively complicated installation but this review covers the details with loads of photos.
SW-Motech Brake Reservoir and Exhaust Valve Guards for the V-Strom
(September 15, 2014): Here’s a quickie showing the beautifully made SW-Motech rear brake cylinder reservoir guard and the exhaust valve guard for the V-Strom. Unnecessary? Probably…but they look cool!
Metzeler Tourance Next Tire Review
(September 14, 2014): In the interest of science, I bought a set of the new Metzeler Tourance Next tires (review) and installed them on the V-Strom.
The tires make quite a difference in handling compared to the stock Bridgestone Battle Wing tires, but the quickness may not be for everyone.
If you have installed a set of new tires — Bridgestone or others — on your 2014 V-Strom 1000 ABS, let me know how you like ’em!
Suzuki DL1000A V-Strom Shop Manual and Wiring Diagram
(September 4, 2014): I ordered a 2014 Suzuki V-Strom 1000 ABS (DL1000A) shop manual from the local dealer. List price is $90.00.
I was looking mostly for torque values (see the Suzuki V-Strom 1000 ABS Torque and Other Specs below) and other tips.
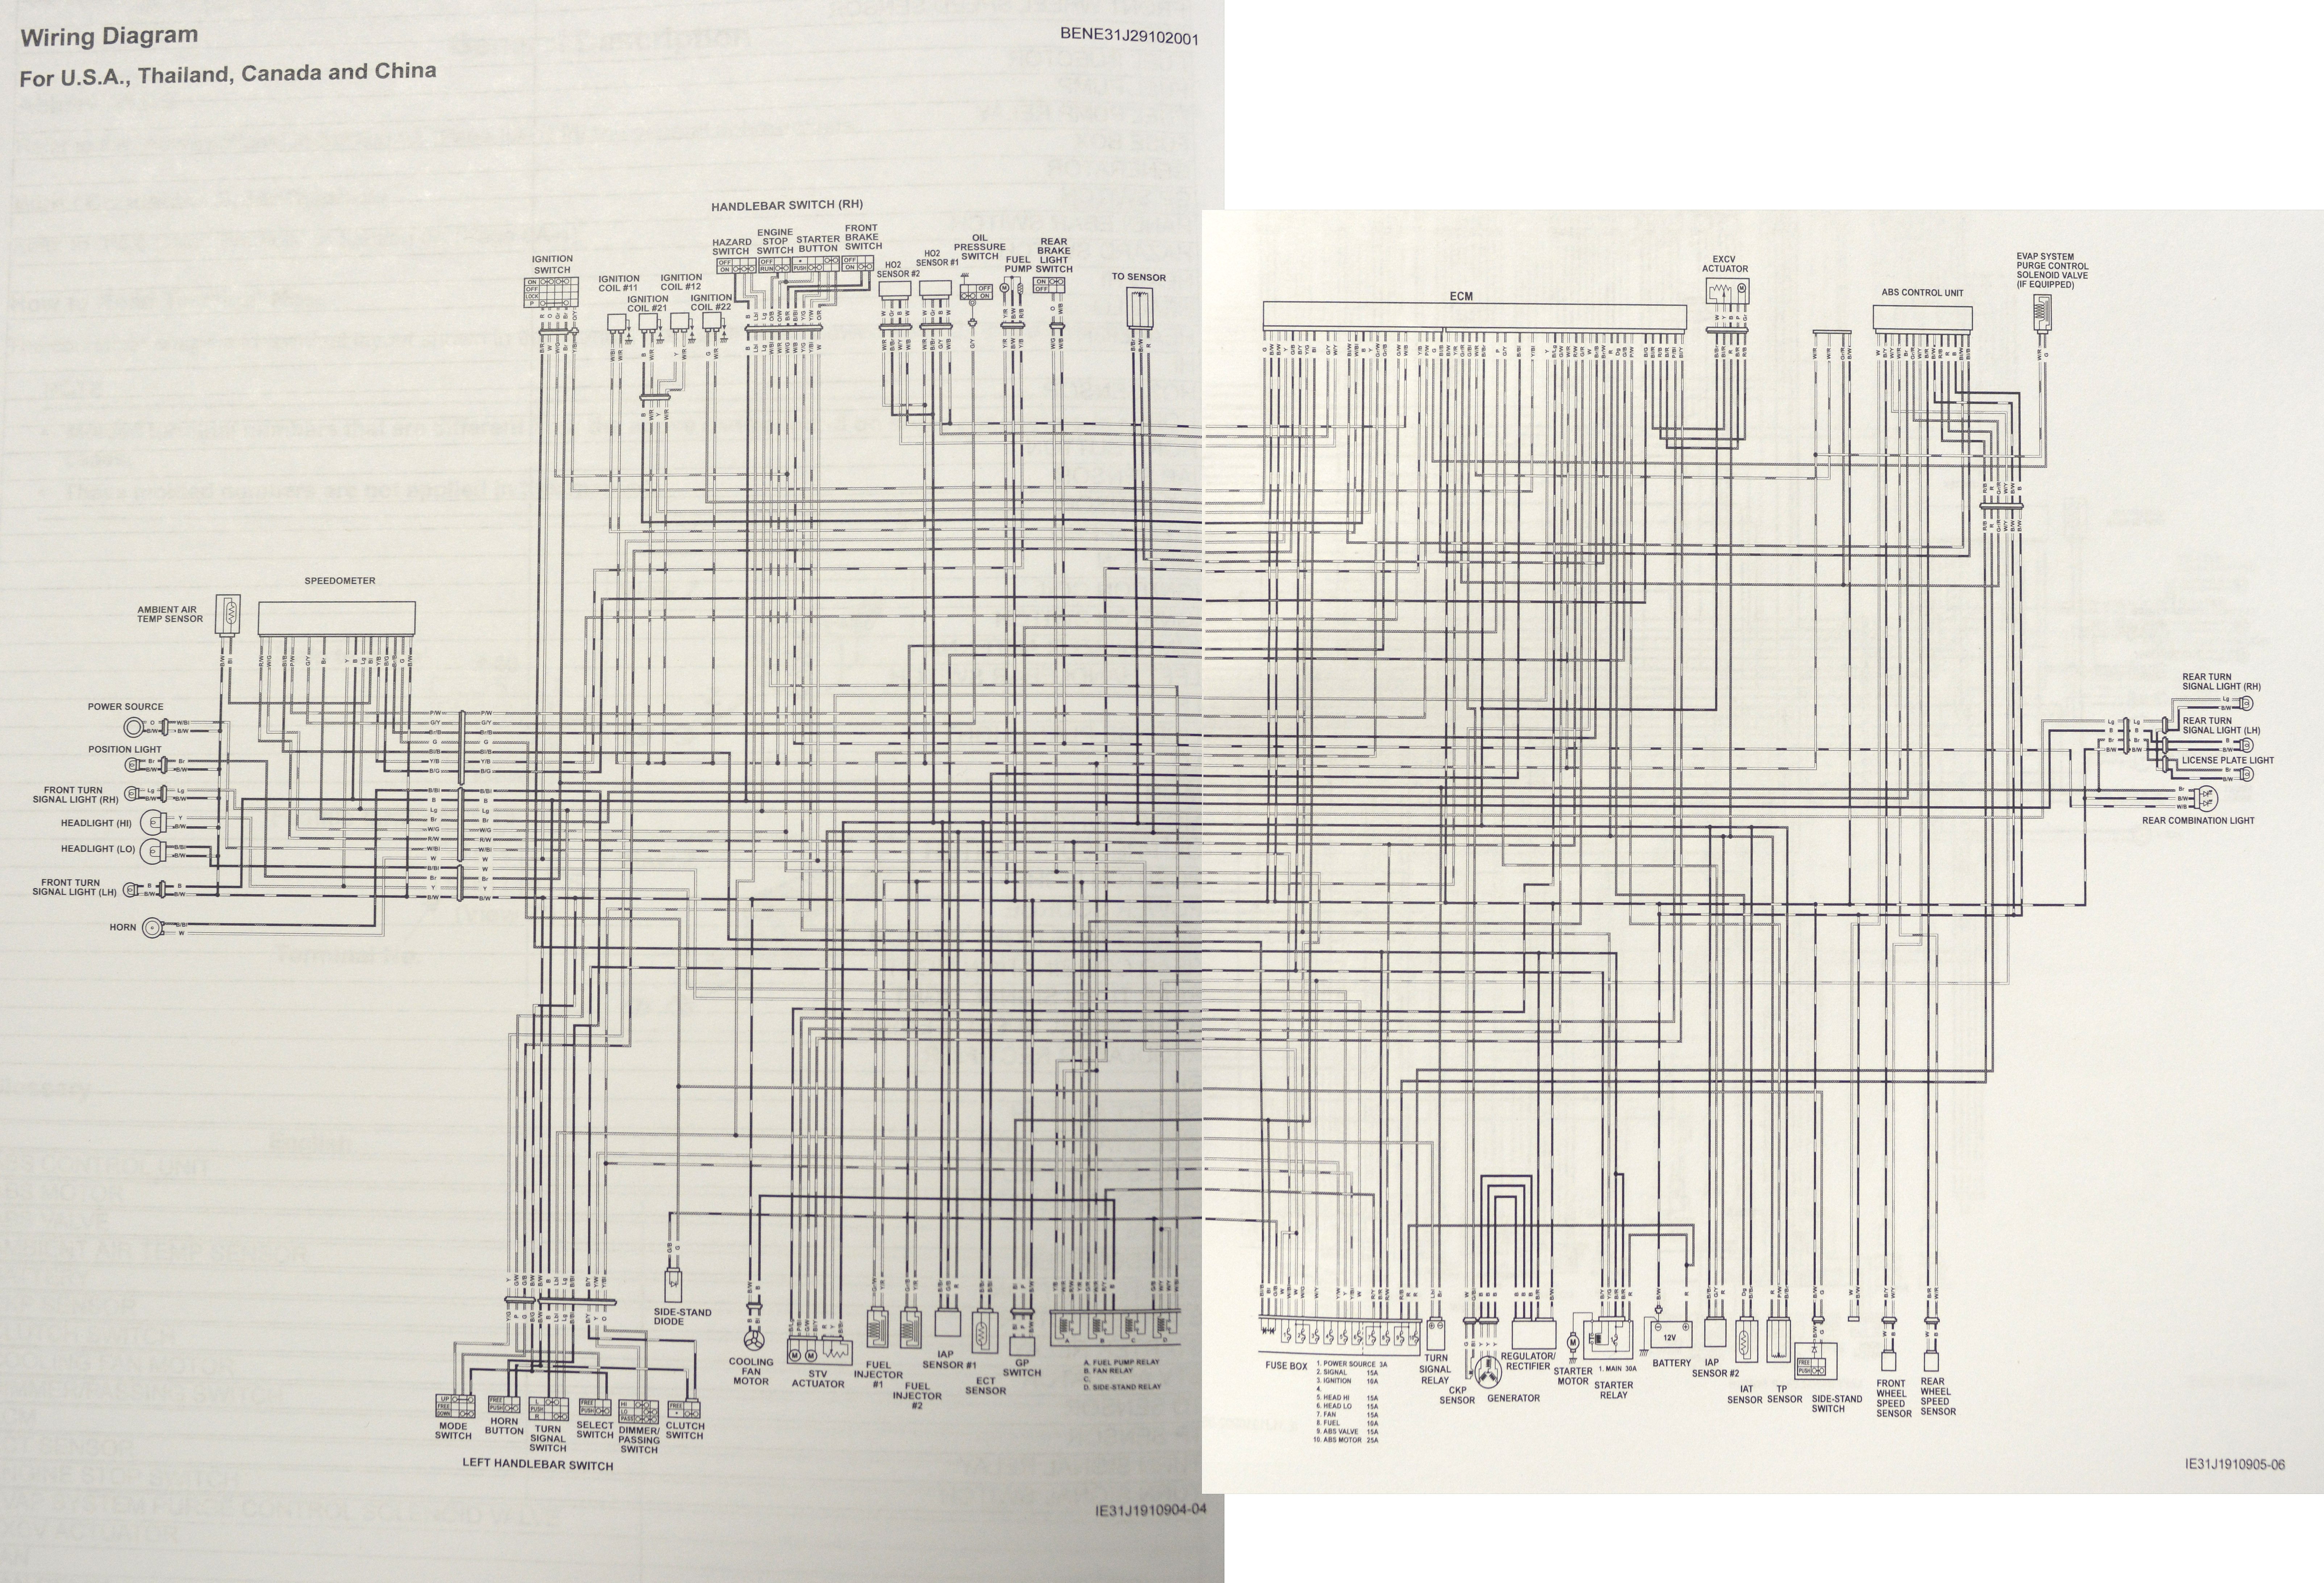
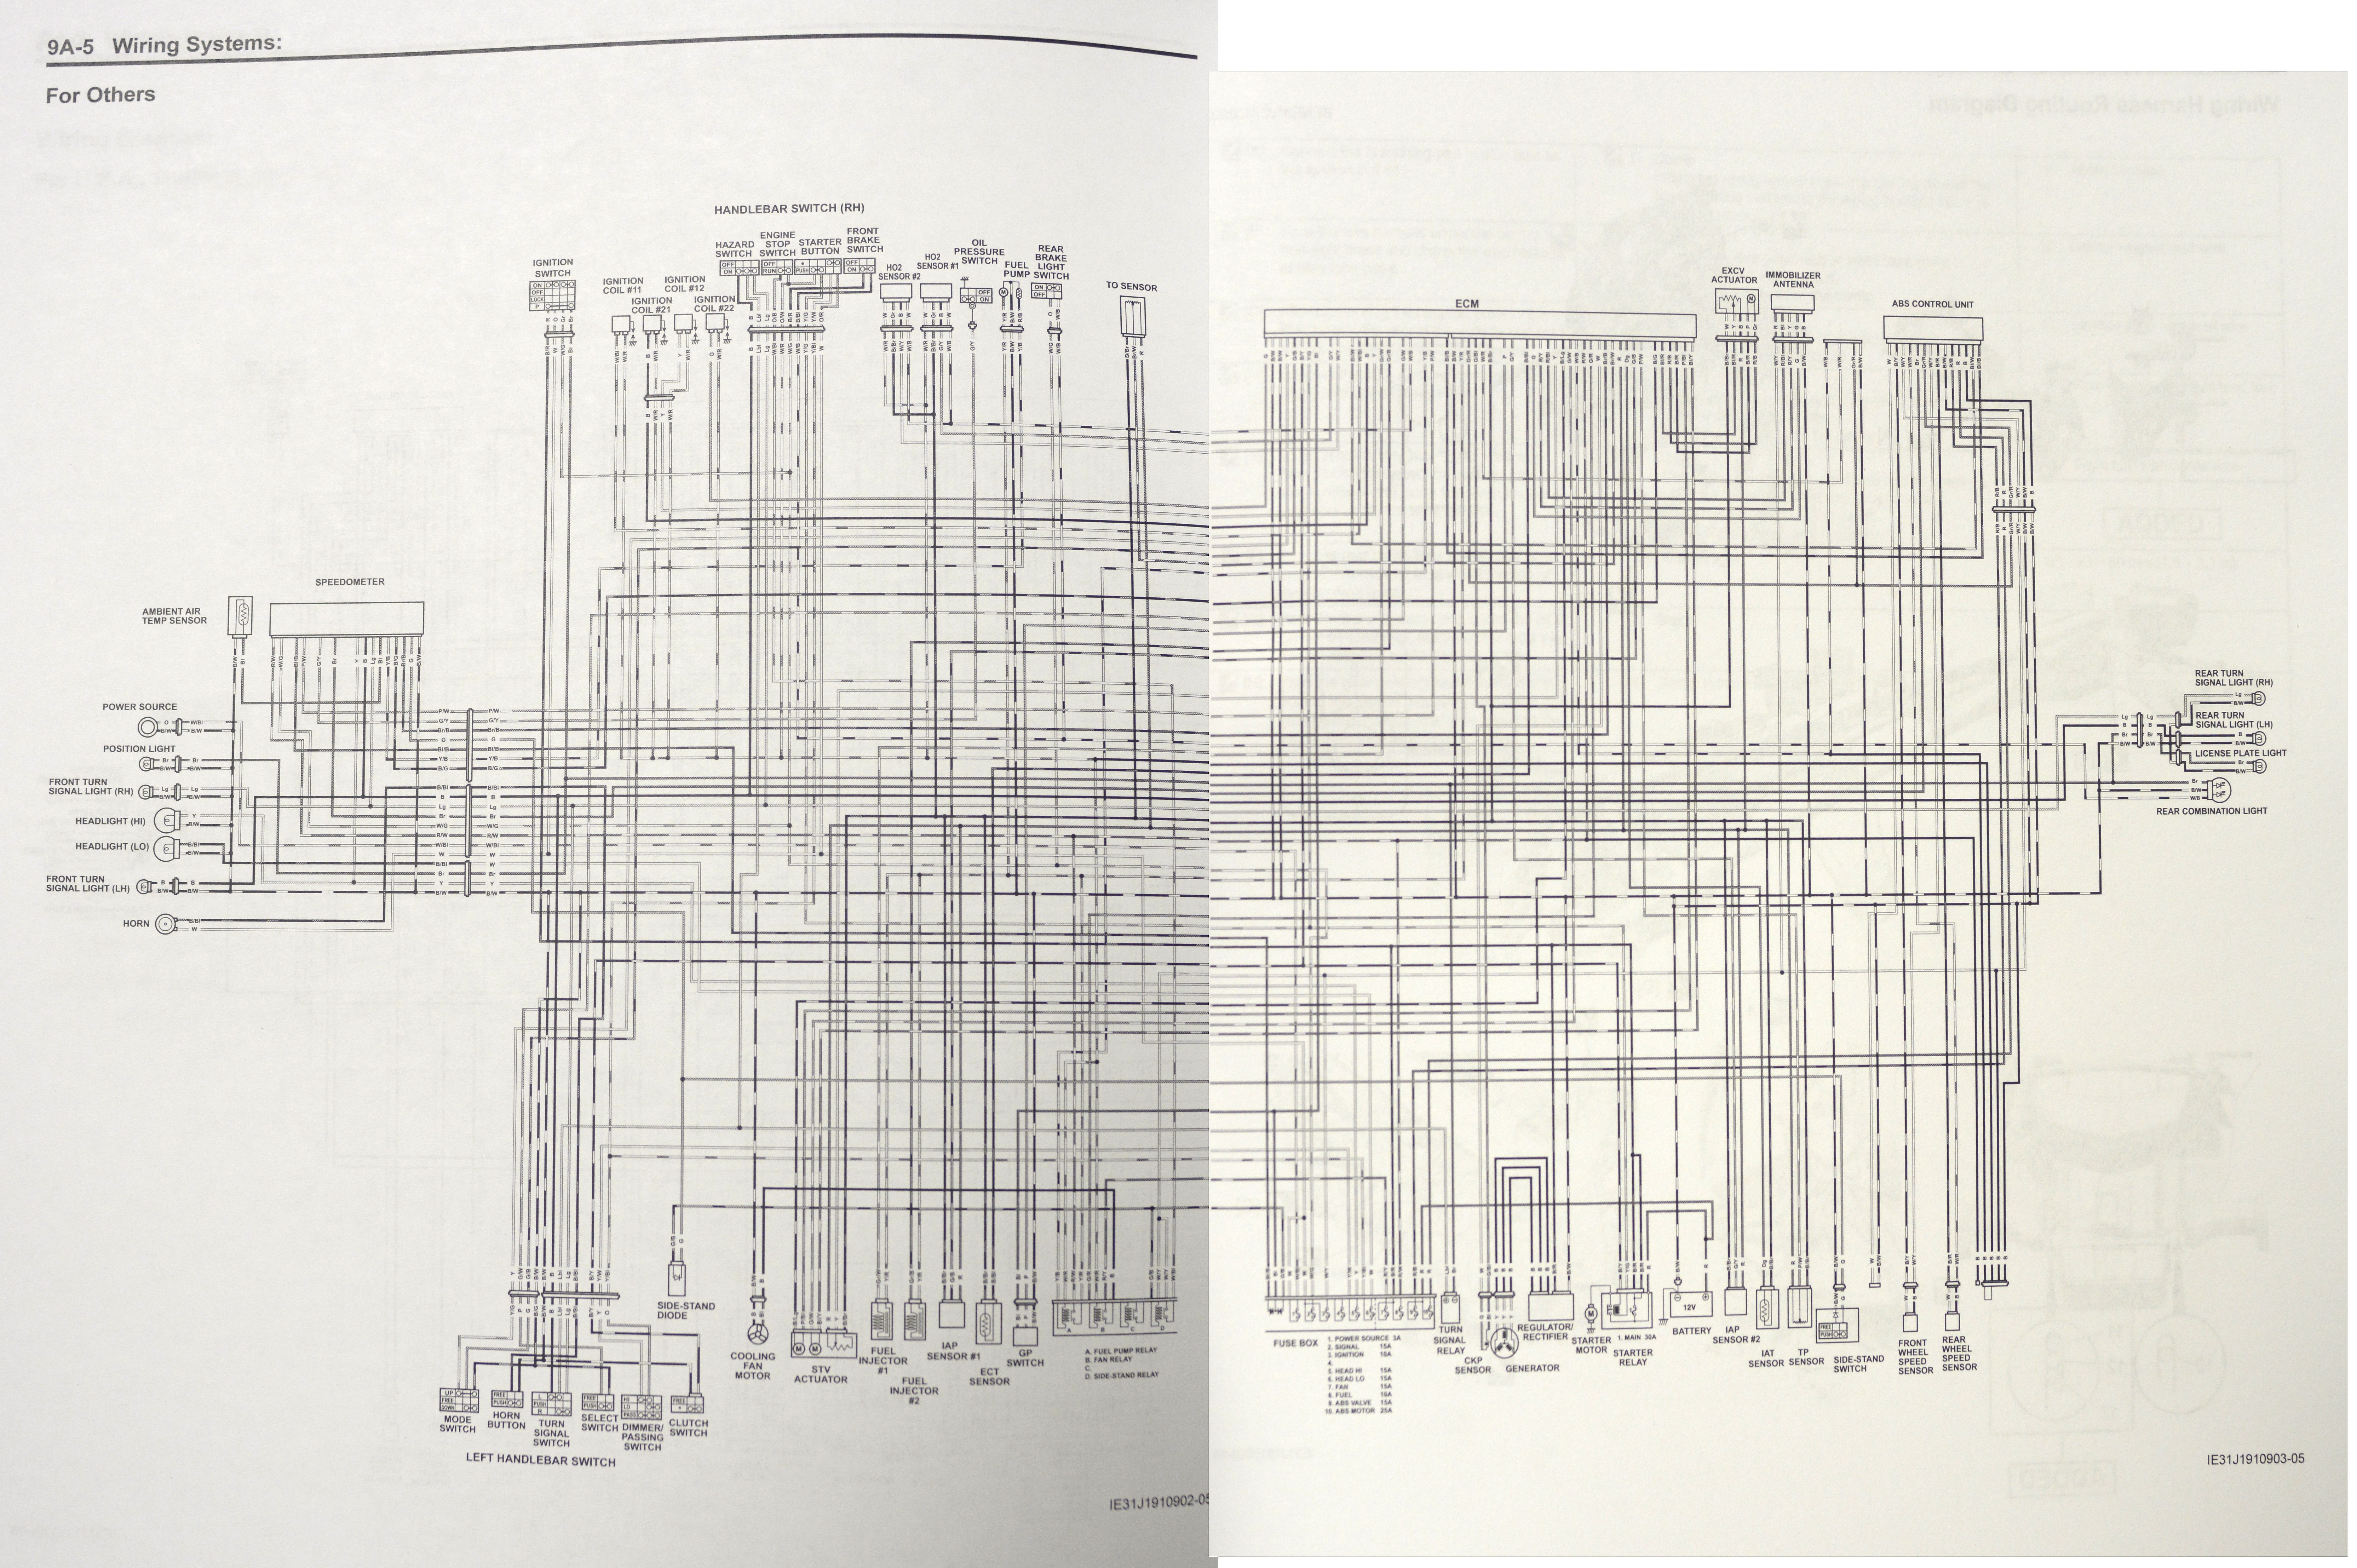
AAlso, I wanted to see a wiring diagram for the V-Strom.As it turns out, the wiring diagram in the shop manual is in black-and-white and is spread across 2 pages, making it a bit difficult to read.
I took photographs and then pieced it together somewhat clumsily in Photoshop and I’m attaching them here. They are best viewed at full size.
▪ Here is the 2014 Suzuki V-Strom 1000 ABS wiring diagram for U.S.A., Thailand, Canada and China.
(6414×4368 pixel .jpg).
▪ Here is the 2014 Suzuki V-Strom 1000 ABS wiring diagram for all other countries.
(6661×4431 pixels, .jpg).
▪ Here is the 2014 Suzuki V-Strom 1000 ABS Shop Manual Table of Contents. (900×1577 .jpg).
Let me know if you find this information useful. If you need a torque value, let me know and I’ll add it to the list below.
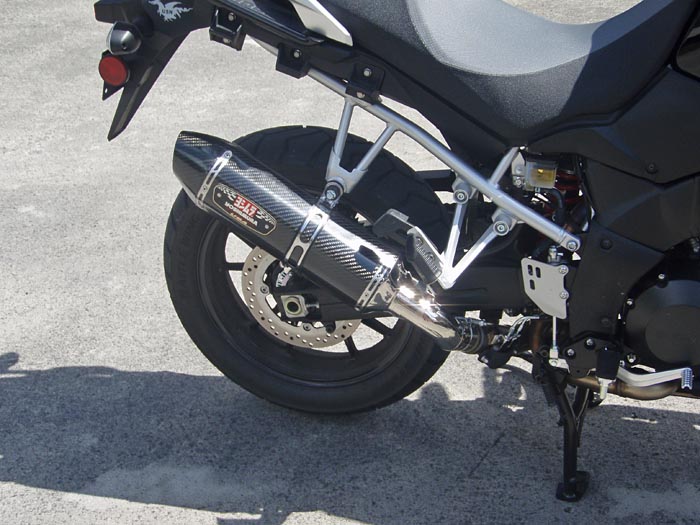
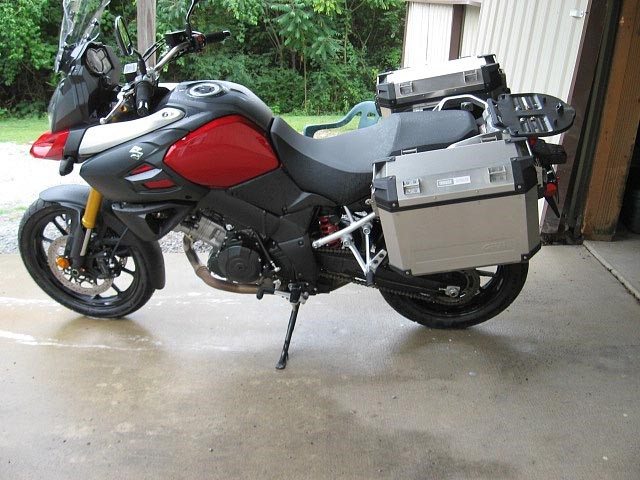
Owner Report: Suzuki V-Strom Exhaust and Luggage
From “R.M.” (September 2, 2014): Couple of thing that I have done IRT touring and performance… Added a Yosh carbon fiber slip-on (photo below). Simple install, took about 15-30 minutes.
Sounds about the same at idle, but nice ‘bark and rumble’ underway. Could not get the scale to work properly but am betting shed 7-10 pounds. Looks better too.
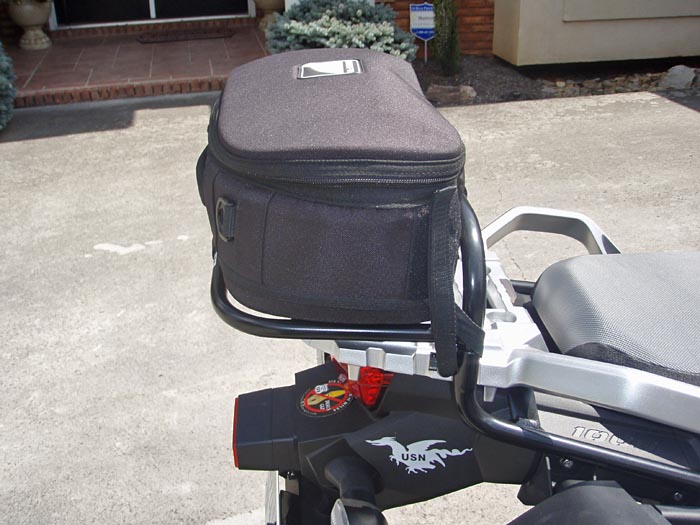
Don’t know what you may or may not know about the Ventura Pac System, but Paula and I have been using it to tour for years now. We like that the bike stays narrow and does not have big ‘boxes’ hanging off the back.
Seems whenever we rent bikes on a tour we always clip something with one of the panniers. I was especially impressed on how Suzuki kept the new panniers tucked in, so adding the Ventura system was a no brainer.
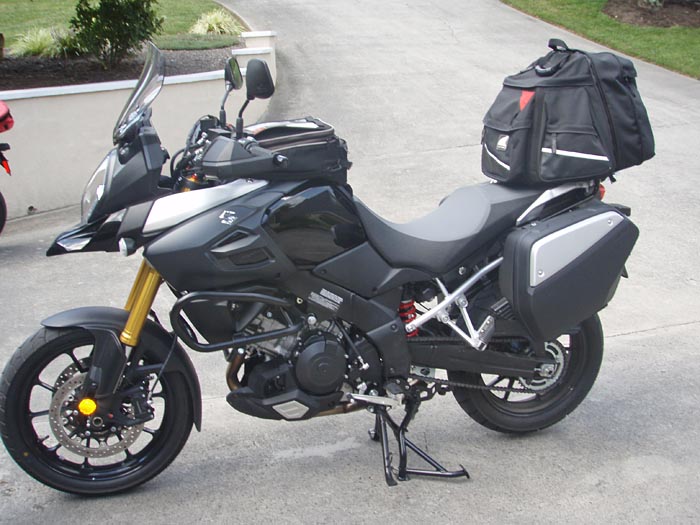
First pictures (below) is of the sport rack with the 10 liter day pac that I use most of the time. Clean and tidy.
Next, the pics of the Ventura Pacs along with the panniers attached. 141 liters of storage!!! Pacs have 51 plus 35 for 86 total, and the panniers add another 55 (29 plus 26).
Hope you find this interesting and maybe share with other potential Strom owners. Bike ready to tour. Note how the bike stays narrow…love it.”
Suzuki V-Strom Horn Upgrade
(August 30, 2014): The stock Suzuki horn is a wimp. I replaced it with a pair of Stebel Magnum horns and a dual horn wiring harness for a relatively easy upgrade with excellent, loud, powerful sound in the Stebel Magnum Horn Review Redux. Includes .mp3 sound file comparison!
Watch Out For That Side Stand!
(August 24, 2014): Suzuki side stands can be tricky. On both the Suzuki GW250 (Blog) and the V-Strom, the side stand deploys only just forward of its centerline and it does not have a spring or detent to hold it in place once deployed.
This means that if the bike moves forward or is pushed just a touch forward when on the side stand, the side stand can quickly fold and the bike will fall over.
This has nearly happened to me twice in the garage (Chris was there to help catch the bike before it fell). Then today I parked the bike in the street at a friend’s house. The road was just very slightly sloped forward — so slightly, I didn’t even notice.
I deployed the side stand and started to get off the bike and — surprise! — it started to roll forward. I caught it, but just barely — that V-Strom is heavy!
The design is at fault here and there are three things that should be done by Suzuki to fix this problem: first, the side stand should deploy farther beyond center (towards the front of the bike).
Second, there should be a spring to hold it in the deployed position and third, there should be a strong detent to also help hold it in place.
In the meantime, be very cautious of this with your new V-Strom (or GW250 or DR650 or…).
Raise the Fork Tubes to Sharpen the Handling!
(August 24, 2014): A webBikeWorld reader suggested a trick I should have remembered from a long time ago. Raising the fork tubes in the clamp by about 10 mm can help the handling problems on some bikes. I did this on the BMW K75 project bike a long time ago and it helped.
Raising the forks in the clamp decreases the rake and trail (article) slightly
So yesterday I loosened the 6 fork tube clamp bolts on the V-Strom and pushed down on the handlebars to raise the forks in the clamp.
With the bolts loose, the forks easily popped up about 20 mm, which is too much.
So I jacked up the bike slightly by putting a block under the oil drain plug between the exhaust pipes and pushed the fork tubes down a bit.
It took some back-and-forth finagling and you have to be careful not to twist the tubes in the clamp and to make sure both sides are even, using a scale or the depth function of a Vernier caliper. I ended up with 10.3 mm on both sides.
I took the bike out today and immediately noticed a difference! I’d swear there’s a bit more leg room so I can better touch the ground also.
The V-Strom definitely does not feel as clumsy at low speeds, especially when pulling away from a stop sign into a 90-degree turn.
The overall handling in the twisties feels much more “normal” also and the bike no longer feels like it’s “running uphill” on the big 19″ front tire.
Between this and adding the G2 Throttle Tamer (review), I’m enjoying the V-Strom much more and I’m glad to go through this exercise and bring you these tips. Definitely try both of these and I’m sure you’ll be very pleased.
Suzuki V-Strom 1000 ABS Torque and Other Specs
UPDATE (April 10, 2015): A webBikeWorld visited asked about torque specs for the Adventure version crash bars. There is no specific information on this in the V-Strom shop manual that I can find, but there’s a page with torque specs based on bolt size (.jpg).
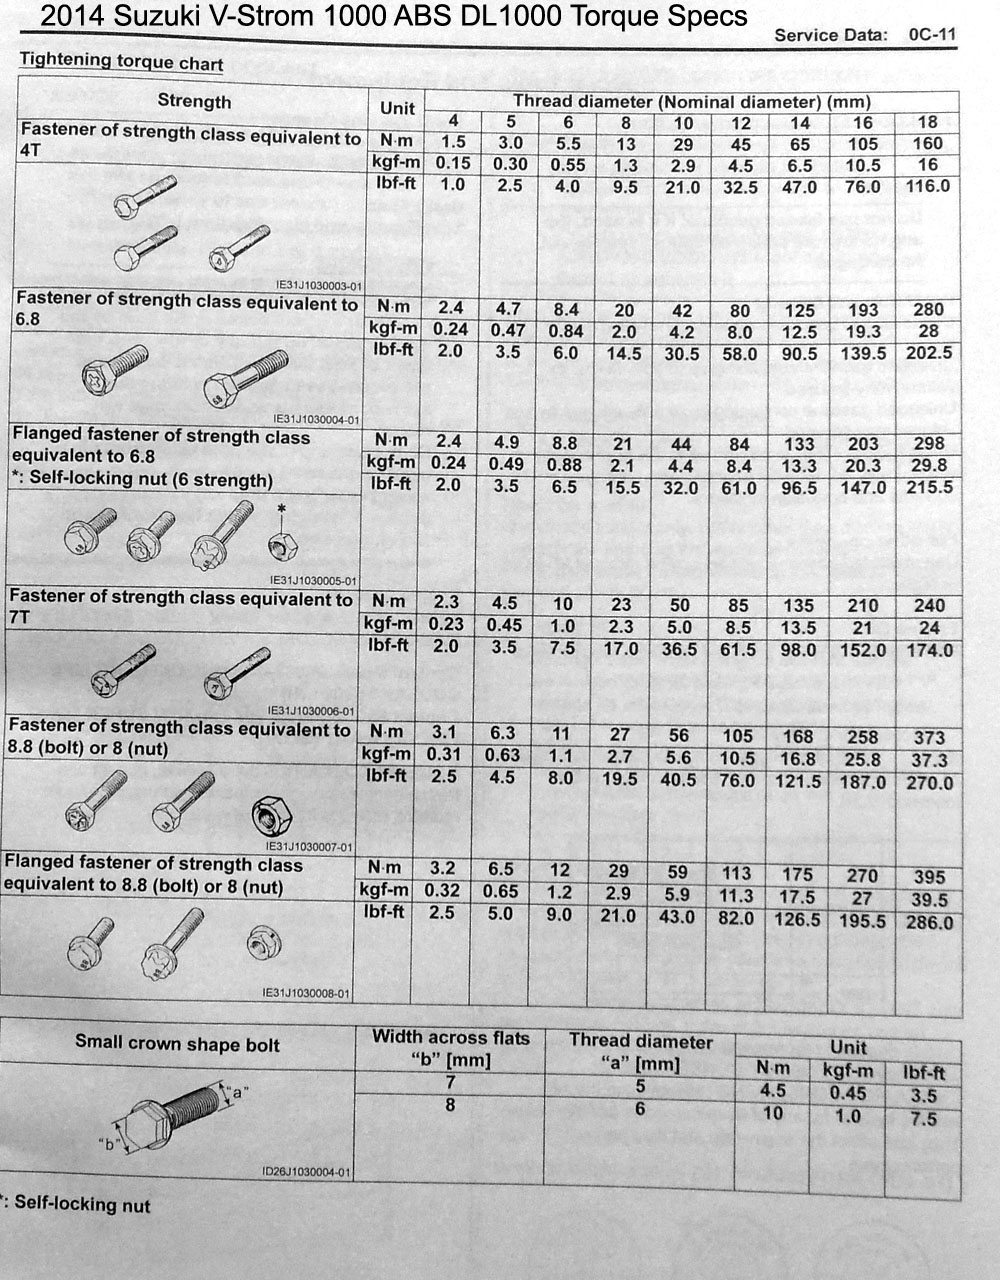
(August 22, 2014): Here are some torque specs for the 2014 DL1000, taken from the owner’s manual. I have an official Suzuki shop manual on order and will add more specs once that arrives. If you need a particular torque spec, let me know.
Also, see the information on the 2014 Suzuki V-Strom 1000 ABS Shop Manual and the wiring diagram in the Blog entry above.
- Front Axle: 100 Nm (72.5 ft. lbs.)
- Front Axle Holder Bolt: 23 Nm (16.5 ft. lbs.)
- Front Brake Caliper Mounting Bolt: 39 Nm (28.0 ft. lbs.)
- Rear Axle: 100 Nm (72.5 ft. lbs.)
- Drive Chain Slack 20-30 mm
- Oil Change: 3.1 liters (3.3 qts.) with filter change or 2.7 liters (2.9 qts.) without filter change. Fill the oil filter first with
fresh oil before reinstalling for quicker pressure return and less starvation. - Oil Filter Torque: Book says 2 turns or 20 Nm (14.5 ft. lbs.)
- Oil Filter Drain Plug Torque: Book says “tighten the plug securely with a wrench” and new crush washer is
required. - Spark Plug Gap: 0.8 to 0.9 mm (0.031 to 0.035″)
- Spark Plugs: NGK LMAR8Bi-9
- Charging Rate: 1.4 A for 5-10 hours not to exceed maximum of 6.0 A for 1 hour.
- Coolant: Approximately 2.13 liters or 2.3 qts.
- Rear Brake Pedal Adjustment: 20-30 mm from top of foot peg to top of brake pedal (0.8 to 1.2″)
- Tire Pressures: 36F/42R for solo or dual.
- Tire Sizes: 110/80R-19 M/C 59V Front. 150/70R-17 M/C 69V Rear.
- Light Bulbs: Headlight 12V 65W H9 High beam. 12V 55W H7 Low beam. Position light: 12V 5W. Turn signals: 12V 21W. Brake Light: 12V 5W.
- Gross Weight Rating: 970 lbs. GVWR
G2 Throttle Tamer Transforms the V-Strom
(August 21, 2014): Simple installation of a G2 Throttle Tamer and a few easy suspension fixes transform the bike from nearly unrideable to a gentle giant. Read more in the Suzuki V-Strom 1000 ABS review Part 3.
Givi Bags on the V-Strom
From “D.C.” (July 26, 2014): “Here are a few pictures of my bike after a couple of goodies. The Givi racks went on in less than 45 minutes. Believe me, that’s saying a lot more for the racks than me. They must of heard about me. There were only 2 pictures and no instructions! How many of us read them anyway??
I can’t say enough about the Trekkers, they’re great but they do stick out a little. They have green indicators on top to let know they are locked. If you see red they are not.
I have always wanted top mounting. They have top brackets for tie downs this extra on other cases — very handy. I have been in 2 days of rain and interstate travel no leaks or rattles. The trunk on the other not so much.
I was able to mount the bracket with out drilling in to the factory bike rack. Slight leak rattles a lot and has come open twice. And the reflective tape is peeling.
I know i should have purchased the complete trekker set but my banker says pay off the side cases first!”
Kaoko Throttle Control
(July 21, 2014): Installed the Kaoko throttle lock (aka cruise control) on the V-Strom; it’s easy to do but not quite as successful in operation as it is on the BMW scooter, due to the V-Strom’s harsh engine response. Read more in the Kaoko Throttle Lock review.
Suzuki V-Strom 1000 ABS Chain Adjustment
(July 12, 2014): Lots of information on the V-Strom chain adjustment in the article How to Adjust a Motorcycle Chain.
SHAD SH36 Side Case and 3P Mounting System
(July 9, 2014): You can save nearly $1,000.00 by mounting the brand-new SHAD SH36 bags instead of the Suzuki bag system.
And the SHAD panniers are lighter and hold more stuff, including a full-face helmet! Info, pricing, photos and lots more in the SHAD SH36 Side Case Review.
▪ Replacing the V-Strom Headlight Bulb With a Nokya Hyper Yellow H7
(June 30, 2014): We have discussed yellow headlight bulbs for motorcycles in the past. I thought it might work for the V-Strom also, so I replaced the stock headlight bulb with a Nokya Hyper Yellow H7. It’s easy to do; this article shows how.
▪ V-Strom Helmet Choices
(June 21, 2014): A few owners asked about windscreen issues when riding with different helmet types (e.g., dual-sport, open-face, full-face, etc.) on the new V-Strom.
I actually find the stock Adventure windscreen (which I believe is slightly taller than the windscreen on the standard version) to be pretty good. I’m 5’10” tall (178 cm) and the middle setting on the windscreen is just about perfect for me.
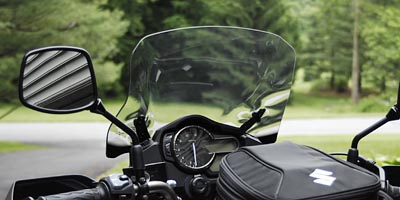
I tried raising the screen one notch and lowering it one notch (involves a too-fussy removal of 4 screws) and both caused more wind blast.
I have also tried the middle setting wearing a dual-sport helmet, the Japanese version of the Shoei Hornet (review).
Based on some owner emails I had received, I fully expected tons o’ turbulence.
But I have actually found that a dual-sport helmet is pretty quiet; quieter, in fact, than wearing my Arai RX-Q (review), which has those noise generating scoops on top.
The Arai RX-Q catches the air directly in the faster Venturi effect air stream that forms over the top of the V-Strom’s windscreen.
The dual-sport peak on the Hornet apparently allows the air to slide over the top of the helmet, reducing the noise levels. I do have to tilt my head just very slightly for this effect; if I wore the Hornet more often, I’d raise the windscreen one notch.
One helmet that works pretty well with the V-Strom and also with the BMW C 650 GT scooter (Blog) is the HJC CL-16 (review). It has a smaller top vent that admittedly doesn’t flow as much air, but remains relatively quiet in the fast air flowing over both windscreens.
In general, any helmet with large top scoops will probably have more noise, as the air coming over the top of the windscreen forms a fast and turbulent flow that hits the upper half of the helmet.
The other issue I’ve found is that the windscreen actually works so well at a point half-way down the helmet and below that I don’t get enough ventilation in the lower part of the helmet.
So you should look for a helmet that has a small first defogging position that will hold the face shield. The CL-16 has a weak detent for this but it’s a bit too weak and the face shield occasionally shuts in a crosswind.
This is where an open-face helmet comes into play; something like the AGV Blade (review) is one of my favorites on both the scooter and the V-Strom, as is the new Nexx SWITX SX10 (review). If you want a sort-of dual-sport look, try the AFX (review).
Bottom line: The new V-Strom’s windscreen works pretty well in my opinion and better than I expected. I may try a third-party ‘screen when/if one becomes available, just for kicks.
▪ Paint Protection
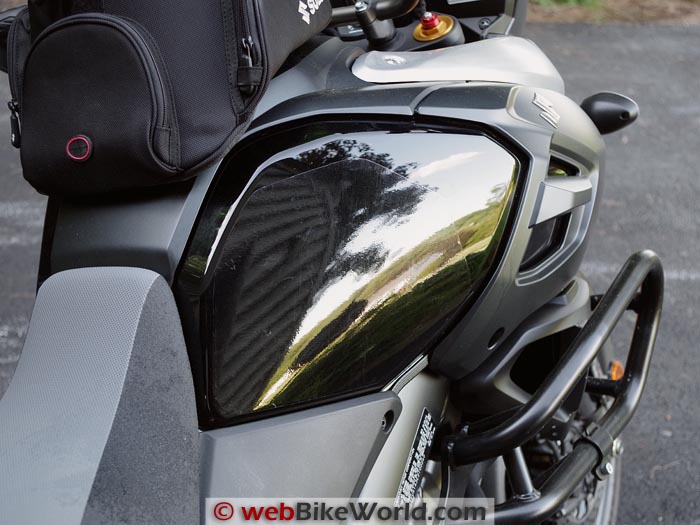
(June 8, 2014): About the only exposed paint on the V-Strom is right where your knees hug the fuel tank.
I noticed some spider web scratches appearing within a few hundred miles, so I whipped out a pencil and paper and made a template to cut some 3M Scotchcal paint protection film and laid it on both sides of the tank.
We have several motorcycle paint protection film reviews on webBikeWorld that include installation instructions, so I didn’t think this needed another go.
It’s very easy to install on the flat-sided V-Strom fuel tank and the hardest part it getting your template correct…and making sure you’re cutting the stuff correctly for left and right sides — a mirror image. Here’s a pic of the final result:
▪ Tank Bag Review and Installation
(June 3, 2014): The Suzuki V-Strom 1000 ABS tank bag is a quality piece of luggage. It takes a few extra parts and the initial installation can be tricky, so read this report with lots of photos and information.
▪ Center Stand Installation
(May 18, 2014): The Suzuki V-Strom 1000 ABS center stand kit is expensive but it’s a perfect fit on the bike and it’s also surprisingly easy to install…with a few tips!
See the Suzuki V-Strom 1000 ABS center stand kit review and installation article for all the details, along with a video!
▪ Tank Bag Notes
(May 17, 2014): I ordered the Suzuki tank bag and the center stand when I bought the bike. They both arrived this week and I’ll have detailed reviews describing the installation of both.
But in the meantime, here’s a tip on something I discovered: the Suzuki tank bag mounts on a ring adapter that fits on the fuel filler. So you need to buy the adapter kit also — they don’t tell you that when you order the tank bag.
It’s a nice design and avoids having to use straps or magnets, but it makes the entire kit even more expensive. The official Suzuki tank bag is a beautiful piece (part number 990D0-04600) but it costs $249.95.
Add the ring mount (part 990D0-04100, $52.95) and ring mount adapter (990D0-04610, $56.95) that you’ll need — another $98.59 total for both.
This makes the tank bag with mounting hardware $348.54, which seems pretty steep to me. I’m not sure what an equivalent bag system for, say, a BMW R1200 GS costs, but I’ll check into the ring mount bags from our affiliate, Twisted Throttle, to see if there’s a cheaper equivalent.
I ordered the ring mounting kit and it should be here in a few days. In the meantime, here are a few quick photos of the Suzuki tank bag and parts that come with it.
By the way, you also have to drill the bottom of the tank bag to fit the mounting bracket on the bag side! You’d think for that kind of money, Suzuki would have it all assembled (and come to your house to install it!).
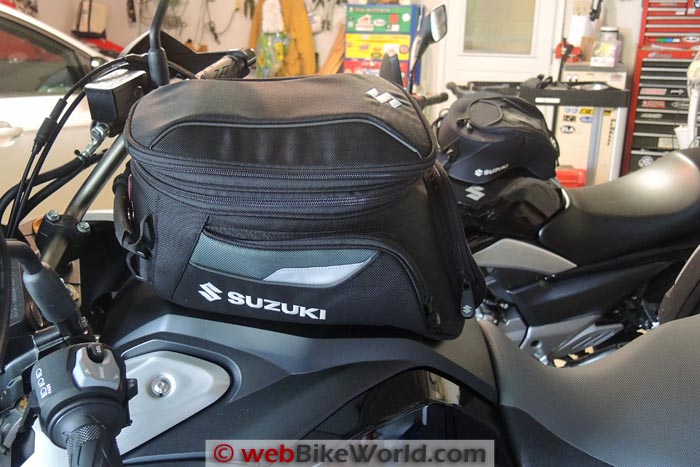 Suzuki V-Strom 1000 ABS tank bag. You can just see the GW250 tank bag in the background.
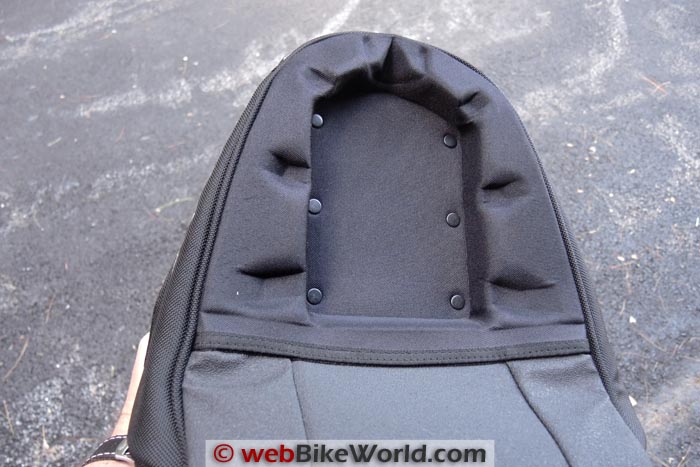 The bottom of the tank bag has a recess for the receiver mount. You have to drill holes in it to mount the receiver.
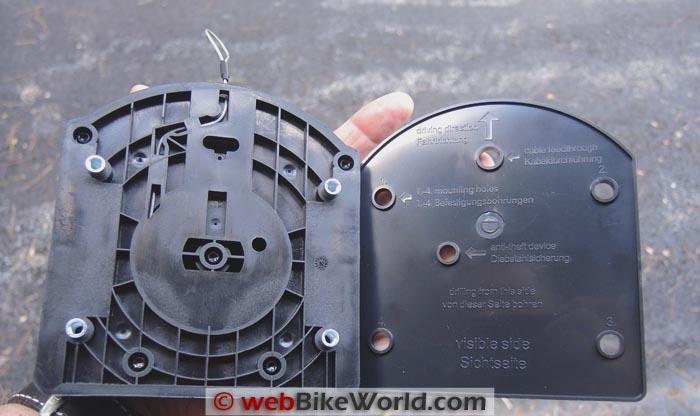 Here are the two receiver parts. Note the 4 metal threaded posts, these go into the holes you’ll drill in the tank bag.
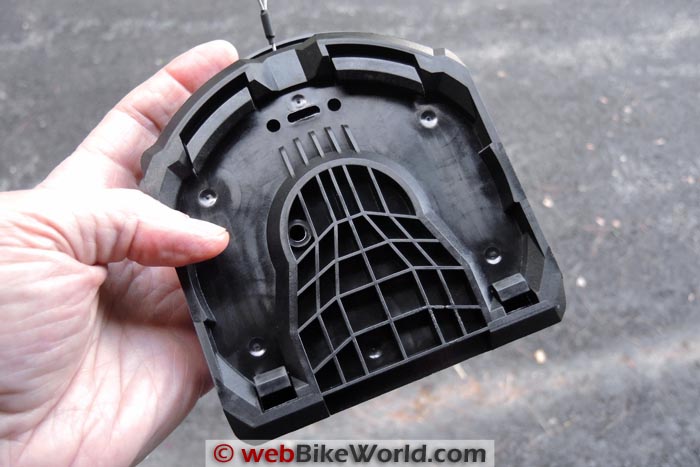 Business end of the receiver plate that mounts on the underside of the bag. It snaps to the ring on the fuel tank filler.
Owner Comments and Feedback
See details on submitting comments.