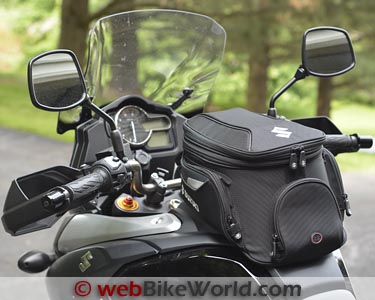
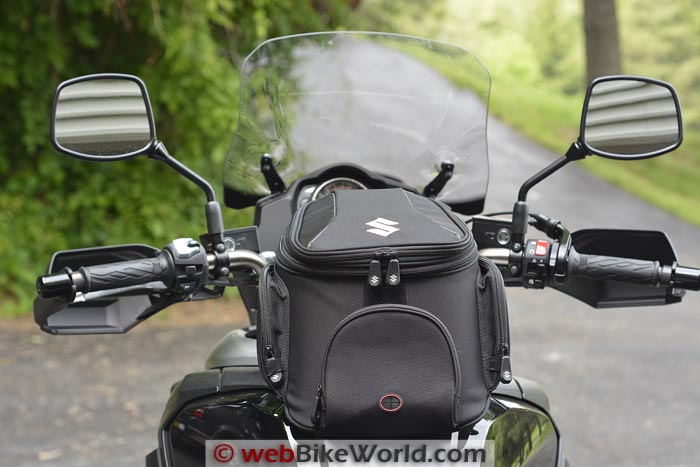

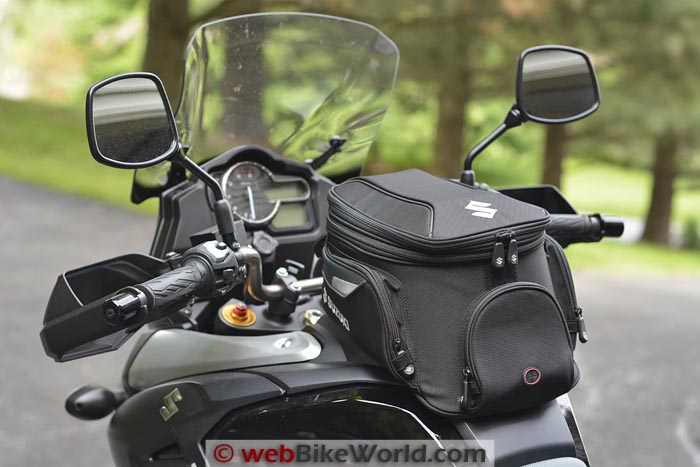

The Suzuki V-Strom 1000 ABS tank bag accessory is a high-quality (and expensive) piece of luggage.
It may be worth the cost though, because the bag fits the bike perfectly and it mounts on a ring lock on top of the fuel filler, so there’s nothing to scratch the tank.
The Tank Bag…and Parts
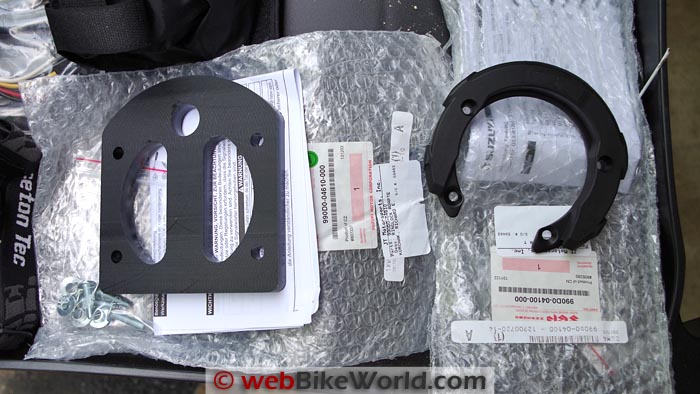
You’ll need to order 3 different parts for a complete tank bag assembly; something I only discovered after the tank bag arrived without the necessary mounting parts (see the Tank Bag Notes in the V-Strom 1000 ABS Blog).
In addition to the tank bag itself, called the “Suzuki Ring Lock Tank Bag” (part 990D0-04600-000; $249.95), you’ll need the Ring Mount (part 990D0-04100; $52.95) and the Ring Mount Adapter (part 990D0-04610; $56.95).
That’s a grand total of $359.85 — yeeowch!
Depending on shipping costs, you may be able to save a few bucks by buying the SW-Motech tank ring for $39.99.
Then you can buy one of the Twisted Throttle SW-Motech/Bags Connection tank bags, which are available in several different shapes and sizes (Twisted Throttle is a webBikeWorld affiliate retailer).
Actually, the Suzuki accessory tank bag and mounting parts are said to have been manufactured by SW-Motech.
Mounting the Tank Bag
My biggest gripe with the Suzuki tank bag system is that the owner has to drill through the bottom of the tank bag to mount the adapter plate parts that snap on to the fuel filler ring.
Suzuki should have done this at the factory, first of all because at the prices their charging, it should be a bolt-and-go process.
Do you really want to buy a 250-buck tank bag and the first thing you have to do is drill some holes through it?
I found the instructions to be rather vague, and that’s my second gripe. It took me quite a while to get it all figured out and actually there are 3 sets of instructions, one with each part, which make it more difficult.
The tank ring and adapter instructions refer back to line drawings on the tank bag instructions, which doesn’t help.
But, now that I did all the hard brainwork, you have this detailed webBikeWorld review to use as a reference, right?!
Here’s a tip: I’ve learned the hard way after many “I told you so” lessons that the most important thing you can do is read the instructions slowly and carefully several times until you fully understand what they’re describing.
Lay out all the tools and all the parts and hardware and familiarize yourself with the nuts and bolts. Then do a dry run through the procedure before you start.
Believe me, the one time you discover something was different from what you may have originally thought or assumed, it will be worth the extra time and effort.
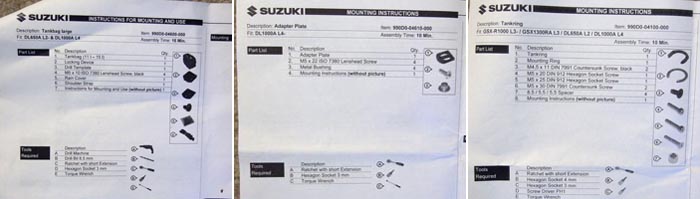
Here’s a photo of the instructions and if you click on the text links in the description box, you can view a larger-sized individual photo of each, showing the parts, hardware and tools required. Also linked below the photo are .pdf’s of the line drawings that nicely illustrate the assembly; i.e., how the darn thing goes together.
Three sets of part/tool lists (click for larger size): Tank Bag (L); Adapter Plate (C) and Tank Ring (R). Also, here are line drawing diagrams showing the parts assemblies for the adapter (.pdf) and the tank ring (.pdf).Tools Required
You’ll need a Phillips #1 screwdriver (I use the excellent Wiha Micro-Finish screwdrivers (review)) and a 3 mm and 4 mm Allen wrench (I use the Craftsman T-handle hex wrenches (review)).
And if you have one, a torque wrench that goes down to a miniscule 3 Nm.
You’ll also need a metric scale (ruler) and an electric or battery-powered drill and an 8.5 mm drill bit or its vintage equivalent, the 21/64, which is just 0.2 mm smaller.
Note that the Bags Connection branded EVO tank bags that use the same clip-on method come with an 8.5 mm drill.
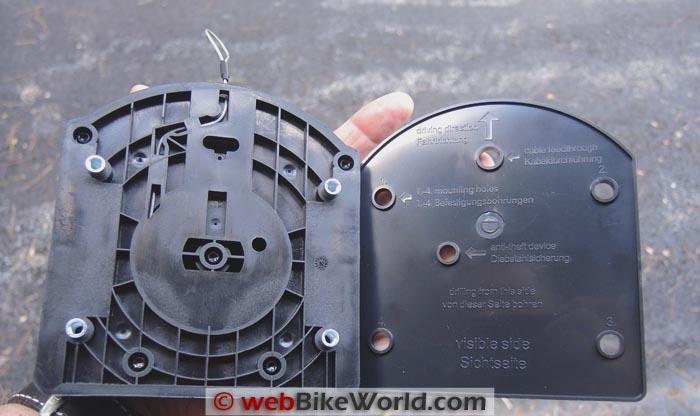
Besides the tank bag, you’ll need the Ring Mount Adapter (part 990D0-04610; $56.95) on the left (it fits between the clip and the tank bag bottom) and the Ring Mount (part 990D0-04100; $52.95) on the right. The Ring Mount attaches to the top of the fuel filler.Let’s Get Started
Since a picture is worth 1,000 words, let’s do it that way…
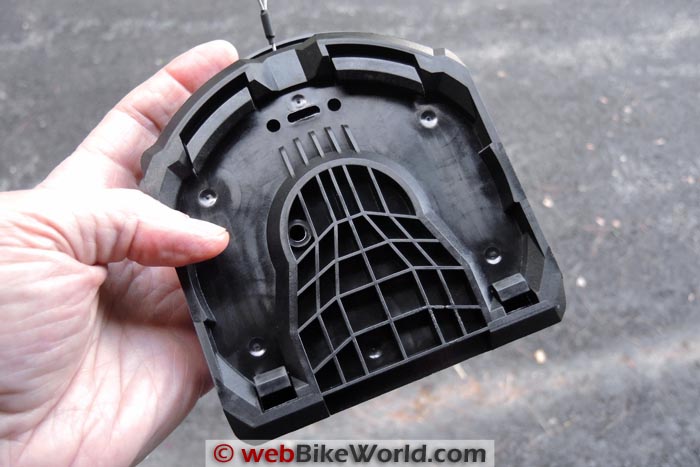
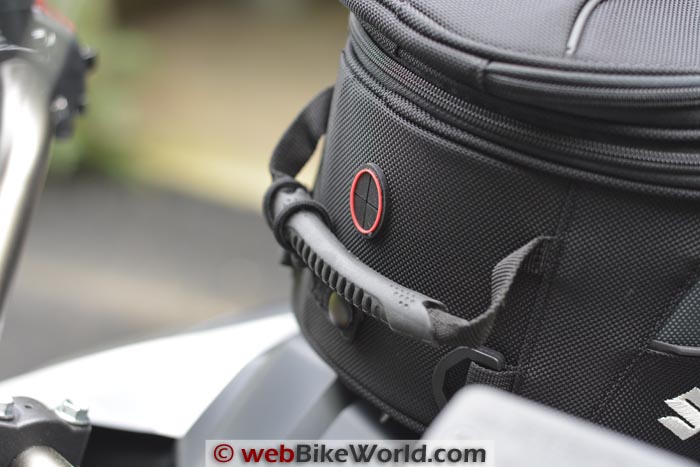
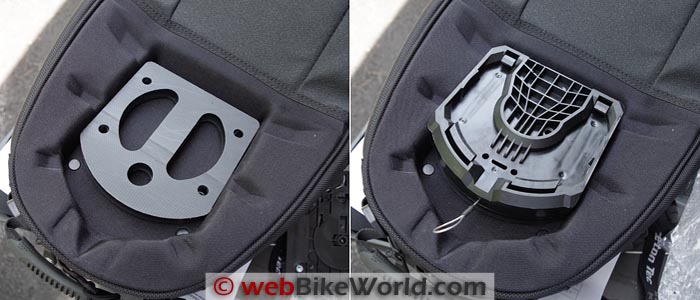
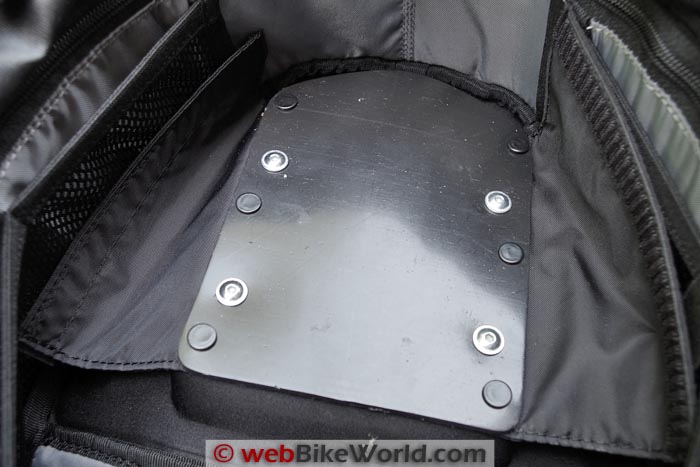
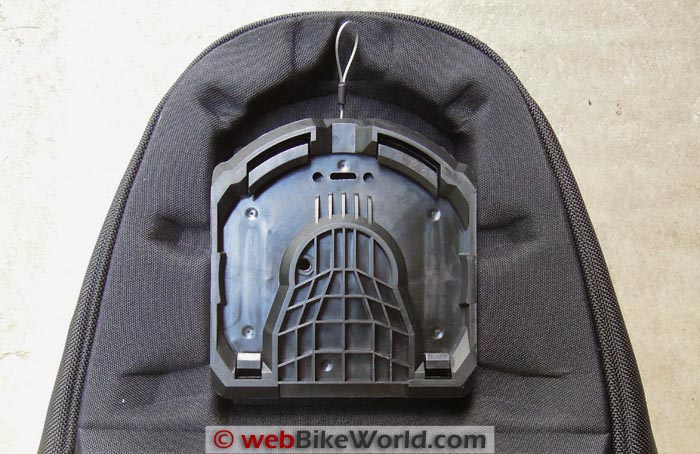
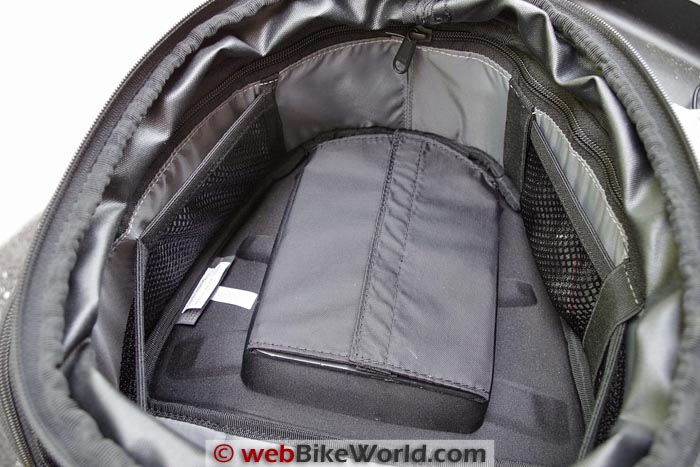 Here’s the inside of the tank bag. Un-fold the cover on the recess, or “hump”. It’s held on with hook-and-loop. The recess holds the adapter plate and the plastic clip on the bottom of the tank bag, which then clips to the fuel filler mount ring.
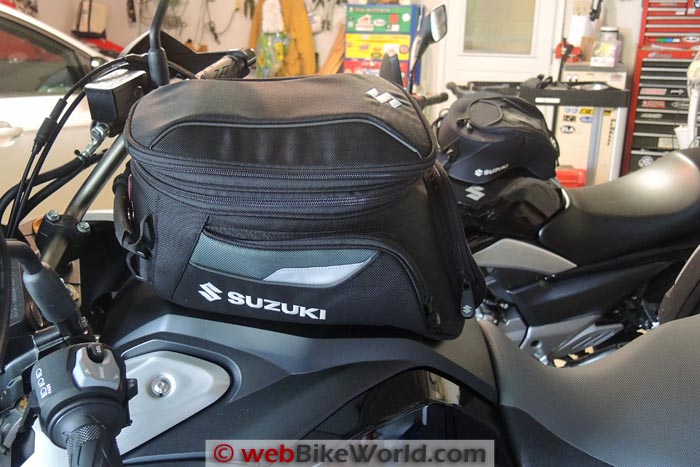
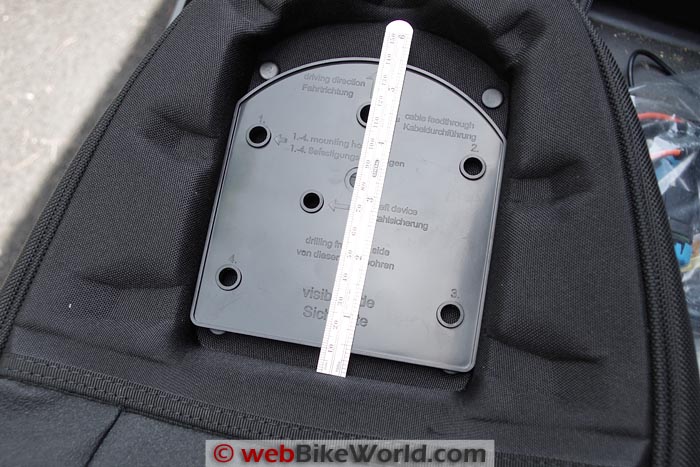
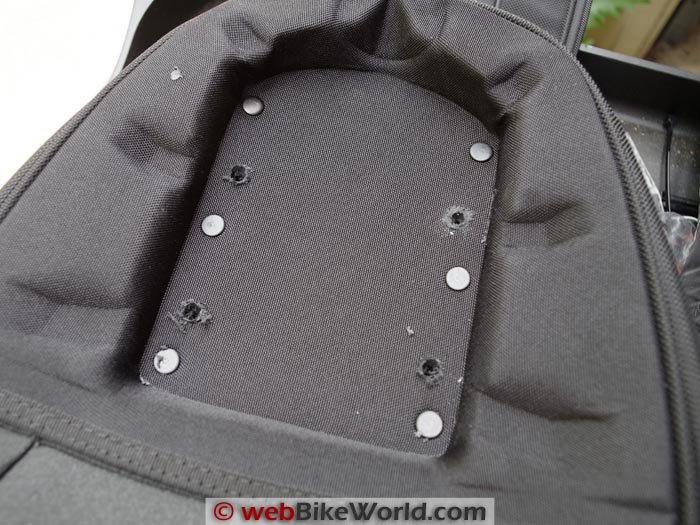
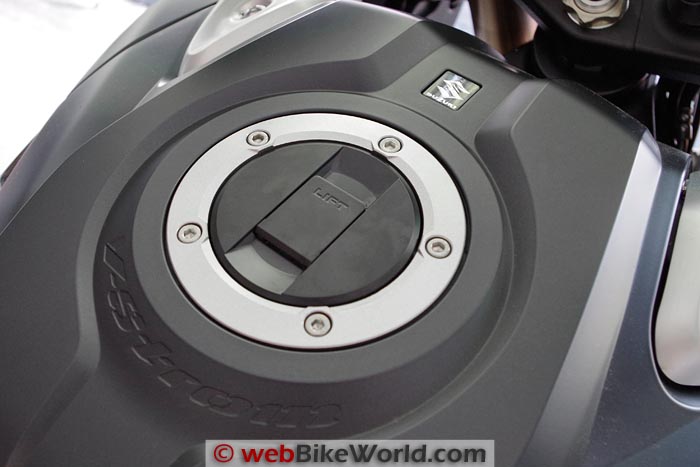
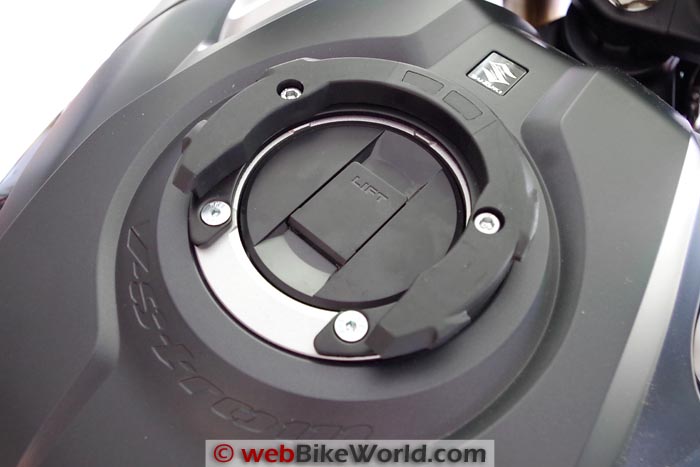
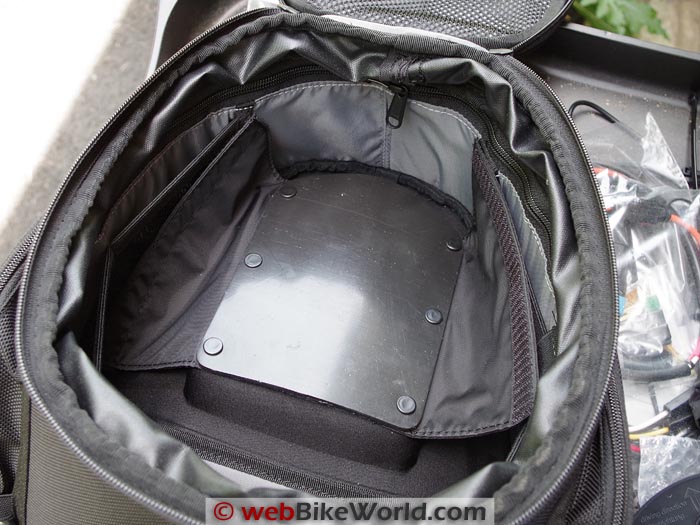 Here’s the plastic cover over the “hump” inside the tank bag. Again, the hump is formed from the recess underneath the tank bag, which is necessary to hide the lock part of the mount that snaps on to the tank ring. You have to drill through to mount the adapter plate and the plastic clip shown in the next two photos. In the photos above, the tank bag is flipped upside-down to show the recess. On the left is the spacer and on the right is the plastic snap mount that then clips on to the fuel filler tank ring. I laid these in for illustration; the bag hasn’t been drilled yet, which is necessary to bolt these together to the bag. The holes must be drilled using the template (next photo) to attach these to the tank bag. Both of these parts come with the tank bag itself, by the way. Here’s the drilling template that comes with the tank bag. The instructions call for a 10 mm space from the bottom edge of the recess to the start of the template. This is a critical measurement to ensure that the tank bag sits correctly when it’s connected to the tank ring, so make sure you get it right. Here’s the bag after the holes were drilled through the template and into the recess. The holes must be drilled all the way through the bag, so be careful not to also drill through the top of the bag when the bag is flipped over. The grommets provided in the hardware kit with the tank bag fit into the drilled holes. M5x22 ISO 7380 lens head screws through the mount attach to the plastic clip on the bottom recess of the tank bag. Here’s the tank bag from the bottom, now with the clip mount installed over the spacer. The screws and grommets are shown in the photo just above this one. Next, remove the 4 lower bolts from the fuel filler ring. Attach the fuel filler ring mount using the correct bolts and bolt placement. Note that the bolts look the same but are not. The two M5x30 DIN 7991 countersunk screws fit the lower holes. The M5x25 DIN 912 hex socket screw (25 mm long) mounts in the upper right and the M5x20 DIN912 hex socket screw (20 mm long) mounts in the upper left. Note also that there are 4 spacers (8.5 mm by 5.5 mm) that fit in recesses in the fuel filler ring itself. I had a slight clearance problem on the right side and had to use a file to grind off some plastic from the top part of the mount near the open tip so that the fuel filler lid would open without rubbing. These are supposed to be torqued correctly. You’re pretty much finished. The tank bag snaps on to the ring and there’s a narrow wire loop in the front that you pull to release the bag from the clip. There’s supposed to be a little snap loop that holds the wire release in the front of the bag so you can easily find it, but the loop seems to be missing from my bag, I couldn’t find it. The Suzuki bag (apparently made by SW-Motech/Bags Connection) is very nicely made. This is an input hole in the front, for an electrical accessory or charging wire, which lines up nicely with the electrical outlet on the V-Strom’s dash. Here’s another port in the rear for a headphone or other type of accessory wire for anything that can fit in the pocket. You’re done! The tank bag has two side pockets, a rear pocket and the large main cavity. It comes with a carrying handle, carrying strap and a waterproof cover, just like the Suzuki GW250 tank bag (review).
Conclusion
The tank bag for the Suzuki V-Strom 1000 ABS is a nice piece of gear that adds to the carrying capacity of the Adventure model.
The Quick Lock tank bag mounting system works well and keeps the bag from rubbing on the paint. It’s fairly easy to remove but easier to install on the locking ring.
The initial installation process is more difficult than it should be, but anyone with fairly basic mechanical skills and a few tools should be able to do it. Don’t forget: read the instructions carefully and take your time!
More wBW: Suzuki V-Strom 1000 ABS Blog | wBW Motorcycle Reviews
Owner Comments and Feedback
See details on submitting comments.
From “J.P.” (June 2014): “I have the SW-Motech version of that EXACT tank bag mounted on my Suzuki GSX1250FA that I traded-in my 2004 Suzuki DL650 V-Strom for. I was also put off by the price, but the design appealed to me so I pulled the trigger.
I also took my time installing the unit, measuring twice, three times, four times, five times…….before finally drilling (!) into my new bag. It was worth it in the end.
I love the quick attach and detach mounting, how it stays off the paint, and how it allows me to mount my iPhone 5S as a nav unit.
I bought the accessory holder that allows mounting of a cell phone or GPS device and it works like a charm. I also bought, what the heck, in for a few hundred bucks already, the map case that attaches to the top of the bag for highway maps. Works great.
So with the full monty, I have cell phone, navigation, power for my cell phone, and a map, all within easy reach on top of this very functional tank bag. Expensive, but a very functional and pleasing to use set up.
Oh, my release lanyard was in place on my SW-Motech version and it snaps nicely to the front carry handle. If you can afford the coin, this is a worthy addition to the bike.”