
The SW-Motech skid plate engine guard (aka bash plate) for the Suzuki V-Strom 1000 ABS is very well made, as is typical for SW-Motech accessories.
It comes with a full array of high-spec hardware that makes the stock Suzuki stuff look pretty wimpy.
Be sure to carefully lay out all of the hardware and check the instructions to make sure you understand what you have before you start.
The skid plate mounts with bolts that replace the Suzuki center stand; bolts that replace six engine over bolts and then attaches to the Suzuki or SW-Motech engine crash bar in front.
The SW-Motech skid plate is light years beyond the el Cheapo plastic valance that Suzuki installed on the Adventure model.
Problems? Well, I’m not sure what will happen next time I need to change the oil (there’s only a small drain hole in the bottom of the skid plate) and if I really did hit a rock, I sure hope those engine cover bolts don’t come tearing loose.
Otherwise, it’s a heavy-duty part that should protect the very vulnerable front exhaust pipe and oil filter on the new V-Strom. It’s expensive though and installation is a bit of a project.
NOTE: This post is definitely photo-heavy, but I hope it tells the story!
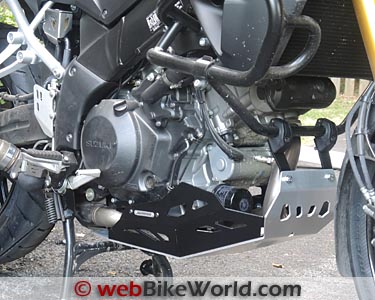
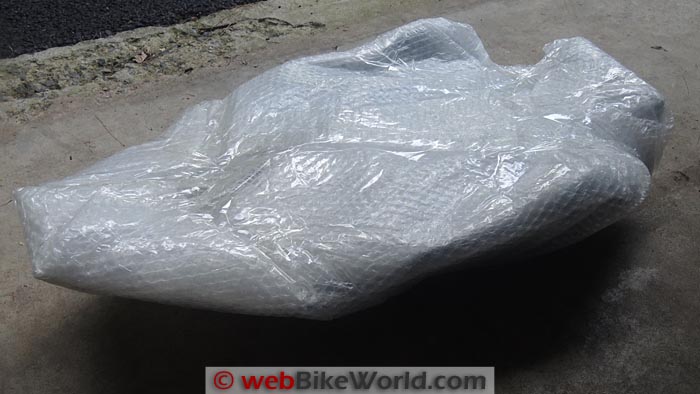 A pod from “Invasion of the Body Snatchers”? Not yet — it’s just an SW-Motech skid plate engine guard..
Introduction
The cheap plastic valance that Suzuki gives us on the 2014 V-Strom 1000 ABS Adventure model is laughable, so it should be one of the first things you replace, especially if you’re planning on going anywhere off the straight and narrow.
What to replace it with? I installed an SW-Motech engine guard for the Suzuki DR650SE (review) a couple of years ago and I liked it so much, I immediately turned to the German-based company again for more.
My experience with SW-Motech accessories has so far been very positive.
The company makes very high quality goodies, with excellent (but detailed) instructions, full hardware listings and they even give you all the torque specs for the new and usually much higher quality hardware.
The SW-Motech skid plate engine guard or “bash plate” for the V-Strom is no exception. It comes from Twisted Throttle, the webBikeWorld affiliate and SW-Motech importer/distributor in the U.S.A.
It’s precision-made, looking like laser or water-jet cut and CNC press braked. The black anodized sides have been flush-riveted to the main aluminum body along the flat business end.
Some holes have been cut for access to the oil drain plug and a couple of other holes and one slot that I haven’t figured out yet.
This is my only concern so far, because I can fit a ratchet extension up through the hole to reach the engine, but I’m not sure what will happen when the oil comes pouring out.
I’ll have to noodle on that for a while — and thankfully the next oil change isn’t due for a while — and hopefully some kind SW-Motech skid plated V-Strom owner will clue me in.
This baby isn’t cheap, but it’s not bad as these things go. It has a list price of $257.50.
All is relative however, because Suzuki charges $234.95 just for that cheap plastic cover (Part # 94400-31860)!
I know for a fact that Suzuki had an aluminum skid plate for the 2014 V-Strom 1000 ABS listed in the “Accessories” section for the bike, but I just looked and it is no longer there.
Very strange…I think it had a list price of $359.95 but it had “SUZUKI” laser cut on the sides, a bit much.
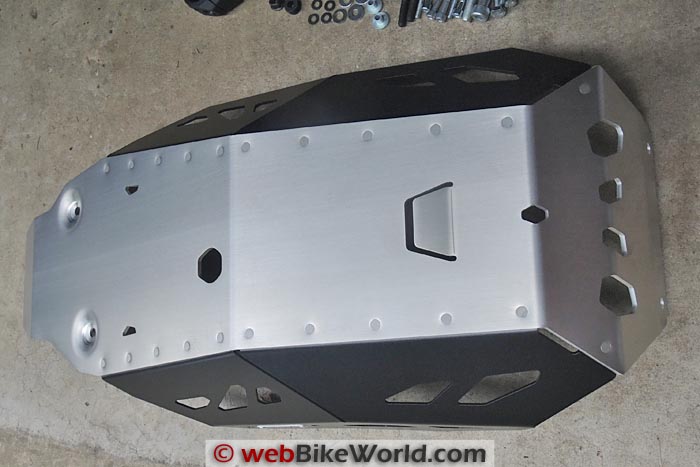 The bottom of the skid plate, showing the flush-mounted rivets and openings for oil drain plug wrench (L) and…?
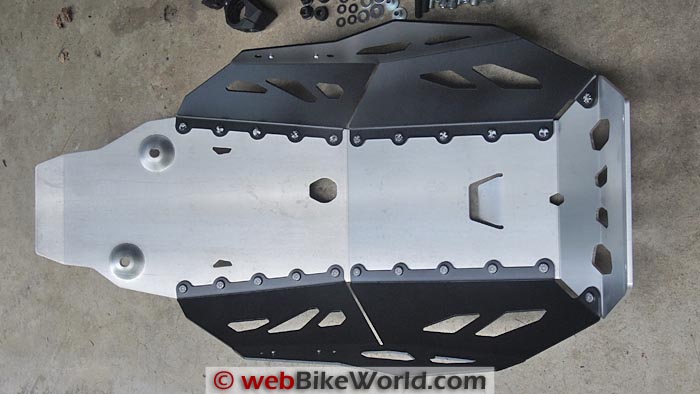 Here’s the inside of the skid plate (the side towards the engine).
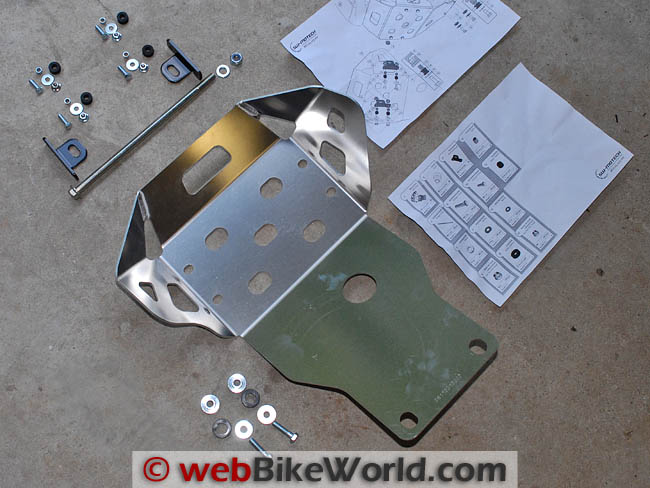
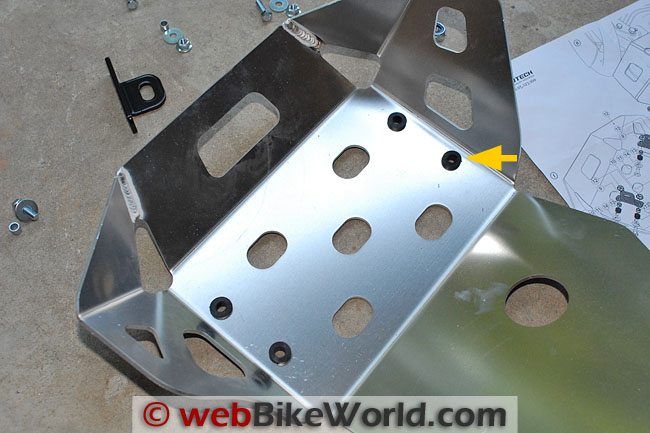
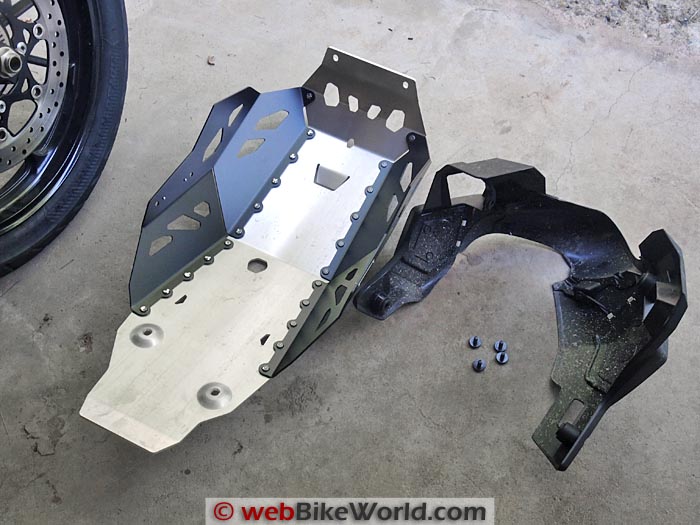
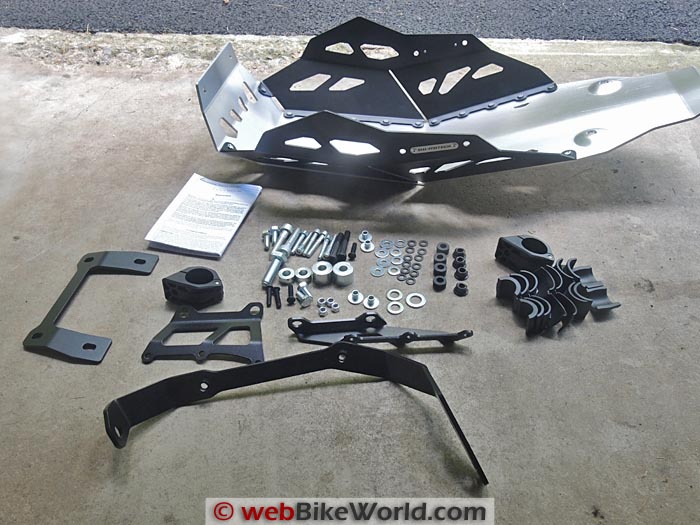 Here are all the parts, hardware, brackets and the skid plate.
Installing the SW-Motech Skid Plate Engine Guard
First of all, before you start the project, either download the .pdf instructions for installing the SW-Motech bash plate or carefully study the instructions that come with the kit.
I know, I know — who reads instructions, right? But I can assure you that study time at the beginning of projects like this will actually make it go smoother and faster.
The installation isn’t too difficult, but it is a bit complicated and there are 85 different hardware pieces that are included in this kit and it’s very important to become familiar with each part and to know where it goes on the bike during the installation.
TIP: The very best tip I can give you on this is to absolutely, positively first thing lay out all of those 85 bits o’ hardware that comes with the kit in little rows and check them carefully against the hardware list in the SW-Motech instructions. It is especially easy to confuse some of the washers.
I’m not trying to scare you away, because it isn’t that hard to install. But having done it, I’m trying to make it easier for you!
Once you understand all the hardware and know how to reference it in the SW-Motech instructions and then where it goes on the bike, all you have to do next is to start the wrenchin’.
TIP: By the way, if you’re not familiar with metric hardware nomenclature, well, get familiar. Buy a metric scale (that’s a “ruler” to you non-machinists) and even a metric thread gauge and check all the hardware and study the instructions to see where it all goes.
The SW-Motech instructions are always complete and detailed. They are in a “3D” diagram format, so study the assembly also and compare the drawings to the bike to understand it all.
The more time you spend on all of this up front, the easier this job will be, I guarantee it.
By the way, you (or your dealer) DID install that Suzuki center stand (review), correct? It’s a gem and something you really should have for this bike.
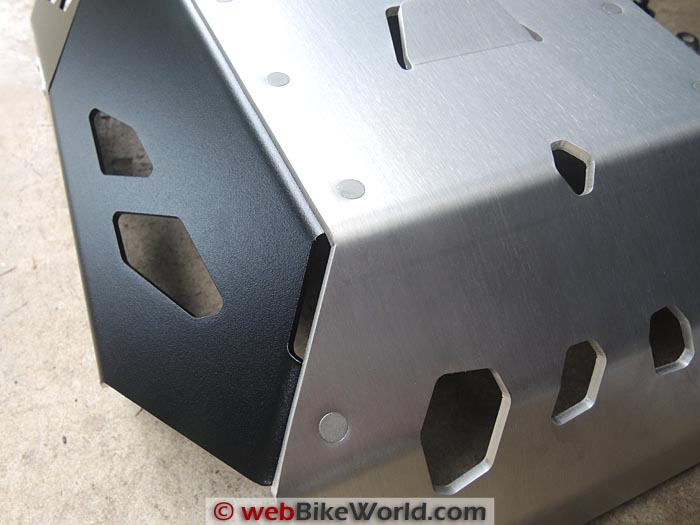 Detail showing the build quality of the SW-Motech skid plate engine guard for the 2014 Suzuki V-Strom 1000 ABS.
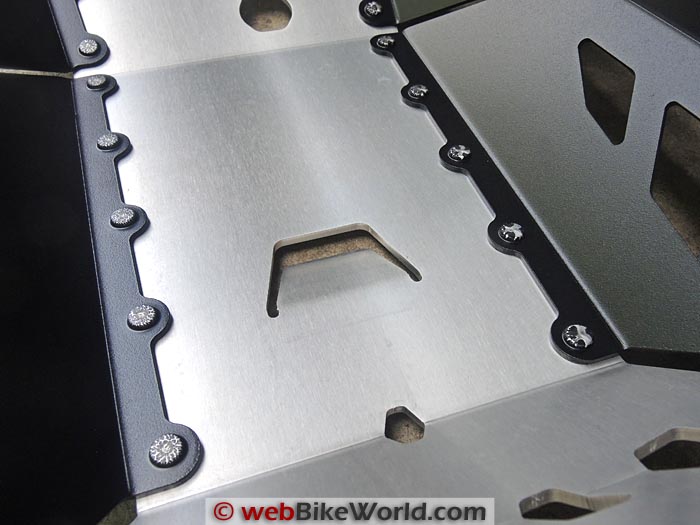 Here’s a view of the inside of the skid plate, showing the back side of the rivets and the opening for…a drain?
Tools Required
Only basic hand tools are required to install the skid plate, including 4 mm and 6 mm Allen wrenches (T-handle and 3/8″ socket type); a socket set; some combination wrenches (spanners) and a torque wrench.
We use the excellent Check-Line DTW 100 Electronic Torque Wrench (review) that is calibrated accurate and traceable to NIST. It has an instant Nm-to-Ft. Lbs. electronic conversion and it beeps when you reach the torque setting.
You’ll also need some good quality, medium-strength thread locking compound.
Photos for Illustration
I’m not going to repeat the entire instructions here, but let’s take an assembly tour in photos and you can see what’s involved and hopefully reference this article also if you run into problems.
We took many photos but posting too many could make it more confusing (and burn up your WiFi router!), so Burn and I chose what we thought were the most relevant. The photos are organized in the assembly order.
 The SW-Motech skid plate engine guard compared to the flimsy plastic valance that comes with the V-Strom Adventure.
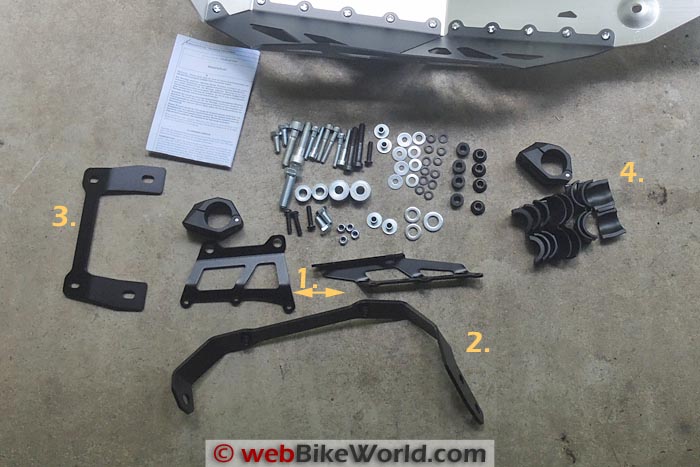
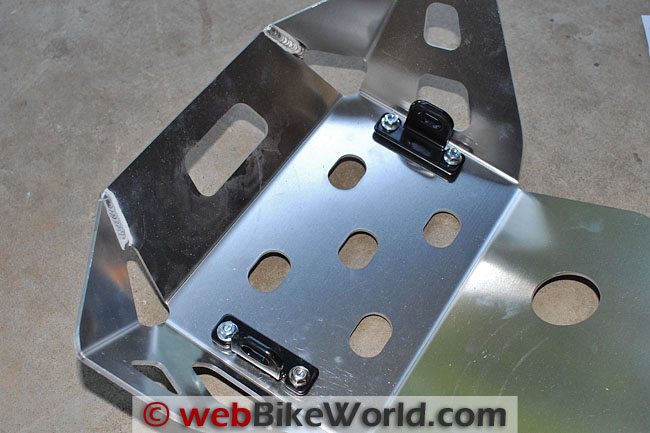
PHOTO 1 (Above):
1. These are the brackets that mount on both sides of the engine, using SW-Motech provided HHCS that replace the lower engine cover bolts on each side of the V-Strom.
2. This is the bracket that runs across the back of the skid plate; it attaches to the center stand mount bolts, two on the right and one on the left.
3. This is the bracket that holds the front of the skid plate to the crash bar (either Suzuki or SW-Motech type).
4. Two of these rubber insulators are used on the front along with the plastic clamp (visible to the left of the number “4”). The kit includes several thicknesses to fit the different engine crash bars but only two are used.
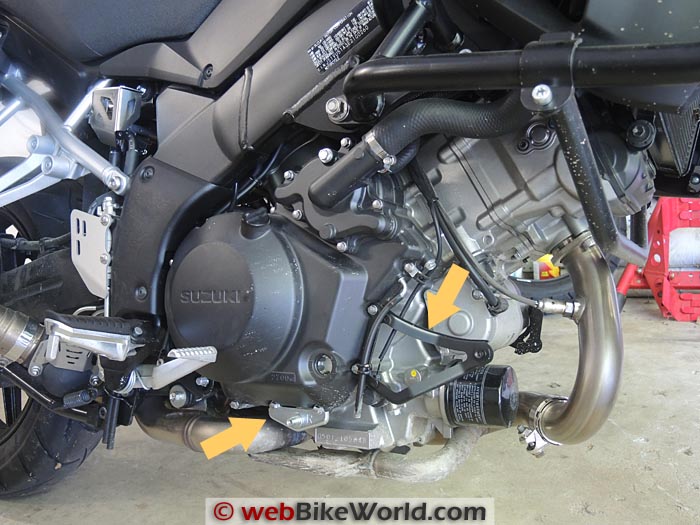
PHOTO 2 (Above): First thing is to remove the plastic Suzuki valance cover that comes with the Adventure that fits on the bottom of the engine. Also remove the brackets that mount it. There is no valance on the standard version of the V-Strom.
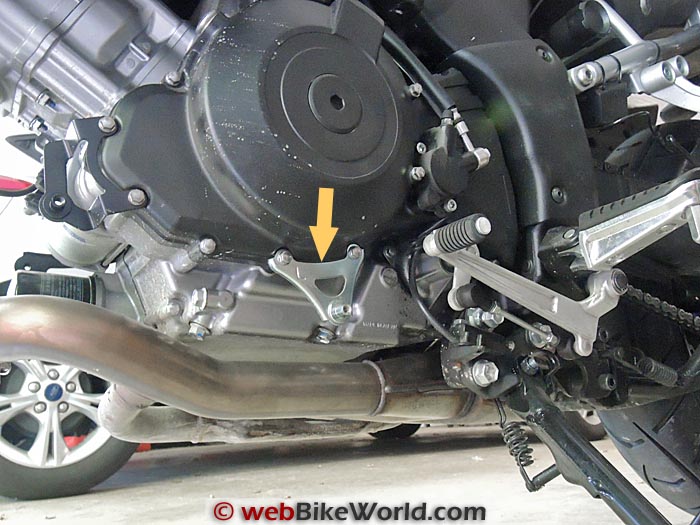 PHOTO 3: Here’s the valance bracket on the left side of the engine, remove this also.
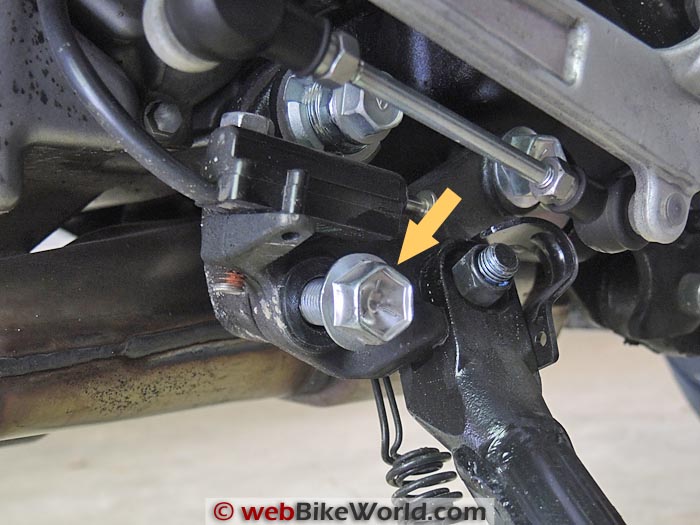
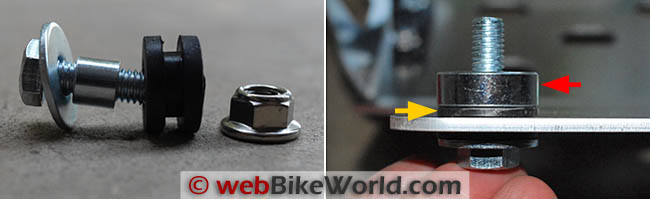
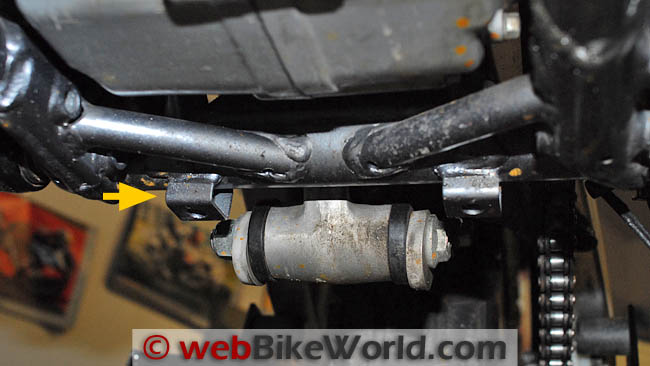
PHOTO 4 (Above): This is the stock Suzuki bolt on the left side that holds the side stand. It is replaced with an SW-Motech bolt and washer to attach the rear mounting bracket for the skid plate (part #2 in photo 1 above).
SW-Motech provides a heavy-duty high-tensile bolt replacement, identified as #8 in the instructions (M12x40 DIN 961, “Hexagon Screw, Fine Thread”. It takes 79 Nm of torque.
The washer is part #9, with an ID of 13 mm, DIN 125. NOTE: The DIN standards by number are defined in this Wikipedia entry.
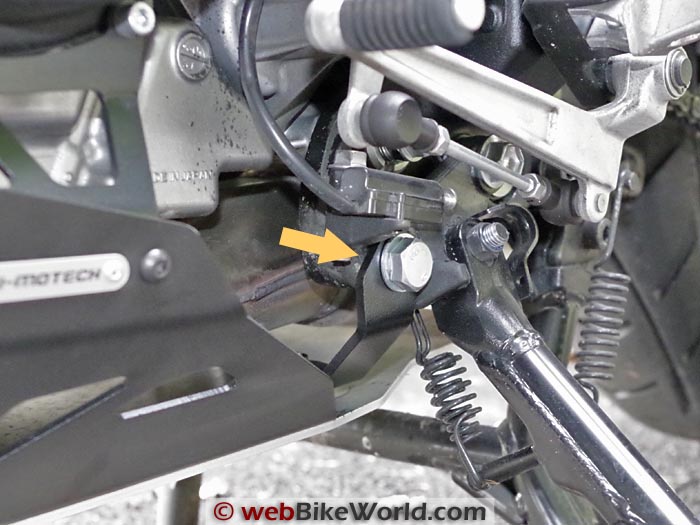
PHOTO 8: This is the replacement SW-Motech bolt and washer for the side stand, used to mount the left side of the rear cross bracket. This replaces the stock Suzuki bolt shown in photo 4 above.
Note that these photos are slightly out of order when compared to the more detailed instructions but we organized them this way for clarity.
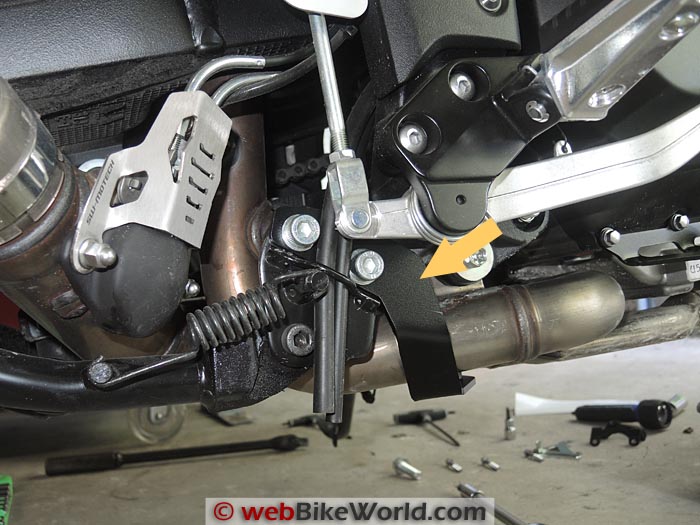
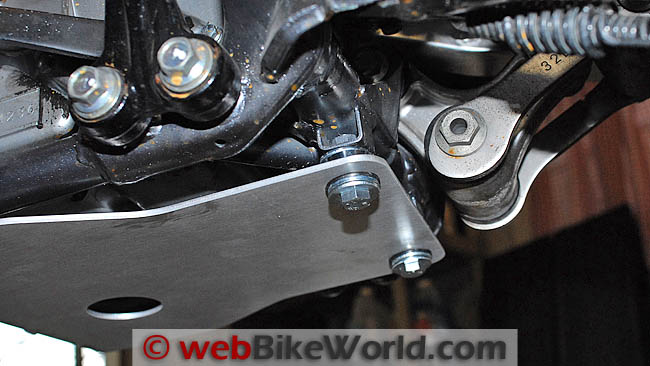
PHOTO 5: Here’s the right side, this shows the skid plate mounting bracket (arrow). Note the two bolts to the left of the arrow, these are the SW-Motech replacements that hold the rear skid plate bracket (part #7) in place.
They are listed as part #10 in the instructions (HSS, Fine Thread) and they are M10x45 DIN 912. The washers have an ID of 10.5 mm, DIN 125. Note the SW-Motech exhaust valve cover (review)on the left in the photo.
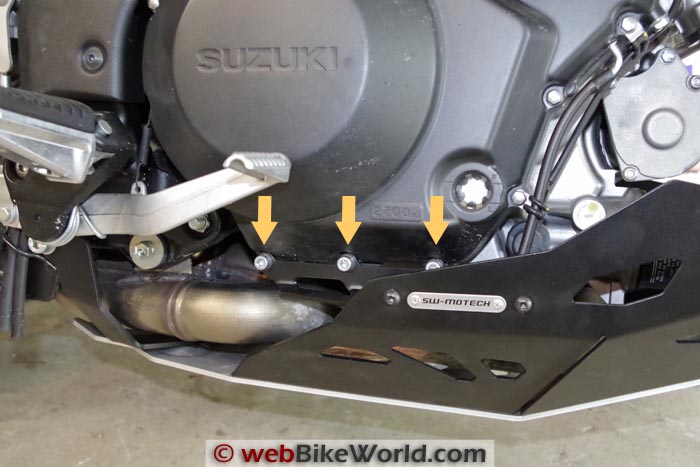
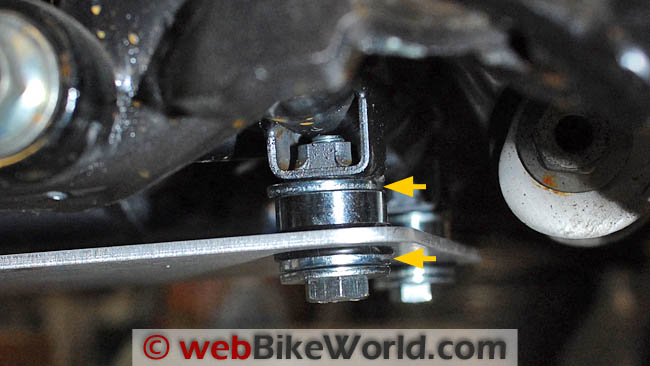
PHOTO 6 (Above): Moving towards the center, the skid plate mounts on both sides by replacing 3 of the bolts that hold the engine side covers in place.
The stock Suzuki bolts are replaced with stronger M6 DIN 912 HHCS on both sides. NOTE: This is tricky, the bolt lengths are slightly different for both sides.
On the left side, 3 part #5 (M6x40 DIN 912) with 2 each part #6 flat washers (ID 6.4 mm DIN 125 are called for.
On the right side, 3 each of part #14 (M6x35 DIN 912) and 2 each part 15 (ID 6.4 DIN 125) are used. So the left side uses the 40 mm long HHCS and the right uses the 35 mm version.
The flat washers parts #6 and #15 are identical.
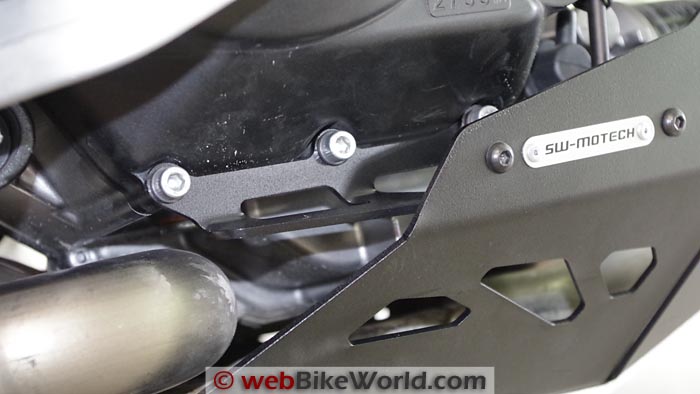 PHOTO 7: Close-up of the center mounting bolts with bracket, right side.
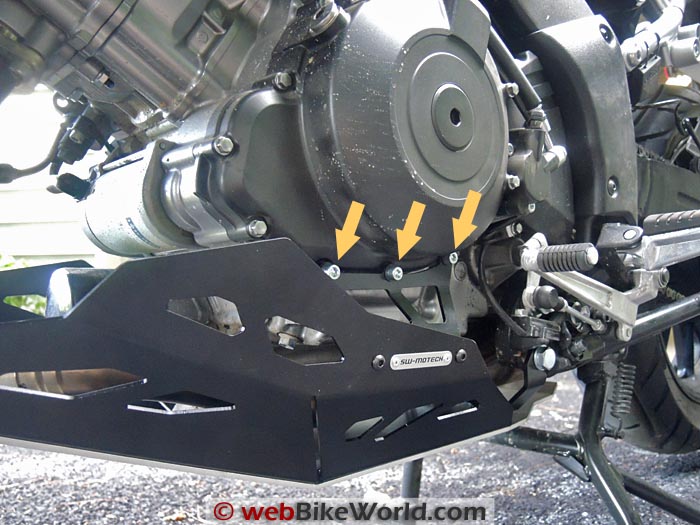 PHOTO 8: Here are the 3 center mounting bolts on the left side. These replace the stock Suzuki engine cover bolts. See the note in photo #6 above.
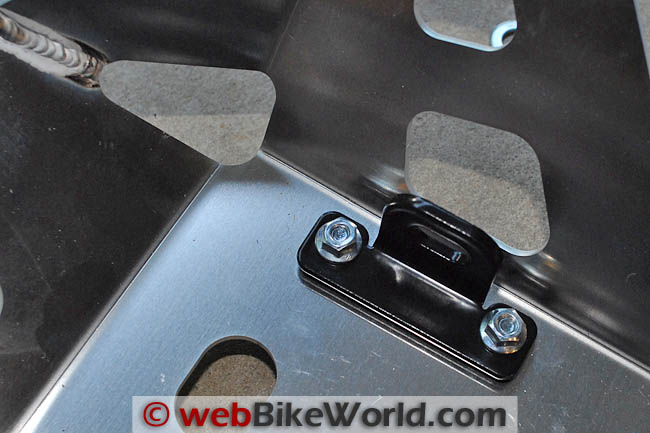
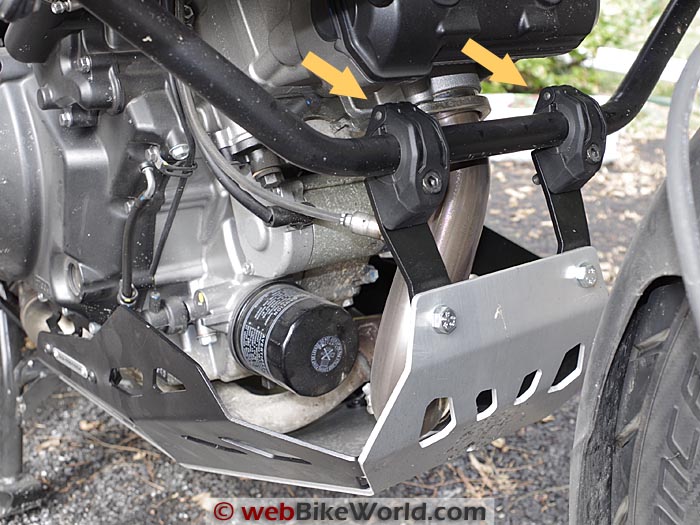 PHOTO 9: Front mounting brackets with plastic clamps enclosing rubber isolators. Leave these slightly loose to line up, straigten and tighten when everything else is attached.
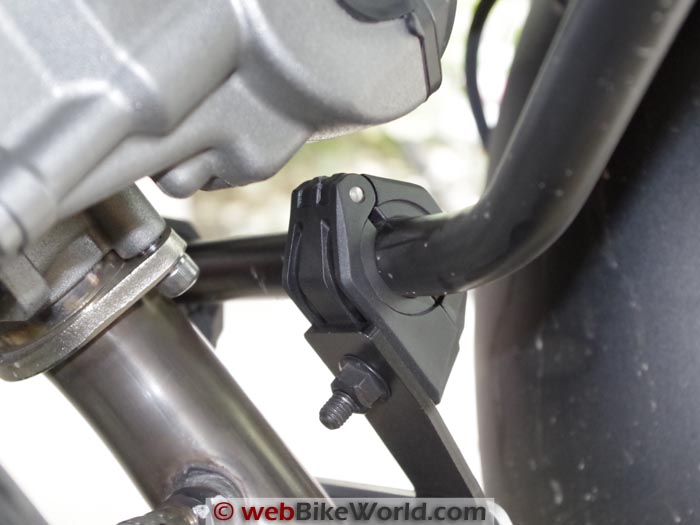 PHOTO 10: Close-up of a front mounting bracket. Note plastic clamp enclosing the rubber isolator.
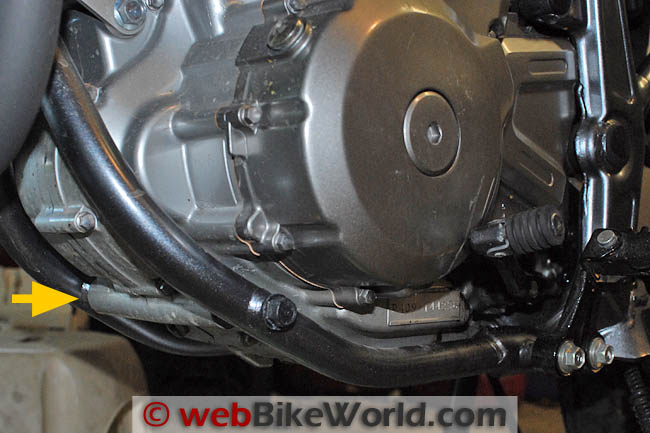
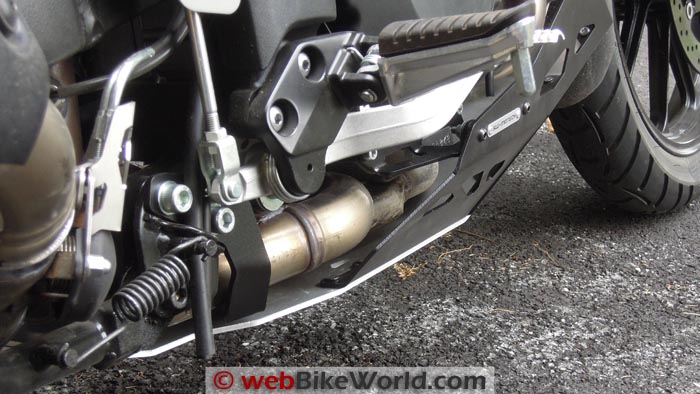
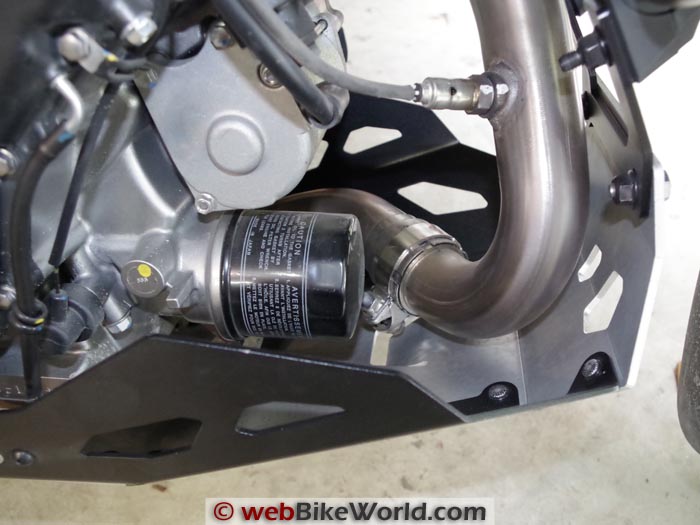 PHOTO 11: Photo showing clearance for oil filter and front exhaust pipe.
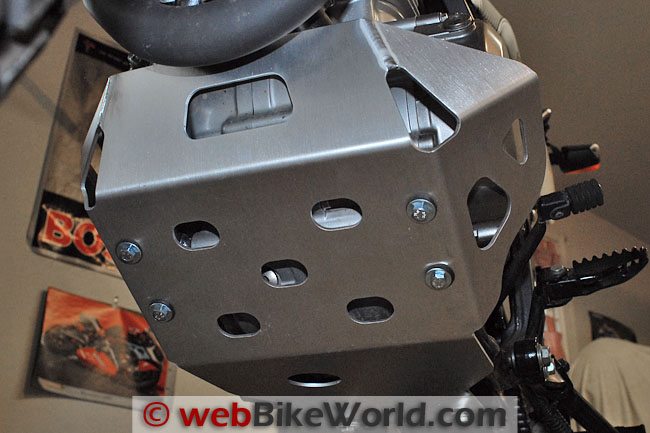
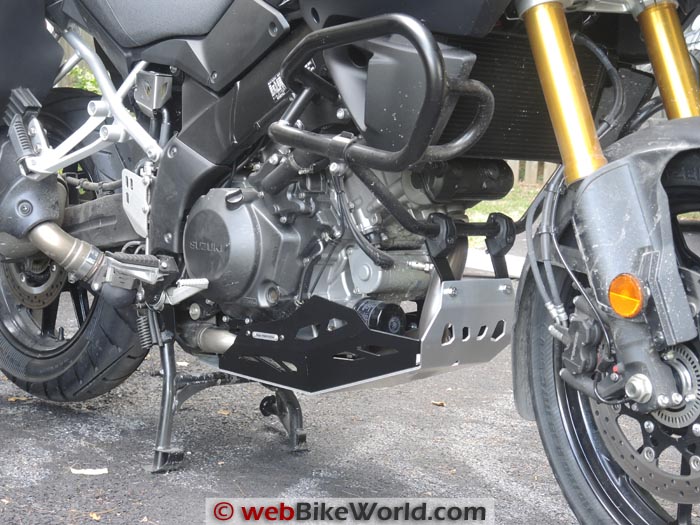 PHOTO 12: Job complete! Photo showing the size and coverage of the SW-Motech skid plate engine guard.
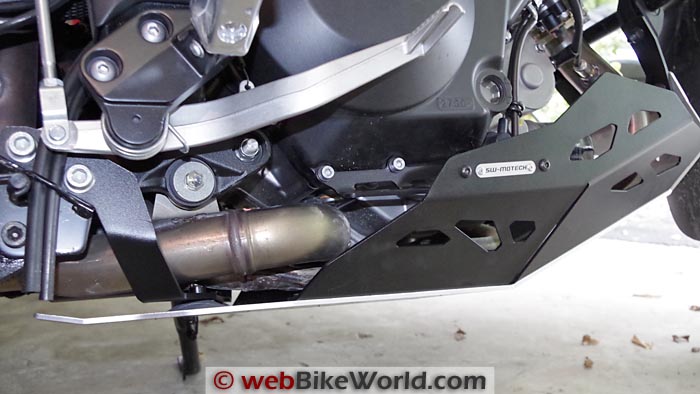 PHOTO 13: Side view showing full-length coverage.
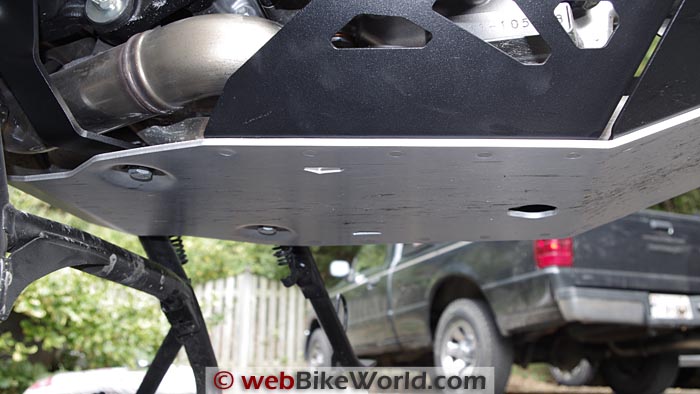 PHOTO 14: View from underneath. Note oil drain plug wrench hole towards the front (R).
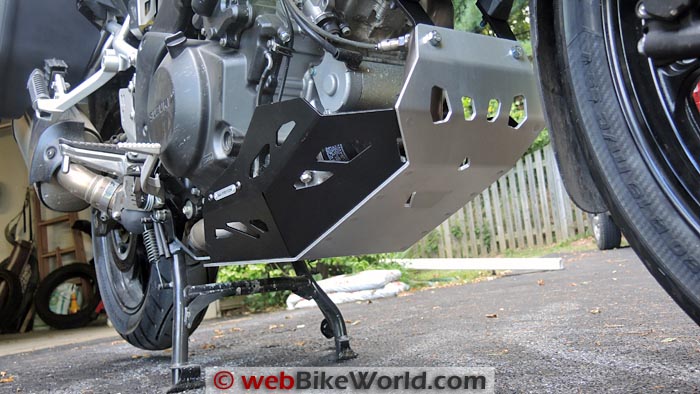
PHOTO 15 (Above): (UPDATE) Some owners have said there may be a clearance problem with this skid plate when cornering. I ride this bike pretty hard on and off-road and have not experienced an issue. Here’s a photo of the clearance along the side.
If the skid plate does bottom out, then it’s probably doing its job. I guess it might be possible in some extreme circumstance, but that same circumstance would probably affect the engine, oil filter, exhaust or center stand under the same condition and the skid plate is meant to protect.
And as I have stated before, my opinion is that the V-Strom is not an off-road bike by any means.
The SW-Motech skid plate does reduce clearance under the engine by about 20 mm along the bottom and the angle on the center side of the skid plate could be tighter to the engine.
In any case, we’ll do some experimenting to see if we can get it to scrape. Here’s another photo, showing the clearance on the side from the rear.
 PHOTO 14: View from underneath. Note oil drain plug wrench hole towards the front (R).
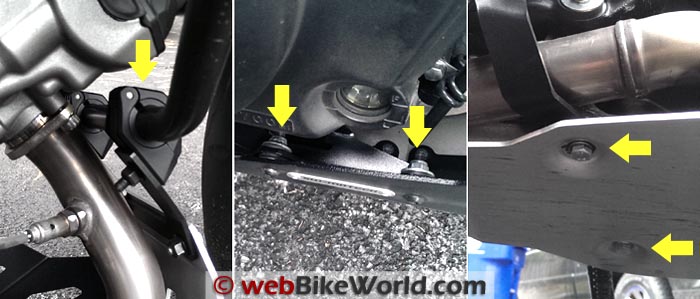
PHOTO 16 (Above): (UPDATE 2) Thinking about the oil change issue, I’ve decided that the best way to do this is to remove the skid plate before draining the oil. It’s actually not that bad.
From left to right above, first remove the 2 bolts that hold the front of the skid plate. Center, remove the two bolts on either side that hold the skid plate to the side brackets.
Right photo, remove the two bolts that hold the skid plate to the rear bracket. Drop the skid plate, then you can drain the oil and change the filter just like normal.
I haven’t tried it yet because I had changed the oil and filter shortly before mounting the skid plate, but I think this is the way to go.
Conclusion
The new SW-Motech skid plate engine guard for the 2014 V-Strom 1000 ABS is very well made and comes with high-quality hardware. The instructions are detailed and complete, if a bit complex.
Study the instructions carefully and lay out all the hardware before beginning this project. It’s easy to confuse some of the washers and the side mounting bolts, so be careful.
Also, check washer locations and placement and remember to use thread locker. You may want to leave the bolts loose until all of the parts are in place, then proceed to tighten to spec.
The SW-Motech instructions include torque specs for all of the important bolts.
The skid plate looks robust, but I’m a little concerned that it attaches with bolts in the center that also hold the engine side covers. I’m hoping that the higher-spec SW-Motech hardware will protect against any damage.
Since the V-Strom is far from an off-road bike, in the end, this skid plate is a bit more “show” than “go”. But, it’s light years better than the thin plastic valance that Suzuki provides with the Adventure.
The SW-Motech skid plate engine guard is also pretty expensive, with a list price of $257.50, although that’s about par for skid plates of this quality and it’s cheaper than the mysterious Suzuki optional aluminum skid plate that seems to have disappeared from their parts listing.
Note that this skid plate is in limited supply so if you want one, buy it quick when it shows up in the Twisted Throttle stock.
By the way, there’s also an optional aluminum tool box that can be purchased that mounts on the front of the skid plate.
Publication Date: September 2014
More wBW: Suzuki V-Strom 1000 ABS Blog | wBW Motorcycle Reviews
Owner Comments and Feedback
See details on submitting comments.
From “K” (April 2017): “I have one of these skid plates mounted on on my 2014 NC700XD. Oil changes are easy, only four bolts need to be removed form the bottom of the plate to gain access to the drain plug and the oil filter.
There is a clearance issue with the center stand though. The inside of the right leg on the stand rubs against the plate making it a little difficult to to get the bike up onto the stand.
I used a Dremel tool to grind a small semi-circle away from where the stand makes contact, now it works fine.
I’m very happy the very vulnerable looking underside of the engine case is now protected from hazards I encounter on the dirt roads here in Vermont.
The skid plate on my bike has many scratches and small dents from stones thrown up by the front wheel.”
From “K.P.” (January 2015): “I have an idea. It’s from an old puzzle I saw once a long time ago. How do get a wooden dowel out of a wine bottle when it will only come out if it is perpendicular to the mouth of the bottle?
It will not slide out if the bottle is held upside down. You use a paper tube inserted into the mouth of the bottle to catch the top of the dowel and guide it out inside the tube.
I would try an oversize piece of plastic pipe shaved down to fit the opening in the bottom plate and maybe held in place with an O-ring for starters.
I just bought a SW-Motech plate for my 2014 NC700X DCT from Twisted Throttle so I have been thinking of how to manage an oil change, every 8000 miles on the NCXD.
My only question now is if the plate will fit with the Givi engine bars I have on the bike. It’s too freakin’ cold right now here in Vermont to try it out.
On second thought you could mount a the pipe to the inside of the plate. Secure a flange to the end of the pipe and bolt that to the inside of the plate.
I would weaken the end of the pipe closest to the engine case by cutting slots so if the plate deforms the pipe won’t damage the case. As for not enough clearance to get a tool in you could make the hole bigger in the plate.
I have to see if the plate will even fit on my bike first. Here’s hoping for an early Spring.”
From “S.C.” (January 2015): “Great article with clear photographs. Thank you. Just some information you may find useful…I am a bit of a peg scraper on my new V-Strom 1000 at times so I understand there may be an issue of this plate touching down ridden that way.
I have been a forum participant about this possibility and exchanged ideas with the person who touched down with the plate towards the rear of its placement.
The last thing I want to chance is the plate scraping if my wife is with me on trips.
My ‘solution’ has been to order a 30 mm raising link from the States (AdventureTech) in conjunction with dropping the forks 10mm (as much as I think feasible) through the triple clamps.
This will further minimise the chance of grounding but also take me higher over rougher stuff when I’m loaded up a little.
The idea is that plate will then serve to deflect rocks thrown up by the wheel rather than be taking weighted hits should the bike bottom occasionally.
Rick at AdventureTech is providing these links in various sizes up to 30mm. OK, thanks again for your efforts. Much appreciated and very good work.”
Rick’s Reply: To be honest, I think this is a non-issue. There was one video taken of an overloaded bike hitting a big dip in the road with no other information and supposedly the sound is the skid plate scraping.
I have a hard time believing this is a real problem however and I ride the V-Strom sportbike-hard and fast in the corners and on some pretty bumpy roads and haven’t come close to touching the skid plate.
I also discussed this issue with the manufacturer who said the skid plate was tested and approved by the TUV in Germany and that they have never heard of this being a problem.
But, if you learn anything different, especially with 2 people on board, please let me know.
From “D.F.” (October 2014): “It looks to me that even if you can get a socket through that little hole that the oil will spill all over the inside of the skid plate.”
Rick’s Reply: Agreed, not sure how I’ll work this yet, maybe make a funnel out of aluminum foil to stick in there. I’ve used the heavy-duty aluminum foil trick a lot on other bikes and I always keep a roll handy in the garage!