Suzuki GW250 Inazuma Blog
Welcome to the Suzuki GW250 blog!
The GW250 is a webBikeWorld Project Bike for 2013.
I bought this bike on a whim, more or less, when I discovered that the 2014 Suzuki V-Strom 1000 ABS (preview) won’t be ready until Spring of 2014.
By the way, despite the preponderance of the Suzuki brand in the Blog list, it’s pure coincidence, nothing more.
The Suzuki GW250 is a “world bike”, introduced in the summer of 2013 in Asia and Europe and in the fall of 2013 in the U.S.A.
It was apparently introduced at the 2013 AIMExpo dealer show (report) in Orlando back in October but I completely missed it there and the Suzuki reps never mentioned it when I asked “So what’s new?”.
A new 250cc motorcycle is, to play on words, big news in the U.S.A. Motorcycles under, oh, about 800cc’s are considered “beginner’s bikes” in the U.S., as ridiculous as that may seem.
And it is a ridiculous concept, as I am about to prove with the Suzuki GW250.
I first “discovered” this fact when I bought the Suzuki DR650 (blog) for the webBikeWorld project entitled “Budget Adventure Touring“.
I quickly discovered that simpler is indeed better and a single-cylinder 650cc bike that can basically be field-stripped blindfolded is, in fact, much more fun to own and ride than the $20,000.00+ overly-complex, over-engineered, computerized fly-by-wire “serious” motorcycles that we’re seeing more and more of today.
Indeed, I will now go even one step further and state a fact that will be considered absolute heresy, at least in the United States: A 250cc motorcycle is perfectly fine for motorcycling!
To prove it, I’m living with the GW250 over the next several months and we’ll outfit it with as much gear as we can find. I’ve already discovered some luggage and other gear that will be the subject of this blog, so be sure to check back often.
The links to the reviews and articles are entered in the table below; some of the articles are on their own page and some are contained in the blog, so be sure to scroll down.
Also, you can subscribe to the webBikeWorld.com RSS feed, Twitter posts, Facebook, Google+, YouTube Channel, Vimeo Pro Channel (info page) and more to get updated every time a new article is posted!
If you have any tips on parts or accessories for the GW250, please give me a shout at editor@webbikeworld.com
|
wBW Suzuki GW250 Blog
|
|---|
| Suzuki GW250 Review Initial thoughts from the first week of ownership. |
|
GW250 Accessory Reviews
|
| GW250 Chain Adjustment Tips |
| SW-Motech Bags-Connection Daypack Review |
| Suzuki GW250 Center Stand |
| Suzuki GW250 Tank Bag |
| Adding a Battery Tender SAE Harness |
| Suzuki GW250 Sport Screen Installation |
| Oxford Temperature Gauge With Clock |
|
More Info in Blog Entries (Below)
|
| Multi-Function Instruments? (Below) |
| GW250 Break-in Report (Below) |
| Bags-Connection EVO Rear Bag (Below) |
|
Owner Reports and Tips (Below)
|
| Nelson-Rigg Bags for the GW250 |
| Home-Made Luggage Hooks (Seat Rack) |
| Owner Upgrades (Below) |
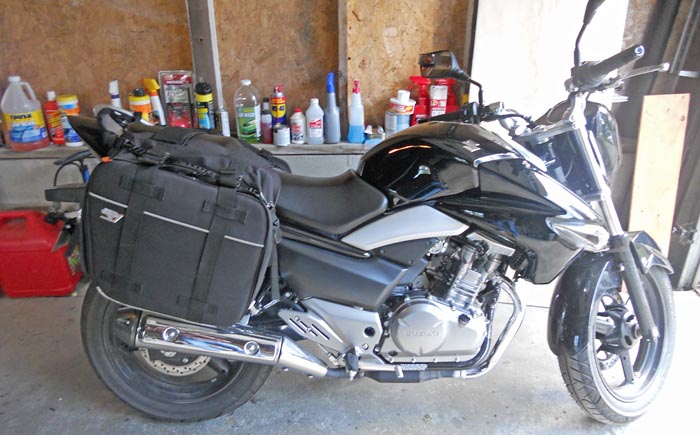
Nelson-Rigg Panniers for the Suzuki GW250
From “N.C.” (May 2014): “My neighbor traded me two older style, but great condition Nelson-Rigg bags for some spare lumber I had, that he wanted.
They maybe initially appear a tad to large for the GW, but the angle they adopt lines up with the side panels, clears the pipes by two inches — and they cost me nothing. Amazingly, I have been asked twice if they came with the bike as standard, so they can’t look too bad!
So now I have a sports tourer, grocery shopper and general hauler all in one. The bags I have fitted are from the Nelson-Rigg Classic range CL-850 Touring Saddle Bags. The model they now sell is an updated development from the CL-850, the Nelson-Rigg CL-855 ($120.94/pair here. List price is $159.95 the pair.
They also sell a Strap Mounting Kit at $9.95, which might be a useful addition. I already had a selection of black straps available from some Kuryakin bags, which I was able to use with the Nelson-Rigg bags.
Just turned over 1,500 miles and the engine is really loosening up. Average mpg is now over 69. Top speed I have achieved 77mph with a bit of a head wind. I think it’ll top out about 82-84 under the right conditions.”
Suzuki GW250 Inazuma Owner Upgrades
From “W.C.” (May 7, 2014): “After reading your glowing review on the Suzuki Inazuma GW250 on webBikeWorld, I thought I’d drop you a line or two! (See W.C.’s “My Suzuki Inazuma 250” website for more information).
Here’s some of the things that I’ve bought for my black Suzuki Inazuma GW250 (I bought one of the first Inazuma that arrived in the UK, back in November 2012):
Mirror Extensions: Mot Motolodge Mirror Extensions (PAIR), Black, 60mm or 100mm (UK). The 60mm extensions adequately overcome the mirror problem that Inazuma riders complain of. The 100mm extensions included in the pack were too long.
Horn: It’s easy to swap the squeaky Suzuki horn with just about any decent 12V Electric Horn. I bought a Ring 12V High Performance Horn for around $25 from Halfords here in the UK. It took less than 5 minutes to swap it in.
Chain Cleaning Brush: Laser 4140 Chain Cleaning Brush (UK) (or the Grunge Brush (review) in in the U.S.). Of course, never use WD-40 (solvent) or a metal wire brush on an O-ring chain!
I use Muc-Off PTFE Dry Lube 400ml Chain Wax every month or so after using Muc-Off Chain Cleaner 400ml made specifically for O-ring chains, just to keep the external surfaces from rusting.
The chain pin and bushing wear areas are already pre-greased and sealed at the factory for the life of the chain. (More on chain lubes and chain cleaning here).
Tires: Regarding the tires, when I replace the stock IRC’s (which I have found hold perfectly well in the dry and fairly well in the wet), I will probably go with Pirelli Sport Demons: Front 110/80 – 17 M/C 57H TL and Rear 140/70 – 17 M/C 66H TL.
Luggage: I originally bought a Ventura Luggage System & Black Rally Euro III 56-litre Soft Bag costing around $520 to use when I traveled from the UK to the south of Spain last year.
But this year, I decided to replace the Ventura system with GIVI panniers and top case which are fully-lockable (with several sets of spare keys) and are totally waterproof even in torrential rain.
- GIVI PL3103 pannier holders
- GIVIGIVI E21N Cruiser Monokey (pair) hard-sided panniers (21 L).
- GIVI SR3103 rack.
- GIVI E470N Monolock Simply III hard top case (47 L).
TThe total cost for the GIVI items was around $500. I cut and put some 1/8″-thick black rubber car mats inside the cases with Evo-Stik Impact adhesive to stop any rattling around of items whilst riding.
Windshield: I bought an MRA Customshield made from high-impact acrylic (17″ Wide x 19.5″ High x 0.12″ Depth) for around $155.
I assembled the shield as per the instructions which came with it using a drop or two of Granville Lock Thread on the threads of the hex bolts during assembly to prevent them from vibrating loose whilst riding.
I also used Granville Lock Thread on the threads of the M8 bolts which were used below.
I discarded the two large (25 mm internal diameter) handlebar clamps which came with the shield as there is no space on the handlebars to fit them!
I drilled out the two smaller plastic clamps (which clamp onto the ends of the stainless steel support bars) with an 8 mm diameter drill bit (the existing plastic clamp holes are only 6mm diameter) holding the plastic clamps in a padded vice during drilling for safety reasons.
(Note: Drilling out the plastic clamp holes will invalidate the guarantee).
I obtained a pair of Bar-End Mirrors from Classic Bike Parts (although just about any similar-fitting, Halcyon 820-style, bar-end mirrors will do the job) unscrewed and discarded the round M8 Allen bolts, mirrors and mirror arms leaving just the expanding mechanisms.
These are the important bits!
I prI prised off the two round black plastic blanking caps from the inner ends of the handlebar stems and pushed the bar-end mirror expanding mechanisms inside the inner ends of the handlebar stems.
I half-tightened the M8 bolts which open up the bar-end mirror expanding mechanisms, sufficiently to stop them moving while positioning the shield.
I secured the smaller plastic clamps of the shield with two M8 x 40mm bolts that I had handy (together with M8 flat steel washers and split washers) on top of the two bar-end mirror expanding mechanisms.
I only tightened these two bolts a little as I still had to adjust the position and angle of the shield.
After getting the position and angle of the shield correct (approximately 60 degrees and about the same angle as the front forks to the ground), I tightened up all the M8 bolts securely not too much. The expanding mechanisms will break if you over-tighten them too much.
I laI later added an MRA X-Creen Touring XCTA Universal Add-On Adjustable Air Deflector Flip Spoiler (Ref: MRA-XCTA) to the top of the MRA Customshield for around $150, though I’m not sure now that it was really that necessary.
The PUIG windshields that you can buy for the Suzuki Inazuma GW250 seem to do almost nothing at all regarding air-deflection and the Suzuki Smoked Visor accessory (review) (99000-9900A-48H) for $160: well, no comment!
I later found out that the MRA Customshield was vibrating around a bit at speed, so I added 2 bent metal strips, 25 mm rubber washers and some M6 nuts and bolts to hold the bottom of the shield to the 2 bolts situated underneath the Instrument LCD Panel.
All in all, a bit of a pain to sort out the shield but now it’s fine and rock solid! I haven’t come across anything on the internet to better this shield yet.
The GW250S version of the Suzuki Inazuma 250, of course, has a fairly decent half-fairing and windshield already fitted but this version of the Inazuma wasn’t available at the time I bought my Inazuma otherwise I would have gone and bought the GW250S!
Break-in Period: I use any decent Semi-Synthetic Oil SAE 10W-40 for the frequent oil changes (every 3000 miles).
During the break-in period it’s important not to ride the bike at a constant speed and to use the gearbox as much as possible (not easy to do since you won’t be travelling fast, particularly during the first stage of the break-in period).
The engine RPM should be progressively increased, peaking occasionally to the maximum allowed for each stage for brief moments. It’s important to put the bike under some stress during the break-in period and to give it fairly strong acceleration in each gear but not labouring the engine in too high a gear, for example, up a hill.
Also, don’t ride the Inazuma for more than 30 minutes at a time during the first week of the break-in, without leaving the engine to cool down for an hour or so, as a lot of immediate local heat will be generated due to the friction of the parts yet to be bedded in. (Editor’s Note: Read the owner’s manual also!)
Seat Cover: I bought a Black Genuine Sheepskin Motorcycle Seat Cover from eBay for around $48 and I’m now able to ride for 2 hours without a break(!) although I do recommend you have a break every hour for a coffee and a rest.
Exhaust System: You can knock some 19 lbs. off the wet weight figure of the Inazuma (403 lbs.) by fitting a 2-into-1 IX Race Exhaust System. This exhaust system has a removable dB-killer for race track use.
The The 0 – 60 mph and standing quarter-mile times will improve by around 1%. It costs around $450 and can be bought in 2 different styles, PZ8122 X-Pure Inox or PZ8122B X-Pure Black, both in Stainless Steel, from ADN Motor in France.
The 2-into-1 IX Race Exhaust System retains the Exhaust Gas Monitoring Sensor in the exhaust down-pipe and thus the Engine Fuel Injection (EFI) Management System keeps the mixture settings correct.
In the end, I decided to do a bit of walking to lose weight rather than spending some $450! So, I gave this one a miss although I know a guy in Paris, France who has proudly fitted one to his Inazuma!
Seat: Some Inazuma owners have decided to change the seat. Top Sellerie in France do a range of seats for the Suzuki Inazuma GW250 for around $280 each.
I find the original seat comfortable enough myself, particularly when I also put my trusty sheepskin cover on the seat for long ride-outs! My black sheepskin cover is held on quite securely by a large and wide elastic band which slips easily underneath the seat.
WWell, a long email but since you’re the first person in the US to have given such a good review to the Suzuki Inazuma GW250, I thought it was worth it!
I would advise you to seriously think about keeping this bike for good – the Inazuma will definitely grow on you!
My last bike was a Suzuki GSX750F but this Suzuki Inazuma GW250 is miles more economic and I have toured solo on it through France and Spain just as well as the GSX750F.
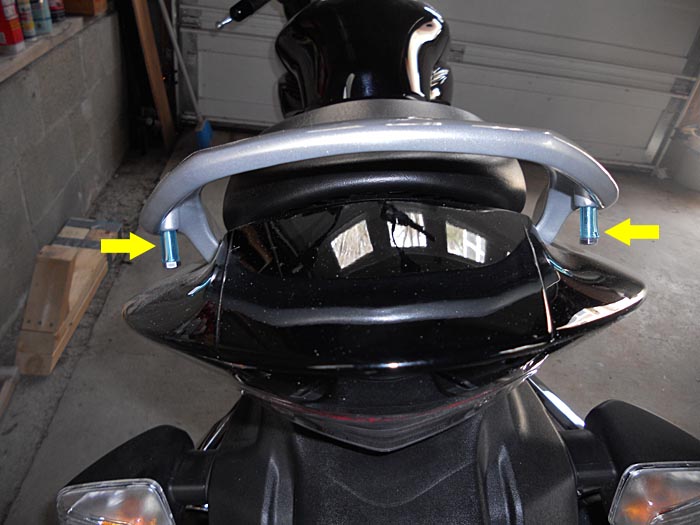
Home-Made Luggage Hooks
From “N.C.” (May 7, 2014): “I’ve had my GW for four weeks (traded down from a VFR800!!) 1,200 miles already and just loving the ease of riding, ergonomics, light weight and great handling. 60+mpg doesn’t hurt either.
But don’t splurge $9.95 plus carriage for the luggage hook set, just buy two correct size metric bolts — check thread and length — sleeve them in blue fuel pipe tubing all for less than $1.00!!!”
Also: “I’ve solved my mirror problem — again at low cost! I fitted a small rectangular “overtaking mirror” ($4.00 from NAPA) to my left side mirror, but I fitted it the “wrong” way round, so it widens my view behind me, not out to the “overtaking lane”. I suppose you could fit one to each mirror, but just the left one does the job fine.”
Suzuki GW250 Center Stand
April 11, 2014: The Suzuki GW250 Center Stand is surprisingly easy to install (all things considered) and it adds a lot of utility to the bike. It’s well made and nicely designed. Includes photos, narrative and a video.
Suzuki GW250 Tank Bag
March 22, 2014: The Suzuki GW250 Tank Bag finally arrived, 3 months after it was ordered. It’s an excellent piece of luggage that’s a perfect match for the bike. Details, photos and even a video included!
Battery Tender Harness Installation
February 11, 2014: It’s very easy to install a Battery Tender harness to the GW250. The harness is inexpensive and it makes it easy to connect a Battery Tender or other accessories.
GW250 Sport Screen Installation
February 8, 2014: Too cold and icy to ride, so let the farkling begin! Installing the Suzuki GW250 Sport Screen accessory isn’t difficult — once you read the instructions about 15 times. Here are some tips.
Multi-Function Instruments?
From “K.D.B.” (January 6, 2014): “I’ve owned my new Suzuki GW250 for a few weeks now and put 220 miles on it so far.
I thought I’d adjust/observe the “Shift/RPM Indicator” function on the instrument panel but couldn’t find it or access it. I can’t see anything about it in the owner’s manual either.
The Suzuki U.S. website lists it in the GW250 features section: “Features a digital LCD speedometer, odometer, twin trip meter, clock and fuel gauge readouts, maintenance interval indicator and 3-mode rpm indicator (Normal mode, Eco mode and Off) on the right, plus LED indicators on the left.”
But unless I’m just missing something obvious, I don’t think my U.S. version has this feature. Thoughts/info/ideas?”
Rick’s Reply: I have the gear indicator on the LCD, but have not heard of a “Normal/Eco” shift indicator and there’s nothing in the owner’s manual that I can find about it either. Perhaps some early feature that Suzuki planned that never made it to production.
Why you’d need an ECO mode on the GW250 is a mystery… Perhaps our other readers have some insight on this?
Follow-Up from “K.D.B.” (March 2014): “I thought I’d update you on the “3-mode RPM/shift indicator” mystery. After speaking to a Suzuki “customer service rep” three times on the phone, it was confirmed that:
1) Yes, this feature was purposefully removed by Suzuki prior to bringing the GW250 to the U.S.A. and Canada even though it had been on the model that was sold in other markets around the world for the prior year.
2) Suzuki neglected to change their marketing/promotional materials and website after choosing to remove the “3-mode RPM/shift indicator”.
Due to my complaints and persistence, the U.S. Suzuki website was finally changed/updated with correct information, however…the information systems that local dealer websites draw from still are showing the “three-mode rpm indicator” as a feature on the GW250.
The take-away here for me is: If planning to purchase anything from Suzuki in the future, don’t trust the promotional materials/website info. Personally confirm every feature being on the machine.
As annoying/frustrating as this has been for me, my local dealer was also frustrated with Suzuki’s misleading promotional materials/website.
When Suzuki refused to discuss the issue further with me, my local dealer quickly made amends for the misleading info and offered a complementary accessory for my GW250 to make up for the feature/functionality that I paid for but didn’t get on my motorcycle.
I should be receiving/installing my new “top case carrier” rack within a few weeks.”
GW250 Break-in Report
(December 3, 2013): NOTE: See Part 1: The Suzuki GW250 Review
I’ve discovered the worst part about buying a brand-new GW250 — the break-in period! According to the owner’s manual, the engine has to be kept below 5,500 RPM for the 500 miles. As I discovered, 5,500 RPM is only 45 MPH — and that’s on a perfectly flat road!
This means I can only ride it on roads where the speed limit is 45 or below.
And the engine speed needs to vary — it can’t be kept at a steady 5,500 RPM, because the idea is to vary the speed to break in the cylinder walls and get oil up around the rings and parts.
In effect, this means you basically have a moped for the first 500 miles. I go out on the bike for an hour or 1-1/2 hours at a clip and come back with maybe 30 miles on it, when you factor in the requirement to vary the speed, stop signs, etc.
This is like torture, and the fact that winter weather has now set in doesn’t make it any easier. I went out yesterday for another 30 miles or so but the entire week before that was a no-go because the weather was terrible.
And it’s not over at 500 miles, either. From 500 to 1,000 miles, the limit is 8,250 RPM. At least that should get me up to 55 MPH or so…
The upside is that the engine is smooth as silk so far. We’ll see what happens when I can get it up to the 11,000 RPM redline. The transmission shifts easily and feels precise, although maybe just a touch less so than the best. It’s definitely better than the DR650 or any other bike I’ve owned, I can say that for sure.
First Month Riding Impressions
Note that the GW250 “reviews” in the print magazines that have been popping up are brief impressions with the authors only riding the GW250 for a few minutes on the track at the AIMExpo. They don’t have a clue about the break-in issues and none have reported on the longer term “real world” riding characteristics of the bike.
The throttle return spring on the GW250 is very light. This is both good (less strain on the right hand) and bad. Here’s the bad: the engine is so smooth and quiet and revs so freely that I find myself grabbing too much throttle sometimes when pulling away from a stop.
This might be a problem for beginners.
What happens is that the touch needed to get the engine RPMs up is very light, so it’s easy to give it more than you really need. I can’t hear anything with ear plugs in and a helmet on.
Seating Position
The only real disappointment to me on the GW250 is the seating position. I really do find it to be difficult in several ways. First of all, I can flat-foot the bike with my 30″ inseam. This is fine — but not really necessary; tip-toes would be satisfactory.
The seat feels both too narrow and too hard. The seat contour for the rider is too deep; you can see in the photos that they really scooped out the foam towards the front, and this forces the rider in towards the fuel tank, with no room to move back and forth on the saddle.
Apparently, they carved out the seat to make the low seat height. But this forces me to fold my legs much more than normal to get my feet on the pegs, even with my 30″ inseam. Combined with the too-far-forward seating position, it’s difficult even to get my toes on the pegs — the pegs usually end up just before the heel of my shoes.
And the handlebar(s) position is a bit strange. It’s a long stretch for me with my 34″ street sleeve length, so there’s not much left over for me to bend my elbows. The leaned-forward seating position forces me to put weight on my hands and I have to consciously remind myself to give it a light touch.
This will be a problem for beginners, who should not get into the habit of putting weight on their hands. Combine this also with the suspension, which is fine on smooth roads but very stiff when it gets bumpy — especially in corners — and the beginner may end up putting too much feedback into the handlebars while unconsciously twisting the throttle with its too-light return spring. If this happens in a bumpy corner, watch out.
I’d like to completely re-contour the seat to make it flatter and higher, then raise the bars up and back about 50 mm. Not sure how this can be accomplished yet though. The good news is that the fuel tank is molded in a shape that allows the rider to easily “lock” the legs under the lip, which helps take some of the pressure off the hands.
Handling
I’m still very impressed by the overall ambience of the GW250 though. The very smooth engine really wants to rev, which is why I can’t wait to get past the dreaded break-in period. Although the engine is very quiet, the muted burbling from the exhaust is still a surprise. It just doesn’t sound like a 250 to me.
I’m also impressed by the handling, which is a combination of the bike’s geometry, suspension and the IRC Road Winner tires, which seem surprisingly good so far. The handling is very neutral — not too quick or “flighty” and it feels planted in the corners.
It handles like a bigger bike, other than when the cheap-ish suspension bits betray their price point on washboard roads. So the handling should be perfectly fine for beginners, if they can get beyond the seating position issues I mentioned above.
More to come on this topic as I add some miles to the GW250’s odometer…
SW-Motech Bags-Connection EVO Rear Bag
(December 2, 2013): I procured a Bags-Connection EVO Rear Bag (review) for the GW250. It’s a medium-sized tail bag with dimensions that are about as big as you’d want for the GW250. Read the full review for more info, photos and even a video.
Owner Comments and Feedback
See details on submitting comments.