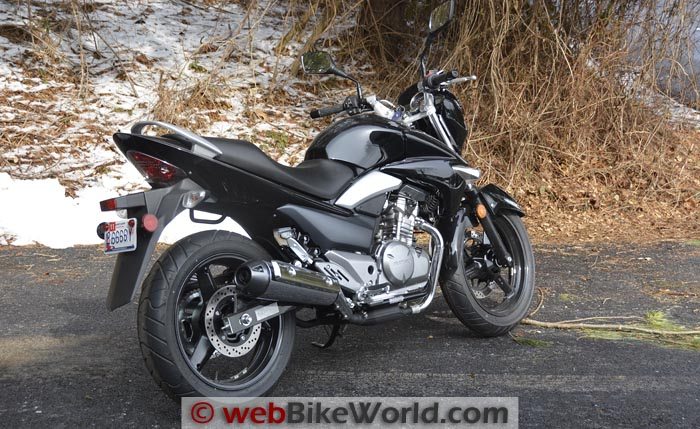
Exactly two weeks after I took delivery of the new Suzuki GW250 Inazuma, the “Polar Vortex” winter of ’13 set in.
The Vortex has delivered the worst winter I’ve ever experienced here in the Mid-Atlantic.
Besides constant sub-freezing temperatures, we also had more snow than usual and even a massive ice storm that knocked out power for several days to the entire region.
So after putting only about 500 miles on the GW250 at a mind-numbing sub-45 MPH speed (keeping the revs below 5,500 per the book), the bike has been in garage hibernation.
I’m desperate to get out on it again, because the silky-smooth, free-revving engine is a real kick.
But, I’ll just have to keep waiting for the temperatures to climb at least above freezing. I’d settle for a nice and toasty warm 45 right about now?
In the meantime, I fired up the ol’ Kerosun heater in the garage, warmed up the tools and installed the windscreen I had ordered with the bike.
I also have the Suzuki center stand to install, but next up I’ll also post a quickie on installing an SAE connector on the GW250, which is a must-have accessory for any bike.
The Bags-Connection EVO Rear Bag on the BMW R65.The Suzuki GW250 Sport Screen
Suzuki has a few accessories listed for the GW250, but most of them are generic items like Suzuki-branded jackets (probably made by Pilot), Ogio bags and other things.
The GW250-specific accessories include a center stand, rear luggage rack and top case, a magnetic tank bag and the windscreen, or what Suzuki calls the “Sport Screen”. It’s Part number 99000-9900A-48K and it has a list price of $139.95.
I ordered the Sport Screen, center stand and tank bag for starters. The tank bag has been on backorder since I picked up the bike in November of 2013, so not sure what’s up with that.
I’ll get to the center stand soon, but in the meantime, I decided to tackle the Sport Screen.
Probably most GW250 owners would have the dealership install the Sport Screen and center stand, but in the interest of science and our loyal webBikeWorld visitors, I decided to make it a DIY project.
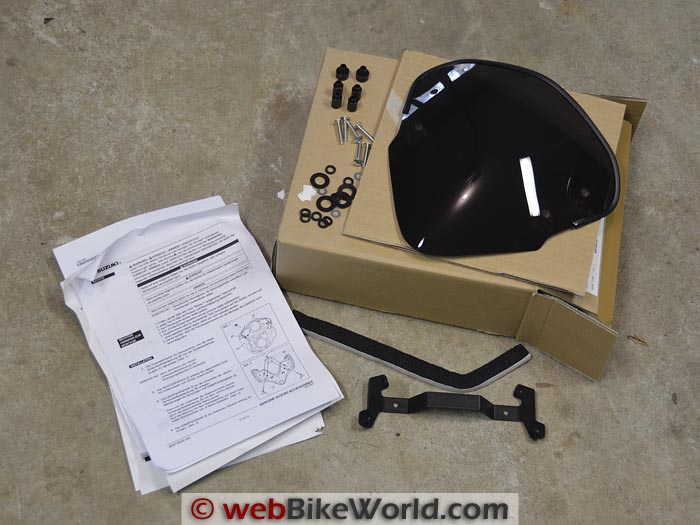
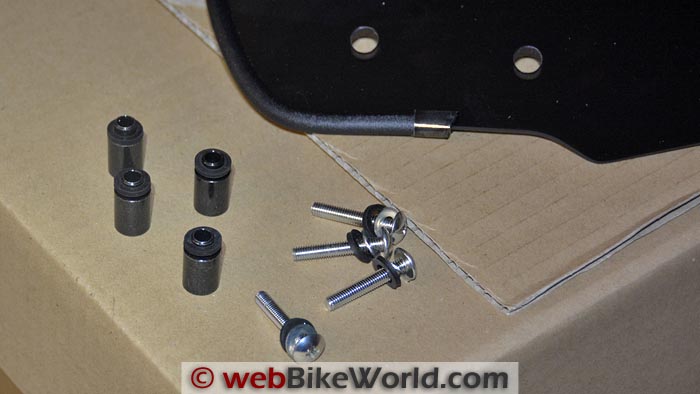
The Sport Screen kit comes with everything you see in the photo above, including the very dark smoke windscreen, the mounting hardware, a cheesy foam gasket and the instruction manual, printed in a couple of languages.
Tools Required
Basic tools are needed for the job, including a drill and drill bits. You’ll need a small drill bit for a pilot hole and a 14-16 mm bit to enlarge the holes; a 9/16″ or 5/8″ will work.
You’ll also need a 4 mm Allen wrench and a Phillips head screwdriver.
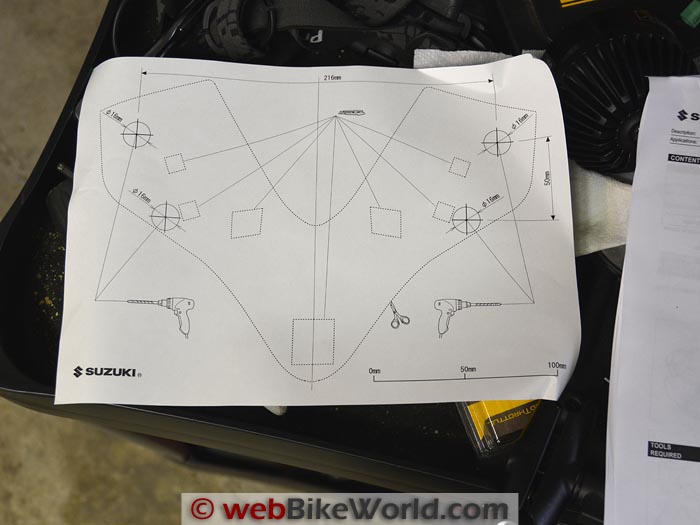
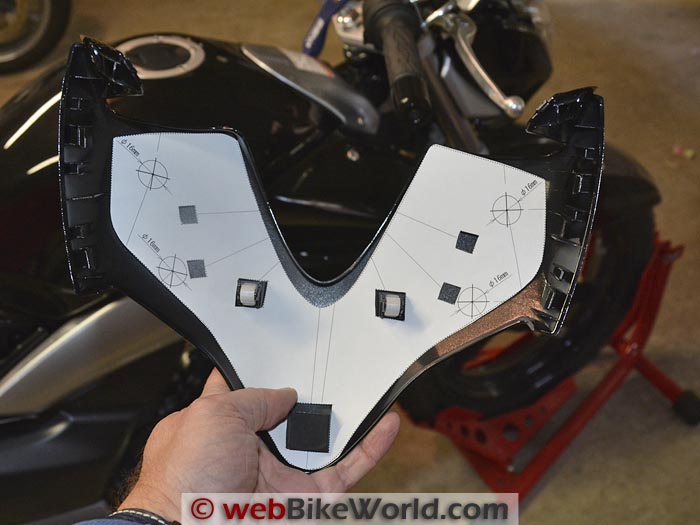
They give you a paper template to cut out of the instruction guide, which is used to lay out the holes that must be drilled in the headlight cover, so you’ll need scissors and tape.
An X-Acto knife is really handy for cutting out the squares and circles (see below). That’s it — pretty basic stuff, eh?
Installing the Sport Screen
I laid everything out and studied the instructions and I’d have to say, they’re not easy to understand.
I read through them at least a half-dozen times, trying to understand the procedure, until I finally just rolled up my sleeves (virtually speaking) and jumped in head first. I figured that I couldn’t mess anything up too awfully bad…
Of course, once I finished the job, the instructions made sense. Hopefully I can help explain it here, because in the end, it’s not too difficult and the only scary part is drilling into your nice, new headlight cover.
I’ll highlight the basics via the photos and captions:
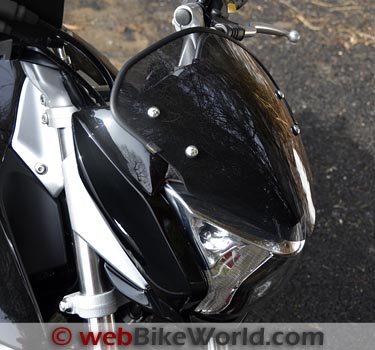
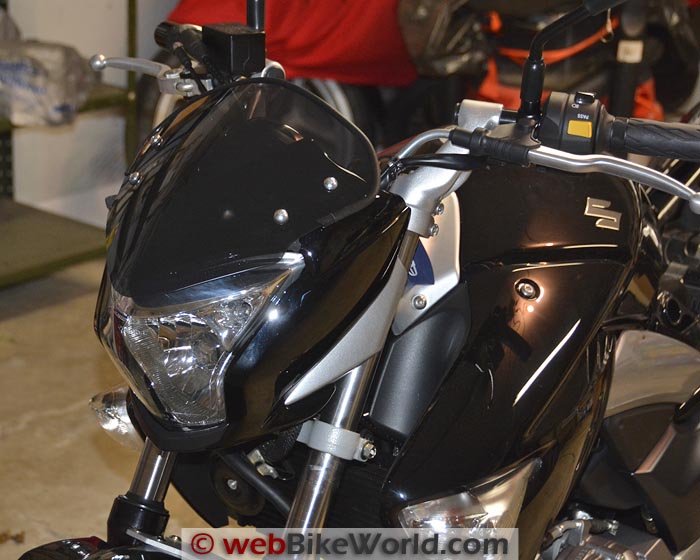
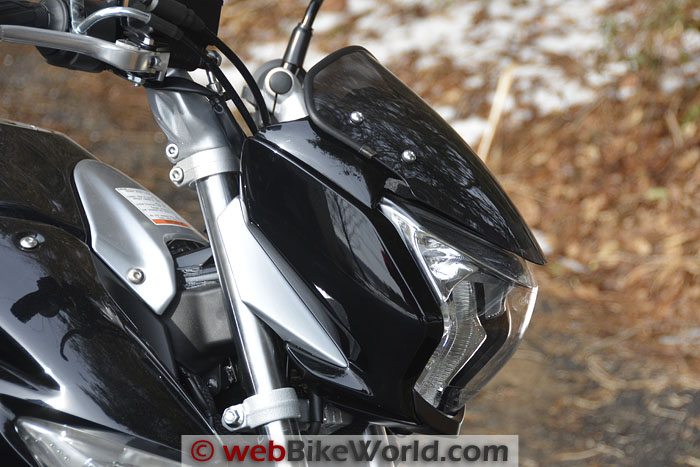
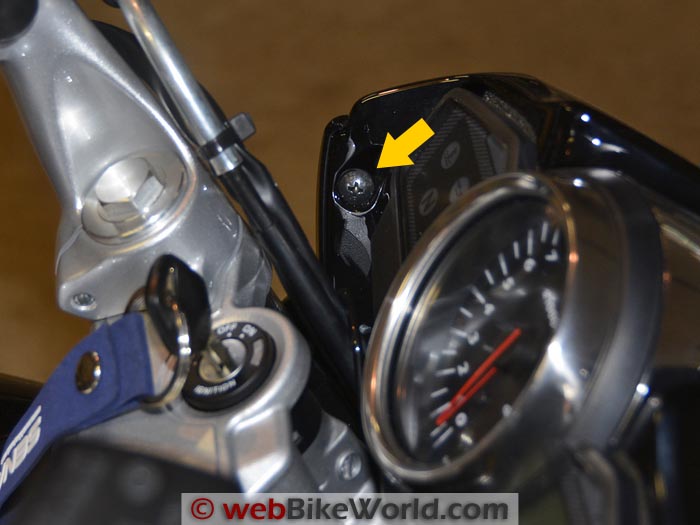
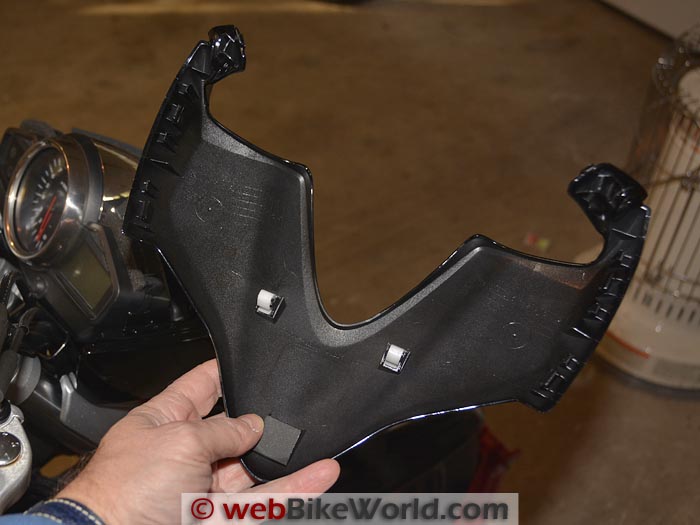
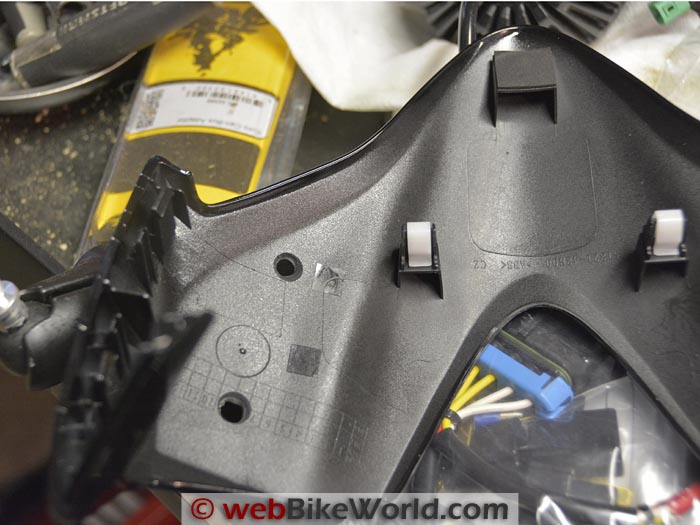
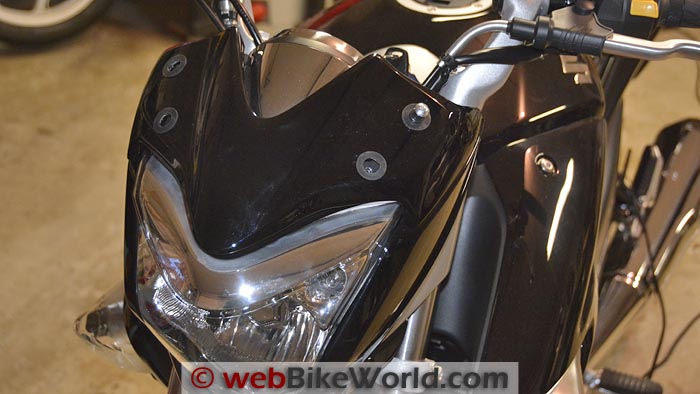
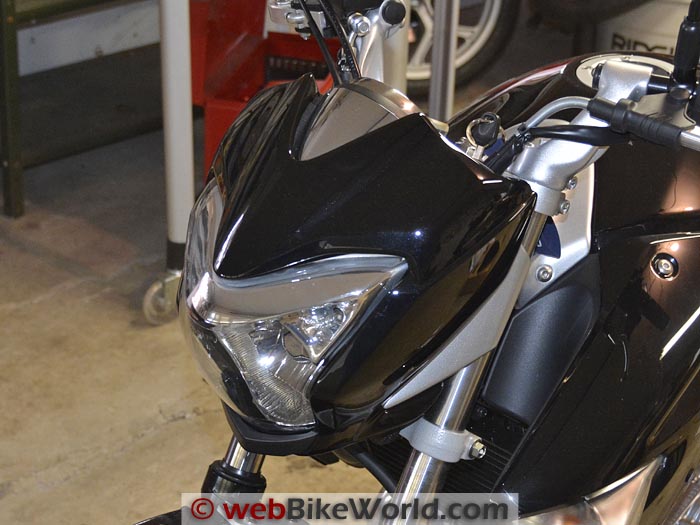 Just for reference, here’s the stock GW250 with the headlight cover. First, the instructions tell you to remove the two Phillips head screws (one on each side) on the headlight cover. Here’s the drilling template that’s printed in the instructions. You’ll have to drill 4 holes by first drilling a small pilot hole, then using a large 5/8″ or so drill to make them larger. The standoff posts that hold the Sport Screen away from the headlight cover fit through the 4 holes, so they only have to be large enough to fit the standoff postsh a little room to spare so the posts don’t rub or squeak. Here’s the headlight cover, which can be removed from the bike once the two Phillips head screws are removed. Note the white tabs, which fit into receivers on the bike. Be very careful when you remove the headlight cover as you pull it away from the bike to make sure the cover doesn’t break. Carefully cut out the template with the scissors, then cut out all of the square outlined holes with the X-Acto knife and fit the template to the back of the headlight cover. Cut the 3 central square holes carefully because these act as lineup or index points to correctly orient the template. Now comes the scary part — drilling through the headlight cover! I used a small 5/32″ (~4.0 mm) drill first, then the 5/8″ drill. I drilled from the back side, hoping to prevent rough edges on the front (painted) side of the headlight cover, but I don’t think it really matters much, as the headlight cover hides mistakes. I used a chamfering bit on the holes but I don’t think it’s really necessary (although the instructions recommend it). Here’s a close-up of the standoff posts and screws with gaskets and washers. These attach to pre-tapped holes that are already under the headlight cover (Suzuki anticipated the Sport Screen installation) and the standoff posts are what hold the Sport Screen. After the holes are drilled, the hard (and scary) part is done. Re-install the headlight cover with the 2 Phillips head screws. I placed the rubber gaskets over the holes and one standoff post with screw can be seen in the upper right hole, just for illustrating how this works. Place the 4 rubber gaskets over the holes, then insert the standoff posts. If your holes were drilled correctly, the rubber gaskets will hold the standoff posts in place so you can locate the Sport Screen and then screw it down. Tighten the screws and you’re done! Don’t over-tighten; Suzuki gives a torque spec of 3 Nm (2.2 ft. lbs.), which isn’t much. The rubber gaskets have enough flex to act as a sort of locknut, so you don’t need much torque and if you over-tighten, you can risk cracking the Sport Screen now or later, when you’re riding on a rough road and the shocks are transmitted through the screws. You’re all done! Here are a couple of photos of the installed Sport Screen. To be dead honest, the windscreen doesn’t do a thing and I’m not sure if the bike looks better without it. Here’s a side view.
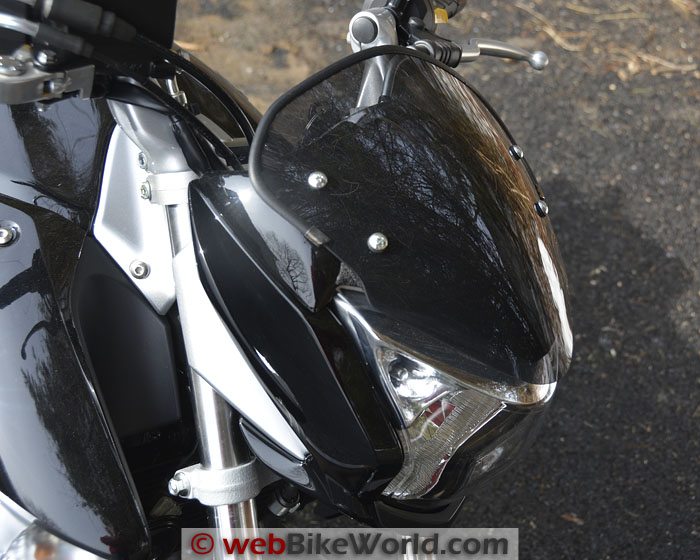 Might look better if the screws were plated black?
Conclusion
Installing the Sport Screen on the GW250 isn’t very difficult, once you know how. The downside is that it’s purely a “looks only” accessory — it does nothing at all to provide any additional wind protection (or nothing that I can notice anyway).
I’m not sure I’d spend the money, knowing what I do now. All I need now is some warmer weather so I can actually ride the darn thing…
More wBW: Suzuki GW250 Blog | Suzuki GW250 Review | wBW Motorcycle Reviews
Owner Comments and Feedback
See details on submitting comments.