Windscreens for the Versys
Motorcycling is unique in its ability to bring the rider (and passenger) closer to the elements – a sense of freedom as the rider and machine move as one through the air.
Each individual has their own opinion on just how much of that air should be felt while riding.
Which leads us to this Quick Look comparison of three windscreens for the Kawasaki 650 Versys.
We must first acknowledge that this effort was once again conducted in our never-ending quest to expand our riding horizons with the VERSYS-tility machine.
Although this article was originally intended to focus on the Givi windscreen, with some mention made of other windscreens fitted, it became clear as we went along that all three of the windscreens identified in this submission stand out in their own right.
And they all have a specific application for the Versys, primarily based on user function. Accordingly, a more head to head approach is presented.
The three windscreens fitted and evaluated were: the original equipment windscreen; the MRA produced-for-Kawasaki Vario Touring screen; and the Givi D405ST windscreen.
The stock windscreen, although appearing very small, is also very functional.
The slightly larger Vario Touring shield provides additional coverage for a wider range of body types. Last, but not least, the Givi shield is stylish and is extremely functional, providing the best coverage under all conditions.
 Kawasaki Versys Original Equipment Windscreen
The Stock Versys Windscreen
The stock Versys windscreen at 28 cm high by 30.5 cm (11×12 inches) wide is small, bullet shaped and complementary in design to the other front-end components.
The Versys windscreen mounting bracket has a pair of vertical arms, each with six holes, for mounting a windscreen.
These holes depending on how a particular windscreen is designed and drilled, provides the ability to adjust the height of the windscreen. The standard height adjustment is about 20 mm or just over three-quarters of an inch per increment.
The mounting pattern on the stock windscreen allows two settings to be used (low or high), with the highest setting increasing the height by just over 37 mm.
This in itself may not seem like a lot, but as with most windscreens, it does make a difference. Using the stock windscreen for over a month really did prove that this minimalist item could do an adequate job of protecting the rider.
One of the best features of this OE item is that it is very quiet, largely due to its shape and small overall size.
The next best feature is that it is just about perfect for warm weather riding in allowing a good flow of air, with little buffeting or pressure build-up.
When riding in wet conditions, it provides basic protection, but a good all-weather outer layer is needed to stay dry.
However, for all its attributes, for prolonged riding in inclement weather and cold temperatures, the shortfalls of this small screen become much more acute.
So driven, we move on to (literally) bigger and better things, prefaced with the knowledge that bigger is not always better.
 MRA Vario Touring Windscreen
MRA Vario Touring Windscreen
In this instance, the next windscreen fitted, the Vario Touring screen, is bigger and very much better.
Made by MRA (Germany) for Kawasaki (stamped on the lower part of the windscreen), this design has been around for some time and is marketed for a great many other motorcycles by other suppliers. It is marketed both with and without the adjustable spoiler.
With smooth, flowing lines and a relatively low height, the screen very much complements the front end of the Versys. This look is further enhanced by the bottom side flares that project a flowing look to the upper front end of the motorcycle.
The screen measures 33.5 cm (13.1 inches) high with the top adjustable spoiler fully deployed and 31.5 cm (12.4 inches) high with the spoiler pushed down to its lowest setting.
Bottom width is 38 cm (15 inches) across at the lower flare, while the top width is about two inches less at 33 cm (13 inches).
The size of the spoiler by itself adds much to the height coverage provided by the Vario windscreen. But it is the unique and very functional top spoiler (removable and replaceable) that is the best feature of this screen.
The spoiler mount has seven positions (lowest plus six detent or click adjustments on each bezel bracket), allowing both height and angle adjustments, albeit over a fairly short range of motion.
However limited in range they might be, changing height and angle of the spoiler does make a difference.
Mounting up the Vario windscreen is straight forward, as long as the basic picture-based instructions are reviewed first and all necessary hardware pieces are in the kit.
Due to the length of the shield and the fact that it only has one mounting position, additional clearance or offset is needed to maintain clearance between the lower part of the Versys cowling and the windscreen itself.
Accordingly, four spacers, in different sizes for top and bottom, are provided for the mounting points, along with longer 5 mm screws (4 mm hex head vice stock 3 mm hex head items). The windscreen kit included an edge protector strip, which was not used.
Having used this windscreen on both Versys for most of the past riding season, we can state without any hesitation that this is one very effective windscreen.
We did a lot of playing with the spoiler; it really does make a difference.
Even with the spoiler left in its base setting, the screen provides a significant advantage over the stock screen, especially in inclement (wet or cooler) weather.
The Vario windscreen performs well in providing good protection at all speeds and under widely varying weather conditions.
At very high speeds some buffeting can be felt around the shoulders and helmet area, although adjusting the top spoiler can temper the environment in some conditions.
Where good weather prevails most of the year or for late spring, summer and early fall riding in variable weather zones, this windscreen will do the job.
However, when temperatures really start to dip and heavy rain is introduced on a daily basis, our thoughts turned to seeking out even more front end protection. – sometimes the wimp factor is allowed to come out.
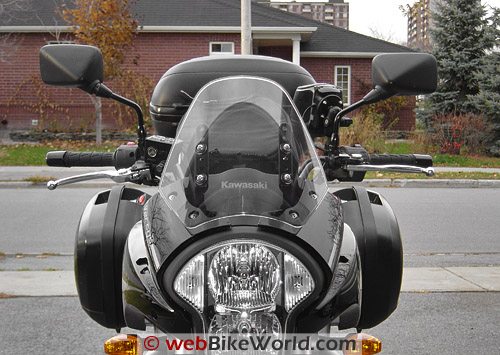
 Givi D 405 ST Windscreen
Givi D405ST Windscreen
With colder and otherwise inclement weather becoming the norm, the awareness that Givi had released a windscreen for the Versys came to the forefront.
Even though our local Kawasaki dealer had been carrying them since mid-summer, two of which were ostensibly for us, the urgency had not been there.
The Vario Touring windscreen provided more than satisfactory service over the summer and on into early fall.
But, in wanting to extend our Versys riding season for as long as possible, all available protection/comfort options were put on the table and the Givi windscreen was the first one installed.
Accordingly, the last Givi D405ST windscreen in stock was fitted to the black test Versys.
The whole effort, conducted in the parking lot, took five minutes.
Note: carrying a small Allen (hex) key combination tool from Sears has never been a bad thing…
Our experience with Givi products, especially windscreens, is that the company does a good job in interpreting requirements and in executing the product.
First impressions for this screen did nothing to dispel this feeling.
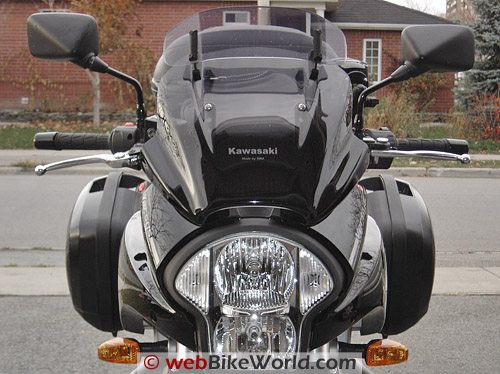
Clean simple lines, excellent cut and finish, and an easy fit using the stock hardware, thanks to accurately drilled and buffed mounting holes. This is a quality item in every respect.
A fair bit larger than the other two windscreens, it measures 45 cm x 50 cm (17.7 x 19.7 inches) wide at its broadest point, across the lower flare, with a rounded tapering profile over the upper half of the screen.
Comparatively, it is 18 cm (7.1 inches) higher and 19.5 cm (7.7 inches) wider than the stock shield, and 11.5 cm (4.5 inches) higher and 12 cm (4.7 inches) wider than the Vario Touring shield (with the spoiler fully deployed).
Not surprisingly, the Givi shield provides the best flexibility for height adjustment among all three windscreens fitted so far.
The stock shield provides two height settings and the Vario only one, although it has the adjustable spoiler. The Givi windscreen allows three different height settings, low, middle and high, in 20 mm increments.
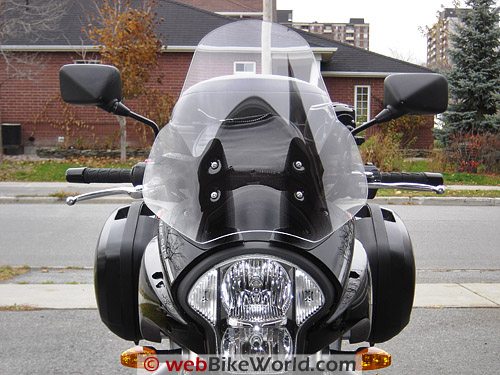
The five minute effort involved using the four stock windscreen bolts (4 mm hex head), along with the thin clearance washers that fit between the windscreen support arms and the windscreen itself.
To provide some additional clearance (see Quick-Look review on the Zeta handguards/deflectors), four 5 mm thick rubber washers were also inserted to offset the screen a bit more from the mount arms.
The lower flare portion of the screen has a flat black matte coating on the inside, providing a partial black-out effect that pretty much hides the Versys mounting bracket and arms, and helps to reduce reflections.
Mounted in any of three positions, clearance between the bottom of the windscreen and the curved upper portion of the cowling creates an unobtrusive air stream that depressurizes the cockpit area nicely.
With ambient air temperatures ranging from -3C (26.6F) to 10C (50F), the test and evaluation environment has been (sadly) good.
The lowest position (18 cm over stock) provides coverage far better than either the stock or Vario windscreen and will likely be just fine for warmer temperatures. The middle and highest positions result in better coverage, which while expected, is not always the case with some windscreens.
Moving from the lowest to the middle to the upper positions moves the side coverage zone up from lower arms to just below the shoulders, with only a moderate increase in buffeting felt on the shoulders.
Riders with shorter upper bodies than the 6ft 3in, 34in inseam (non-crash) test dummy will likely be in pretty still air.
While there is little change in noise levels between the three heights, there is a definite change in air flow up and around the top section of the windscreen as the windscreen is moved up, but it never resulted in any real buffeting.
We will be the first to admit that upper body height, body positioning and even the type of helmet used, may all impact to create different situations.
On one of the coldest days (0C/32F), the windscreen was moved up to the highest setting before setting out on a short highway jaunt, which by itself generated significant wind-chill. On this setting, some air is felt on the shoulders, but there was no helmet buffeting at all.
For those interested in doing the measurement (head-on or angularity based), the middle setting being used now puts the top of the Givi windscreen 35 cm (13.77 inches) higher than the top point of the cowling (above the instrument housing).
Acknowledging the height differentials between the three windscreens, the biggest advantage this windscreen provides is in extending side coverage.
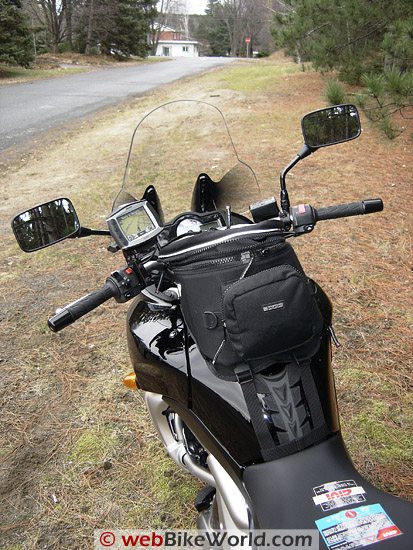
Even without hand-guard deflectors installed, the wide flare lower portion of the windscreen is very effective in extending the cockpit zone out to and beyond the ends of the handlebars, particularly on the low and middle height settings.
On the highest setting, this zone is moved up, resulting in most of the protection being lost at the handlebar level. However, with hand guard deflectors installed, this area is once again filled in nicely.
The two accessories complement each other very well, creating a very effective wind-stopping, chill-reducing zone.
 Givi D 405 ST Windscreen, Rear View
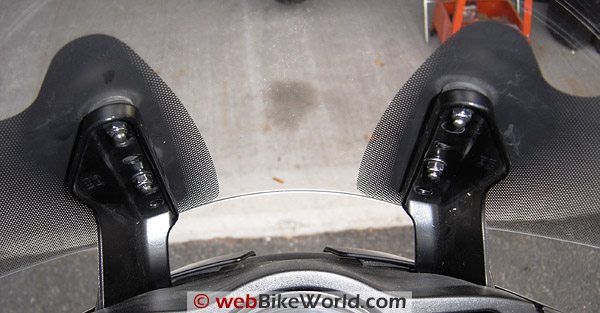 Givi D 405 ST Windscreen, Rear Mounts
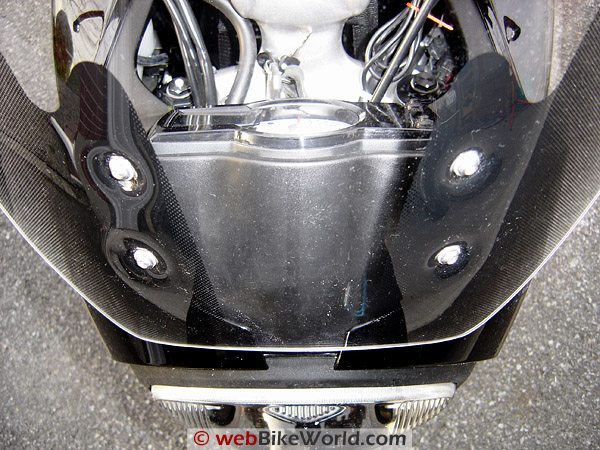 Givi D 405 ST Windscreen, Blackout Graphics
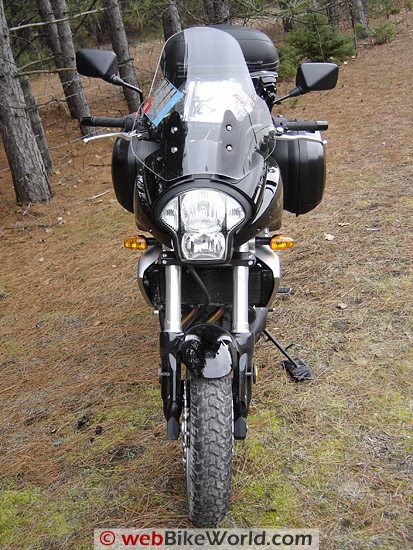 Givi D 405 ST Windscreen, Front View
Conclusion
Givi has produced a stylish and effective windscreen that simply works.
Reflecting foresight in design, it can be set to three discrete heights, making this windscreen very adaptable and thus attractive to a wide range of riders, especially in climates where weather changes are the norm.
But, by the same token, the excellent coverage provided might work a bit too well for others who ride in warmer climes throughout the year.
Looking at all three windscreens, the stock unit and the Vario Touring shield will no doubt still be used for specific activities, especially in the full heat of the summer.
For off-road excursions the mid-sized, but heavier constructed Vario Touring shield is seen as the best option, especially when considering its adjustable spoiler.
However, appreciating everything else, the svelte looking Givi windscreen is our pick as the best overall screen of the three.
Note: there are other windscreens available or coming to the market for the Versys.
Of particular interest is the new CalSci Versys windshield that was supposed be available as of 20 November.
Based on our positive experiences with two aftermarket items, we are looking forward to getting one of the CalSci units for installation on the other Versys, and comparison of course. Variety really is the spice of life.
Notes
- Stock Kawasaki Windscreen Installation: OEM item, four bolt mounting Function: Small size but very effective, quiet, two height adjustments, one to two season use. Cost: Replacement unit, typically $160 CAD.
- MRA Vario Touring Windscreen Installation: Uses specific kit hardware, retains four bolt mounting Function: Larger than stock, good air flow characteristics, very effective adjustable spoiler, one to two or three season use (depending on locale). Cost: $179.00 CAD ($140.00 USD) (See comments and photos below).
- Givi D405ST Windscreen Installation: Direct bolt-on, uses stock mounting hardware, 45 cm high by 50 cm wide (18 cm over stock height, clear tint with lower flare black-out matte panels. Largest of all three tested, superb design and finish, three height settings, very good protection, recommended for year-round use. Cost: Standard list $130.00 USD or CAD. Has been seen listed for less.
Review Date: January 2008
Master Listing of All wBW Motorcycle Product Reviews
Owner Comments and Feedback
See details on submitting comments.
From “F.F.” (September 2014): “I have a Givi 405ST windscreen (thanks to you!) and I’m really satisfied of it.
As I’m using my Versys all year along in Paris and as this city can be very cold in winter (!), I’m looking for hand guards to complete my equipment. I’ve found your advice below and I have two questions on it:
Q. Where can I find the “3-5 mm spacers”? and Is it absolutely necessary to install them? And if not, do you think there’s a risk to broke my windscreen or to lose comfort with my steering?
One last question: Do you think it’s possible to install warming handles with these hand guards?”
H.B.C.’s Reply: The small plastic or light metal/alloy spacers used to push the windscreen out a bit (3 to 5 mm minimum) so the edge of (some) windscreens won’t be in conflict with any installed hand guards can be found at most hardware-type stores or perhaps even some hobby stores.
Even something like thick plastic washers would work (I’ve used them for similar installations as a temporary workaround).
As identified in the article and above, the spacers were used to provide clearance between the edges of the GIVI windscreen and the front edges of the installed accessory hand-guards.
So depending on the make and type of windscreen being used and the type of hand-guards fitted, the spacers may or may not be required.
It is critical that installed accessories do not or cannot interfere with each other and/or cause any safety issues on the motorcycle, so it is essential when undertaking this type of accessory installation to make sure everything can and will work together safely.
If the windscreen hits the hand-guards or any other part on the motorcycle, then yes, breakage can occur and if the windscreen is not stable or interferes with the steering in any way, then again, there is risk.
Accessories are meant to or should enhance a motorcycle, not be a detriment to its use or performance.
Yes, as noted in the article, an original set of the Oxford Heated Grips (different marketing name now) were easily installed on the Versys and most other brands on the market should fit as well.
The grips typically fit over or replace the standard grips and the usual heavy duty wiring leads can be run without interfering with the hand-guards.
Don’t forget that hand-warmers/heated-grips can place a heavy electrical load on the system, something that needs to be appreciated and managed.
Having ridden in climates similar to the weather found in Paris, a properly fitted windscreen (that has the clearance to allow hand-guard use) along with heated hand-grips will make your cold weather riding much more comfortable and safe. “Profitez de votre moto Versys“.
From “M.B.” (10/09): “My dealer tried to install hand guards with the Givi 405ST windscreen on my Versys and the hand guards were touching the wind screen when fully turning the handle.
Is this problem also observed with the Zeta hand guard?”
HBC’s Reply: As I noted in the article, the Givi windscreen can be used with the Zeta hand guards, but it is a tight fit and depending on how both accessories are installed or aligned, the edge of the windscreen can just touch the hand guard, but only at full lock.
It is noticeable when the motorcycle steering is locked, but it doesn’t prevent the handlebars from being locked. I had more clearance issues with the tank bag than the windscreen in this regard.
A small workaround, which was done during one of my test installations was to fit 3-5 mm spacers (hard rubber or plastic) between the windscreen and the mounting bracket to move the windscreen and thus tits edges out slightly.
On both of our motorcycles, this was more than enough clearance so that nothing touched.
In adjusting the Zeta mounts, especially at the inner handlebar mounts, I was able to gain a bit of clearance as well. Another important clearance points that needs to be addressed is the size or length of the bar-end weights or (spacers).
If they are less than the item I used, then this can cause the hand-guards to sit further in and thus lessening any clearances.
It is a tight fit and some adjustments or small workarounds may be needed. We used this combination on our two Versys for over a year. The new owner of one Versys is very happy with the hand guard/windscreen combination.
From “P.”: “I was wondering about the rack fitted to the black Versys in your test?
I’d really like to know if it was easy to fit and whether they know if the Givi M11 steel top-plate can be used on this machine instead of the M5 or M5M one shown in the pictures?
I’m more interested in a rack that can be used to strap things to than a top case mount, if you know what I mean, and the M11 is a tubular steel frame ‘traditional’ rack.
I’d also be interested in how they fitted the MRA screen, as I’ve got one for my Versys but the instructions are in German!
There are extended bolts and new spaces involved, whereas I thought it was going to be a straight bolt off – bolt on replacement job. If they can offer any feedback I’d appreciate it.”
HBC’s Reply: Regarding the Givi M11 rack-style top plate, as long as the mounting holes line up, or you are prepared to put in new ones, there is no real reason why it should not work.
Someone else in the area has one, I think on a KLR, but I never did follow up on it – it would look better on the Versys and be more functional, as you have indicated.
The installed kits are the standard GIVI/Kawasaki accessories, which still come with the somewhat clunky plates. As well, there is a aluminum plate available that is lightweight and can provides cutouts for mounting or securing stuff as well – I have not managed to snag one of them yet.
B. Not sure if you have the MRA high touring screen for the Versys, or the MRA Vario Touring Screen with or without the adjustable spoiler.
The MRA Vario Touring Windscreen as a Kawasaki accessory came with a single instruction sheet, which I no longer have, although I could translate the German as needed…in lieu of this, I have attached a couple of web-sized pictures that might help illustrate it all, along with the following points:
(1) The MRA shield only has one setting on the Versys, the mounting points are the top and bottom holes in the Versys windshield bracket.
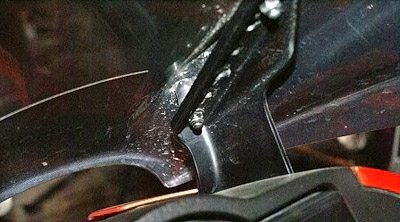
(2) The black spacers are for the bottom holes and fit between the windscreen and the bracket – the shape and depth of the windscreen dictates additional clearance at the bottom to clear the top surface of the upper snout of the fairing, so this was the MRA solution. The shorter items in the kit are for the top holes.
(3) To facilitate installation it is sometimes easier to have one or both of the top bolts run through and secured very loosely, which still allows the bottom of the shield to be pulled away so that the extended spacers can be fitted between the windscreen and bracket. An extra set of hands is good as an alternative.
(4) If you do have the Touring Screen and Spoiler, that is good, being able to adjust the spoiler really helps tune the airflow and if you just have the basic touring screen, you can order the spoiler kit
 Vario Touring Shield, mounting bracket.
 Vario Touring Shield, bottom mount spacers.
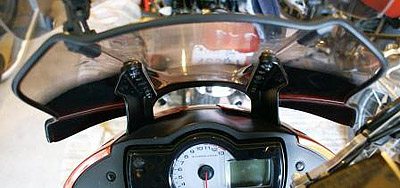 Vario Touring Shield, showing clearance.
From “V.S.”: “Great website. I visit quite often. I just saw the article on the windscreens. I have just ordered a screen from Skidmarx. It is new to market and haven’t received it yet, but I hope it equals or out performs the GIVI.”