Stubby Tire Tools are easy to use and they provide good leverage to get the job done without damaging your rims.
They are a welcome addition to the tire changing equipment in my garage.
Early in my career as an Automotive Technician (we were just “mechanics” or “grease monkeys” back then), I worked in a shop where we did a lot of service work on Renaults and Peugeots.
The wheels on these unusual cars had no hole in the center large enough to fit the typical tire changing machines of that era and they usually had only three wheel lugs.
The French certainly had a different approach to automobile design than the rest of the world at that time!
It was a small, three person operation and we changed all of our tires by hand. This involved use of a large, lever styled manual tire bead breaker, two large steel tire spoons (which I still have to this day) and a “BFH” (Big Frigg’n Hammer).
Unlike most of today’s cars, almost all of these rims were heavy steel and all had wheel covers or hub caps, so it didn’t matter much if we nicked or scratched a rim here and there, since any damage would be covered up by the wheel trim.
If we were to use those same methods and tools today, we’d be buying some darned expensive light alloy rims for sure.
Since those days of yore, all of the tires I’ve mounted have been with the aid of a variety of tire changing machines from the very archaic to quite exotic. This extends to mounting my motorcycle tires for the past 11 years.
Because of the high prices the dealer charged me to mount and balance a set of tires, I devised a way to use the machines at work with the aid of duct tape to avoid damaging the painted alloy rims.
I later advanced to using either the No-Mar tire changer (review) or the Cycle Hill tire changer (review) at home. This reduced the down around time to nearly nothing.
But not everyone can afford, or has the room, for a tire machine in their work area or what if you have to dismount a tire while on the road?
Why Stubby Tire Tools?
My friend Glen and I hatched a plan to ride the Trans-Labrador Highway (described in my Sena intercom report) and during our research for that trip, a few riders said they had experienced tire failures of various types while riding the unpaved portions of the road.
Some of these failures could not be solved with a simple plug from the outside, so the tire had to be removed from the rim and patched from the inside or a tube installed.
It was because of these reports that I decided I better refresh my skills in changing tires by hand so as to be proficient at it should the need arise.
The side of a dusty gravel road in the wilds of Labrador with black flies biting every piece of exposed skin is not the place to become re-acquainted with the technique!
Besides, we were planning to switch out our stock tires for a set of Continental TKC 80 tires (review) before reaching Canada and that job would have to be accomplished using the “arm-strong method”; i.e., by hand.
Old-Fashioned Metal Tire Irons vs. Stubby Tire Tools
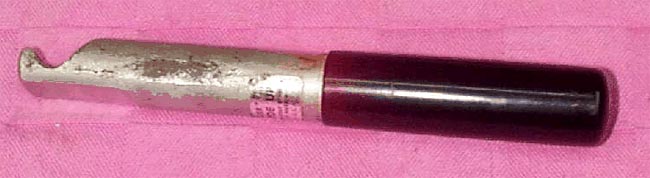
I had a pair of the typical long, curved metal motorcycle tire spoons that were given to me by a friend, and I used these for my first “arm-strong” tire-changing practice session.
But, I knew if I were to use these on the rims of my 2002 BMW R1150GS (review) — or any other rim for that matter — without some method of protection, the metal rims would be damaged in the process.
I didn’t have any special rim protectors on hand, so I styled something from a plastic container scavenged from our recycling bin.
This worked, but it required additional fiddling to keep my homemade rim savers in place and ultimately I did manage to nick the rear wheel once or twice anyway, much to my chagrin.
Enter a pair of “Stubby’s” to the rescue!
I’d love to give you a rundown on the origins of the Stubby Tire Tools and a little bit of the company’s history, but alas, their website sheds no light on the subject other than to say that they are “designed by motoheads for motoheads”.
They do state that Stubbys Tire Tools are made from a “high quality plastic” and that their shape helps prevent pinched tubes and that they are not to be used with mousse foam inserts.
Mousse?
The only mousse I know of is that chocolate flavored stuff that looks like pudding and a product women (and men) use in their hair.
I had no idea what they were talking about until I did a search on the term and learned that they’re actually a type of foam insert that goes inside a tire in place of a tube or the air that keeps the tire inflated.
Wow, a new wrinkle in the brain as they say!
Stubby Tire Tool Types
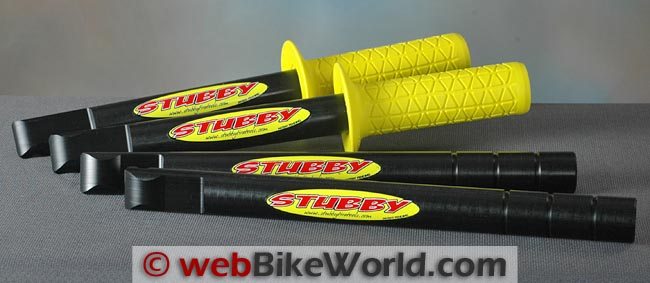
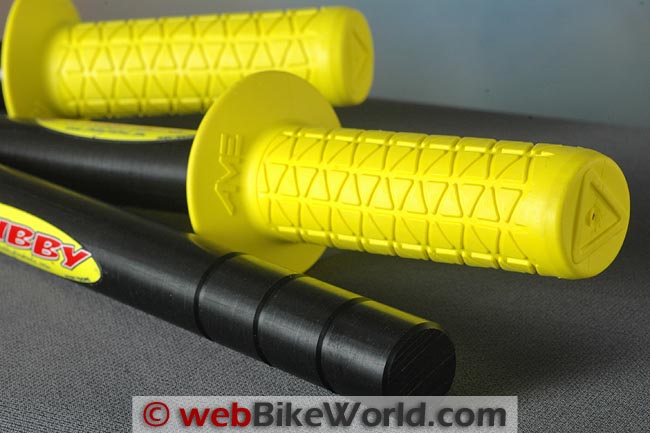
Stubby Tire Tools come in three variations: the Stubby Pro, the Stubby Slim and the Fanny Packer, all of which are sold in pairs.
The Stubby Pro is equipped with rubber grips (as shown in the photos) and the grip is available in seven different colors, pressed onto one end of the tool, just like a handlebar grip.
The grips work very well to keep the Stubby Tire Tool(s) from slipping out of your hands and if you get them in a bright color, as I did, they’re easier to find after you accidently kick one away from your immediate work area.
The Stubby Slim is nearly identical to a Stubby Pro but it does not have the rubber grip. In place of the grips, it has three grooves around the circumference, approximately 15/16″ (25 mm) apart starting from the end and 1/16″ (2 mm) wide.
These grooves, I assume, are there to help give you a better grip when using the tool and I’d bet money if you peeled back the rubber grip on the Pro you would find the same grooves underneath.
Both of these styles use the same shaft length, which is 11-3/4″ (297 mm) in length and 1″ (27 mm) in diameter. Actually, the Stubby Slim Tire Tools remind me of a pair of Nunchucks (which derive their name from “Nunchaku”) without the connecting chain.
The third member of the Stubby family is called the “Fanny Packer”.
The term “Fanny Packer” would imply that they could be carried in a “fanny pack” or somewhere in your riding gear, but I personally wouldn’t want these tools that close to my body in case of an “off”.
Although they’re shorter than the other two Stubby Tire Tools, they’re still hard and they have a semi-pointed end and could do some bodily harm if they were in the wrong place when you fell.
But their smaller length of 8-3/4″ (222 mm) makes them a better choice over the other two models to slip into a side case or tail bag when space is at a premium and you want to take along a pair of tire “irons” that won’t damage your rims.
I have the Stubby Pro and Stubby Slim models, so I can’t report on the efficiency of the Fanny Packers, although I assume the only real difference would be a reduction in leverage because of their shorter length.
Construction of the Stubby Tire Tools
The Stubby Tire Tools are made from a type of plastic compound that provides a smooth, slick surface which allows the tool to glide along a rim without nicking or scratching the finish.
Of course, with enough lubricant and a tight tire they can slip out or off the rim and they did just that to me a couple of times. But so much of mounting and dismounting tires, whether by hand or not, is in the technique, and practice does make perfect.
For comparison purposes, the Stubby Pro weighs in at 9 1/8 oz. (250 grams) each, while the Stubby Slim weighs 7 oz. (199 grams) whereas the metal irons I have weigh 13.3 oz. (378 grams) each.
That’s quite a reduction in weight just by using a pair of Stubbys verses a pair of metal tire irons.
Of course, the Stubby Tire Tools will take up a bit more room because of their thickness, so maybe it’s a draw in the end.
But, the Stubby Tire Tools are very light weight and they won’t harm the finish, so you could probably tie-strap them onto the frame somewhere if needed.
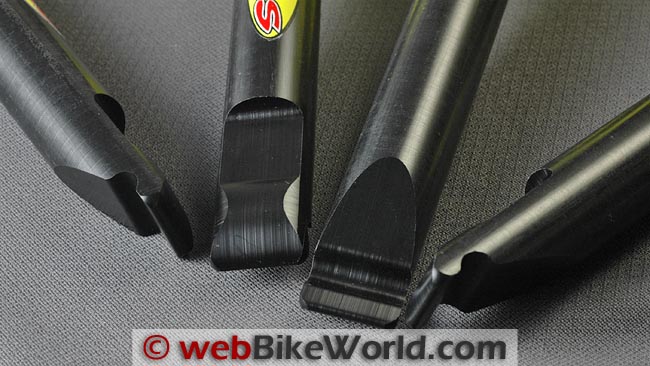
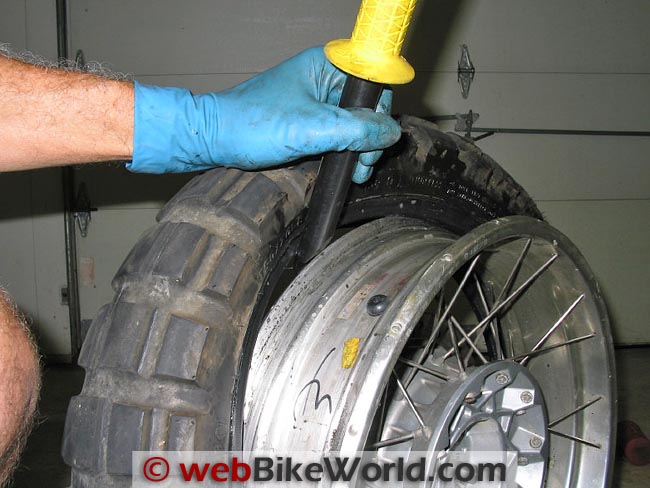
One end of the Stubby Tire Tool is machined so it has a slight curve with a notch on one side and a flat surface on the opposite side.
The shape is a bit more complex than that so be sure to take a close look at the photo for more insight on how the ends are machined.
The notch is for hooking the tire bead when removing a tire, then during installation the Stubby Tire Tool is flipped over and the notch is used to grip the edge of the rim while levering the bead up and over the rim.
Removing a Motorcycle Tire With the Stubby Tire Tools
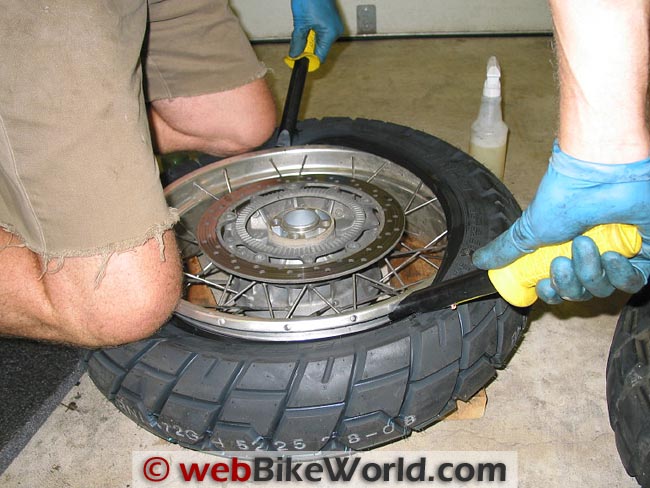
The tire removal and installation process when using a set of Stubby Tire Tools is the same as it is when using any other tire irons, but without the added complication of fumbling with a rim protector or a scrap of plastic to protect the wheel rims.
After removing the valve stem core you’re going to have to break both tire beads free from the rim.
This will require a lever type of device, either home made or manufactured, or a wedge styled one that is driven with a hammer to break the often tenacious grip that can exist between a tire and rim.
(See the webBikeWorld article “Poor Man’s Bead Breaker“).
With the tire beads free of the rim, lube it up with a soap and water mixture that can be easily applied with a spray bottle. There are commercial types of tire bead lube that can also be purchased if you want to spend some money.
Squeeze the beads together and make sure everything is loose from the rim edge and push the beads down into the “drop” at the center of the rim.
Levering the Tire From the Rim
The instructions which came with the Stubby Tire Tools mention starting just to the right of the valve stem or rim lock if they’re next to one another.
Never having changed a tire that incorporated a rim lock I haven’t a clue what they look like, so I’ll take their word on it.
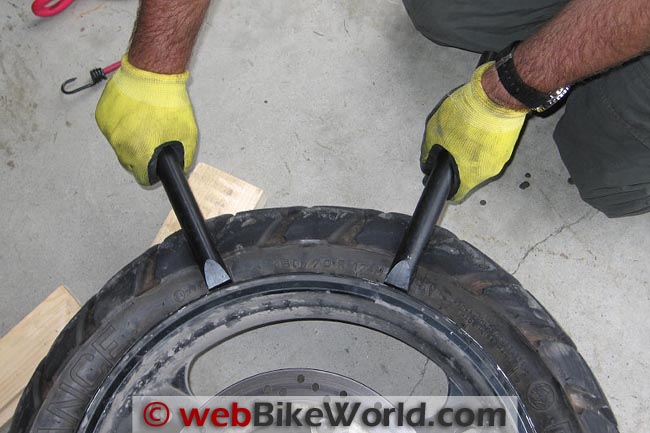
You’re going to want to support the wheel on something that protects the brake rotors or the ABS toothed wheel to prevent damage. I always have a selection of wood blocks in the garage and simply place them on the floor and lay the wheel horizontally on top.
I find that working on the floor when mounting tires by hand I can use more “body English” on them; that is, I can use a knee to hold the beads if necessary.
Starting next to the valve stem or rim lock, if so equipped, insert a Stubby Tire Tool in between the rim and tire and hook the top bead with the notch. Insert the other Stubby Tire Tool a couple of inches away in the same manner.
Move around the rim, levering the tire off while moving the pair of Stubby Tire Tools around.
If you try to go too far too soon they say you can break your Stubby (!).
Before you know it, the first bead is off. If there’s a tube, now’s the time to remove it. Next, simply repeat the bead removal procedure for the other bead and lever the tire off the rim.
Sometimes you can pull the second bead off the rim by hand.
The Stubby Tire Tool directions (here) mention a method where a hammer can be used to tap the Stubby Tire Tool around the rim, but if you choose to use this method I would recommend using a soft hammer to protect the rim.
Installing a New Tire With the Stubby Tire Tools
OK, the old tire is off and now and it’s time to spoon on your new treads. But before you do that, this would be a good time to install a new valve stem if you’ve got tubeless tires.
I have personally had a valve stem split open, right where it passes through the rim, resulting in a totally flat tire.
Luckily, I had gone out at lunch time that day to check tire pressures and I found the tire void of any pressure. So, as a rule I now replace the valve stem with every other tire replacement.
After applying some lube to the bead of the new tire, the first bead can be forced on by hand without any tools. Next, install the new tube if necessary. Be careful to make sure it isn’t pinched.
Sometimes it pays to inflate the tube slightly to get it in place under the tire without pinching.
Make sure the valve stem is seated correctly and is perpendicular to the rim and not pulled one way or another.
It’s the top bead that can be tricky to get up and over the edge of the rim.
Keeping the beads on the opposite side of the rim down in the “drop” in the middle of the tire rim, slip one Stubby Tire Tool between the tire and wheel, hooking the edge of the rim with the notch in the tip of the tool.
Slowly raise the Stubby, levering the tire up and over the rim. Insert the other Stubby in the same manner close to the first and repeat the process. Continue around the perimeter until the tire’s installed.
Remember to keep the tire beads on the opposite side of the rim in the “drop” in the center of the wheel, to minimize the distance you have to lever the bead.
If you don’t, you’re going to have one heck of a fight on your hands which could result in breaking your Stubby.
Voilà! Your new tires are installed, you saved some money doing it yourself and there are no marks whatsoever on your precious rims, thanks to your pair of Stubby Tire Tools!
Now it’s simply a matter of balancing the wheels (here are some webBikeWorld tire balancing reviews and tips) and you’re back on the road in no time with a fresh set of skins on your “scoot”.
So, now I bet you’re wondering how the pair of Stubby Tire Tools performed on our Trans-Labrador adventure ride. To save some room, I took the pair of Stubby Slims which I kept bound together with rubber bands.
These were used when we swapped out the stock tires for the Continental TK80s and the Stubby Tire Tools worked flawlessly, even in the hands of my riding partner.
We had no tire failures of any type so the set of Stubby Slims ended up going along for the ride. But, we were ready to tear the tires down on the side of the road if necessary.
Conclusion
Changing your own motorcycle tires can be rewarding and it can save you some cash — as long as you avoid damaging your rims in the process.
Using a pair of Stubby Tire Tools can help make this task easier, should you not have the means or room to purchase an actual tire changing “machine”.
Their light weight makes them easy to take along should you have a need to remove and mount a tire while on your own adventure, though the Stubby Tire Tools are a little bulky.
They are easy to use and the Stubby Pro and Stubby Slim tools provide sufficient leverage to get the job done without damaging your rims.
I have also found them to be a welcome addition to the tire changing equipment in my garage.
| wBW Review: Stubby Tire Tools | |
|---|---|
| Manufacturer: Stubby Tire Tools | List Price (2011): $28.99 to $34.99 per pair. |
| Color: Choice of handle colors. | Made In: U.S.A. |
| Review Date: October 2011 | |
Owner Comments and Feedback
See details on submitting comments.
From “C.L.” (October 2011): “These things work great! Just got through testing a set and the rim is perfect.
The design let me pop the tire off/on in record time. Makes tire irons obsolete. Thanks for the heads up on a great product, can’t wait to tell my friends about this.”
From “T.M.” (October 2011): “Looks a lot like my old Breezer tire tool I bought back in the early ’70’s.”
From “J.W.” (October 2011): “I’d love to give these a try, but noticed in the review that you guys still use soapy water as a lube. I used to do that, then I found Tire Slick Tire Mounting Lubricant. $5 for a 32 oz. bottle.
It’s cheaper than soap, and so slippery that unless you have a rag handy for wiping your hands, you won’t be able to pick up the tire irons, fancy yellow rubber handles or not. Never, ever going back to soapy water. And I have 4 machines in my garage, one is track only.”